

Buying a domain
Search for and buy a domain without leaving your app. You pay Wix for the domain at checkout, so you enter a payment method there even if your Base44 plan is paid another way. When your purchase completes, Base44 connects the domain for you automatically. Your domain then appears under Custom domains on your Domains page with a Base44 Domain tag, and you can buy more than one domain for a single app.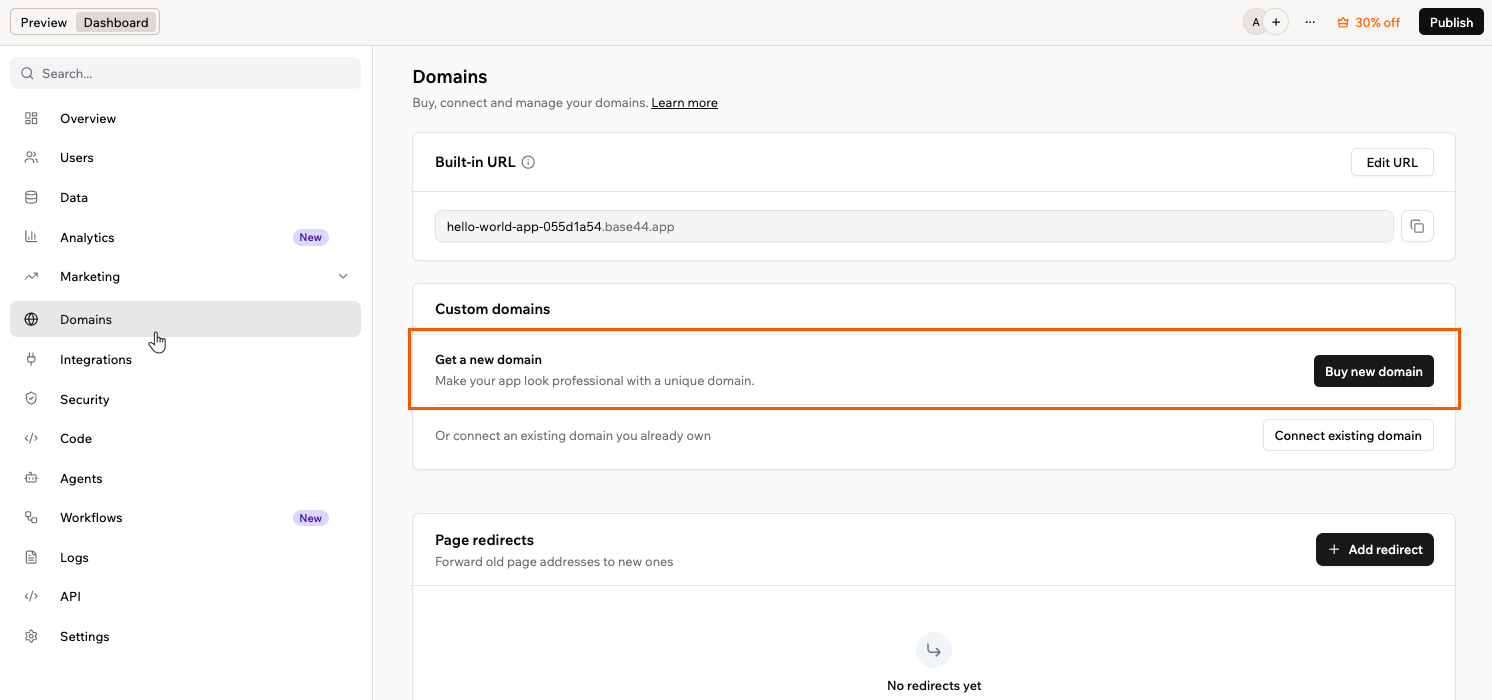
Buying a domain
- Click Dashboard in your app editor.
- Click Domains.
- Under Custom domains, click Buy new domain.
- Search for a domain, or choose one of the recommended options, then click Get it on the one you want.
- Choose a registration period. Longer periods save more and can include bonus years at no extra cost. A free-year voucher, when you have one, covers your first year.
- Add your contact information. This sets the domain’s registered owner, and some of these details may appear on public domain databases. You may need to verify your email address.
-
On Select privacy and security, choose an option. A free-year voucher covers Public Registration only, so the private options add a yearly cost:
- Private registration and DNSSEC: Keeps your details private and adds DNSSEC, which helps protect against domain hijacking and traffic being redirected to malicious links. This option is selected for you, so clear it if you do not want the extra yearly cost.
- Private Registration: Keeps your personal details private.
- Public Registration: Free. Your contact details are listed on public domain databases.
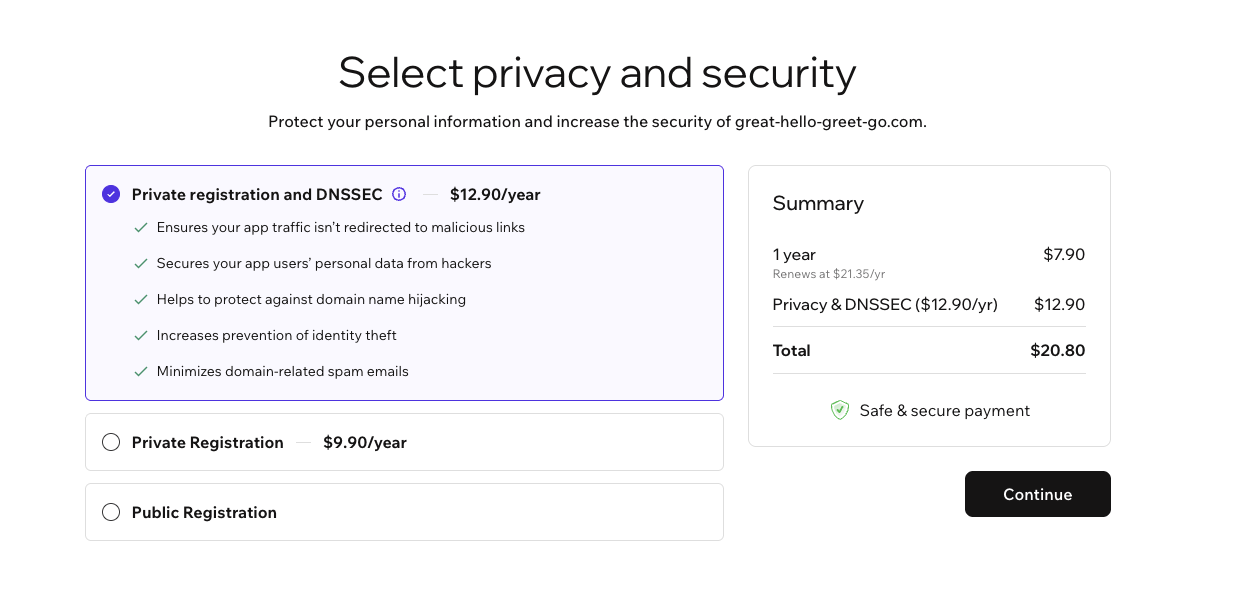
Choosing a privacy and security option
- Choose a saved payment method or add a new one, then click Submit Purchase. By purchasing, you agree to the Domain Name Registration Agreement and the Privacy Policy, and to automatic yearly renewal.
- Your domain connects automatically. DNS records are created for you and SSL is set up, so there is nothing to configure by hand.
Using your free domain voucher
Every yearly plan, from Starter up, includes a free domain for the first year. Claim it within 60 days of starting your yearly plan.- Premium domains, which don’t appear in your search results.
- Yearly Starter plans bought before October 4, 2026.
Verifying your domain
After you buy a domain, its registration is confirmed automatically. This usually takes about 30 minutes, and in rare cases up to 24 hours, before your domain goes live. A country-code domain such as.co.il is different: its registry sets its own deadline, and some give you only a few days.
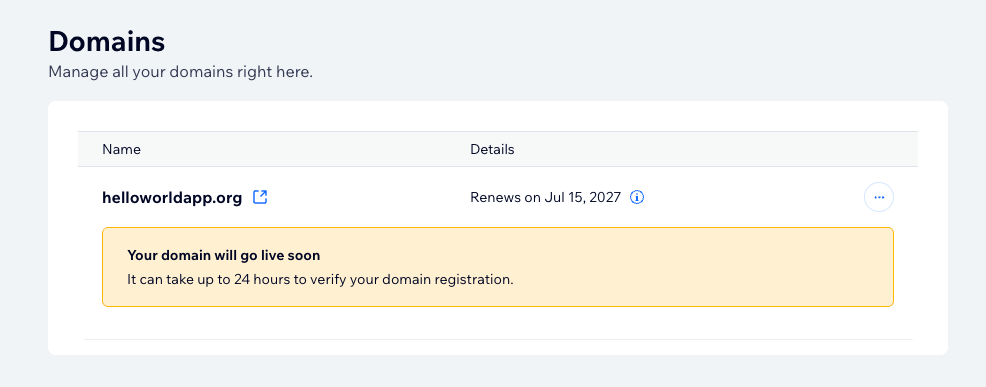
A domain awaiting verification
Managing your domain
Domains you buy through Wix are managed from your domains dashboard, where you can update settings and transfer your domain. Renewals are handled separately, in your workspace settings. Only the workspace owner can manage the workspace’s domains. If Manage Domain is unavailable, one of 2 things is true:- You are not the workspace owner. The option reads Ask a workspace owner to manage this domain. The Wix account covers every domain on the workspace, so managing them is owner-only, as it is for canceling a domain and turning renewal on or off.
- The domain sits on another workspace. The option reads This domain belongs to another workspace. Ask its owner to manage it. When an app moves to a new workspace, its domain stays on the original workspace’s Wix account, so the new workspace’s owner cannot manage it either. The original workspace’s owner manages it from there.
- Click Dashboard in your app editor.
- Click Domains.
- Under Custom domains, click the More actions icon next to your domain.
- Click Manage Domain.
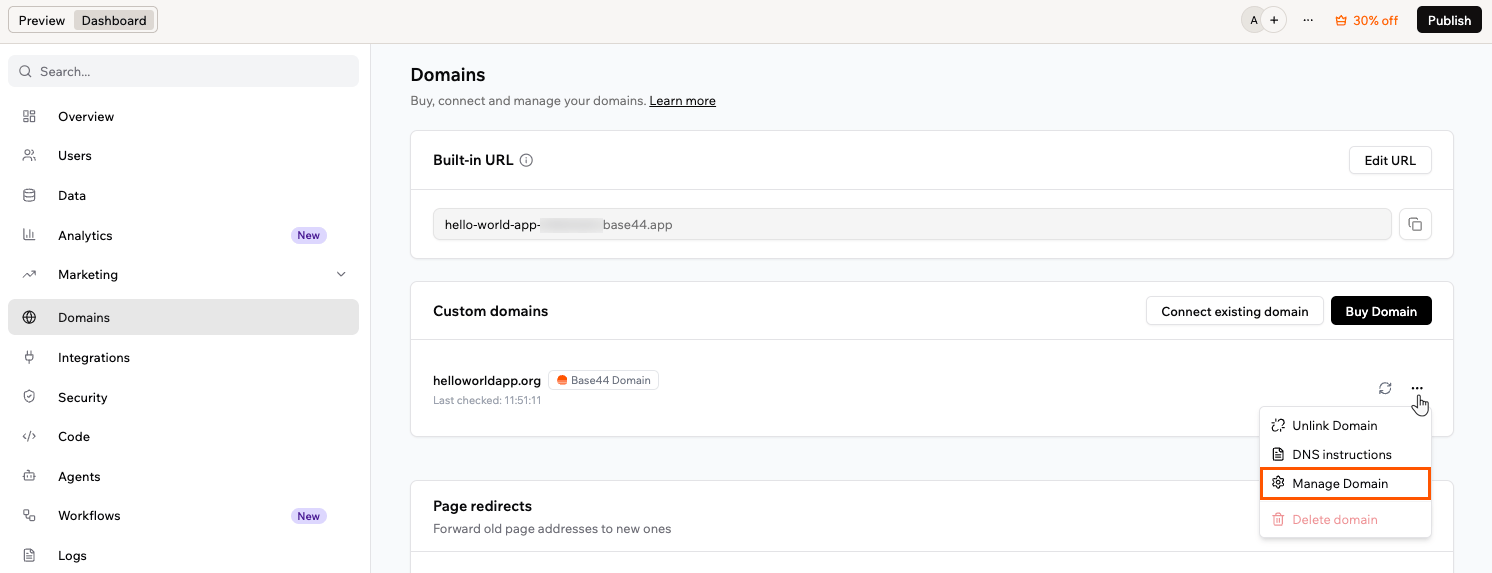
Opening the domain dashboard
Managing DNS records
Your DNS records are set up automatically when you buy a domain, so you do not need to configure anything for your app to work. You can view or edit them at any time from your domain’s management dashboard. To manage your DNS records:- Click Dashboard in your app editor.
- Click Domains.
- Under Custom domains, click the More actions icon next to your domain.
- Click Manage Domain.
- On the management dashboard, click the More actions icon next to your domain.
- Click Manage DNS records.
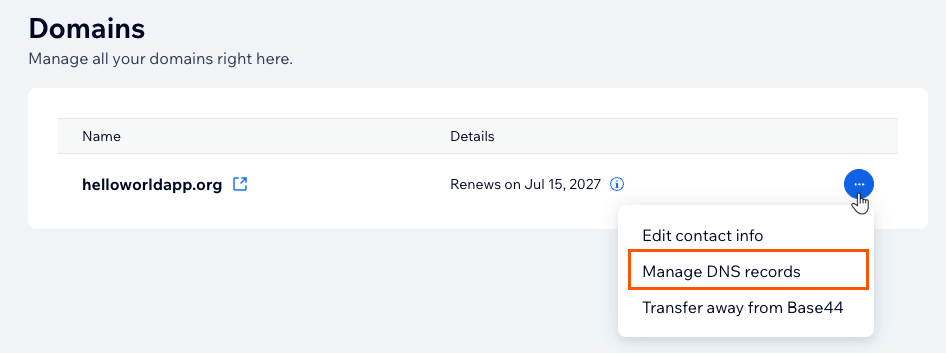
Managing DNS records
- A record
- www subdomain
app.yourdomain.com, add a CNAME record with the subdomain label as the host (for example, app) and base44.onrender.com as the value.
- MX records apply to your root domain, so you cannot add them on a subdomain.
- For a short time after you buy a domain, MX changes can be unavailable while the domain finishes setting up, which can take up to 48 hours. If you see an error, try again later.
Updating your contact information
Each domain has contact information on its registration, which the domain registry requires to be accurate. You can update it from your domain’s management dashboard. Some country-code registries also check the shape of those details and reject anything inconsistent. To update your contact information:- Click Dashboard in your app editor.
- Click Domains.
- Under Custom domains, click the More actions icon next to your domain.
- Click Manage Domain.
- On the management dashboard, click the More actions icon next to your domain.
- Click Edit contact info.
- Update your details, then save your changes.
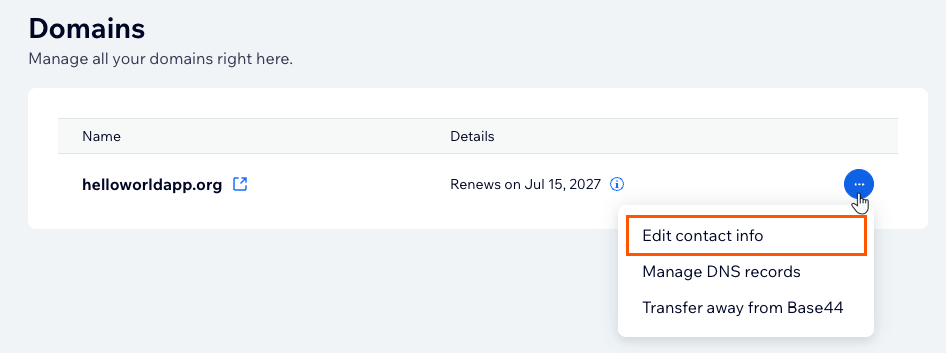
Editing contact info
Resetting your default records
If your app stops loading on your domain after DNS changes, reset the records that point it to Base44. To reset your default records:- Click Dashboard in your app editor.
- Click Domains.
- Under Custom domains, click the More actions icon next to your domain.
- Click Manage Domain.
- On the management dashboard, click the More actions icon next to your domain.
- Click Manage DNS records.
- Set the A record for
@to216.24.57.1, and the CNAME record forwwwtobase44.onrender.com, adding either one if it is missing. - Remove any extra A or AAAA records on the same hostnames that could conflict.
Transferring your domain away from Base44
You can transfer a domain to another provider from your domain’s management dashboard. Once the transfer completes, your DNS records, contact information, and renewals are managed at your new provider. Before you start, check the following:- Domains become available to transfer 60 days after they are registered, and 60 days after you update your registrant contact information, under ICANN’s 60-day transfer lock policy. Your domains dashboard shows the date for each domain.
- Your authorization code, also called an EPP code, is emailed to your domain’s registrant contact address once you confirm the transfer. Your new provider asks for this code to accept the domain, so make sure you can receive email at that address.
- A domain can move to another provider, but it cannot be moved to a different Base44 account, and some country-code domains cannot be transferred away at all. If your domain needs to serve an app in another workspace, connect it there instead of transferring it. See Claiming a domain another workspace used.
- A transfer takes up to 7 days, and there is nothing else for you to do while it is in progress.
- Click Dashboard in your app editor.
- Click Domains.
- Under Custom domains, click the More actions icon next to your domain.
- Click Manage Domain.
- On the management dashboard, click the More actions icon next to your domain.
- Click Transfer away from Base44.
- Review the transfer information, then confirm the transfer.
- Enter your authorization code at your new provider, then follow their instructions to finish the transfer.
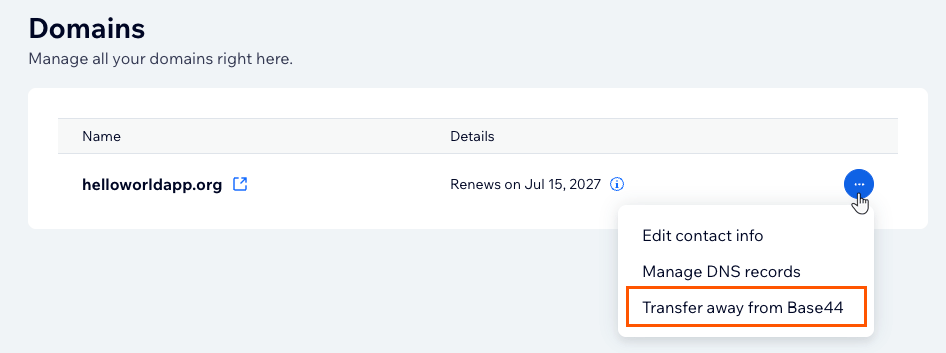
Transferring a domain away
Unlinking a domain
Unlinking disconnects a domain from your app without canceling or deleting it, and it stays registered to you. Treat it as one-way though: if you reconnect the domain afterwards, Base44 no longer recognizes it as a domain you bought here. It still works with your app, but Manage Domain stays unavailable, so you lose access to its DNS records and contact details. To unlink a domain:- Click Dashboard in your app editor.
- Click Domains.
- Under Custom domains, click the More actions icon next to your domain.
- Click Unlink Domain.
- Confirm that you want to unlink the domain.
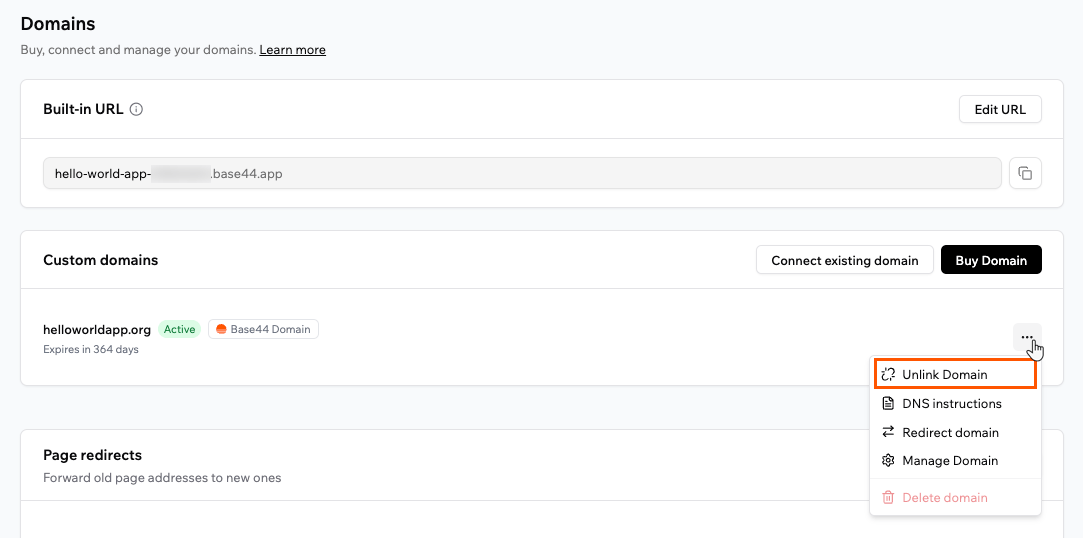
Unlinking a domain
Sending emails from your domain
You can send email from a domain you bought through Wix, such asno-reply@yourdomain.com, so your app’s emails match your brand. Because Base44 manages the DNS for these domains, the required records are added for you automatically.
To set up email sending:
- Click Dashboard in your app editor.
- Click Domains and scroll to the Email domain section.
- Click Use your custom domain.
- Enter a Sender name and a Custom address prefix, such as
no-reply, then select your domain. - Click Connect Domain.
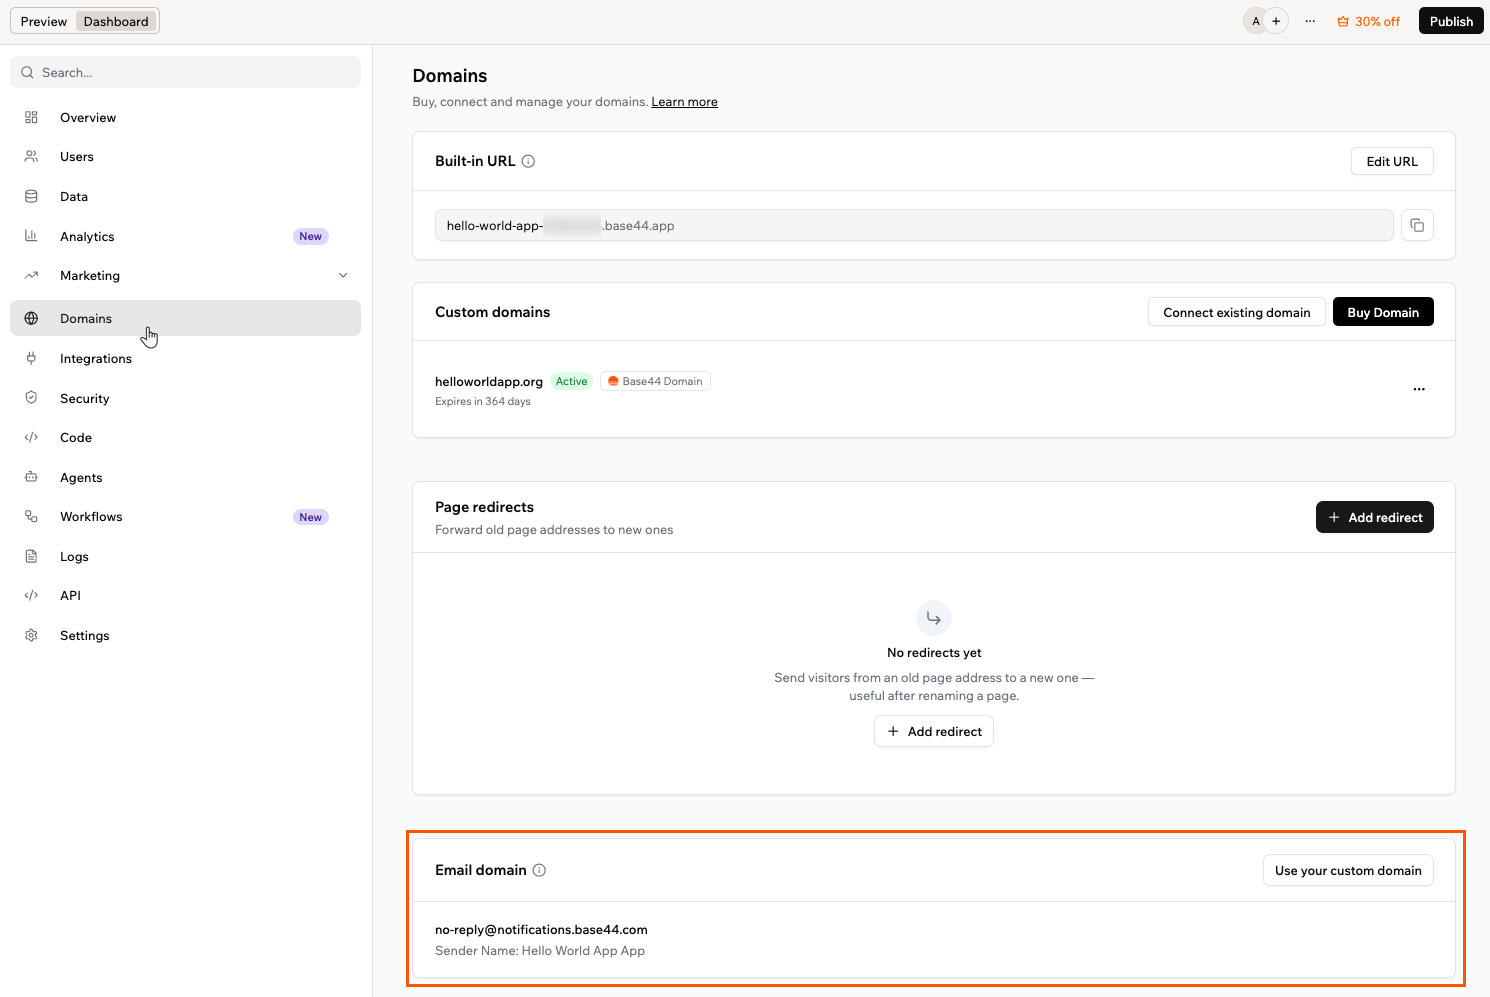
The Email domain section
- Your email domain shows as Active once it is connected. If it shows Connection failed, click Retry.
- For more on custom email domains, including credits and limits, see Sending emails from a custom domain.
Domain ownership
The workspace owner owns any domain bought through Wix, and ownership stays with the workspace owner. Any app owner can transfer an app to another person, and the connected domain moves with the app. Before transferring the app, check that the new app owner’s plan supports custom domains. If it does not, the domain may be disabled. Ownership of the domain itself stays with the original workspace owner, even after the app is transferred.Subscription and billing
You manage a domain’s settings, like its DNS records and contact information, from the app’s Domains dashboard. Billing for your domains is handled in your workspace settings, under Plan & Subscriptions, alongside your plan. Your Billing History page shows your past charges, with separate entries for plans and domains. Domains renew automatically each year unless you cancel, and your plan and your domains are billed separately, so canceling one does not cancel the other. A renewal can be charged up to 30 days before your domain expires, and Wix emails you a reminder 30 days before the charge.Accessing your plans and subscriptions
The Plan & Subscriptions page shows your current plan at the top, with its credits, price, next billing date, and payment method. Below it, the Subscriptions table lists your active subscriptions, including your plan and any domains you bought through Wix, each with its own next billing date, payment method, and status. To open the Plan & Subscriptions page:- Click your workspace name at the bottom left.
- Click Settings.
- Under General, click Plan & Subscriptions.
Managing a domain subscription
From a domain’s row you can update its payment method, cancel the domain, or open Manage Domain. To manage a domain subscription:- Click your workspace name at the bottom left.
- Click Settings.
- Under General, click Plan & Subscriptions.
- In the Subscriptions table, click the More actions icon on the domain’s row.
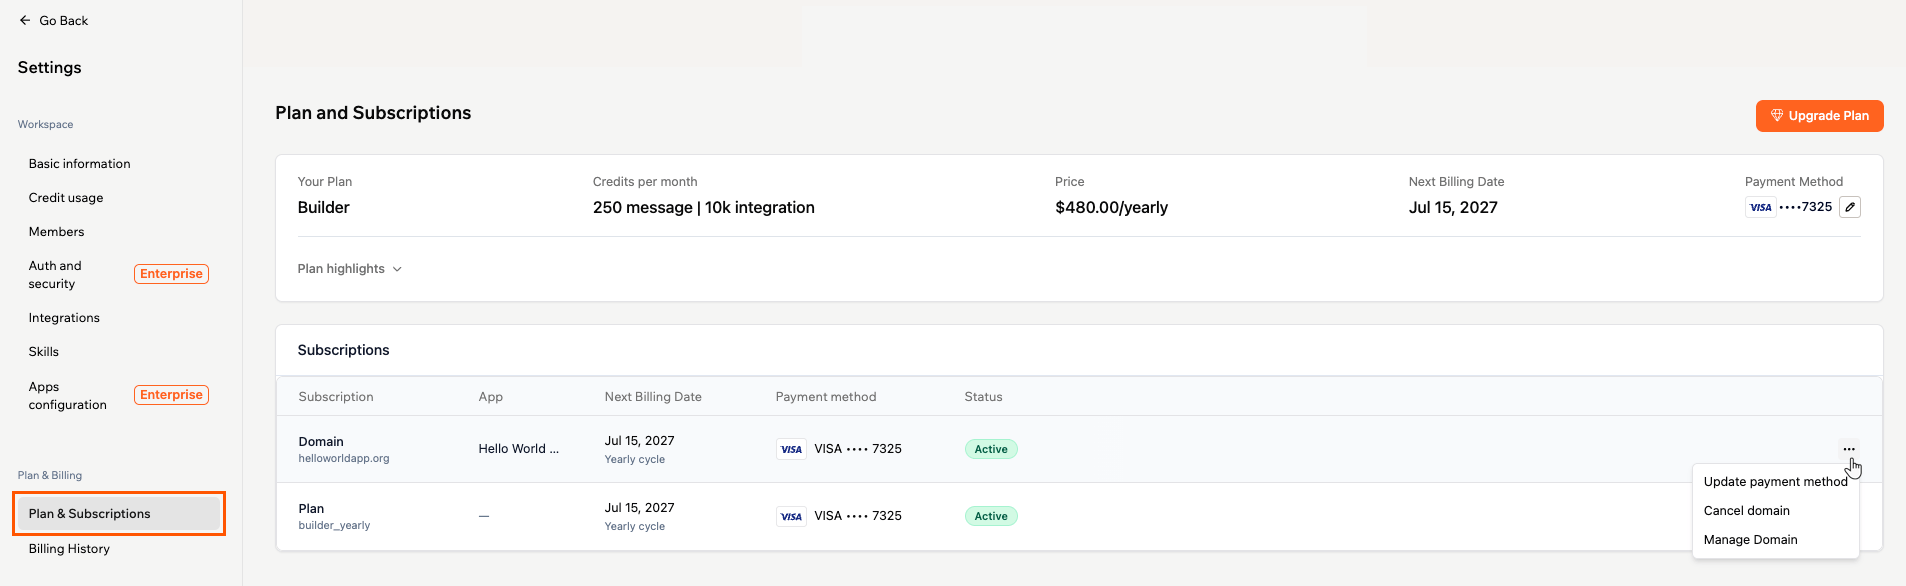
Managing a domain subscription
Canceling a domain’s renewal
Canceling stops a domain from renewing. You keep the domain until the end of the period you have already paid for. To cancel a domain’s renewal:- Click your workspace name at the bottom left.
- Click Settings.
- Under General, click Plan & Subscriptions.
- In the Subscriptions table, click the More actions icon on the domain’s row.
- Click Cancel domain.
- Read the confirmation, then click Cancel domain to confirm, or Keep my domain to keep the renewal.
Turning a domain’s renewal back on
If you change your mind while the domain is still active, you can set it to renew again. To turn a domain’s renewal back on:- Click your workspace name at the bottom left.
- Click Settings.
- Under General, click Plan & Subscriptions.
- Find the domain in the Subscriptions table. Its status reads Auto Renew Off.
- Click Turn On next to the status.
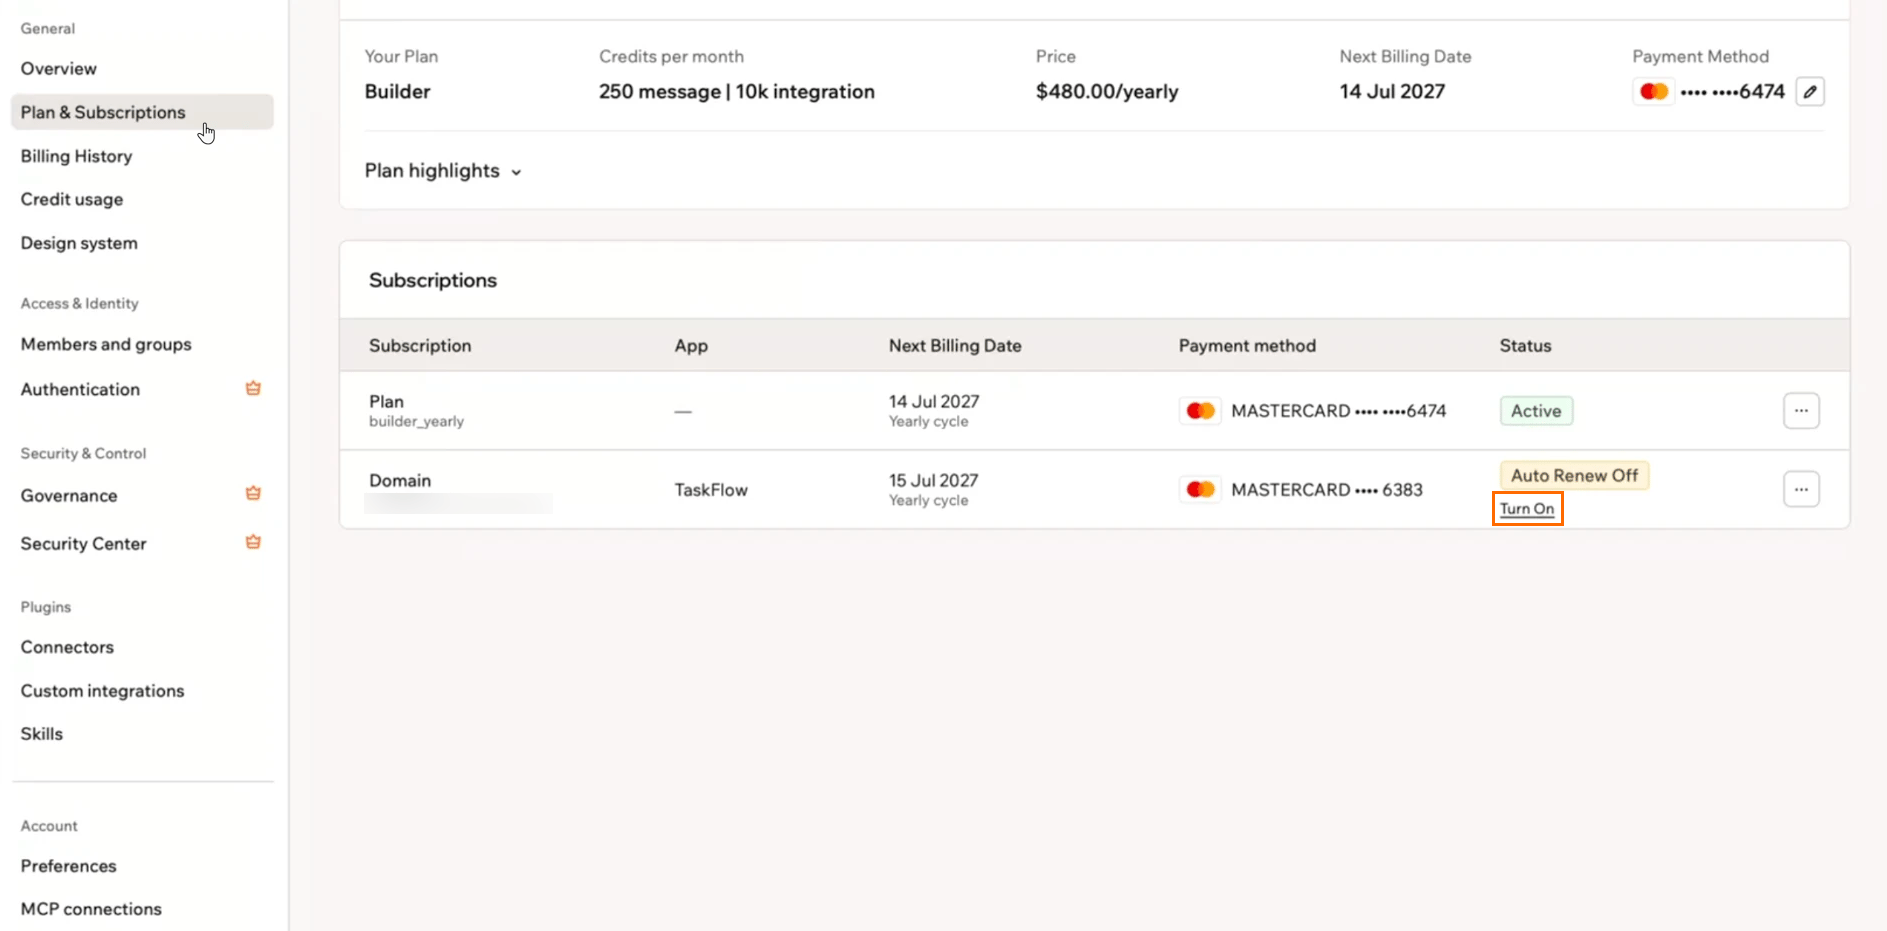
Turning a domain's renewal back on from the Subscriptions table
Resolving domain issues
If a domain bought through Wix runs into a problem, use the sections below. These apply to Wix domains only. For a domain registered with GoDaddy or IONOS, see Managing a GoDaddy or IONOS domain.My Wix domain shows a ClientHold or ServerHold status
My Wix domain shows a ClientHold or ServerHold status
ClientHold or ServerHold status means the registry has not activated your domain’s DNS, so your app doesn’t load on it. The most common cause is unconfirmed contact information or a failed renewal payment.First, confirm your contact information from the verification email, or click Resend Verification Email on your Domains page and complete it. Make sure your payment method is up to date. If the status does not clear after that, contact support.My Wix domain is suspended
My Wix domain is suspended
My domain is locked and will not transfer
My domain is locked and will not transfer
I see 'This domain is associated with another Wix account'
I see 'This domain is associated with another Wix account'
FAQs
Click a question below to learn more about buying a domain through Wix.Why didn't I get a verification email for my new domain?
Why didn't I get a verification email for my new domain?
What is different about a country-code domain like .co.il?
What is different about a country-code domain like .co.il?
.co.il for Israel or .de for Germany. Each country’s registry sets its own rules, and the deadline to verify is the one that catches people out:- Most extensions: You have 15 days to confirm your contact details after you buy.
.de: No verification is needed..co.il: You have about 3 days, so treat it as urgent. Some registrations are also picked at random for an identity check, and you have 21 days to reply to that one.
.co.il domain also cannot be transferred away to another provider, its owner cannot be changed, and WHOIS privacy is not available, so your registrant details are public. The Hebrew .ישראל extension is not offered. After the domain expires you can still renew it for 90 days, and after that the name returns to the registry. For the registry’s own rules, see .IL domain policies.Why was my .co.il registration rejected?
Why was my .co.il registration rejected?
- Give a valid phone number and postal code.
- Do not repeat the same value across different fields.
- Use letters only in an individual’s name.
- Include the legal form, such as Ltd or Inc, in an organisation’s name.
How do I cancel a domain?
How do I cancel a domain?
Can I get a refund on a domain?
Can I get a refund on a domain?
Can I change my domain name after I buy it?
Can I change my domain name after I buy it?
What happens to my app and my email when I transfer my domain away?
What happens to my app and my email when I transfer my domain away?
What happens if a renewal payment fails?
What happens if a renewal payment fails?
What happens if my domain expires?
What happens if my domain expires?