What can I use workflows for?
Workflows handle almost any backend work you want to happen automatically, especially when a task takes more than one step. For example:
- Nurture leads: When a new lead signs up, send a welcome email, wait 2 days, then follow up only if they have not replied or booked a call.
- Alert on conditions: Check inventory on a schedule and message your admins only when an item drops below its threshold.
- React to data changes: When a new product is added, notify your team and create a task to review it before it goes live.
- Keep tools in sync: When a Google Calendar event is cancelled, update the matching booking and email the customer.
- Send scheduled summaries: Every morning, email yourself a recap of the previous day’s orders and post the total to a Slack channel.
How workflows work
A workflow is made of a trigger and one or more steps. The trigger decides when the workflow starts. The steps decide what happens, in order, each time it runs: a step can run a backend function (code the builder writes for you), wait for a set amount of time, or take a different path based on a condition. When you describe what you want in the AI chat, Base44 builds the workflow for you. It appears in two places: your app’s file tree and the Workflows dashboard. Opening it shows a visual diagram that flows from the trigger through each step. Each run is recorded, so you can review what happened and fix any issues quickly.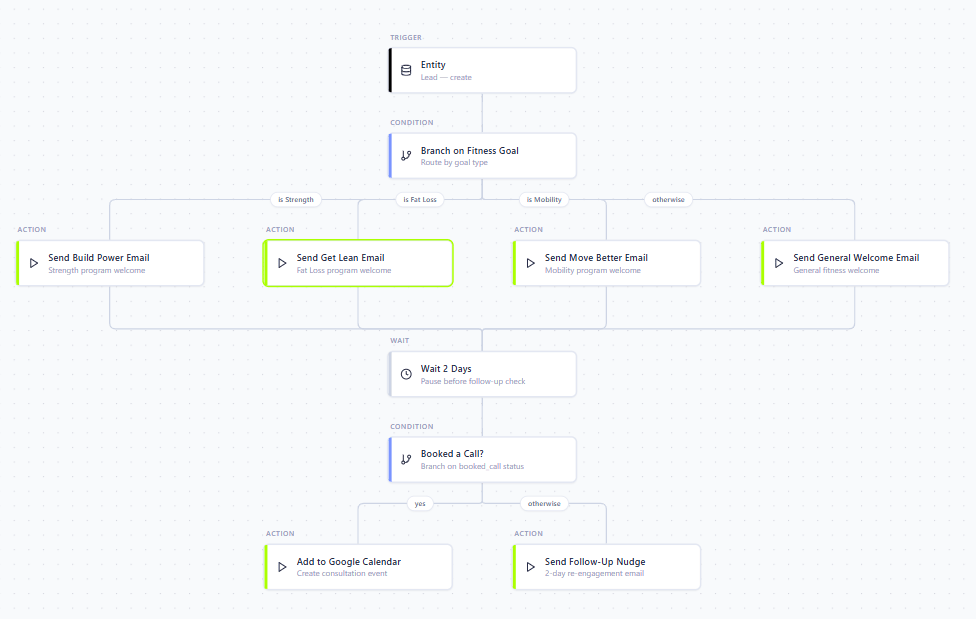
Example: welcoming a new lead. When a lead is created, the workflow sends a welcome email matched to their fitness goal, waits 2 days, then checks whether they booked a call. If they did, it adds the call to your calendar; if not, it sends a follow-up nudge.
How workflows start
There are 4 ways a workflow can start. When describing what you want to the AI chat, it helps to know which trigger fits your use case. Read more about each one below.| Trigger | Best for | Keep in mind |
|---|---|---|
| Scheduled | Recurring jobs, or a one-time job at a set time | Recurring runs happen at most once every 5 minutes |
| Entity | Reacting to changes in your app’s data | Add a condition so it does not run on every change |
| In-app agent | Reacting when someone starts an agent conversation | Runs once per new conversation, not per message |
| Connector | Reacting to events from a connected tool | The tool must support workflow triggers |
Scheduled
Scheduled workflows run at a time you define in your timezone, either once or on a repeating schedule. Use these for recurring tasks like daily digests and weekly reports, or for a one-time job at a specific date and time. Example prompts:Send me a daily summary of all new orders to my email every morning at 8:00.Archive trip records that have been completed for more than 30 days, every Sunday at midnight.
Keep these in mind for scheduled workflows:
- Recurring schedules run at most once every 5 minutes, and you can set them to end on a date or after a number of runs.
- A schedule that reaches its end, including a one-time schedule after it runs, is archived automatically.
- A recurring schedule with no end keeps running until you deactivate or archive it.
Entity
Entity workflows run in response to changes in your app’s data, such as a record being created, updated, or deleted. Use these to react to activity in real time. Example prompts:Send a push notification whenever I add a new WishlistPlace and write any needed backend function for me.Send the admin an email whenever a new booking is created.
In-app agent
In-app agent workflows run once when an app user starts a new conversation with an in-app agent, not on every message they send. Use these to stay on top of who is reaching out, for example to get notified when a customer starts a chat, add them to your contacts, or send yourself a summary at the end of the day. Example prompts:Email me whenever someone starts a new conversation with my agent.Add the person to my Contacts list when they start a chat with my agent.
Connector
Connector workflows run when a connected tool sends an event, such as a new email arriving in Gmail or a calendar event being updated in Google Calendar. The tool must be connected first, and it must support workflow triggers, such as Gmail, Google Calendar, Google Drive, Microsoft Outlook, Microsoft OneDrive, and Slack. You can add a condition so a workflow only runs for the events you care about. This matters most for busy tools like Slack, where you might want to run only for messages in a certain channel or from a certain person. Example prompts:When a new email arrives in Gmail with the subject "Book appointment", parse it and add a new booking to my app.When a Google Calendar event is cancelled, update the booking in my app and post a message in the #salon-general Slack channel.
If a tool does not support workflow triggers, you can still bring its events in. For example, to act on new Stripe payments, use a webhook or backend function to save each payment as a record in your app, then use an Entity workflow that runs when a new payment record is created. Or, instead of waiting for the tool to notify you, run a scheduled workflow that checks the tool on a regular basis, for example every hour, and handles anything new since the last check.
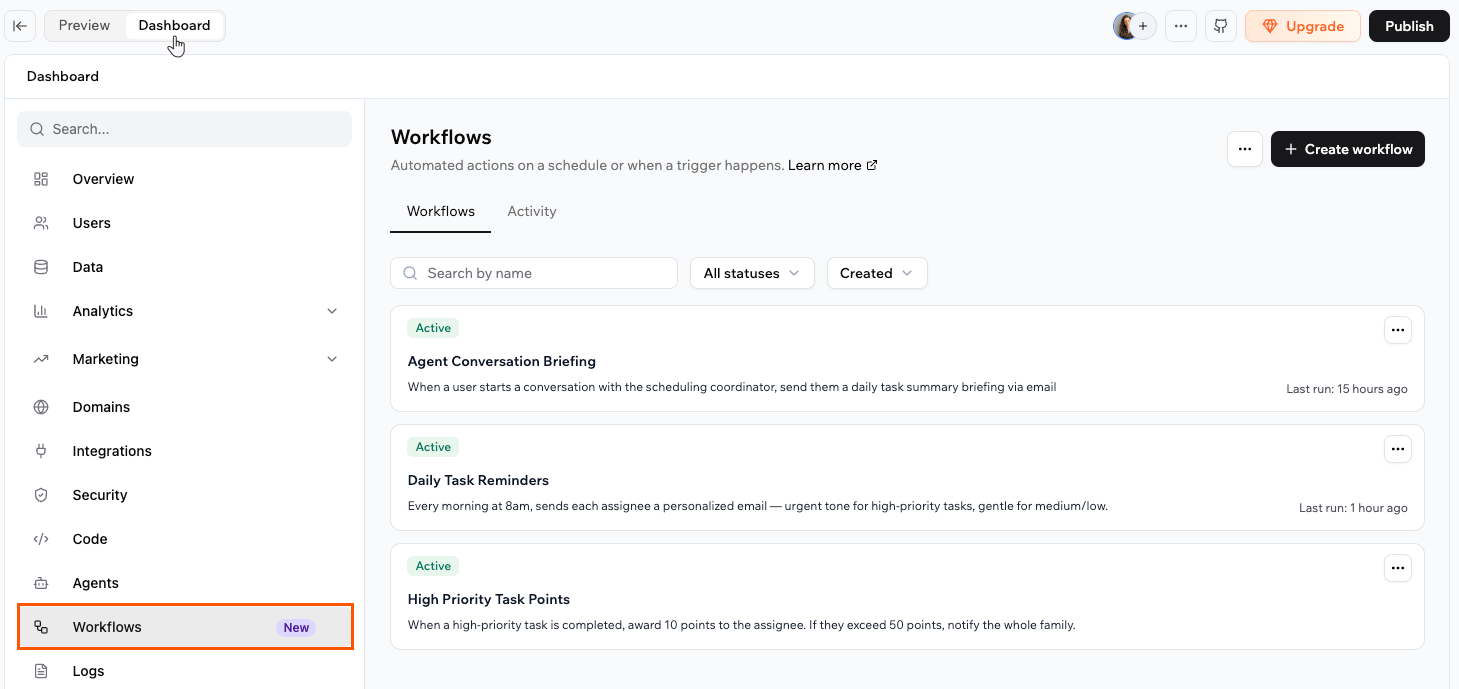
Creating a workflow
From Workflows in your app dashboard, you can see suggested ideas based on your app under Suggested workflows. You can start from one of those, or describe your own from scratch. Either way, you create and refine workflows through the AI chat, not by building them by hand. Describe what you want, review what the builder makes, and keep adjusting it in the chat until it works the way you need.
Using a suggestion
Each suggestion includes a short description of what it does. Choosing one sends a pre-filled prompt to the AI chat, where you can review and adjust it before the builder sets it up. To create a workflow from a suggestion:- Click Dashboard in your app editor.
- Click Workflows.
- Under Suggested workflows, click the add button on a suggestion, then click Send to chat.
- Review the pre-filled prompt in the AI chat, make any changes, and send it.
- The builder creates the workflow and adds it to your Workflows list.
Creating from scratch
If none of the suggestions fit what you need, describe your own workflow instead. The builder works with you in the AI chat: it asks what the workflow should do, checks any details it needs, then builds the workflow along with any backend functions it requires. To create a workflow from scratch:- Click Dashboard in your app editor.
- Click Workflows.
- Click Create workflow.
- In the Create workflow window, click Create from scratch, then click Send to chat.
- In the AI chat, describe the workflow you want, including how it starts and any steps, conditions, or waits. For example:
When a task is created, wait 3 days, then check whether it is completed. If it is, email the assignee a thank-you. If it is not, email them a reminder and notify me when the task is high priority. - Answer any follow-up questions the builder asks, then let it build. It adds the finished workflow to your Workflows list.
Managing workflows
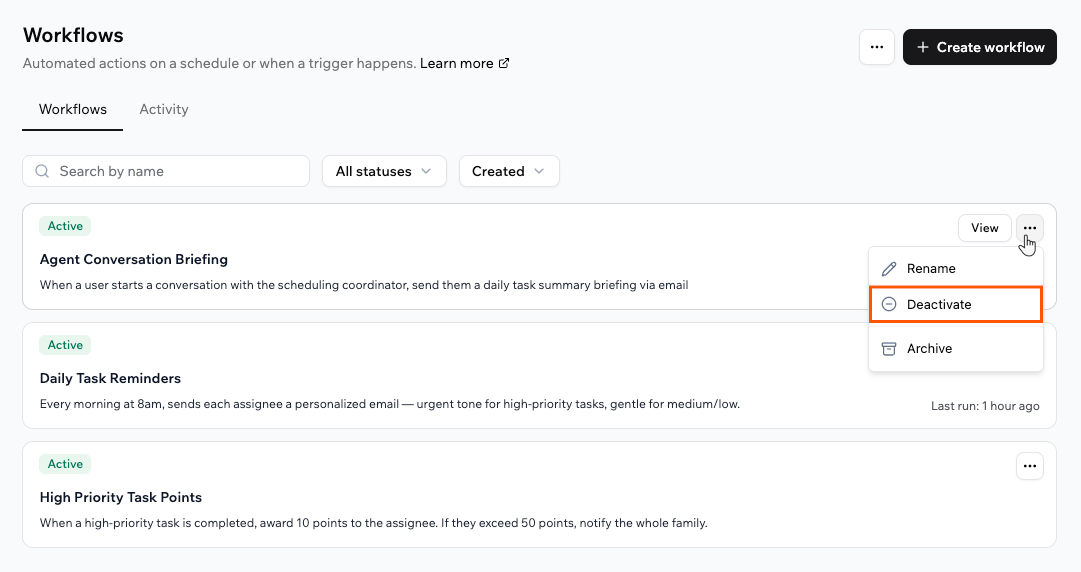
After you start using workflows, you can control when they run, change what they do, rename them, trigger them on demand, or clean up workflows you no longer need. Each workflow shows an Active or Inactive status, and you can deactivate one to pause it and reactivate it whenever you need it.Turning a workflow on or off
Deactivate a workflow when you want to stop it running, and activate it again when you need it. Deactivating stops new runs from starting, but the run history stays available. To turn a workflow on or off:- Click Dashboard in your app editor.
- Click Workflows.
- Click the More Actions icon on the workflow.
- Click Deactivate or Activate.
Editing a workflow
To change what a workflow does, describe the change in the AI chat, the same way you created it. The builder updates the workflow for you, so there is nothing to edit by hand.Changing a workflow’s steps creates a new version. Runs already in progress finish on the version they started with, and new runs use the latest version.
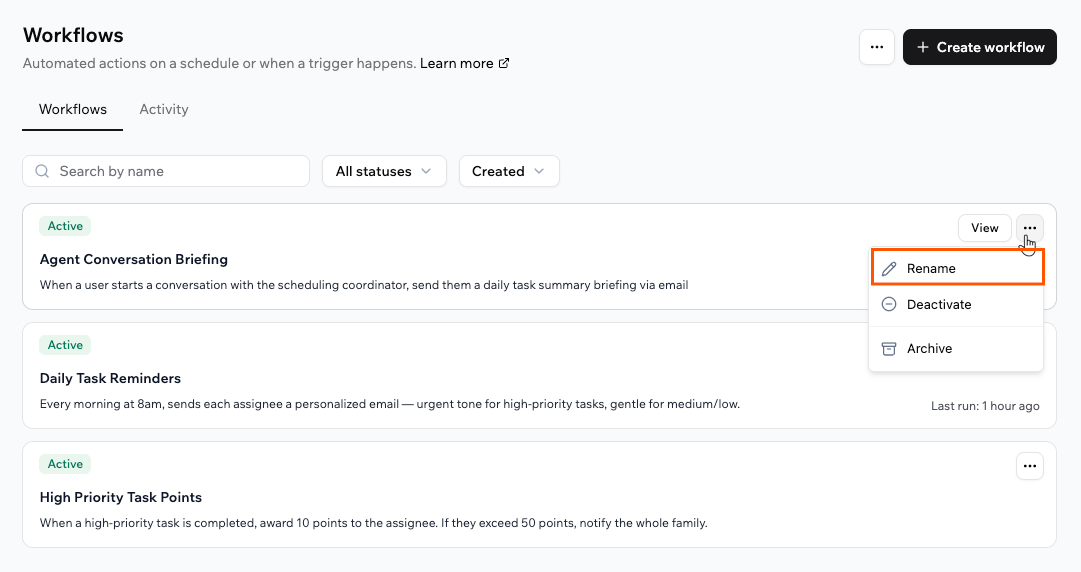
Renaming a workflow
Give a workflow a clearer name at any time. Renaming does not create a new version. To rename a workflow:- Click Dashboard in your app editor.
- Click Workflows.
- Click the More Actions icon on the workflow.
- Click Rename and enter the new name.
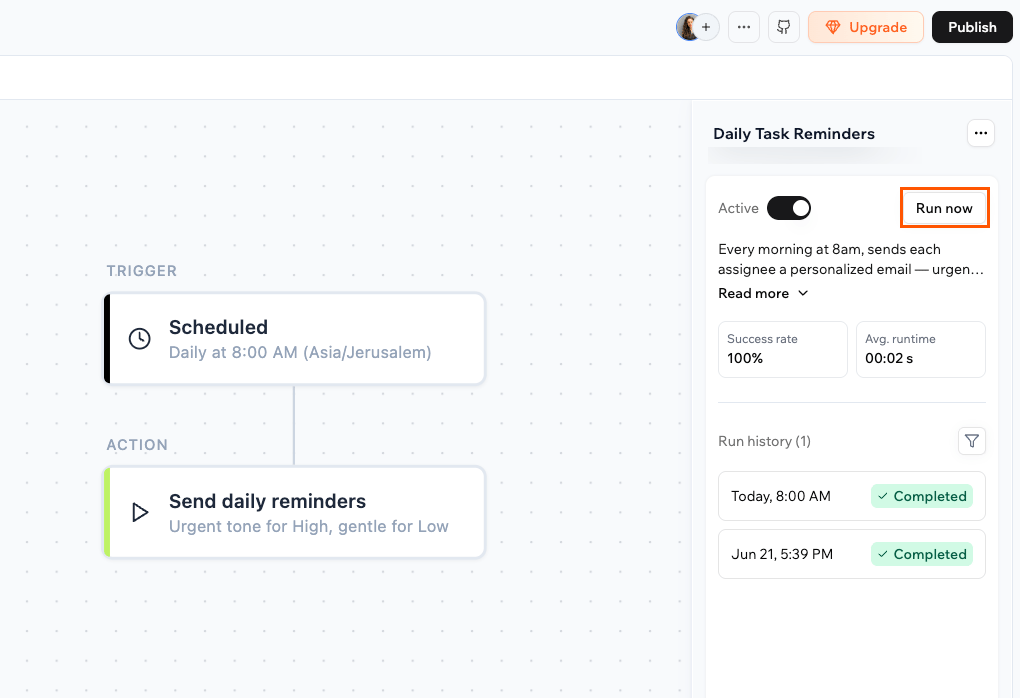
Running a workflow immediately
Run a workflow right away when you want to start it on demand. This helps you test changes, confirm that your configuration works, or handle something urgent between scheduled runs. To run a workflow:- Click Dashboard in your app editor.
- Click Workflows.
- Click the workflow to open it.
- Click Run now in the details panel.
- In the confirmation dialog, click Run now again.
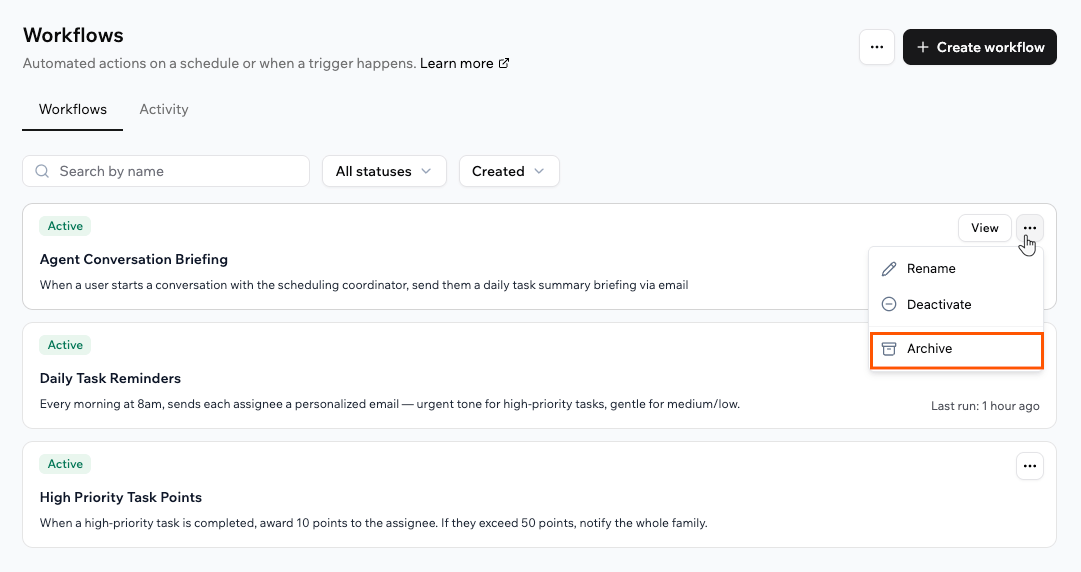
Archiving a workflow
If you do not need a workflow anymore, you can archive it to keep your active list clean. To archive a workflow:- Click Dashboard in your app editor.
- Click Workflows.
- Click the More Actions icon on the workflow.
- Click Archive.
Monitoring runs
Every workflow records each run so you can watch it happen in real time and review it afterward. Review a single workflow’s runs from its details panel, or see runs across all your workflows on the Activity tab.Viewing a workflow’s runs
When you open a workflow, the details panel shows its Success rate, Avg. runtime, and a Run history of every run. When something goes wrong, the run shows the exact step that failed and the error, so you know where to look without guessing. To view a workflow’s runs:- Click Dashboard in your app editor.
- Click Workflows.
- Click the workflow you want to inspect.
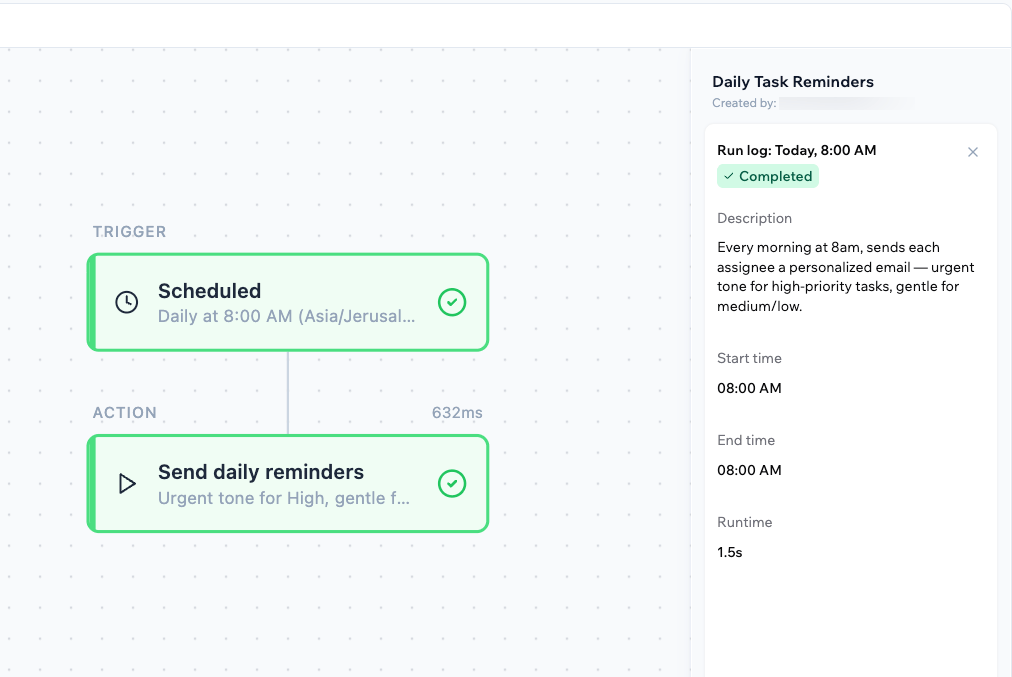
- In the details panel, review Run history, where each run shows its time and status, such as Completed.
- Click a run to open its Run log, including the start time, end time, and runtime.
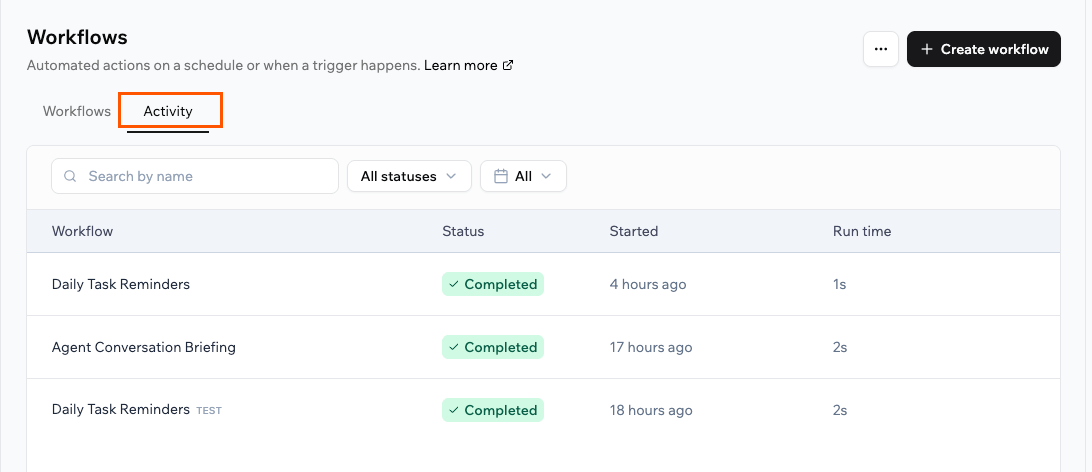
Using the Activity tab
The Activity tab under Workflows in your app dashboard brings together runs from all your workflows in one place. To view activity across workflows:- Click Dashboard in your app editor.
- Click Workflows.
- Click the Activity tab.
- Review the list of runs, where each one shows its workflow, status, start time, and run time. Filter by status (Running, Completed, Failed, or Cancelled) or by time range.
- Click View on a run to open it in the workflow’s diagram alongside its run log.
Workflows and integration credits
Workflows are billed by the steps that run. Each step that runs a backend function uses a fraction of an integration credit, and the charges add up across all the steps in a single run. Built-in integrations that a step uses, such as sending an email or calling an AI model, can use credits too, as they do elsewhere in your app. A workflow with several steps therefore costs more per run than a single-step one, so keep an eye on how often your workflows run and what each step does. If you run out of integration credits while a run is in progress, that run is cancelled. Learn more about credits.Tips for managing credit usage
Workflows that run frequently or chain several actions can drain your credit balance quickly. Here are some ways to keep usage under control:
- Add specific trigger conditions: Narrow the criteria that start a workflow so it does not run unnecessarily.
- Use conditions to skip unneeded steps: Branch the workflow so expensive steps only run when they are actually needed.
- Consolidate redundant workflows: If several workflows perform overlapping tasks, combine them into fewer, smarter ones.
- Resolve failing workflows promptly: Workflows that error can still consume credits on each retry. Check your run history regularly and fix or disable problem workflows as soon as you spot them.
- Review the frequency of scheduled workflows: Consider whether recurring workflows, such as daily reports or reminders, need to run as often as configured.
- Be sparing with AI calls: If a step calls an AI model, that uses credits too, so only call it when you actually need the result.
- Test on a small dataset first: Run a workflow manually and check its run history to estimate the per-run credit cost before enabling it at scale.
FAQs
Click a question below to learn more.Can I add conditions to control when a step runs?
Can I add conditions to control when a step runs?
Yes. Ask the AI chat to add conditions to any workflow or step. For example:The workflow then takes different paths based on the conditions you describe, so different steps run depending on your data. A condition can have several paths, plus a catch-all for anything that does not match, and the diagram shows each path separately.
What happens when a workflow fails?
What happens when a workflow fails?
Open the workflow and check its Run history to find the step that failed. Ask the AI in your dashboard to explain the error and suggest a fix, then use Run now to confirm the workflow succeeds. If a workflow fails repeatedly, Base44 deactivates it automatically and notifies you, so you can fix the issue before turning it back on.
Why does Run now ask me to choose a previous run?
Why does Run now ask me to choose a previous run?
It depends on how the workflow starts. A scheduled workflow can run on demand at any time, because it does not need any input. A workflow that starts from an entity, connector, or in-app agent trigger needs the trigger’s data to run, such as the specific task that was created, so Run now replays the data from a previous run. This means the workflow has to run at least once before you can run it on demand.If you see No previous runs, trigger the workflow for real once, for example by creating a task for the task follow-up workflow, and then use Run now to replay that run.