In Base44, your app’s data is the information that brings everything to life. It includes all the information that your app holds, such as people who sign in, the content you show, orders you process, and the activities that happen in your app.

Example data for a travel app, with tables such as Trip, TripItem, VisitedPlace, and WishlistPlace.
Understanding your data
All of your app’s data is organized in tables, just like a spreadsheet. Each table groups one type of info (such as people or products) and sorts it into columns called fields, such as names, dates, or prices. For example, if you create an app to run your shop’s business, you can use the data tables in Base44 to keep everything organized. You might have a Users data table to store your customers’ names and email addresses, a Products table listing what you sell, and an Orders table to track every purchase. Each new customer, product, or order is automatically added as a new row in the right table, so you can quickly find, update, or manage your shop’s information.Data field types
When you, or the AI, add a field (column) to your table, you choose what type of information it stores. Some common field types include:- Text: For words, phrases, or descriptions (such as customer names or product details)
- Number: For prices, quantities, or measurements
- Yes/No (Boolean): For fields that are true or false (such as “Is active?”)
- Date/Time: To save dates such as sign-up day, order date, or event time
- File: For images, documents, or other files
- Reference: To link this table to another table (for example, linking each order to the right customer)
- Object: For advanced cases, this lets you add structured information such as a JSON object
Accessing your app’s data
It is easy to see all the information your app collects. You can view your data at any time from the dashboard, where each table gives you a clear, organized look at your people, products, orders, and more. This helps you track what is happening in your app and keep everything up to date.Viewing your app’s data
The Data page shows every table in your app as a card. Click a card to open its records.- Click Dashboard in your app editor.
- Click Data.
- Select the relevant data set (table).
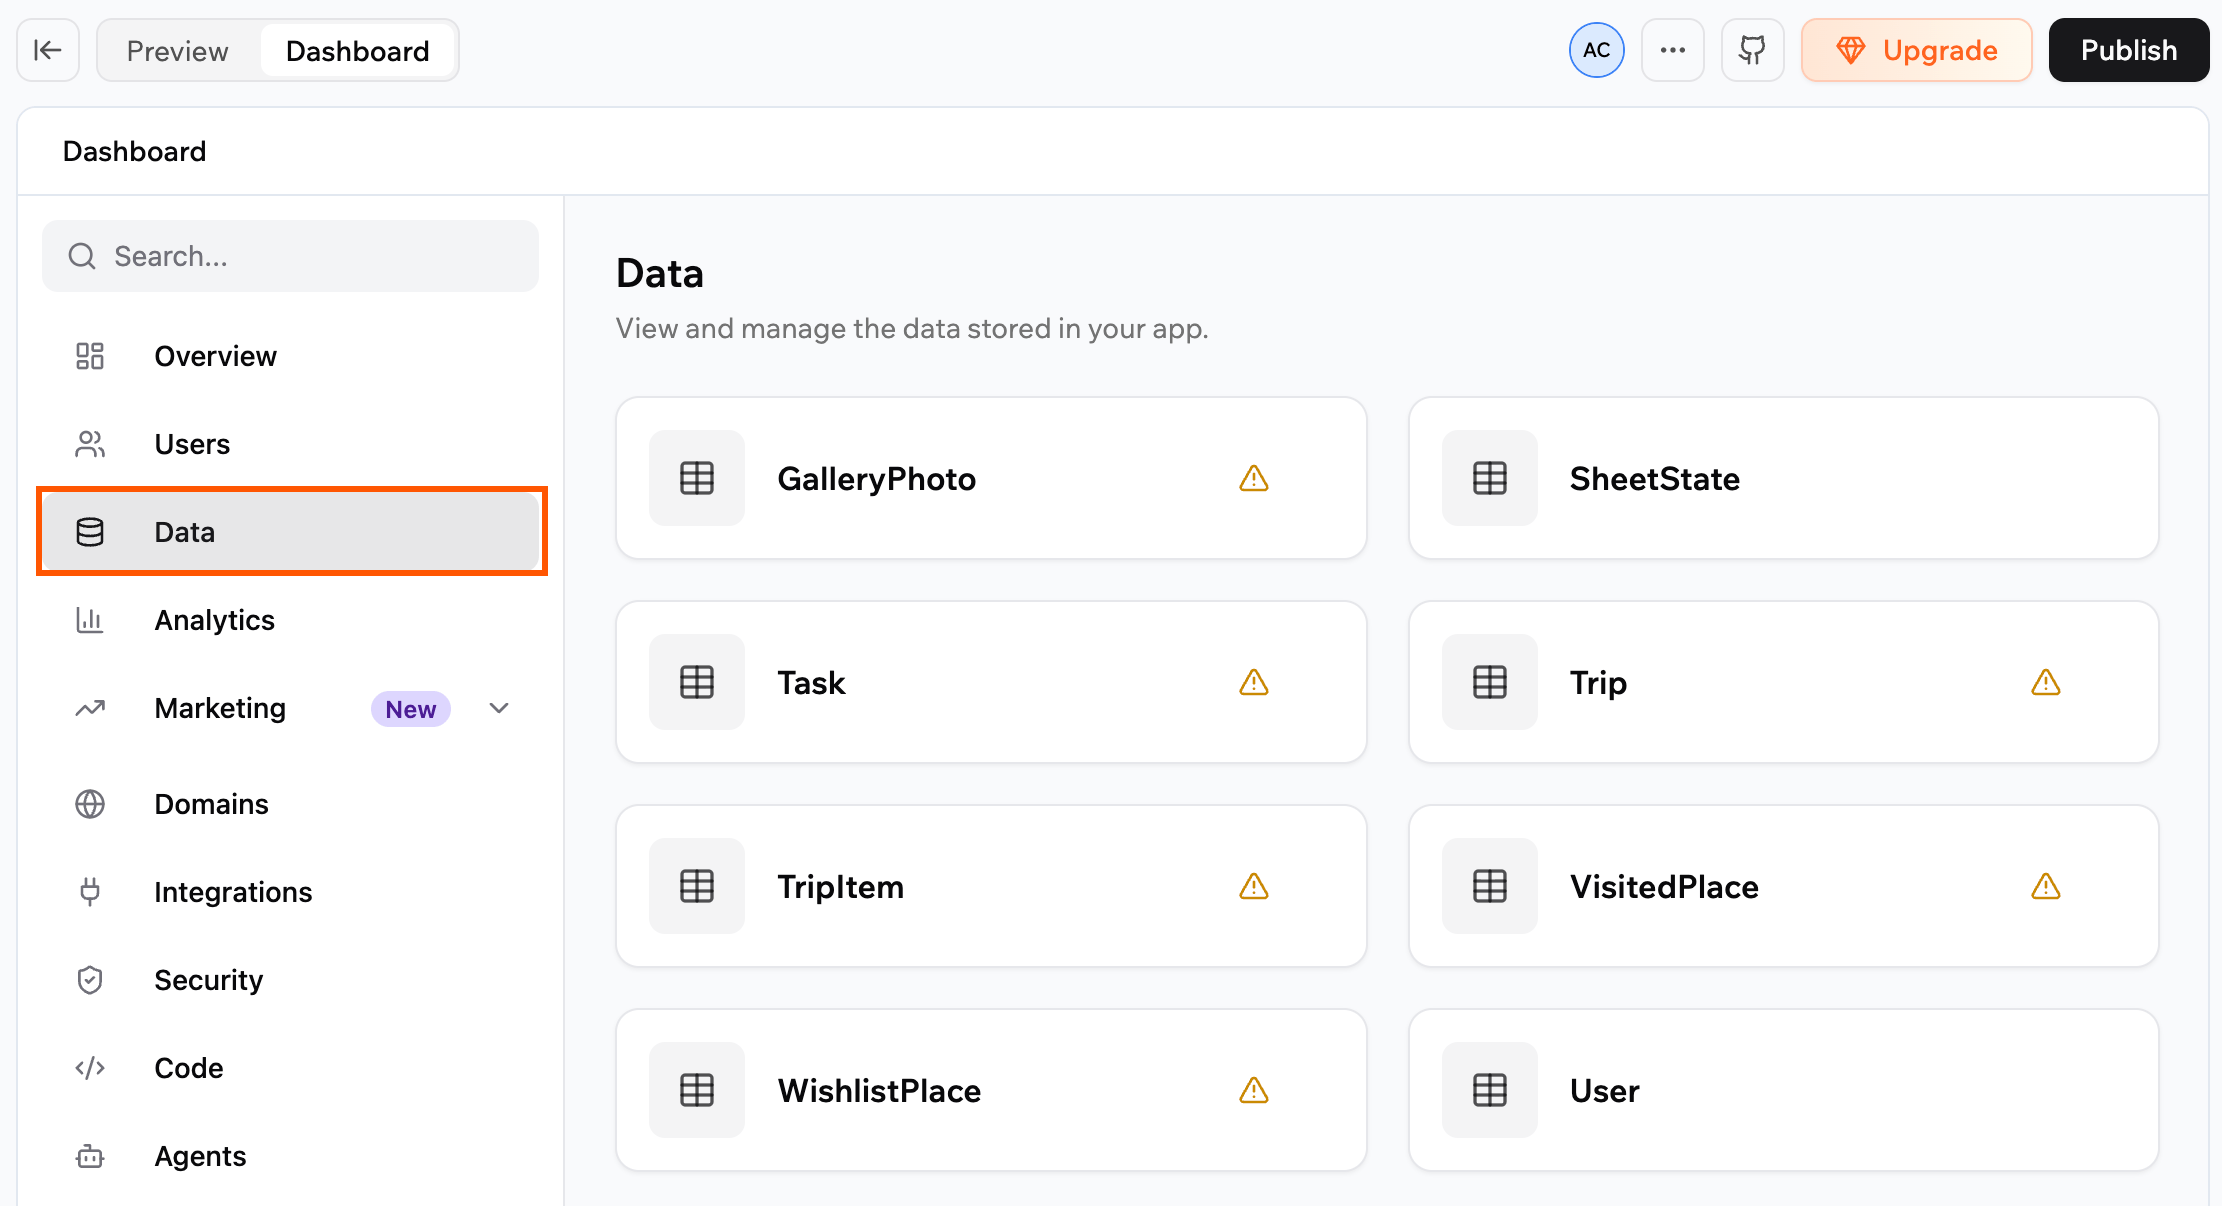
The Data page, with a card for each table in your app

The More Actions menu on a table card

Searching for specific data
Use the search bar above the table to quickly find relevant rows. The search looks through all text fields in your data, so you can jump straight to a specific row instead of scrolling. To search for data:- Click Dashboard in your app editor.
- Click Data.
- Enter a word, number or phrase in the search bar above the table.
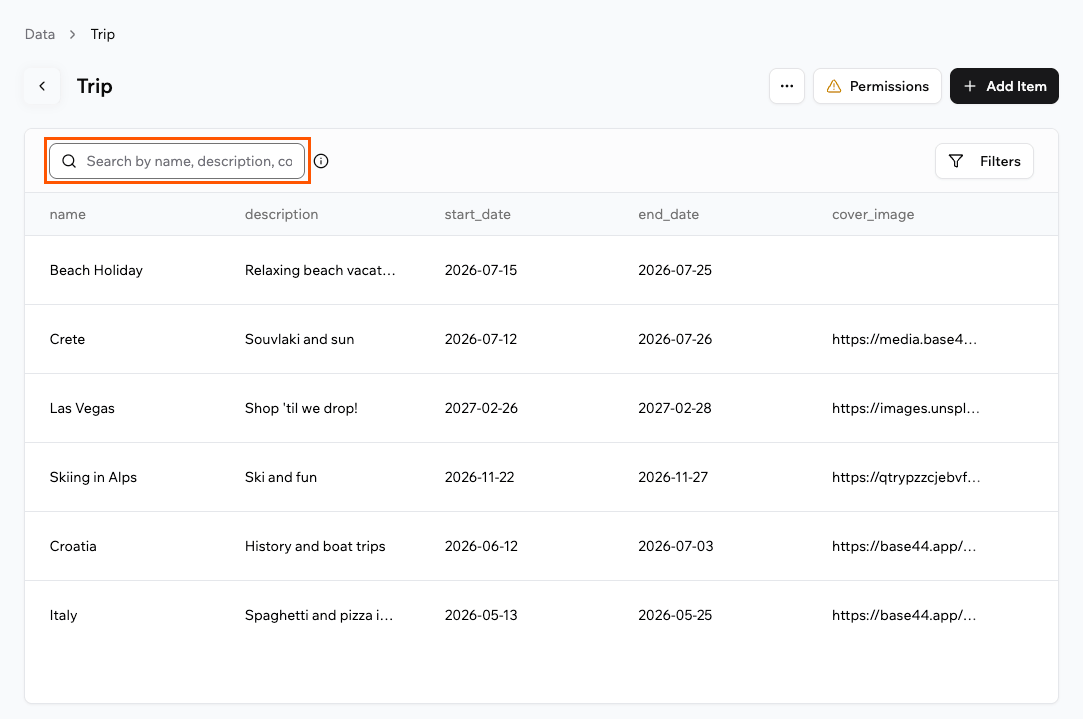
Searching a table with the search bar on the Data page
Filtering your data
Use filters to turn a long table into a focused view, for example to see only shipped features, items owned by your team, or work planned for a specific quarter. The filters displayed come from the fields in your data set, so each table has its own relevant list of filter options. To filter your data:- Click Dashboard in your app editor.
- Click Data.
- Click Filters in the top right of the table and select your filters.
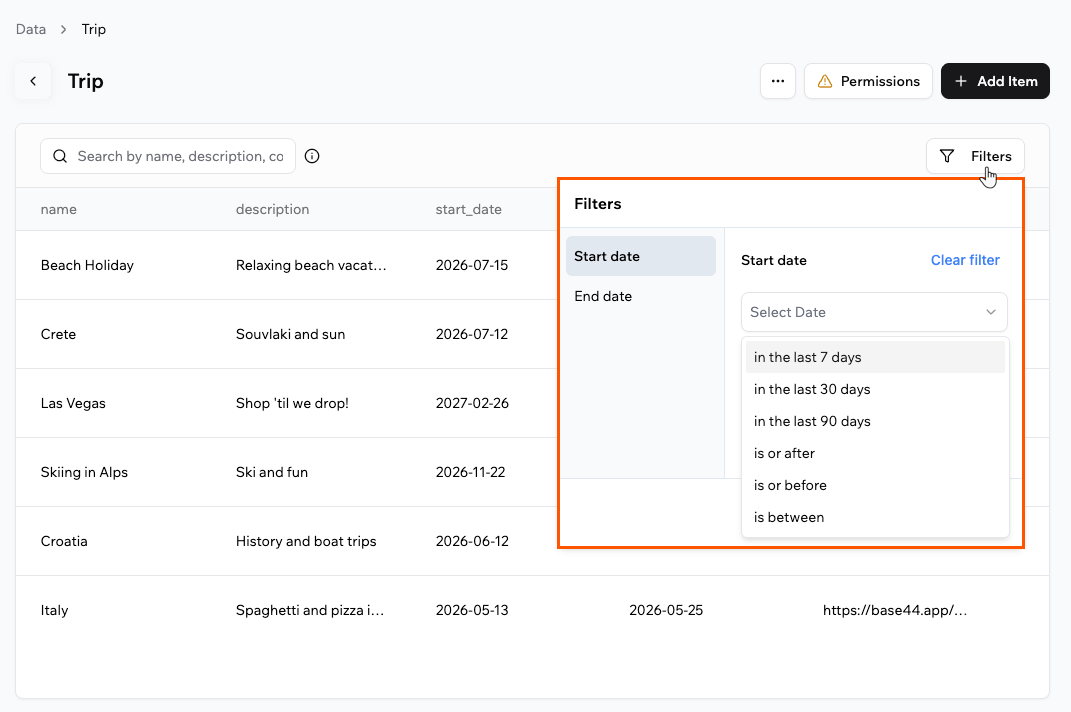
Filtering a table on the Data page
Adding and updating data
Base44 automatically collects and updates your app’s data as people interact with your app. The AI sets up your tables so the right information is saved and kept up to date for you. However, if you want to manually add information (for example, add a product, update a record, or input test data), you can do it easily from your app’s dashboard inside your app editor.Manually adding data
- Click Dashboard in your app editor.
- Click Data.
- Select the relevant data set (table).
- Click Add Item.
- Enter the data and click Submit.
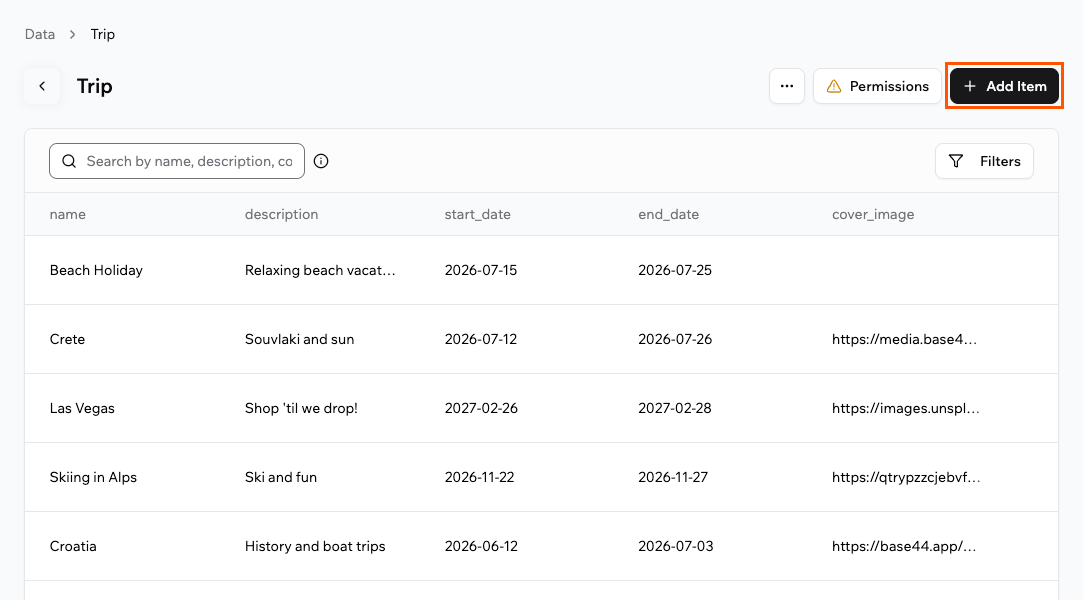
Adding a record to a table on the Data page
Editing data
To edit a data record, click the row of the table that you want to edit, complete the details and click Submit.Deleting data
Delete your app’s data at any time.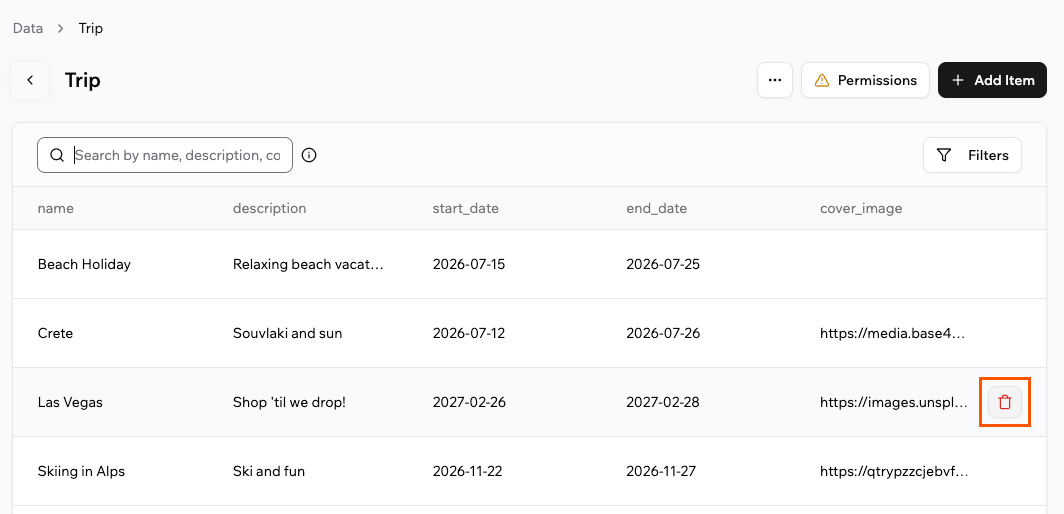
Deleting a single record from a table
- Open the AI chat in your app editor.
- Describe what you want to delete, for example:
Delete the data for Italy in the TripItem entity. - Review the delete request that the AI suggests, including the entity name.
- Click Approve to confirm the deletion, or Reject to cancel.
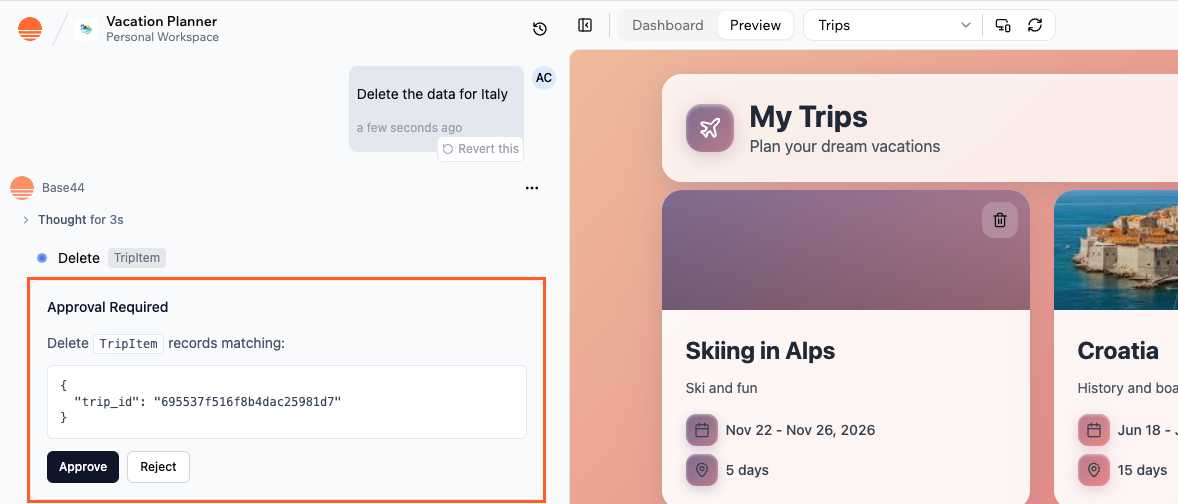
Asking the AI chat to delete data
Importing data
Sometimes you want to bring in lots of information to your app at once. You can import data in 2 ways, depending on whether you want to work directly in the dashboard or ask the AI chat to help.Using the AI chat
Use the AI chat to turn existing data files into entities and records in your app. This is helpful when you already have information in a spreadsheet or JSON file and want to bring it into Base44. You can upload structured data files and ask the AI to create or update entities for you, including setting up tables and mapping fields. Supported formats for importing data:- CSV (.csv)
- Excel (.xlsx, .xls)
- JSON (.json)
Example prompts you can use:
Import this data into the Customers entity.Import this JSON file into my Orders entity.Import the ‘Orders’ sheet into the Orders entity.Here is a CSV of my Products. Create a Products entity with matching fields and import these rows.
- Create the entity you want to import into (for example, Products, Contacts, Orders).
- Open the AI chat in your app editor.
- Click the Upload files icon and select your data file.
- Ask the AI to import the data.
- Review the response and approve the import in the chat.

Approving an import of data in the AI chat
- Ask the AI chat to delete the records in the relevant entity (for example,
Delete all records from the Orders entity.). - Confirm that you want to delete the records.
- Click the Upload files icon and select your data file.
- Ask the AI chat to import the file into the same entity.
Directly in the dashboard
Use this option when you already have a CSV that matches your table and you simply want the rows to appear in your data. Dashboard imports currently support CSV (.csv) files.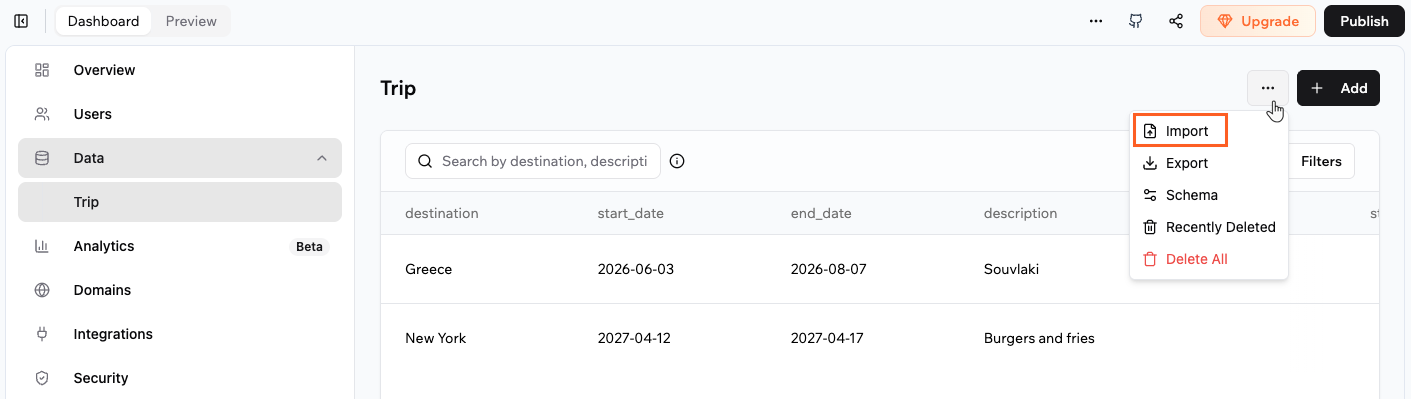
Importing data from your app's dashboard
- Click Dashboard in your app editor.
- Click Data.
- Select the relevant data set (table).
- Click the More Actions icon and click Import.
- Choose your CSV file and click Open.
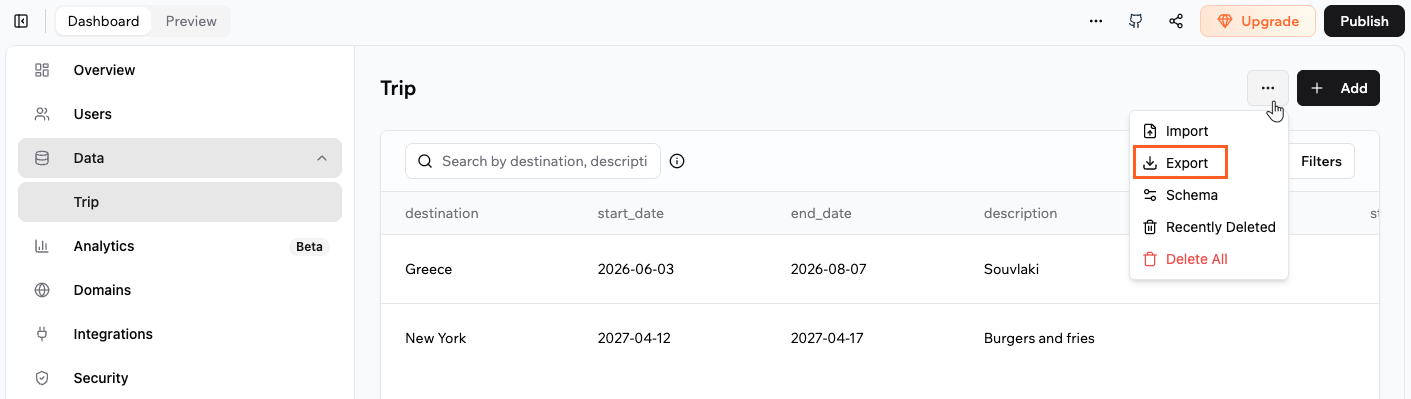
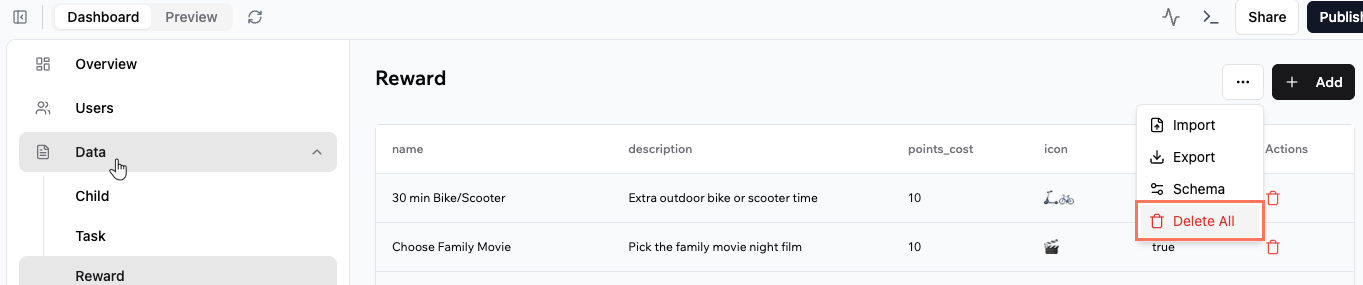
Exporting data
You might want to take your app’s data out for backup, analysis, or to use in other tools. To do this, you can use the Export option. For example, you might want to export your store orders or people lists to share with your accountant, or use the data to create custom reports. Your data downloads as a CSV file you can open in spreadsheet software such as Excel or Google Sheets. To export your app’s data:- Click Dashboard in your app editor.
- Click Data.
- Select the relevant data set (table).
- Click the More Actions icon and click Export.
Exporting data from your app's dashboard
Changing data permissions
Each data table has its own security settings, controlling who can read and write its data. Read Access: Who can view recordsWrite Access: Who can create, update, or delete records
- Click Dashboard in your app editor.
- Click Security.
- Click the relevant data entity and set the permissions.
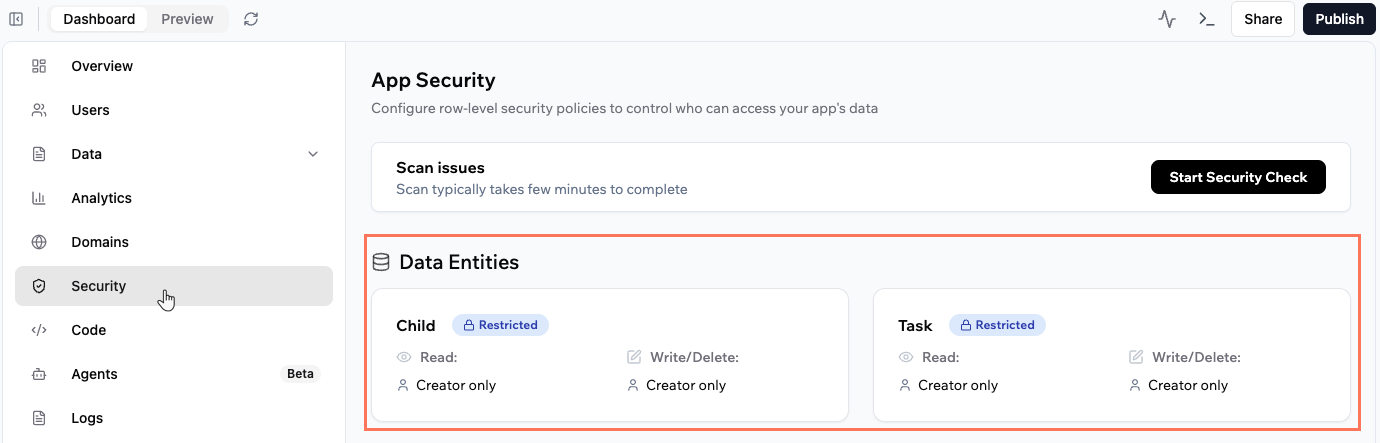
Fixing permission risks
When a table has a row-level security risk, a warning icon appears on its card on the Data page. Open the table to see a Permission risks detected banner that explains the risk and the recommended rules.- Click Fix to apply the recommended rules automatically.
- Click More details to review the risk and the suggested changes first.
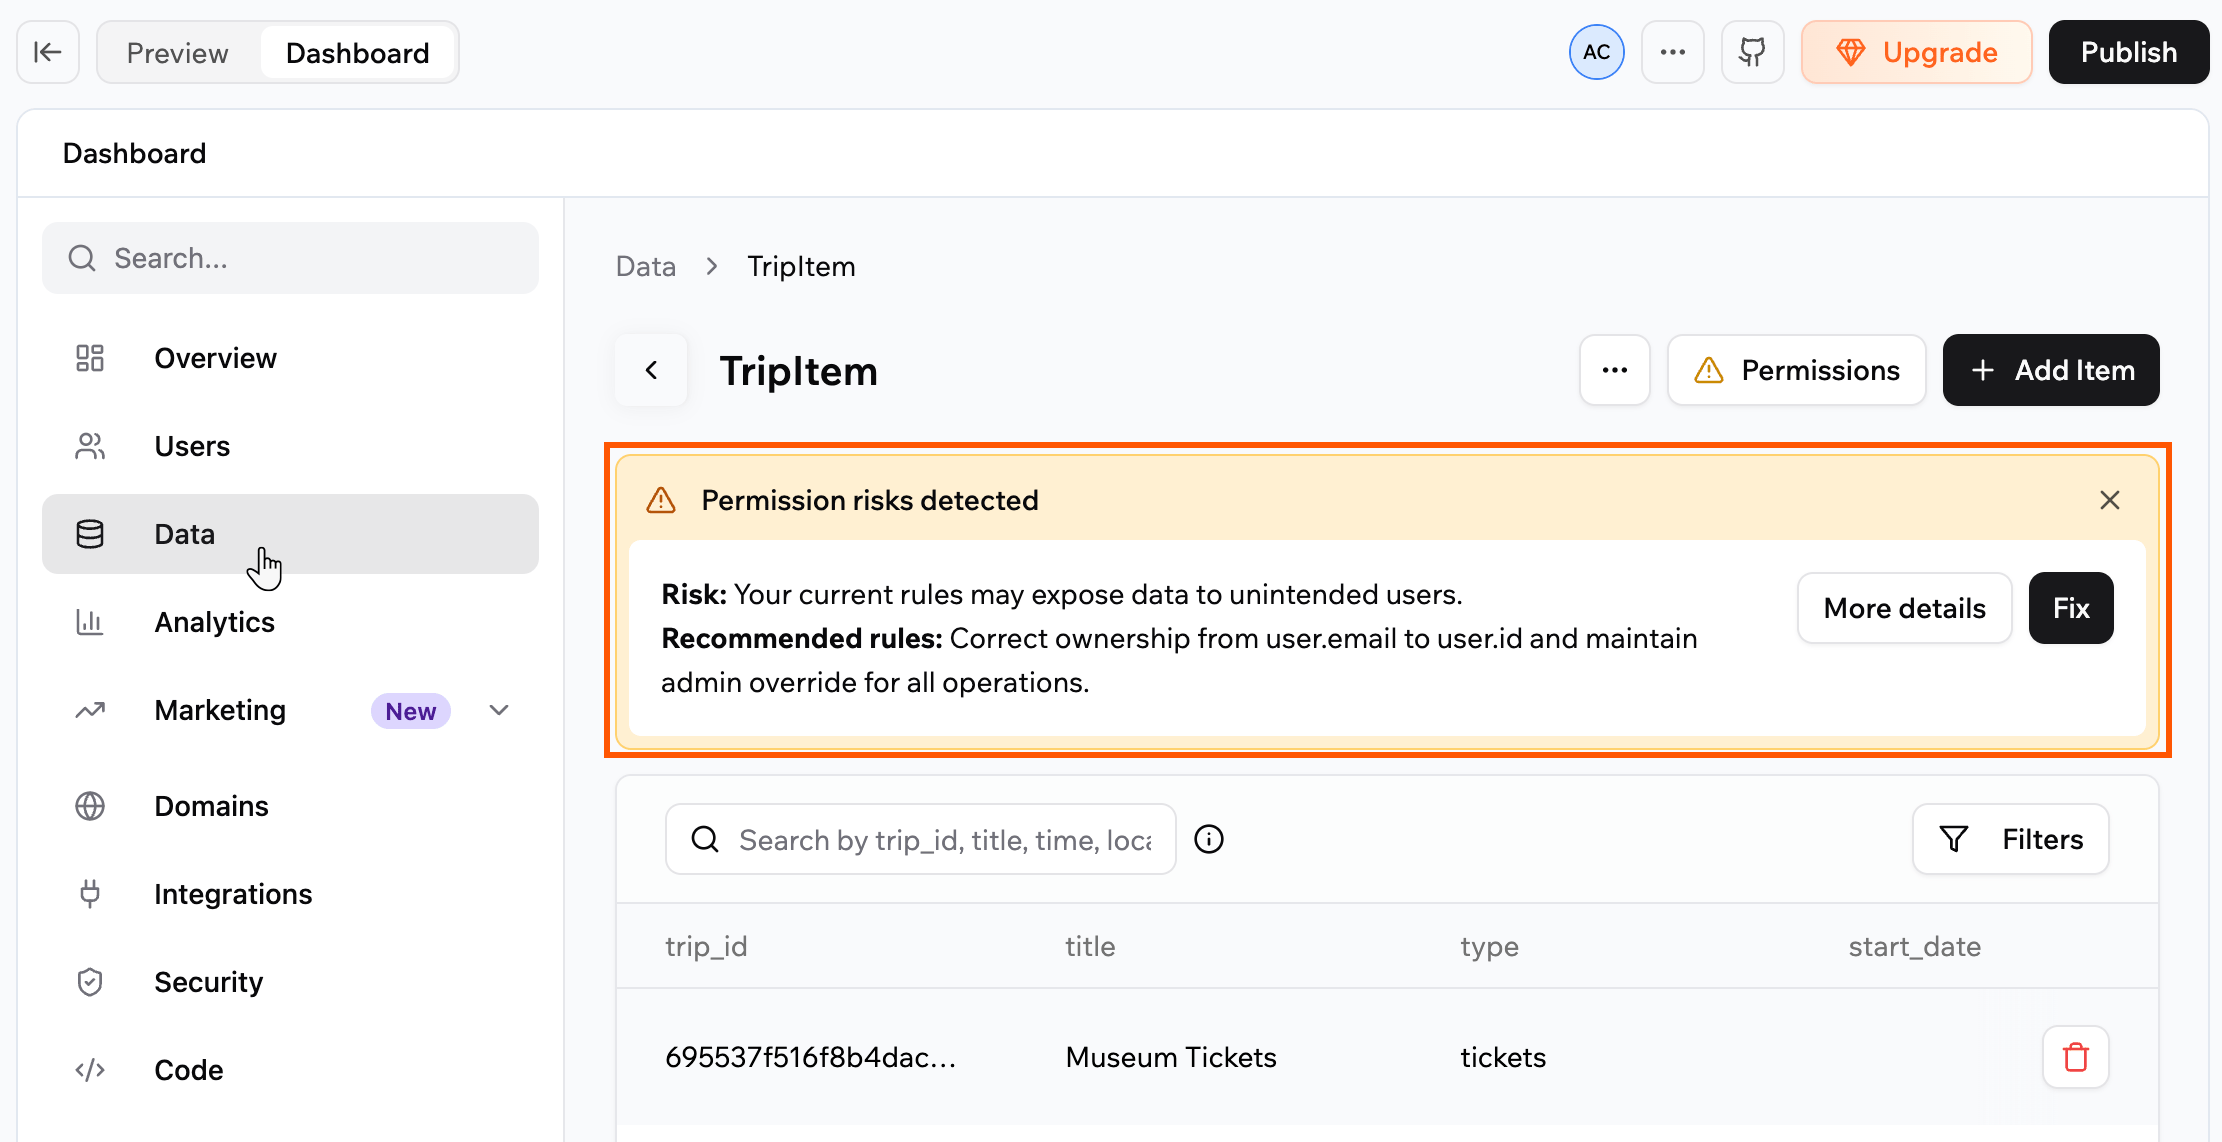
A permission risk detected on a table, with a one-click fix
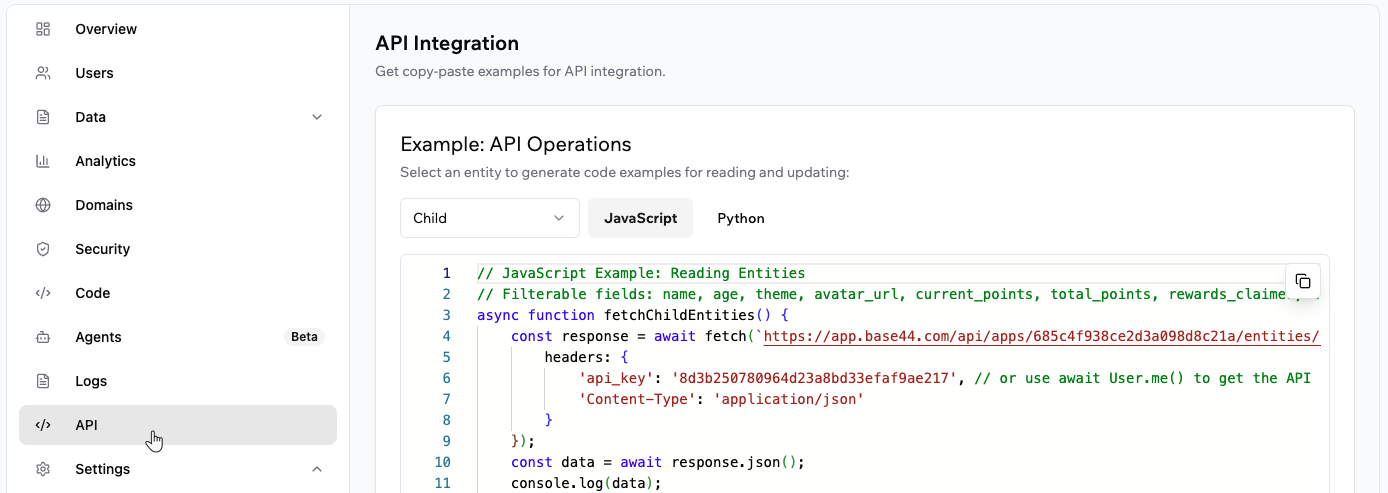
Connecting your data to another app
You can let another app read or write data from your Base44 app. This is useful if you want to sync information, automate tasks, or give access to outside tools.- Click Dashboard in your app editor.
- Click API.
- Select the relevant data entity from the drop-down menu.
- Choose which code sample you need (for example, JavaScript or Python).
- Copy the provided code for reading or updating data.
- Paste this code into the other app or tool, so it knows how to connect to your table.
FAQs
Select a question below to learn more about your app’s data.Can I merge my apps together?
Can I merge my apps together?
Can I delete all the data I created while I was testing my app?
Can I delete all the data I created while I was testing my app?
Can I recover my data after deletion?
Can I recover my data after deletion?
Is it safe to let the AI add test data?
Is it safe to let the AI add test data?
Can the AI chat delete my existing data?
Can the AI chat delete my existing data?
- Export the current table if you want a backup.
- Ask the AI chat to delete the records in the relevant entity.
- Upload your file and ask the AI chat to import it into the same entity.
Can I change the table structure (data schema)?
Can I change the table structure (data schema)?
Is there a limit to how many items I can pull with one data request?
Is there a limit to how many items I can pull with one data request?
Why do I only see some of my data? Have I lost the rest?
Why do I only see some of my data? Have I lost the rest?
- In your dashboard: The data table only shows up to 5,000 items, even if your collection contains more. All of your records are still stored. To review everything, export the collection to CSV from the dashboard so you can see all items outside the table view.
- In your app pages: Pages that try to fetch the entire collection in one request also only show up to 5,000 items. The rest of the records are still there, but they are not loaded on that page. Set up pagination so your app loads data in smaller chunks, for example 50 to 200 items at a time. You can ask the AI chat to add pagination for you.
Can I fetch and display data from my app on the free plan?
Can I fetch and display data from my app on the free plan?
Can I build custom roles and hierarchies (for example, managers and teams) in my app?
Can I build custom roles and hierarchies (for example, managers and teams) in my app?
- People sign up and sign in through the normal Base44 login flow. Their account details are stored in the built-in User entity. You do not change the security rules of this entity.
- You create your own entities to model your business, for example Company, Team, and TeamMember.
- Each record in these entities links back to a User record using a reference field, such as userId. This lets you connect login accounts with your own business roles.
- You use data permissions and row-level security on your entities so each person only sees the records they should see.
- In a SaaS app, each Company record can represent one of your customers. Data permissions make sure people from one company cannot see another company’s data.
- Within each company, TeamMember records can store fields such as role, manager, and team. You can then set rules so managers see all records for their team, while individual team members only see their own records or items assigned to them.
- Global admins in your app can have a role that allows them to see and manage all records across companies and teams.