

Enforcing SSO for apps
Workspace owners and admins can enforce SSO across all apps in a workspace through a single provider. This makes it effortless for people to sign in to multiple apps and ensures your security standards are applied everywhere. For example, if your company has 10 different apps in a Base44 workspace, enabling SSO for app access means everyone logs in with their central company credentials, instead of creating new logins for each app. To set up SSO for all apps in the workspace:- Set up your workspace SSO.
- Click your workspace name at the bottom left of your account.
- Click Settings.
- Click Governance.
- Click the Apps SSO toggle. The toggle appears only after your workspace SSO is set up.
- Enabled: All apps use the workspace SSO settings and app-level configuration is disabled. Public apps that did not require sign-in now do, for both the app and its API.
- Disabled: Existing apps keep workspace SSO and still require sign-in. Only new apps use their own authentication settings.
Auto-admitting SSO users
Workspace owners and admins can set a workspace default that automatically gives people access to eligible private apps when they sign in through SSO. This means you don’t need to invite people to each app or approve individual access requests. This applies only to private apps that use SSO as their only sign-in method. People who sign in another way continue to use the normal invitation or access request flow.Setting the workspace default requires an Enterprise plan (Business or Enterprise). Workspaces created before October 1, 2026 can also set it on the Elite plan.
- Click your workspace name at the bottom left of your account.
- Click Settings.
- Click Governance.
- Find the Apps SSO card.
- Click the Auto-admit SSO users in private apps toggle.
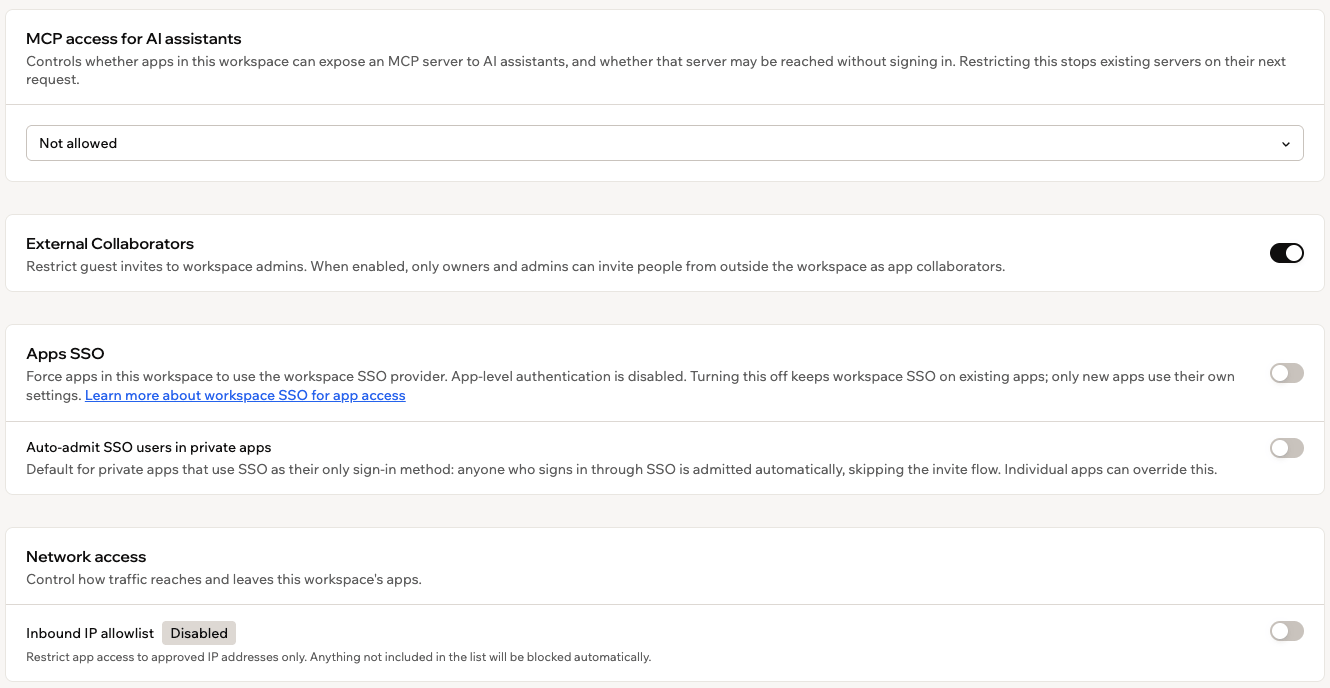
Setting the workspace default for SSO access
How auto-admit works:
- Auto-admit applies only while SSO is the app’s only sign-in method. If you add another sign-in method or turn SSO off, auto-admit stops for that app even if the workspace default is on.
- Turning the workspace default off does not remove anyone who already has access.
- Removing someone from Users in your app dashboard does not revoke their access. They are admitted again the next time they sign in through SSO, so remove or suspend them in your identity provider instead.
Setting publishing permissions
Publishing permissions let you control what people can do when publishing apps: whether they can publish, which visibility levels they can choose from, and which is set by default. You set these rules for each role (Owner, Admin, Editor, and Guest), and you can add rules for specific workspace groups when a team needs different permissions from its role. When someone’s publishing permissions block a publish action, they can send you a publish approval request instead, so work keeps moving without loosening your policies.Setting permissions by role
Configure publishing rights and visibility levels for each role from your workspace settings. To set publishing permissions by role:- Click your workspace name at the bottom left of your account.
- Click Settings.
- Click Governance.
- In the Role based publishing permissions table, find the role you want to configure.
- Use the Can publish toggle to allow or block publishing for that role.
- Under Allowed visibility, select the visibility levels the role can use. Keep at least one level selected:
- All: The role can use any visibility level.
- Private: Only people you explicitly invite can access.
- Workspace: All workspace members can access.
- Public (login required): Anyone with a Base44 account can access, including people outside your workspace.
- Public (no login): Anyone on the internet can access. No account needed.
- Under Default visibility, choose the visibility level that is selected automatically when someone with the role publishes. You can only choose from the levels you allowed in the previous step.
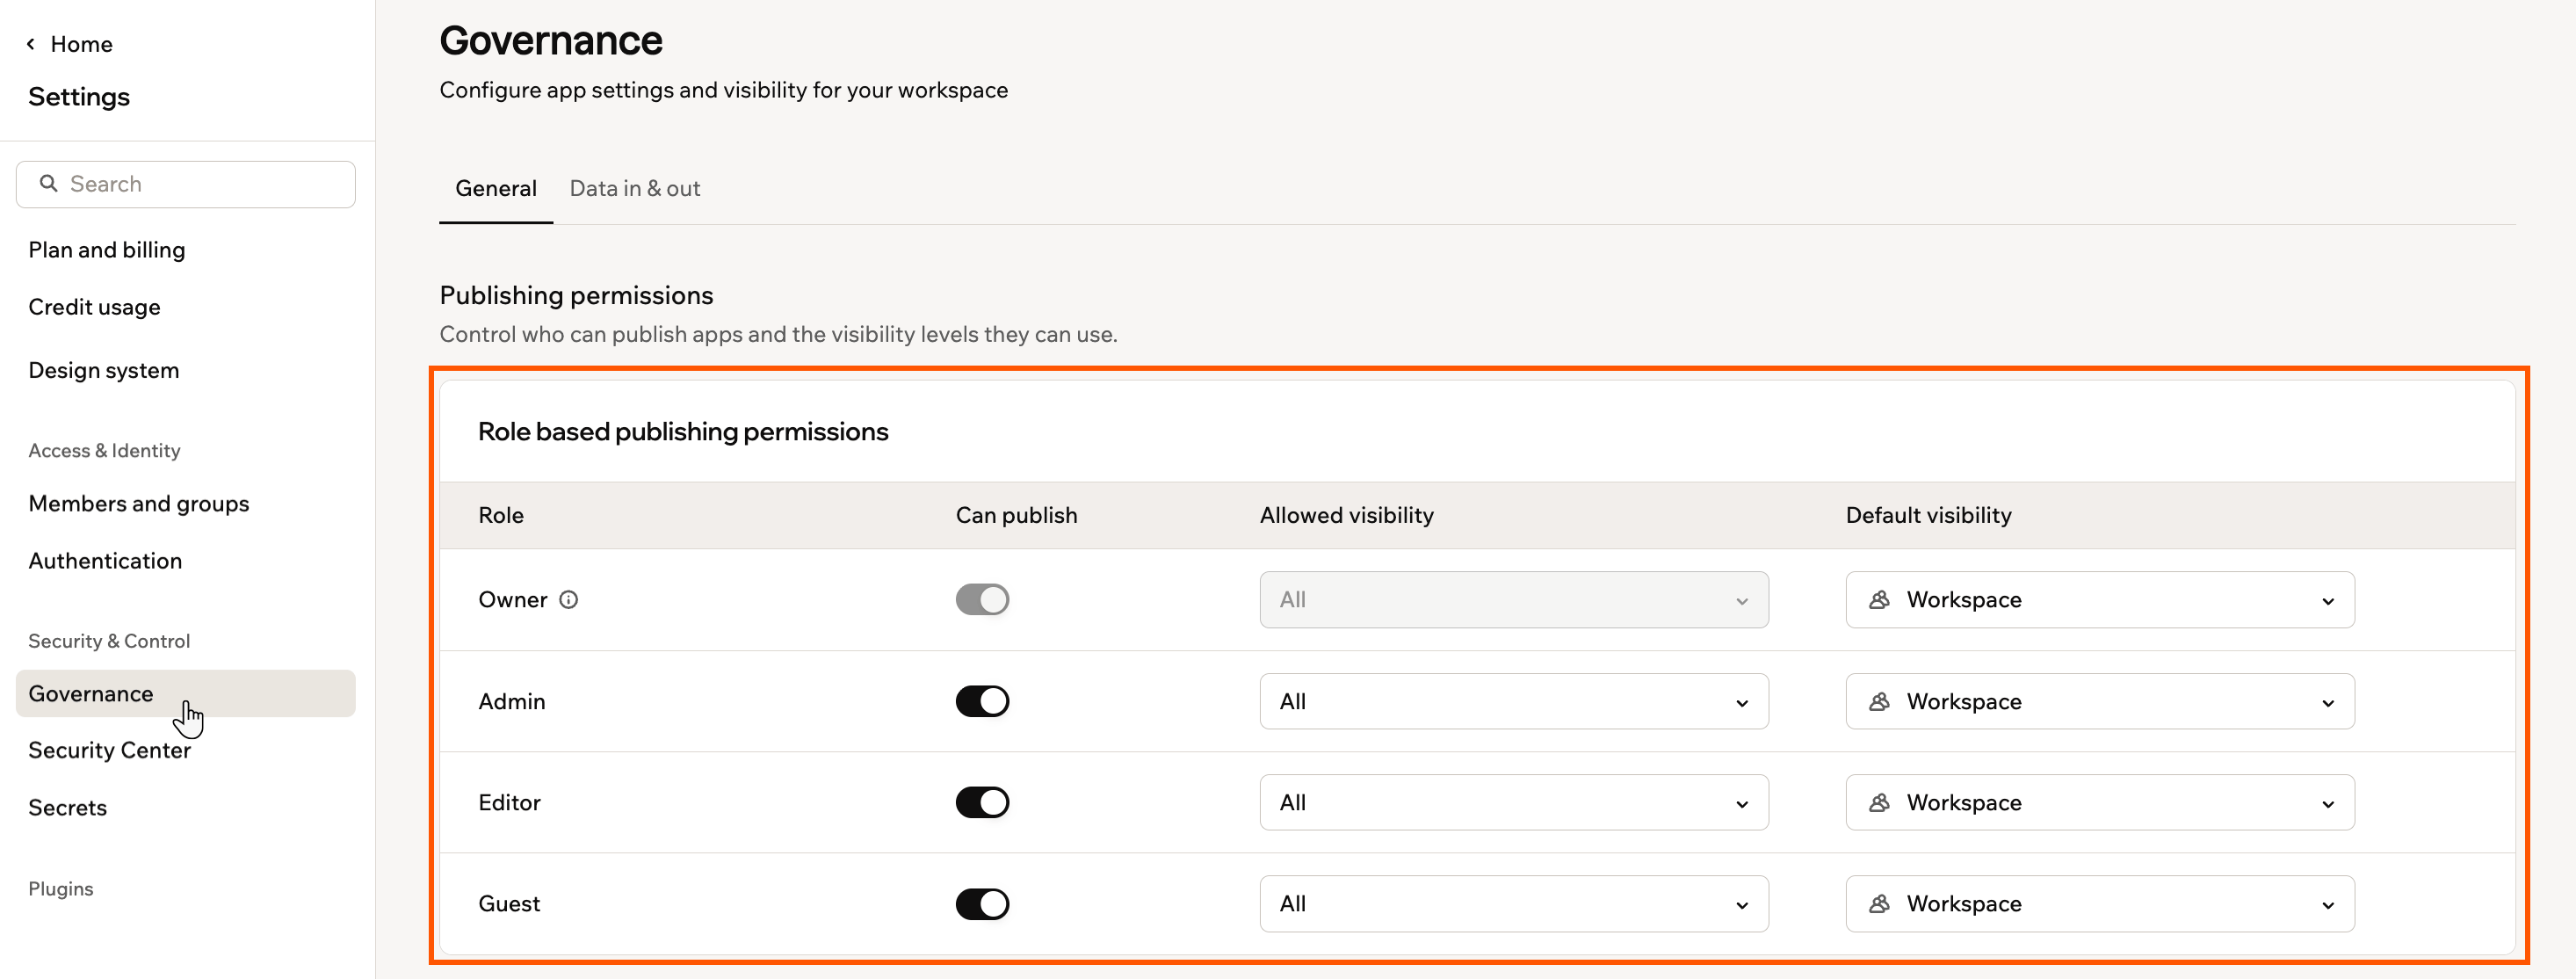
Setting publishing permissions by role
Setting permissions for groups
Sometimes one team needs different publishing permissions from everyone else with the same role. For example, you may want your marketing team to publish public apps without opening public publishing to every Editor, or stop contractors from publishing without blocking the rest of your Editors. Group rules let you do this: members of a group with a rule follow the group’s rule instead of their role’s.How group rules work:
- Group rules use your existing workspace groups, which are managed under Members and groups in your workspace settings.
- Each group can have one rule. To change it, edit the rule’s row, or remove the rule and add a new one.
- If someone belongs to more than one group with a rule, they follow the most permissive combination of those rules.
- Group rules do not affect Owners, who can always publish.
- If identity-provider (IdP) groups are turned off for your workspace, rules for IdP groups show an Inactive badge and are not applied.
- Click your workspace name at the bottom left of your account.
- Click Settings.
- Click Governance.
- Under Group based publishing permissions, click Add rule.
- In the Search for a group box, find the group you want and select its checkbox.
- Click Add.
- On the rule’s row, set the permissions for the group:
- Use the Can publish toggle to allow or block publishing.
- Under Allowed visibility, select the visibility levels the group can use: Public, Private, or Workspace.
- Under Default visibility, choose the visibility level that is selected automatically when a group member publishes.
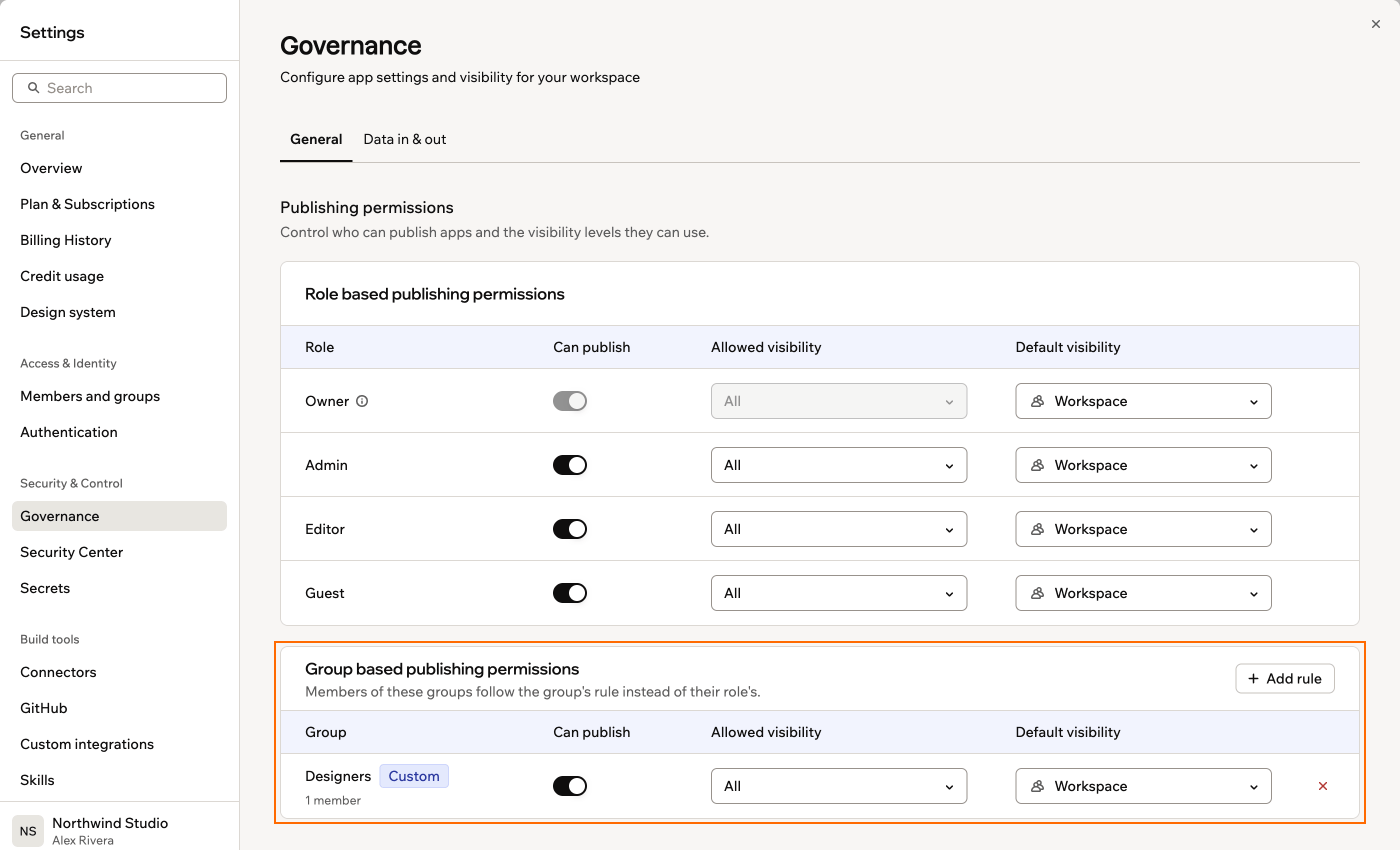
Setting publishing permissions for a group
For governance tracking, changes to publishing permissions are recorded in your workspace audit logs as governance rule changes, along with every app publish, unpublish, and publish approval request event. You can retrieve these events with the Audit Logs API.
Handling publish requests
When someone in your workspace tries to publish but their permissions do not allow it, whether from their role or a group rule, they can send a publish request instead of being blocked. You and the other workspace owners and admins are notified by email and in your Base44 notifications, under the Bell icon at the top of your workspace. Clicking the notification opens the app in the editor, where any of you can review and publish it on the member’s behalf. On the member’s side, the Publish panel in their app editor shows a Request to publish button. It opens a short request form where they select the visibility they want for the app, optionally add a message for the reviewer, and click Send request.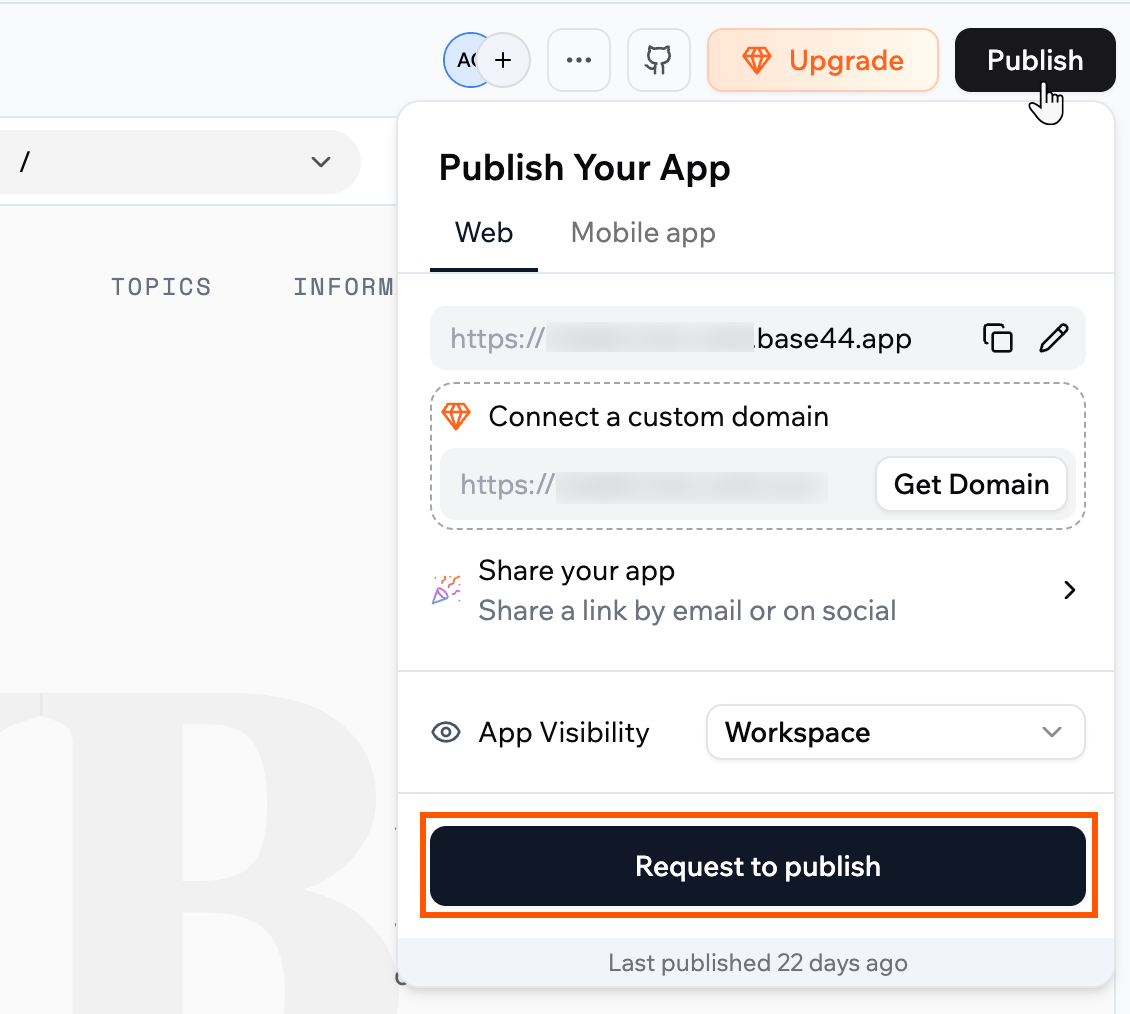
Requesting approval to publish an app
Managing MCP access
MCP lets AI assistants, such as Claude or ChatGPT, connect to your apps and work with them. As a workspace owner or admin, you choose whether apps in your workspace can offer this connection, and whether AI assistants must sign in first. To set up MCP on an individual app, see Connecting AI assistants to your app. To manage MCP access:- Click your workspace name at the bottom left of your account.
- Click Settings.
- Click Governance.
- Under MCP access for AI assistants, select a policy:
- Allowed: Apps can offer an MCP connection, with or without sign-in.
- Sign-in required: Apps can offer an MCP connection, but AI assistants must sign in.
- Not allowed: Apps in the workspace cannot offer an MCP connection.
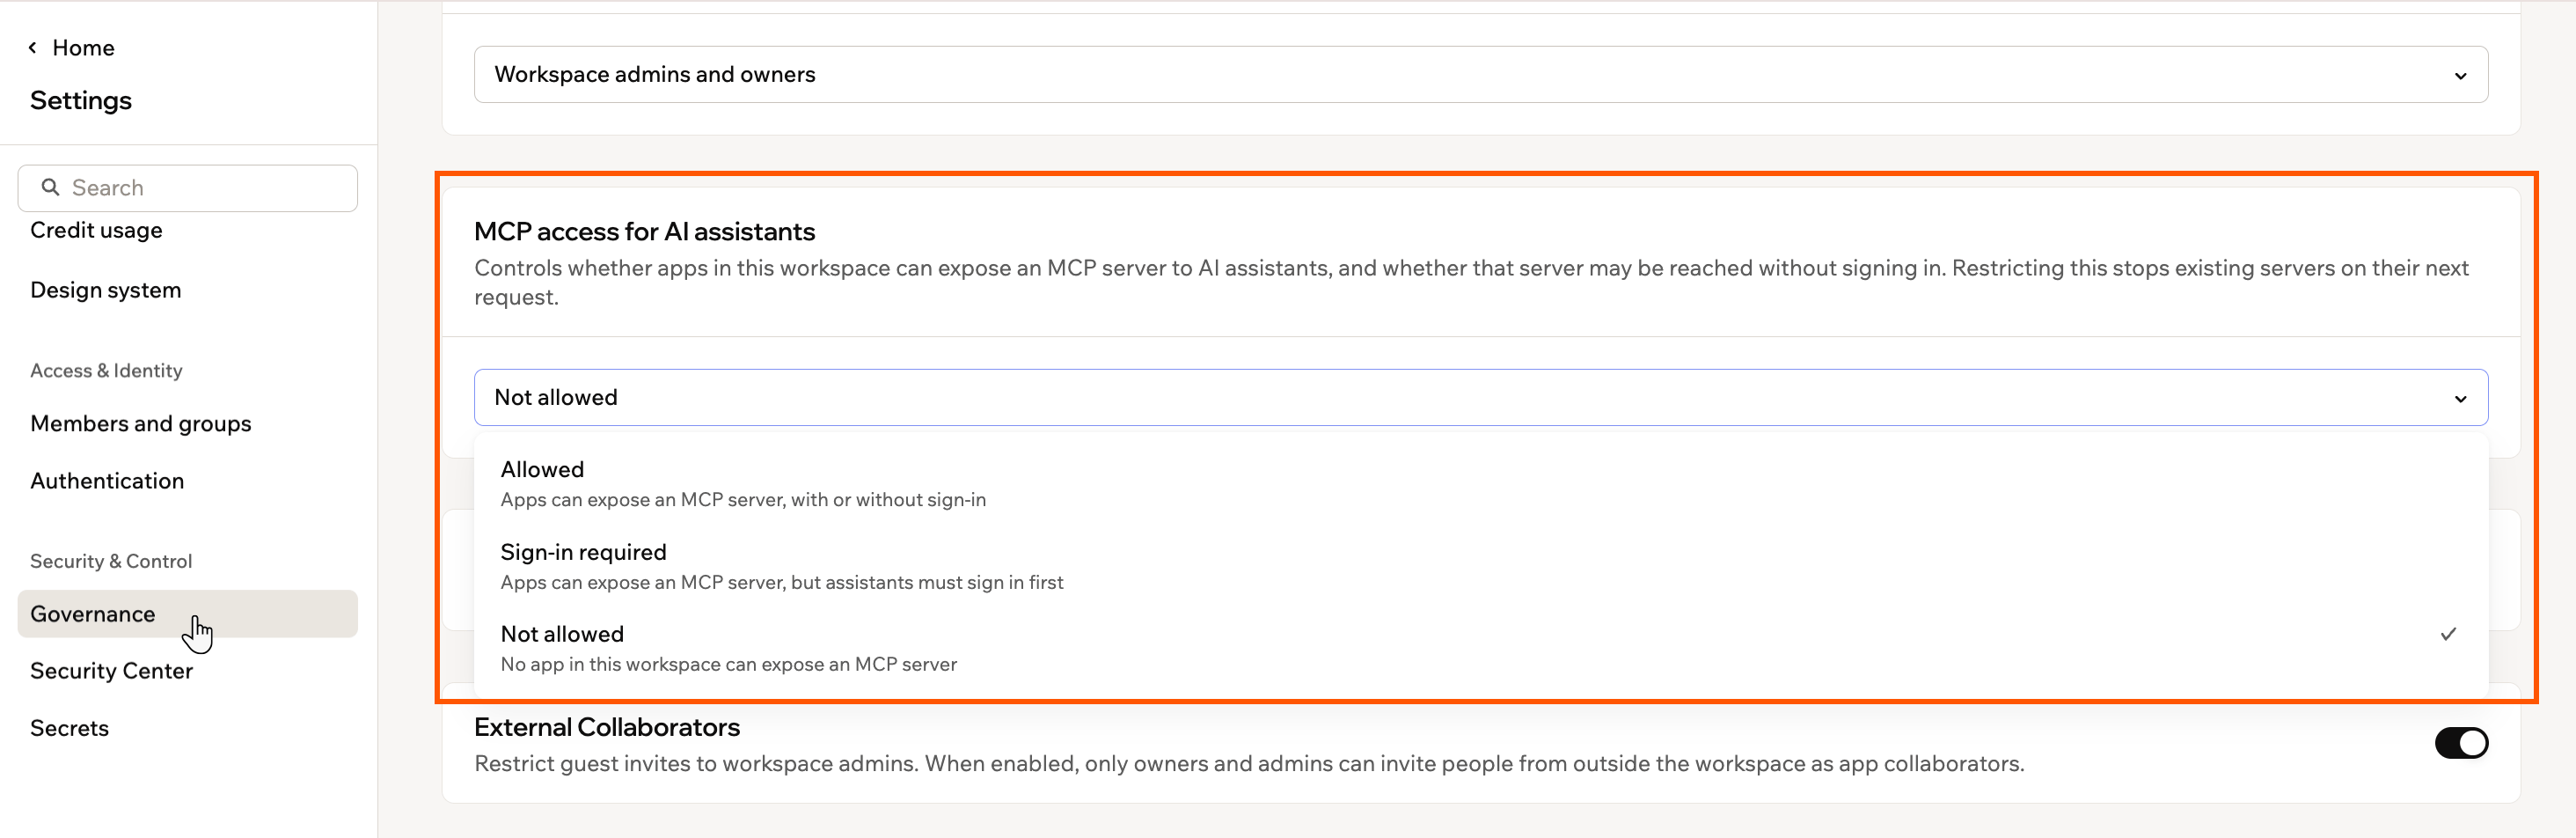
Choosing an MCP access policy for your workspace
Policy changes apply immediately. You do not need to republish your apps. If you select Not allowed, AI assistants that are already connected lose access the next time they call the app.
Controlling app channels
Your apps can message people outside your workspace, and be messaged by them, through channels such as WhatsApp, Slack, Telegram, LINE, iMessage, and email. A data in and out policy lets you decide which of these channels apps are allowed to use. The policy applies to every app in your workspace, including apps built later, and builders cannot override it while it is on.You need the Enterprise plan to set a data in and out policy. It isn’t included in the Business plan. If your Enterprise plan is no longer active, your settings are saved but the policy stops being enforced until you upgrade again.
Setting a channel policy
Turn on the policy, then choose which channels apps in your workspace can use. To set your workspace policy:- Click your workspace name at the bottom left of your account.
- Click Settings.
- Click Governance.
- Click the Data in & out tab.
- In the Workspace policy card, click Turn on.
- In the Communication channels table, use the Access toggle to allow or block each channel.
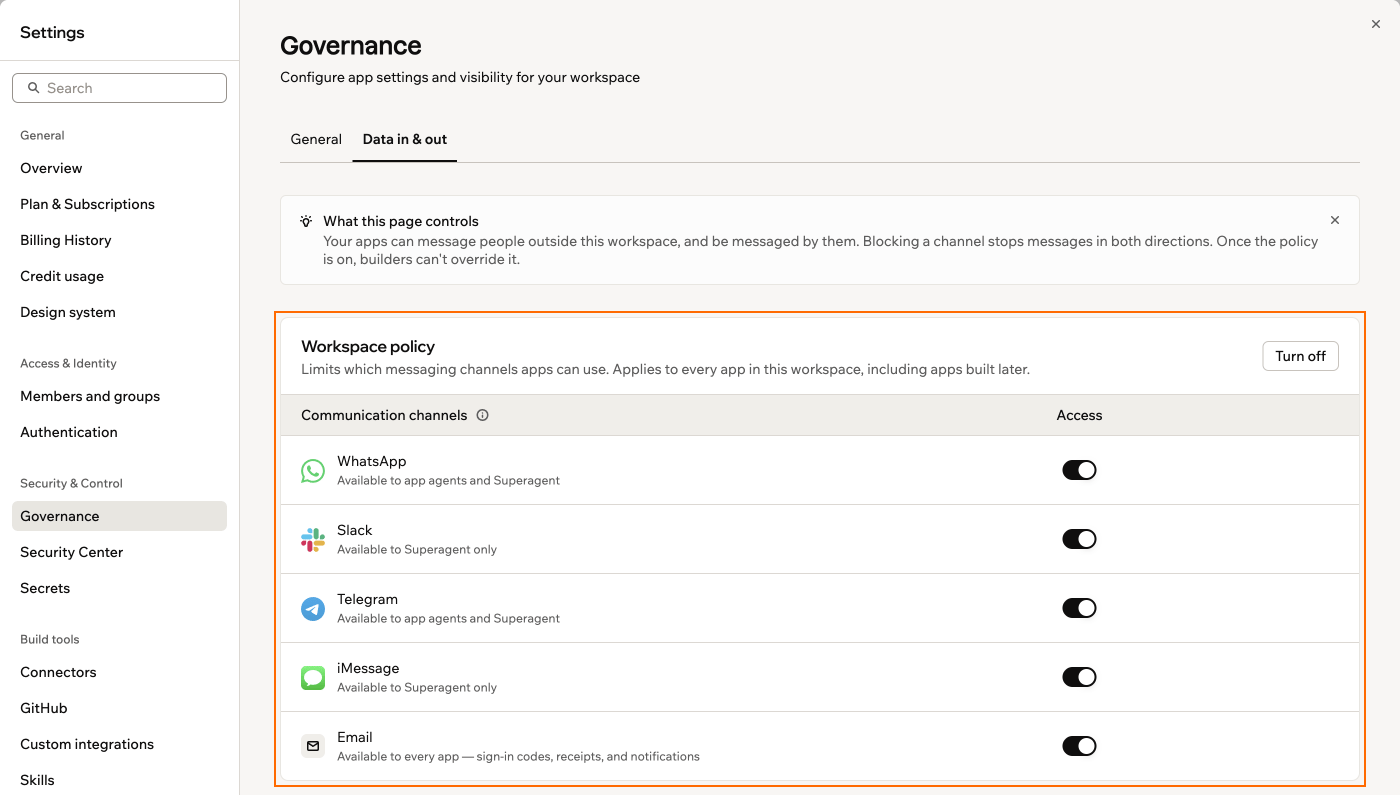
Choosing which channels your apps can use
Good to know about your workspace policy:
- Blocking a channel stops messages in both directions, so your apps can no longer send to it or receive from it.
- The channels in your table can vary, so you may see fewer than the ones listed above. Your table only shows the channels your workspace can actually use.
- Connectors are not part of this policy. You manage those individually from the Connectors page in your workspace settings.
- Turning the policy off lets every app use every channel again.
Adding a policy exception
If one app needs to keep using every channel, add it as an exception. Exceptions run unrestricted, so add them only when an app genuinely needs to work outside your policy. To add a policy exception:- Click your workspace name at the bottom left of your account.
- Click Settings.
- Click Governance.
- Click the Data in & out tab.
- In the Policy exceptions card, click Add exception.
- In the Search apps box, find the app you want and select its checkbox.
- (Optional) In the Reason field, explain why the app needs to skip the policy.
- Click Add exception.
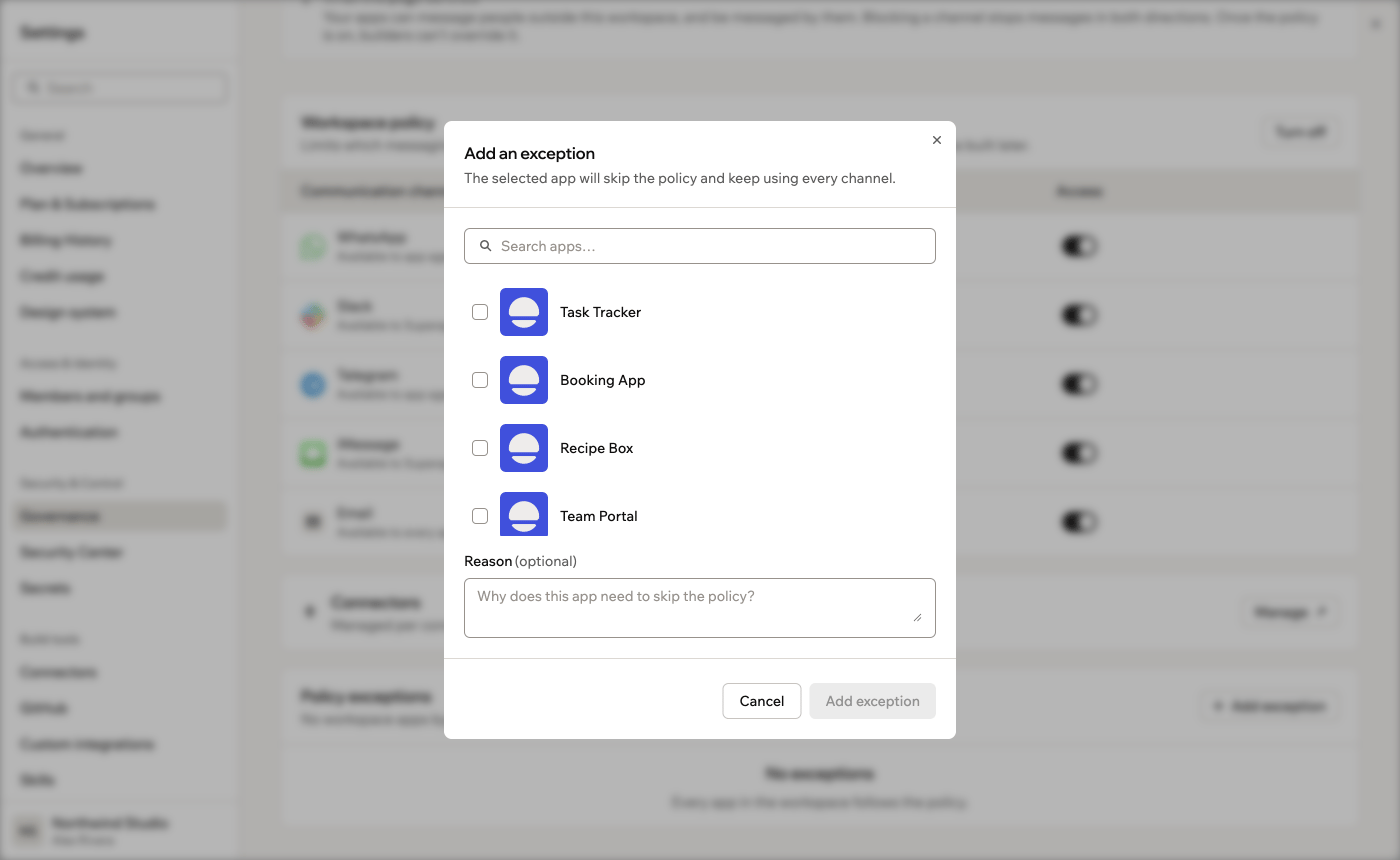
Adding a policy exception for an app
Controlling app embedding
Other websites can show your published apps inside an iframe, for example to put an app on your company’s own site.Understanding embedding policies
A workspace embedding policy decides which websites can embed every app in your workspace, including apps built later. Here’s how it works:- Add each website with
https://orhttp://in front. To allow every subdomain of a site, put a wildcard at the start, likehttps://*.example.com. - Embedding is allowed per website, not per page, and you can add up to 50 websites.
- When a change makes embedding stricter, Base44 asks you to confirm it first, because any website already embedding your apps stops working right away.
- Your workspace starts at Anyone, which leaves each app to decide for itself. Nothing is restricted until you choose a policy.
- When you choose Only these sites or No one, each app’s embedding setting shows Managed by your workspace. With Only these sites, every app uses your list. An app can still be set to No one, but it can’t add its own websites.
Setting an embedding policy
Choose who can embed the apps in your workspace from your Governance settings. To set where your apps can be embedded:- Click your workspace name at the bottom left of your account.
- Click Settings.
- Click Governance.
- Under App embedded in iframe, choose who can embed your apps:
- Anyone: Any website can embed apps from this workspace.
- Only these sites: Only the websites you add can embed apps from this workspace. Under Allowed websites, type each website and press Enter.
- No one: No website can embed apps from this workspace.
- If Base44 asks you to confirm the change, click Apply.
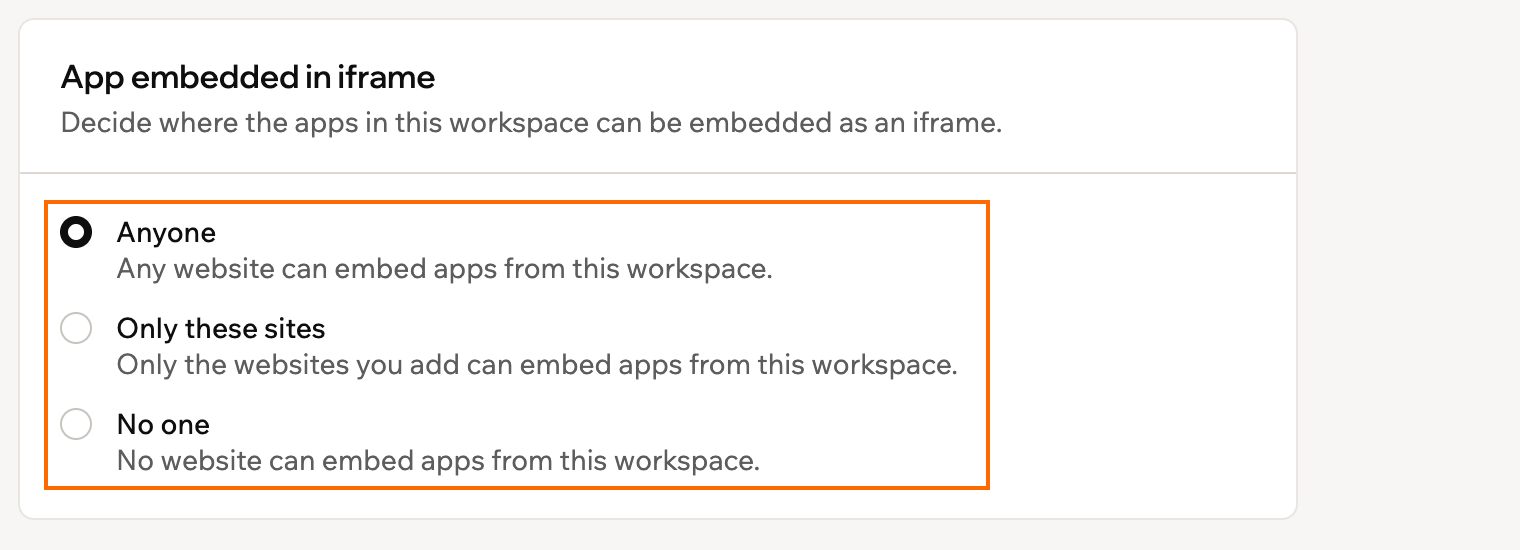
The App embedded in iframe card in your workspace Governance settings
Managing Superagents
You can prevent workspace members from creating, accessing, or interacting with Superagents. When this setting is enabled, Superagents are hidden from all members across the workspace. This is useful if your organization has not approved AI agents for use, or if you want to roll out Superagents gradually to specific teams.Only workspace owners and admins can enable or disable Superagents for the workspace.
- Click your workspace name at the bottom left of your account.
- Click Settings.
- Click Overview.
- Enable the Disable Superagents toggle.
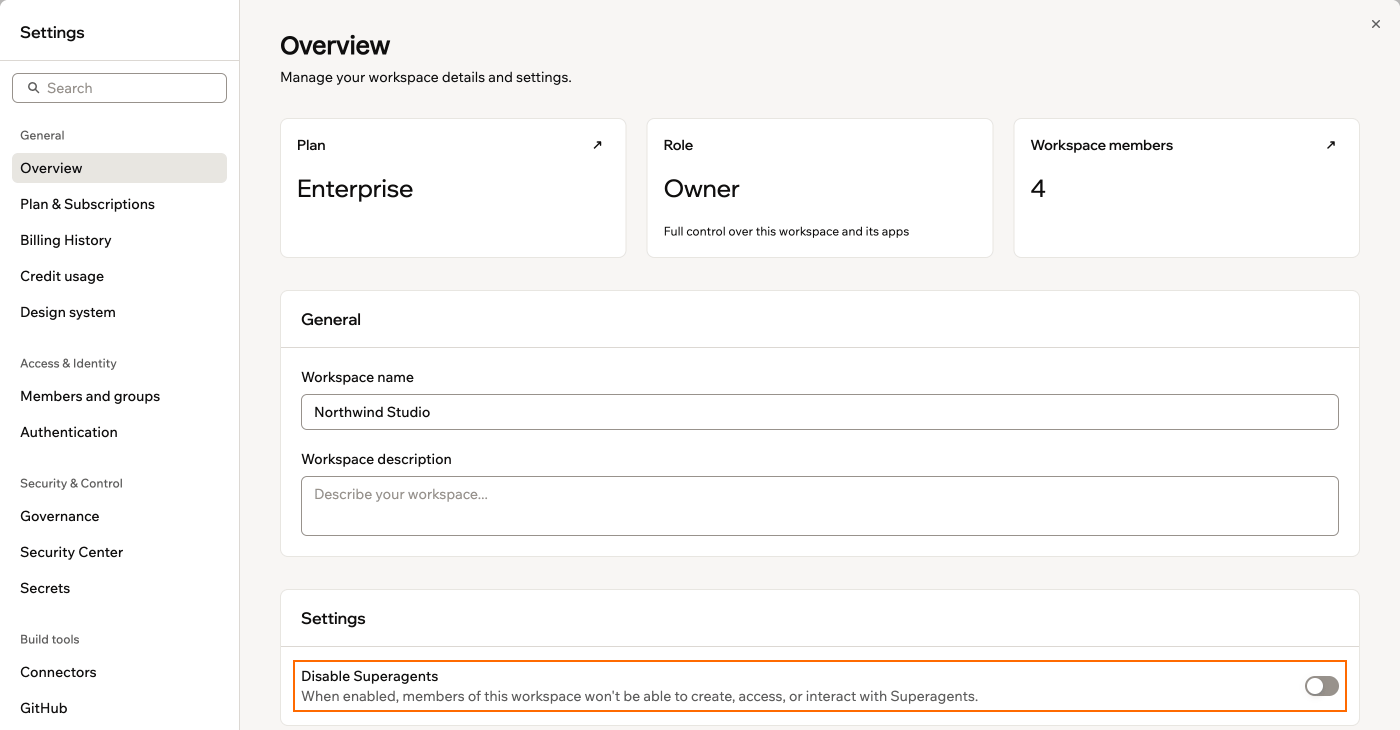
Disabling Superagents for your workspace
FAQs
Select a question below to learn more about managing apps in your workspace.What happens to existing apps when I enable workspace SSO?
What happens to existing apps when I enable workspace SSO?
Existing apps automatically use your workspace SSO settings if enforcement is enabled. App-level SSO settings are locked and can only be managed by workspace owners and admins.
Can app builders override workspace SSO?
Can app builders override workspace SSO?
No. When workspace SSO enforcement is enabled, all workspace apps use the company’s SSO provider. App builders can choose SSO settings only if enforcement is disabled by an admin.
Can I update visibility after an app is created?
Can I update visibility after an app is created?
Yes, you can change an app’s visibility in the app settings at any time, unless restricted by workspace policies.
What setup is recommended if we have both internal and external apps?
What setup is recommended if we have both internal and external apps?
For organizations with both internal and customer-facing apps, configure your workspace like this:Workspace Level:
- Workspace SSO: ON (employees use company credentials)
- Apps SSO toggle: OFF (don’t force it globally)
- Internal apps: Enable workspace SSO individually
- Customer-facing apps: Use their own auth (email/password, Google) with appropriate visibility controls
What happens when I migrate an app with existing authentication to this workspace?
What happens when I migrate an app with existing authentication to this workspace?
App-level auth settings carry over to the new workspace, but keep these considerations in mind:
- If your workspace has the Apps SSO toggle turned on, workspace SSO overrides any app-level auth settings immediately.
- Existing app users are preserved, but if the app previously used a login method that is not configured in the new workspace (such as a custom SSO with a different redirect URI), app users may hit login issues until auth is reconfigured.
- If the app has connectors set up (OAuth connections to Google, Slack, etc.) that are tied to the individual who set them up rather than the app itself, those connections may need to be re-authorized in the new workspace context.