

About the AI chat
The Base44 AI chat is more than just a code generator. It works as your intelligent assistant, understands your goal, and uses the right tools to get you there. Your apps become more accurate, context-aware, and flexible, so you can focus on building complex features quickly, with smart automation working in the background. Unlike traditional AI that only responds with text, the agentic AI knows when to search the web, check your files, or pull in data from other sources. It also uses automatic model selection to choose state-of-the-art models based on what your prompt needs, so you get real solutions without needing to manage models or technical details yourself. The AI chat is how you build your app. To give the people using your app an assistant of their own to talk to, see the AI agent builder.What does this mean in practice? Here are some examples:
- Share a public website link with the chat to instantly copy the design, layout, and visible content into your app. For example: “Copy the layout from
https://example.com.” - Ask the agent to help you follow best practices by searching for ready-made code or common solutions. For example: “Show me the standard pattern for user authentication.”
- Pull lists or content from other websites and use it in your app, such as importing product catalogs or gathering site text and images. For example: “Import the product list from
https://example.com.” - Update the data your app already stores with simple, clear instructions. For example, if your app tracks points for each person: “Give Emily a point for doing her homework.”
Using the AI chat modes
Base44’s AI app builder has 2 chat modes. You switch between them from the mode drop-down at the bottom of the AI chat.- Build: Acts instantly on your prompts.
- Discuss: Lets you ask questions or plan your next change, with no code changes until you approve them.
Using Build mode
Type what you need, and the AI acts right away. This mode is perfect for quick edits and feature requests. To get the best results, be as specific as possible. The more detail you give, the more precisely the AI builds your app. Build mode is selected by default, so you only need the steps below when you are coming back from another mode. Example prompt- Go to the AI chat in your app editor.
- Click the mode drop-down at the bottom of the chat.
- Select Build.
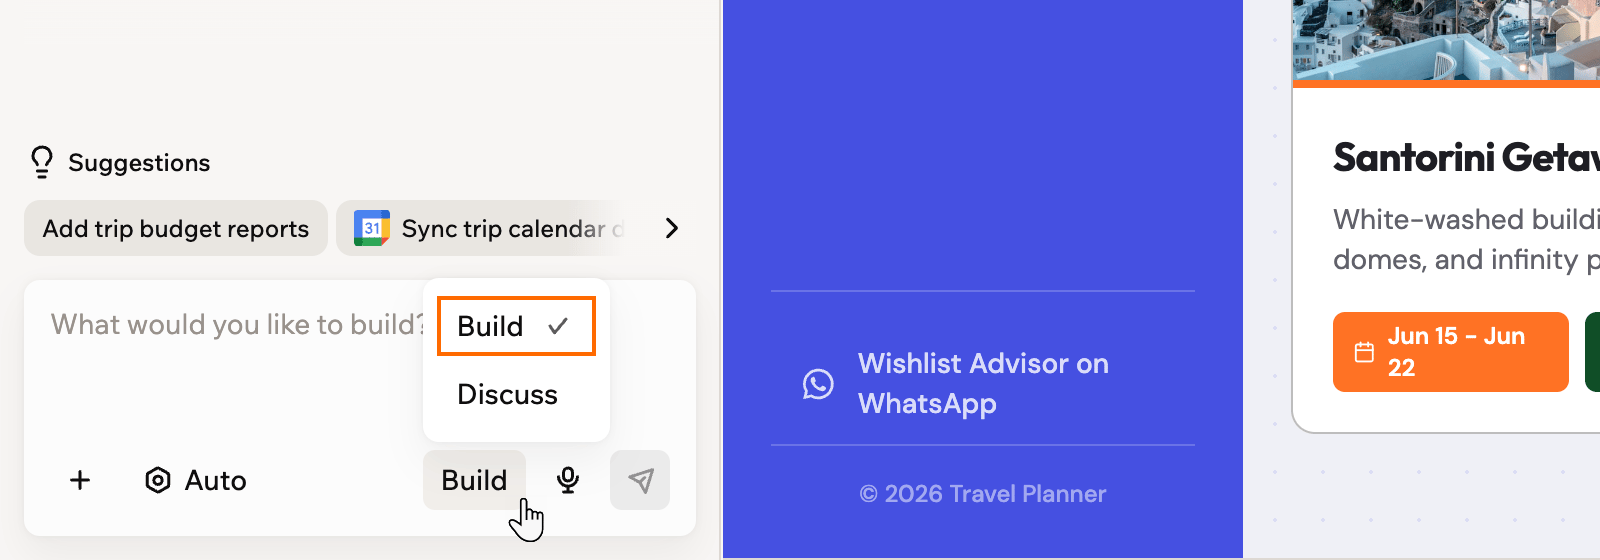
Switching the AI chat to Build mode
Using Discuss mode
Brainstorm, clarify, or explore ideas before changing your app. It is a safe space to ask questions, get suggestions, or talk through options. Depending on what you ask, the AI answers you directly or proposes a change for you to review, and nothing is built until you approve it. Each message in Discuss mode typically uses ~0.3 message credits. If you talked something through without a plan to approve, switch back to Build mode and ask the AI to make the change. When the AI proposes a plan, it appears just above the chat box. Click View to read the full plan, Approve to build it, or Reject to keep talking it through. After you decide, the plan stays in the chat as a card, and you can click it to open the plan again.- It saves credits by avoiding unnecessary trial and error before you finalize changes.
- It uses its own AI model regardless of the model selected in your app, which is what keeps its cost low.
- Go to the AI chat in your app editor.
- Click the mode drop-down at the bottom of the chat.
- Select Discuss.
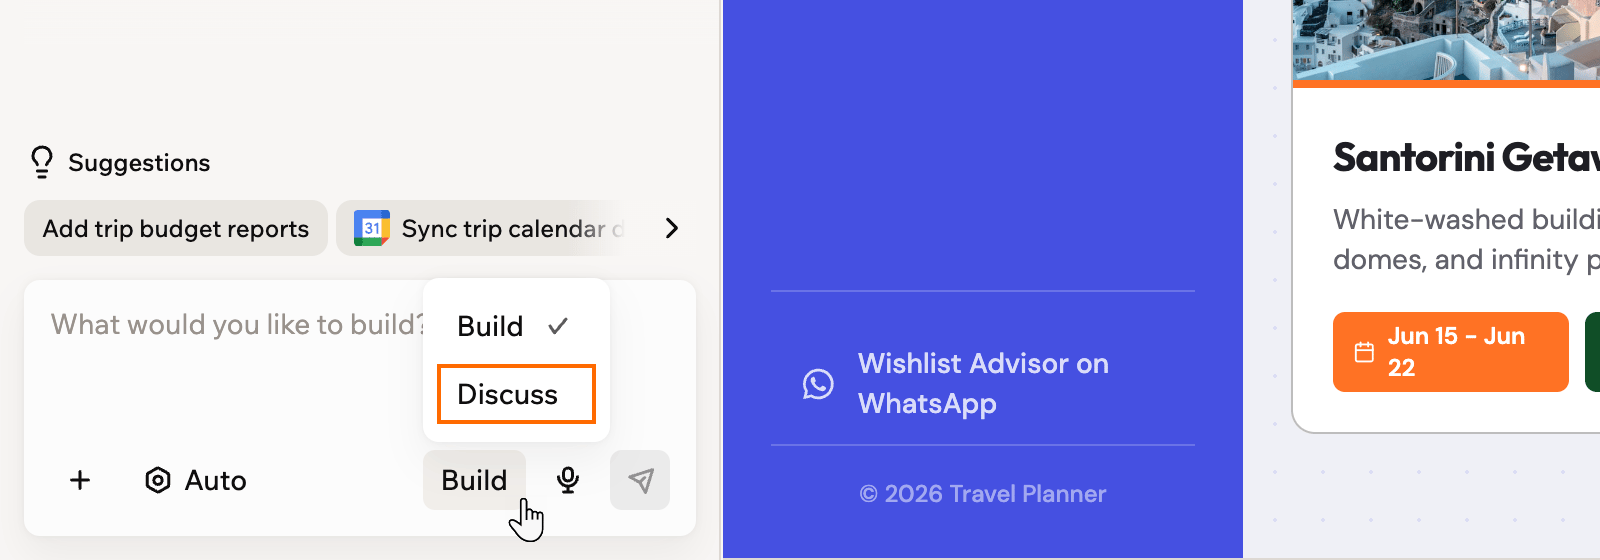
Switching the AI chat to Discuss mode
Using Edit mode
Make changes to the design of your app, either manually or by asking the AI to do it for you. Edit mode has its own button at the top of the editor rather than sitting in the chat mode drop-down. Your edits save automatically as you work. You can undo and redo up to 50 steps within the same visual edit session using the undo/redo buttons at the top of the editor, and your edits remain through preview reloads. If you try to leave with unsaved changes, your browser warns you before you go. Your edits also appear in Version History, so you can restore a previous set of manual edits at any time.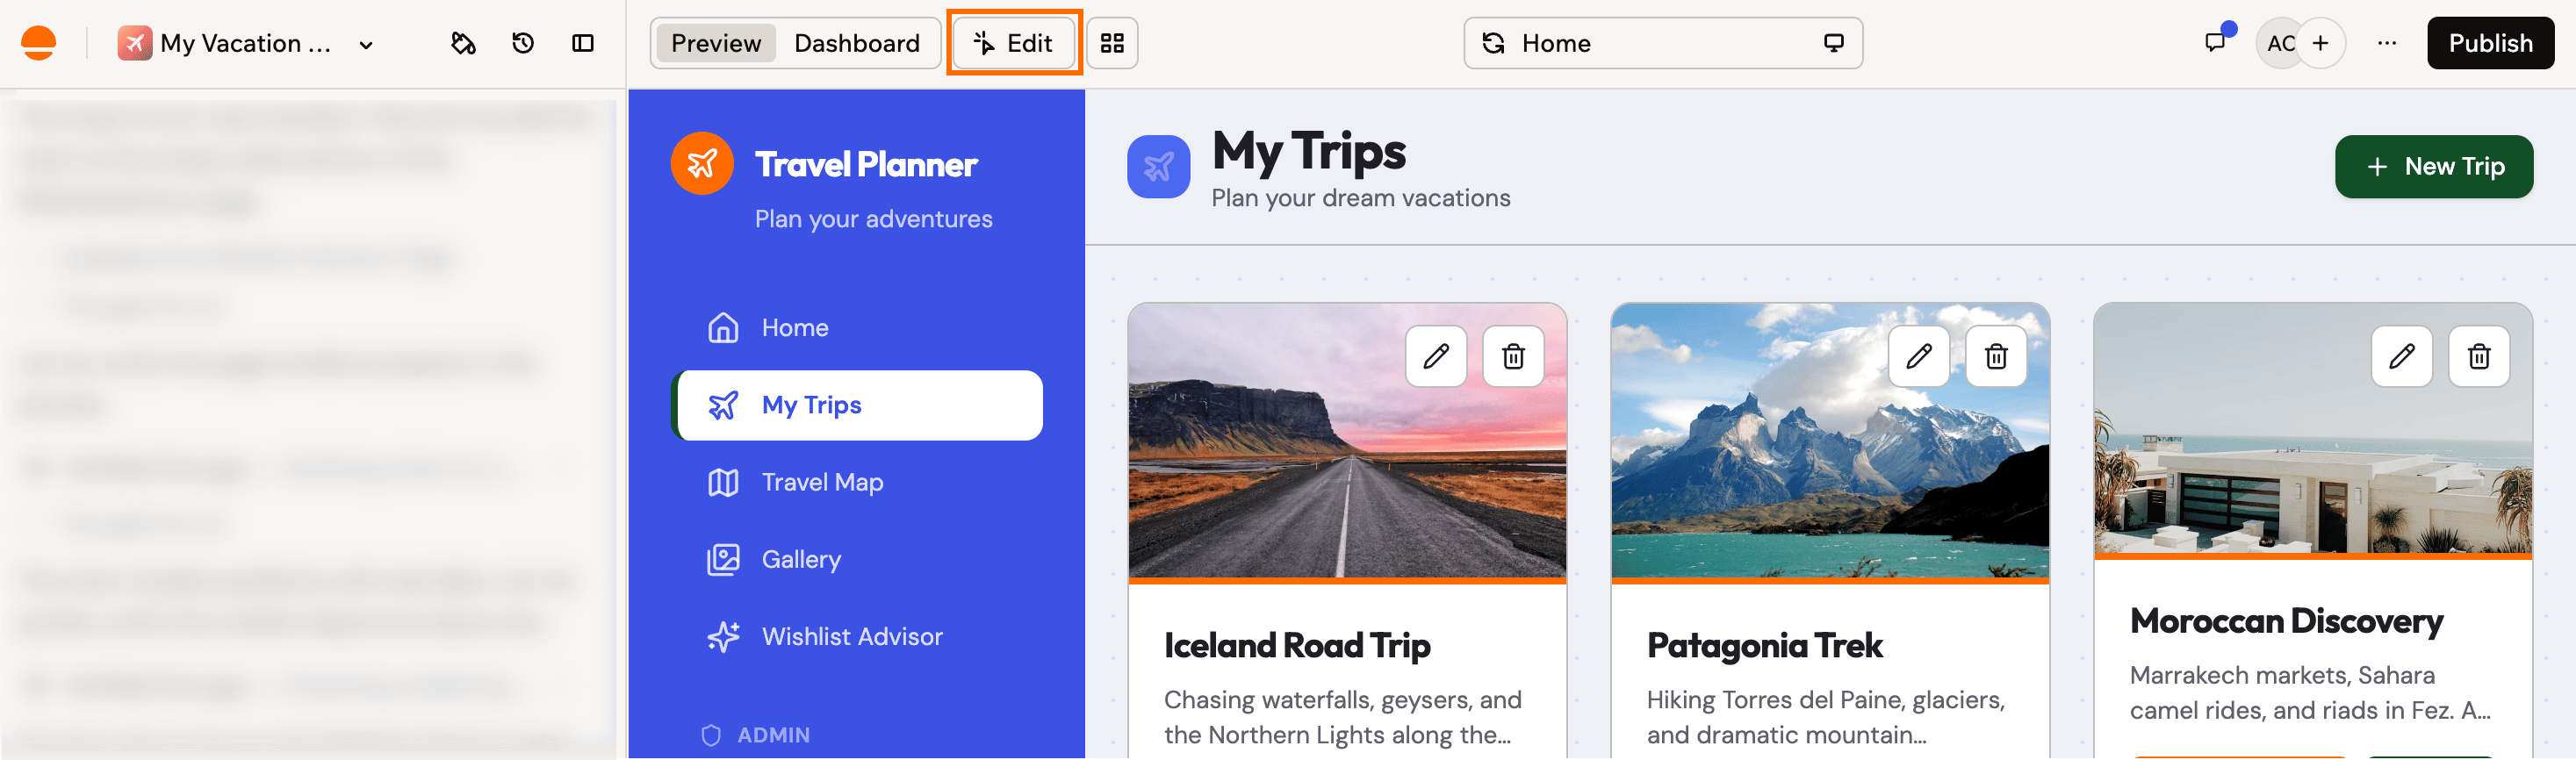
Starting Edit mode from the top of the app editor
- Go to your app editor.
- Click Edit at the top of the editor.
- In your app preview, select what you want to change:
- One element: Click it.
- A group of elements: Click an element that repeats elsewhere on the page, such as a card in a list. Every copy highlights, and your change applies to all of them at once. To change just one copy, describe the change in the AI chat in Build mode instead.
- Make your change in the toolbar that appears next to the element:
- Manually: Use the toolbar options to change things like colors, text, font, or spacing. To fine-tune with Tailwind classes, the styling code behind each element, click Edit Tailwind. To open the element’s code, click Code. To remove the element, click Delete.
- Using the AI chat: Click Edit Element, write what you want changed, and click Send.
- When you’re done, click Edit at the top of the editor again to leave Edit mode.

Selecting a repeating element in Edit mode
- Manual edits: Changes you make yourself in the toolbar don’t use credits.
- AI edits: Edit Element uses message credits. How many depends on the size and complexity of the change.
Customizing your AI chat
How the AI chat behaves on your app is up to you. Pick the model that powers it, decide how often it stops to ask your permission, choose whether it suggests what to write next, lock the files it must not touch, and give it rules to follow on every prompt. You pick the model from the model picker at the bottom of the AI chat in your app editor. The other settings are under the More options icon at the bottom right of the AI chat, next to the microphone. If you can only view an app, you don’t see More options. Freeze Files and Custom Instructions apply to your app’s main version, called main, so they don’t appear while you’re on a branch. A branch is a separate copy of your app for trying out changes. When you’re on one, its name shows at the top of the chat panel instead of your app’s name. To go back to main, click the branch name and select Main chat.Choosing your model
Choose a model manually when you want more control. Each model brings unique strengths, so you can pick the best fit for your prompt. You can pick one when you write your first prompt, or change it at any time while you are working in your app editor. The list shows the main models first, and you can click More models at the bottom to see the rest.- You need a Builder plan or higher to choose an AI model. On a lower plan, you can still use Auto mode, and the other models show a Builder+ badge.
- When you choose a model manually, credit usage varies by model and may use more credits than Auto mode. To see what a message used, click the More actions icon under it and look under Credits Used.
- In an Enterprise workspace, your admin can turn off some models. Those models show as Disabled by your workspace admin. Learn more about controlling AI models.
Available models
- Auto mode: Matched with the best AI model for each request.
- Base 1: Base44’s first in-house model, trained on real building patterns from across the platform. A well-rounded, general-purpose choice for both everyday building and conversation.
- Sonnet 5.5: A well-balanced choice for day-to-day building, writing, refactoring, and troubleshooting, with a strong mix of quality and speed.
- Opus 5.5: The most advanced reasoning model, built for the hardest problems. Use it for complex multi-step logic, intricate architecture decisions, and edge cases where you need the highest level of accuracy.
- Fable 5.1: Great for complex, multi-step builds and detailed debugging, when you want thorough, high-quality results. Uses more credits for each request.
- Haiku 5.5: A fast, lightweight Claude model for everyday tasks and quick changes.
- Gemini 3.8 Flash: A fast option for everyday tasks and quick changes, when you want a response back straight away.
- Gemini 4 Argon: Google’s newest Gemini model, a strong choice for complex builds and debugging.
- GPT-5.6 Terra: A cost-efficient GPT-5.6 option for complex reasoning and multi-step planning, at a lower credit cost.
- GPT-6.1 Sol: A strong GPT-6.1 option for hard reasoning and large, evolving projects.
- GPT 6 Astra: The newest and most capable GPT model, for the hardest reasoning and the most demanding builds. Uses more credits for each request.
From your first prompt
From your first prompt
- On the Base44 homepage, below the prompt box, click the model button. It shows Auto until you choose a model.
- Select the model you want, or keep Auto mode.
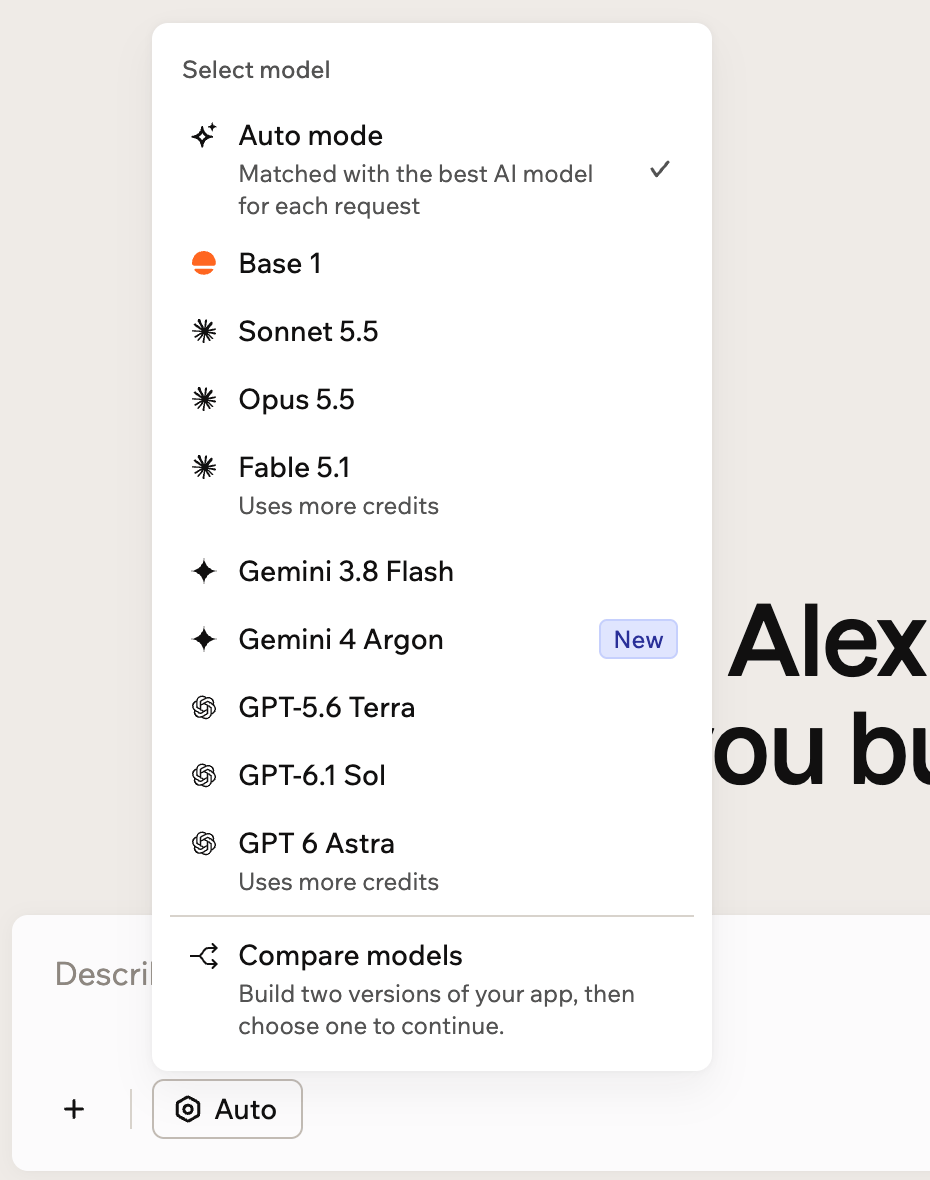
Choosing an AI model from your first prompt
While building
While building
- Go to your app editor.
- In the AI chat, click the model picker at the bottom of the panel. It shows Auto until you choose a model.
- Select the model you want to use, or keep Auto mode to let Base44 pick the best model for each request.
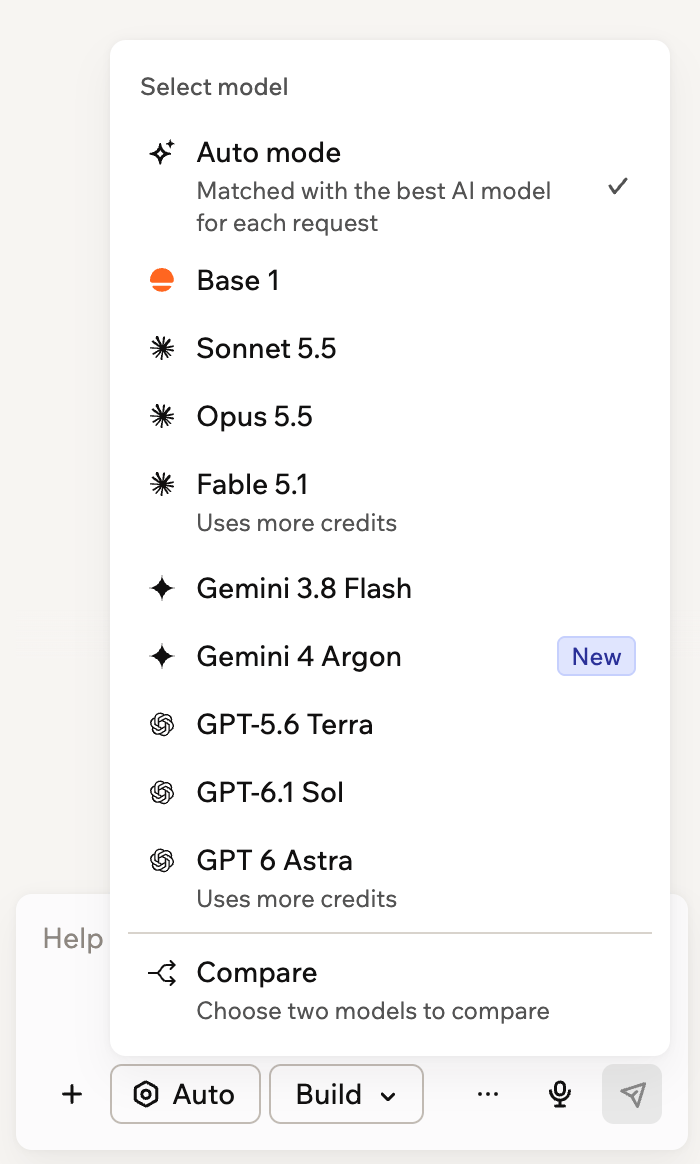
Choosing an AI model in the app editor
Setting the effort level
The effort level decides how much thinking the AI model puts into each response. Higher effort can help with hard problems, such as tricky bugs or complex logic, but responses take longer and use more credits. Lower effort is faster for quick, simple changes. Choose from these levels:- Auto: The model’s own default effort.
- Low or Medium: Quicker responses for everyday changes.
- High, Extra high, or Max: More thinking for the hardest problems.
- The effort button shows for every model you choose yourself, except Base 1 and Haiku 5.5. It doesn’t show with Auto mode or when you’re comparing models.
- Your choice is saved to your account. When you switch to a different model, it goes back to Auto.
- You can also set it from the prompt box on the Base44 homepage, before your first prompt.
- Go to your app editor.
- In the AI chat, click the effort button next to the model picker.
- Select the effort level you want.
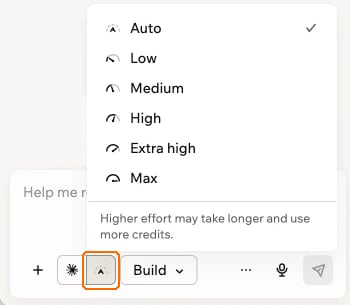
Choosing an effort level in the AI chat
Using Auto approve
Auto approve reduces interruptions while you build. With it on, most steps that would pause for your approval run on their own, and the steps that need something from you still ask. Changes that widen access to your data always ask first, even if you requested them in the chat, such as giving someone write access or loosening who can see or change a table. It covers your whole app rather than individual steps, so everyone building in it gets the same behavior. Anyone who can edit the app can turn it on or off, and the choice stays as set even if the default changes later. Anything that ran without asking is labeled auto-approved in the chat, so you can still see what happened. Click the label to manage the setting, or turn Auto approve off to review steps before they run.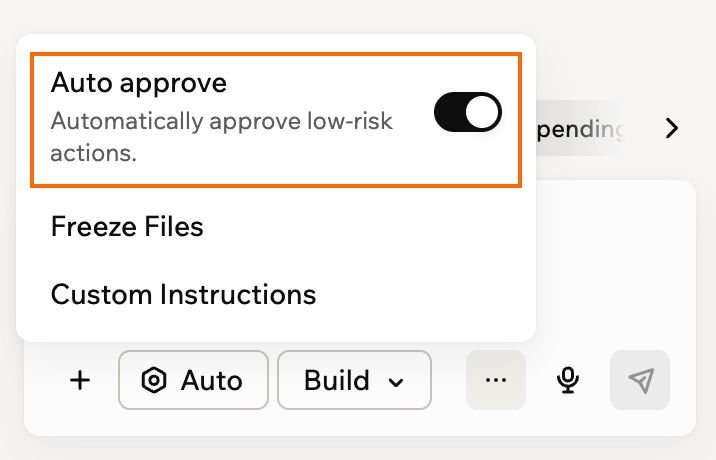
Turning Auto approve on from More options
- Click the More options icon at the bottom right of the AI chat in your app editor.
- Turn Auto approve on or off. Your choice applies immediately, so there is nothing to save.
Using suggestions
The AI chat can suggest what to write next in your message, so you can write prompts faster. This is called Autocomplete. It’s on by default, and you can turn it on or off at any time. Your choice is saved to your account, so it applies to all your apps.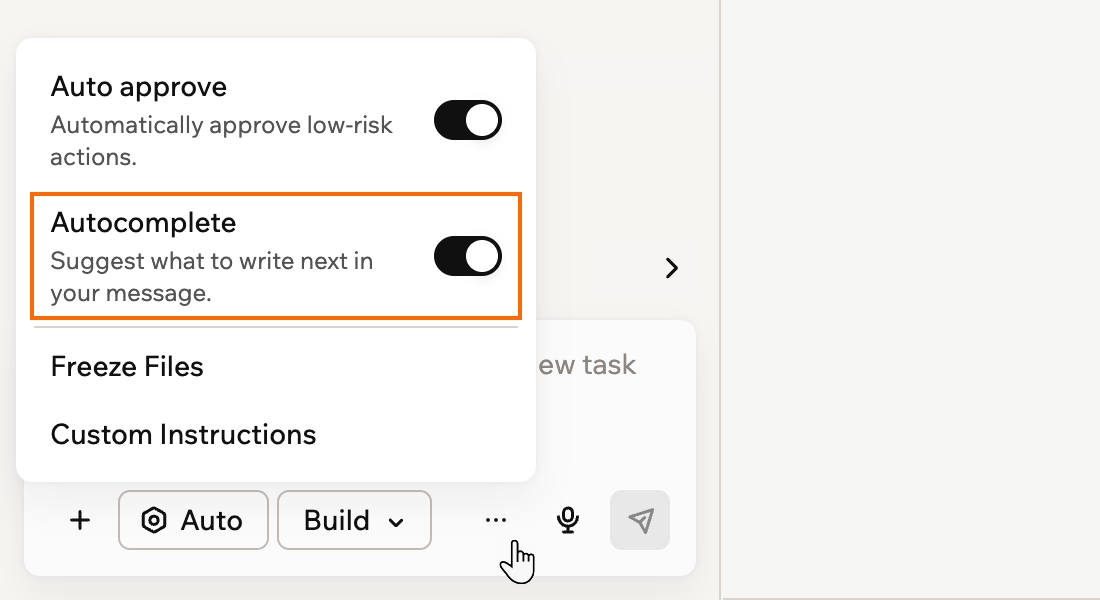
Turning Autocomplete on or off from More options
- Click the More options icon at the bottom right of the AI chat in your app editor.
- Turn Autocomplete on or off.
Freezing files
Lock files so the AI does not modify them, to protect work you want left alone. You can freeze files on main only, not on a branch. Files are grouped by type, such as pages, components, functions, entities, agents, and workflows. Pages and components make up what people see in your app, entities define how your app’s data is stored, and functions run code on the server.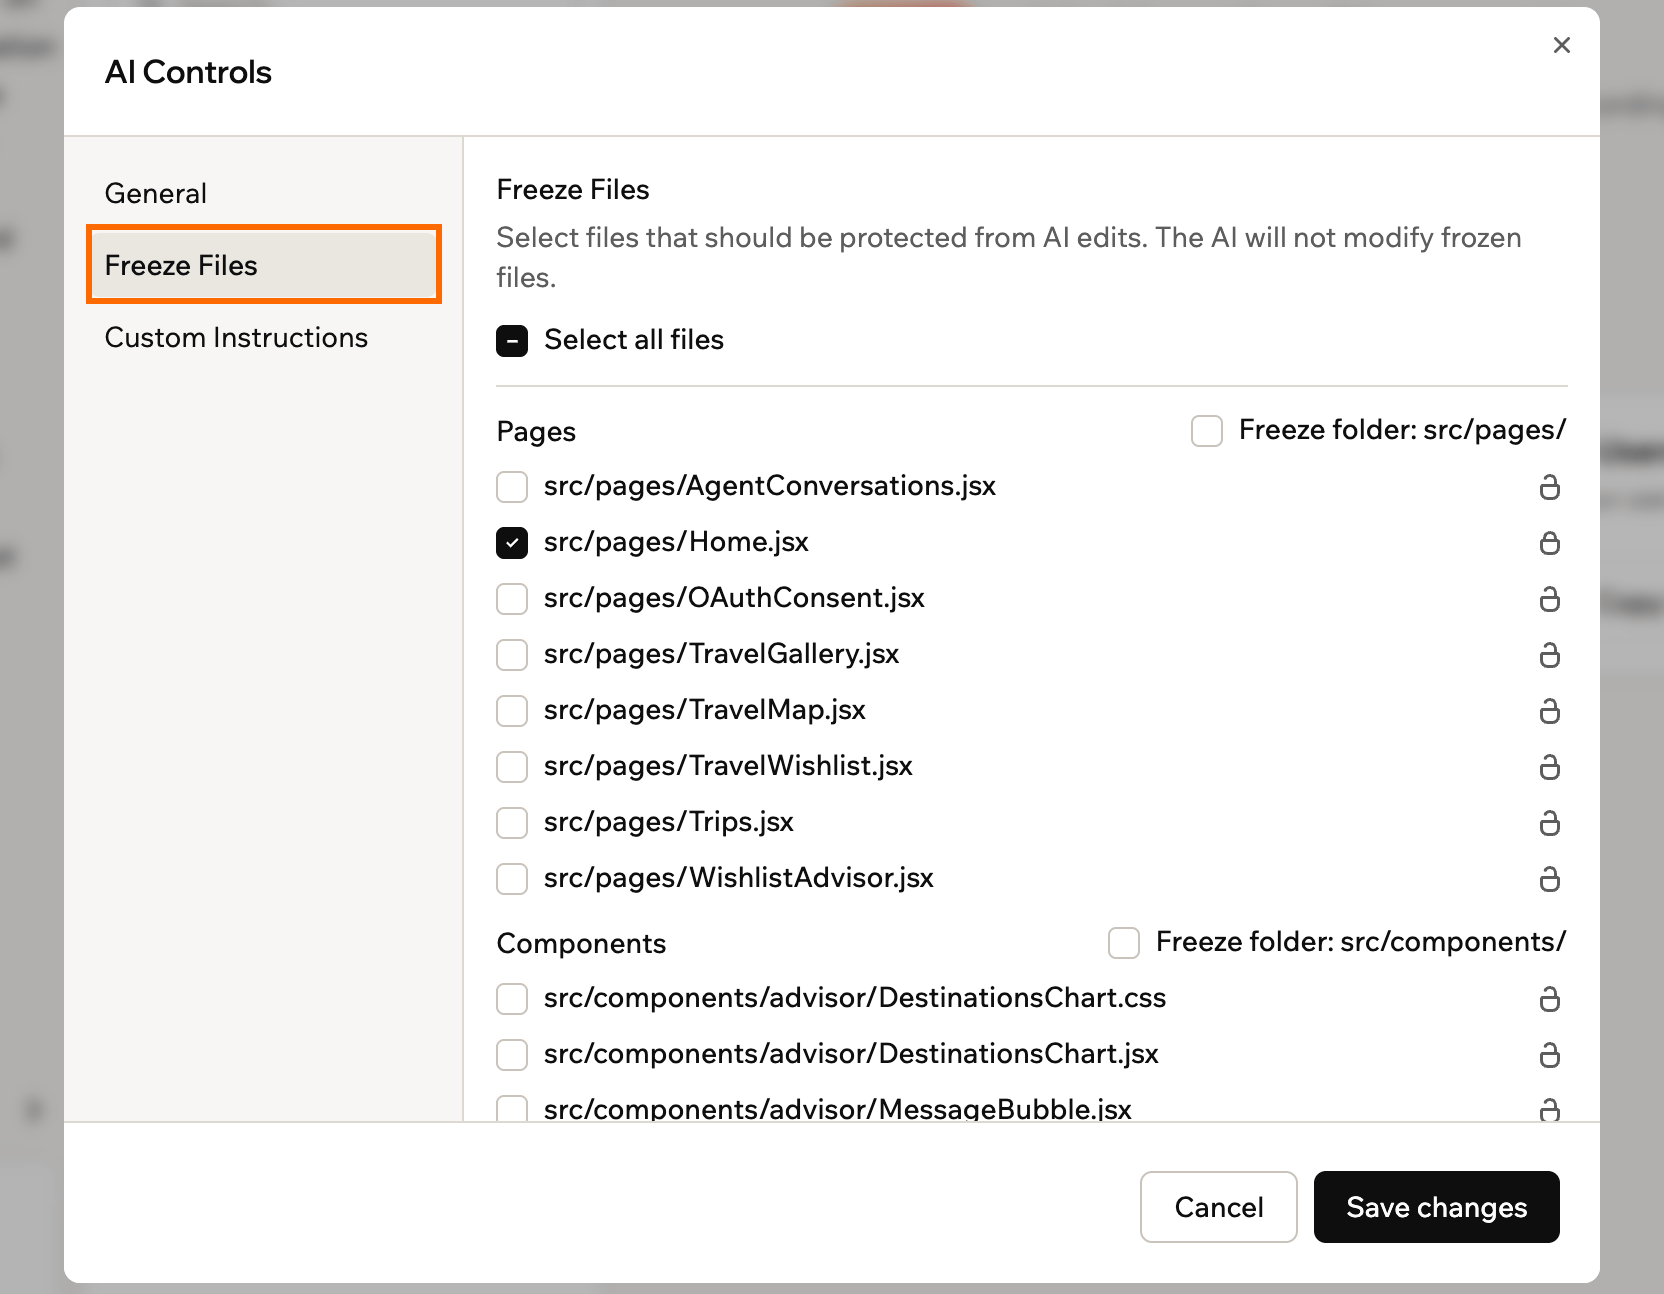
Choosing files to protect from AI edits
- Click the More options icon at the bottom right of the AI chat in your app editor.
- Click Freeze Files.
- Select the checkbox next to each file you want to protect.
- (Optional) Next to a group, select Freeze folder to lock everything in that folder, or select Select all files to lock every file in your app.
- Click Save changes.
Adding custom instructions
Add guidance the AI follows on every prompt, such as tone, design standards, or preferred behavior. You write it once, and it applies to every interaction in this app. You can add custom instructions on main only, not on a branch.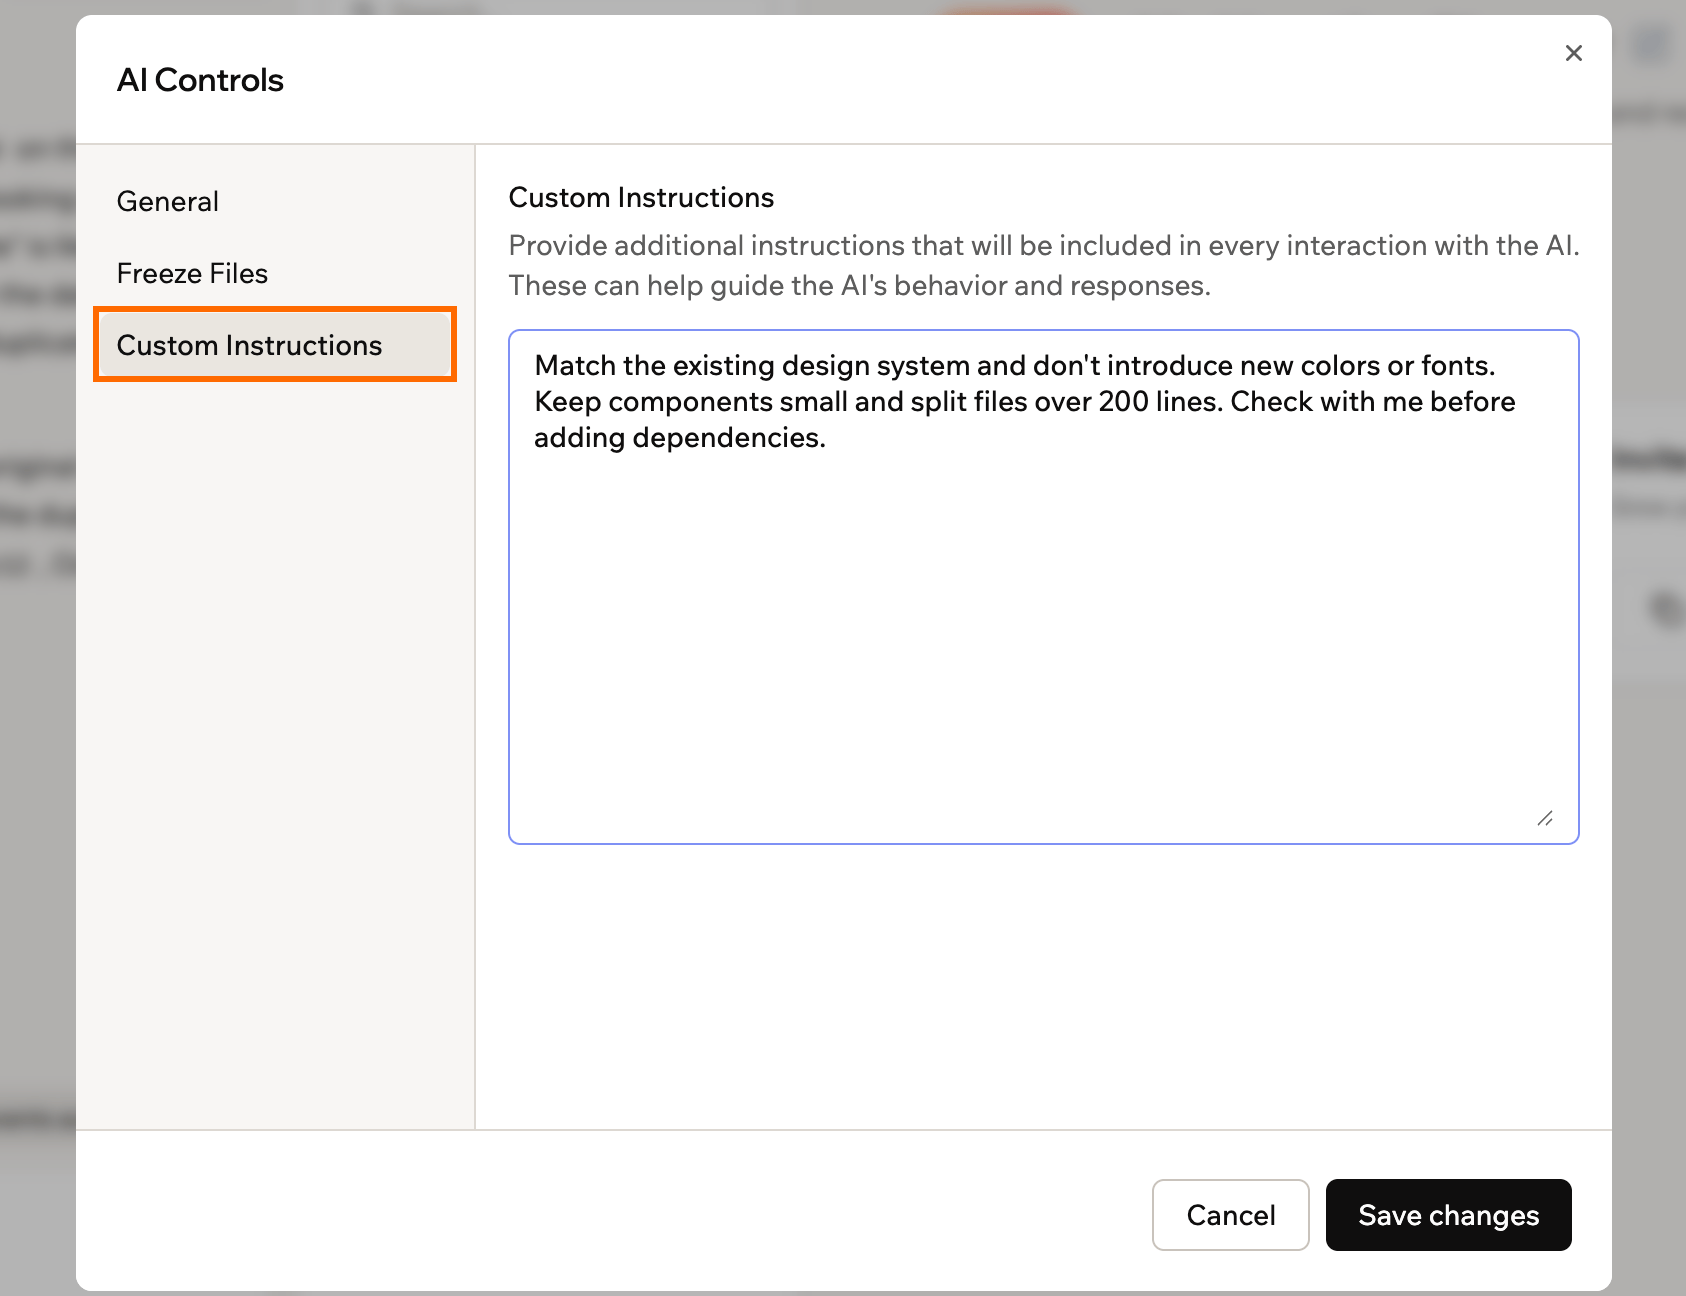
Setting instructions the AI follows on every prompt
- Click the More options icon at the bottom right of the AI chat in your app editor.
- Click Custom Instructions.
- Enter your instructions in the text box, one per line.
- Click Save changes.
Adding a skill or connector to your prompt
Type/ in the AI chat to pull a workspace skill or a connector into what you are asking for, instead of describing it in words. A skill is a saved set of instructions for the AI, shared across your workspace. A connector links your app to another tool, such as Gmail or Slack. Keep typing to filter the list, and press Enter or click to add it to your prompt.
The menu has 2 groups:
- Skills: The workspace skills available to you, so the AI chat follows those instructions for this prompt. You can add one skill to a prompt.
- Connectors: The connectors your app can use. Ones your app is already connected to show a Connected badge, and you can add more than one.
Queuing messages in the chat
When the AI chat is already working on a prompt, you do not need to wait before asking something else. You can keep typing, add more prompts, and attach files. The AI chat adds them to a message queue and sends them one by one as each response finishes.- The queue appears above the chat input and shows all pending prompts in the order they run.
- You can queue up to 7 messages at once.
- Queued messages do not send if you close the app editor. When you reopen the editor, any queued messages resume.
Comparing models
Every AI model has its own strengths and weaknesses: one might be better at design and visual polish, while another is stronger at logic and working with data. Instead of guessing which model fits your request, Compare models runs your next message on 2 models at once, so you can preview both results and keep the one you prefer. Your main app is not touched until you choose.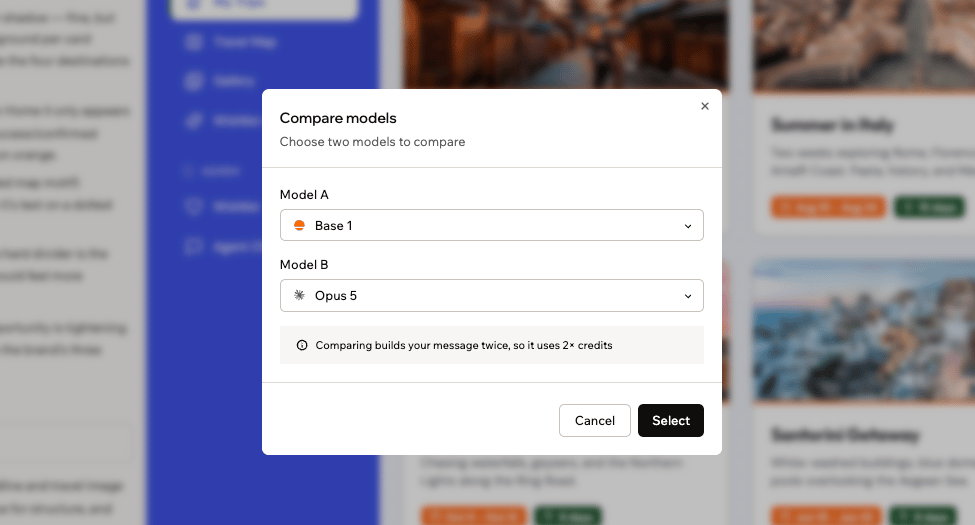
Comparing 2 models side by side
Starting a comparison
Choose which 2 models you want to compare from the model picker, then send the message you want built both ways.- Comparing requires a Builder plan or higher, the same as choosing a model manually.
- Comparing builds your message twice, so it uses 2× credits.
- Messages with attachments are not supported yet. If your message includes one, the comparison is removed and the message is sent normally.
- To cancel before sending, click the X on the model chip in the chat input.
- Open your app in the app editor.
- Click the model picker in the chat input.
- Click Compare.
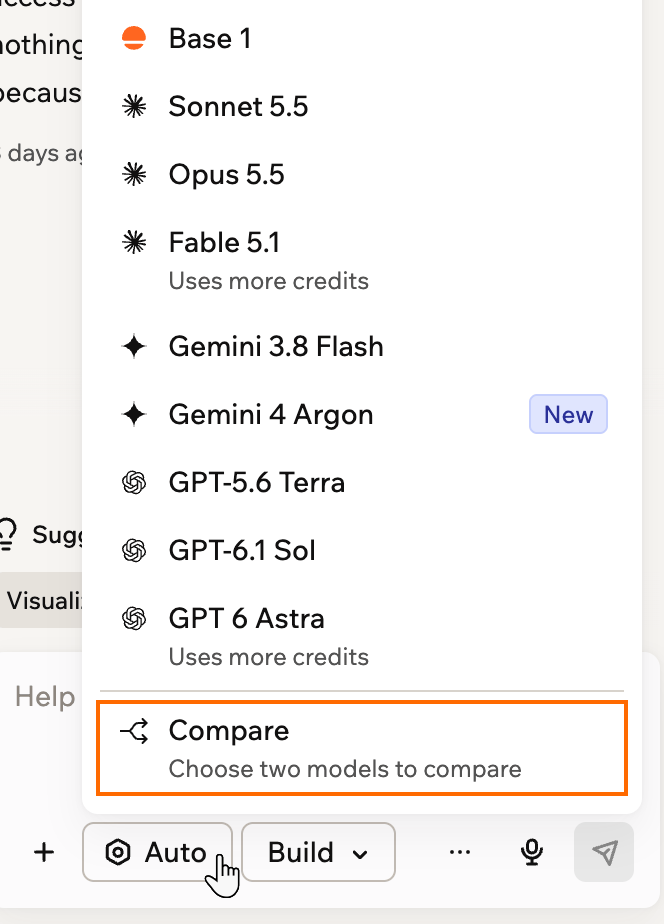
The Compare option in the model picker
- Choose Model A and Model B. They must be 2 different models.
- Click Select.
- Send your message. Base44 builds it twice, once with each model.
Choosing a version
While the 2 versions are being built, the chat shows a Comparing two versions card with each version’s status. When both are ready, the card asks Which option do you prefer? and lists the versions as Option A and Option B.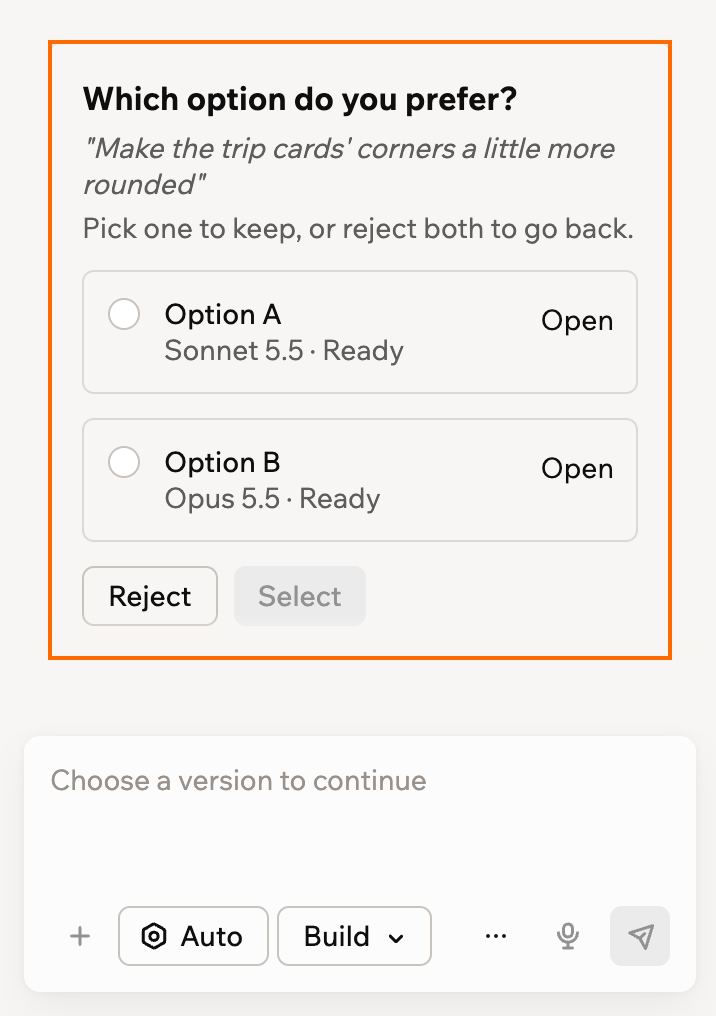
Choosing between the 2 compared versions
- Click Open on an option to preview it. Use the model tabs at the top of the preview to switch between the 2 versions, and keep chatting in a version if you want to refine it before deciding.
- Do one of the following:
- Select the version you prefer: On the card, choose Option A or Option B and click Select. The version you keep is merged into your main app, and the version you did not keep stays in your version list until you delete it.
- Reject both: Click Reject, then click Delete both to confirm. This removes both versions and their chats for good. Your main app is untouched.
Reverting changes
Experiment freely and try new ideas, knowing you can always undo your changes at any time. You can roll your app back to a specific prompt, restore a previous version into the editor, or publish a previous version directly from Version History without changing what you are currently working on.Reverting a specific prompt
Hover over the relevant message in your chat history, click the Revert icon under it, then click Confirm to roll your app back to the state it was in just before that change. Any changes made after that point are also undone, so you can quickly return to an earlier version of your app. If you want to change what you asked instead of just undoing it, click the Edit icon on that earlier message. The chat opens an Edit this message and resend panel. When you resend, Base44 reverts any changes made after that message and then applies your updated request.Restoring or publishing a previous version
Your draft is the version you’re working on in the app editor, and your live app is the published version people use. Click the Version History icon at the top of the chat to open your version list. From there you can preview versions, publish a previous version without changing your current draft, revert your editor to an older version, view or compare the code, or jump back to the chat message that created that version. Click a version in the list to load it in the preview. For each version, click the More actions icon and choose:- Publish this version: Publish this version to your live app while keeping your current draft open in the editor so you can keep working.
- Revert to this version: Replace your current draft in the app editor with this version.
- Code changes: See which files this version changed compared with the version before it, and what changed in each one.
- Compare code vs main: On a branch, see how this version’s code differs from main.
- View code: Open the code for this version.
- Go to message in chat: Jump to the chat message that created this version. This appears on versions created from the chat.

Comparing a version with the one before it
Checking unpublished changes
Before you publish, you can check exactly what has changed since your last publish. Base44 opens an Unpublished changes window that lists every file that differs from your live app and what changed in each one. This option appears when your app is published and you are working on main, not on a branch. To compare your draft with your live app:- Click the More actions icon at the top right of your app editor.
- Click Compare with live code.
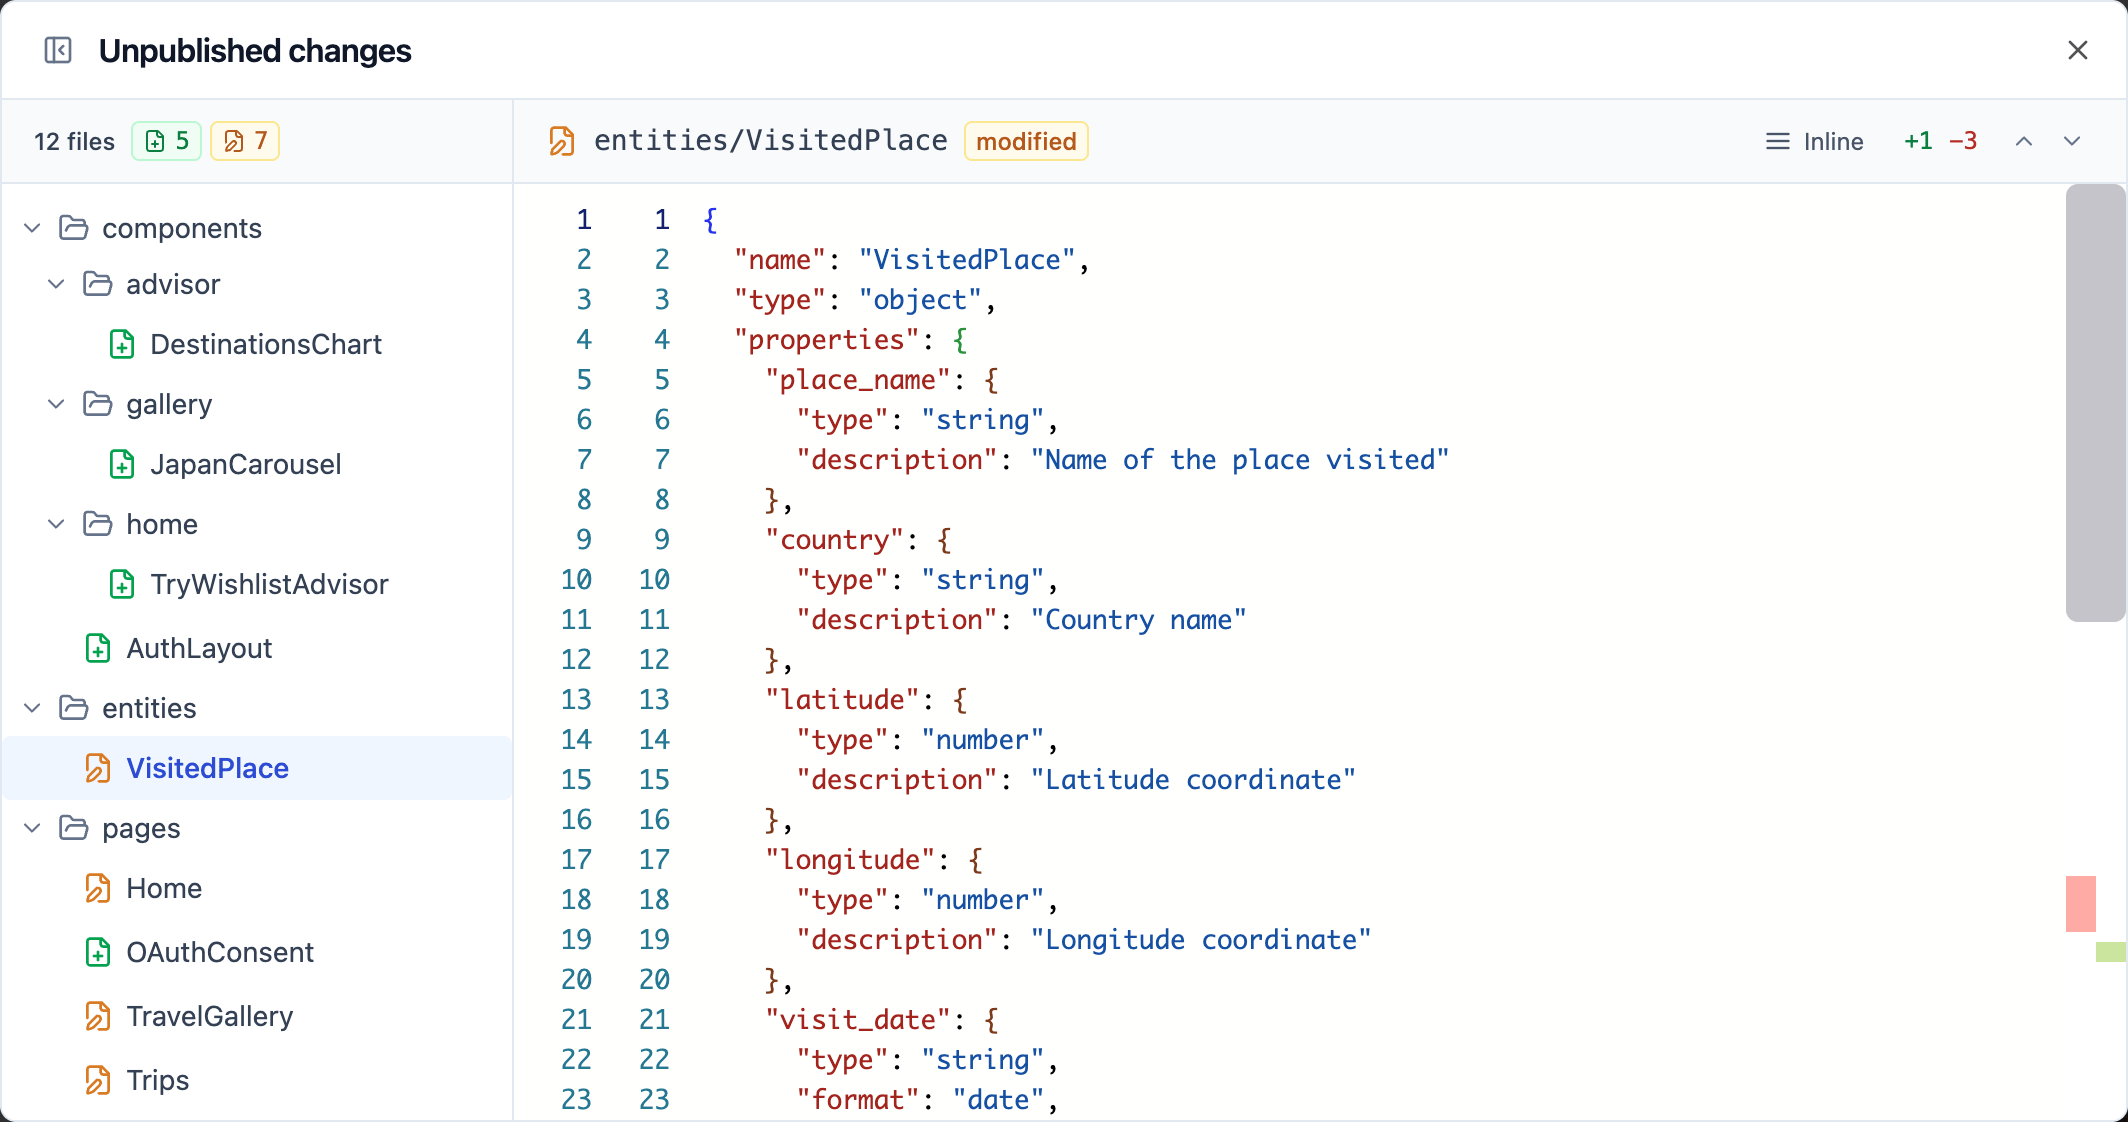
Checking what changed since your last publish
FAQs
Click a question below to learn more about AI chat modes and controls.Why can't I start a model comparison?
Why can't I start a model comparison?
- Your app needs at least one build. Build something first, then compare.
- Comparisons start from your main version. If you are on a branch, switch back to main.
- Model A and Model B must be 2 different models, and both must be available for comparison.
- Imported apps are not supported yet.
What happens when there's a code error in my app preview?
What happens when there's a code error in my app preview?
How can I fix my app if it freezes or the chat gets stuck?
How can I fix my app if it freezes or the chat gets stuck?
- Refresh the page to reload your latest working version.
- Clear your browser cache and reload your app to remove any stored conflicts.
- Try a private window or another browser to rule out extension conflicts.
- Disable browser extensions temporarily if the issue persists.
- Check your credits and plan limits, since running out of credits can interrupt AI actions.
- Revert the last AI action in the chat by clicking the Revert icon under that message, or use Version History to roll back to a stable version.
Can I request credit refunds for AI mistakes?
Can I request credit refunds for AI mistakes?
What can the Base44 agentic AI do with its tools?
What can the Base44 agentic AI do with its tools?
- Read, create, update, and delete records in your app’s database. It can filter, sort, paginate, or update or delete in bulk. For example, add test people, mark old messages as read, or remove expired records.
- Perform web searches to find relevant documentation or features. This works like a search engine with relevant pages, titles, and descriptions.
- Fetch website data from any URL. Retrieve markdown or HTML, for example to scrape documentation or get live page content.
- Smart file search. Quickly find files or code snippets needed for your workflow.
- Read the contents of any project file before editing. This is useful for reviewing your app’s code structure.
- Modify files in your project. Edit pages, components, entities, functions, or layouts, and support targeted partial edits. For example, fix bugs, add features, or update styling.
- Inspect logs and console output to help with debugging or understanding errors.
- Set or update environment variables and secrets as needed. For example, add or update API keys like
OPENAI_API_KEYorSTRIPE_SECRET_KEY.
Are there things the Base44 agentic AI cannot do?
Are there things the Base44 agentic AI cannot do?
How is the time zone determined or managed in the app editor?
How is the time zone determined or managed in the app editor?
Can I speak to the AI chat instead of typing?
Can I speak to the AI chat instead of typing?
How does automatic model selection work?
How does automatic model selection work?
- For small visual or copy tweaks, it chooses fast, efficient models that optimize for speed and responsiveness.
- For larger architectural changes or data flows, it uses deeper reasoning models that can plan across files, entities, and logic.
- When something fails or runs into an error, it can switch strategies or models to recover and try again.