


Connecting your app to external tools
You need a Builder plan or higher to use connectors.
About connectors
Connectors link your app to the tools you already use. Some connections use Base44-managed authorization. If you use your own OAuth application, configure its credentials and scopes in your workspace.Connector types
There are 2 types of connector, based on whose account the connection uses.Connectors for app users
Each person using your app connects their own account. The app acts on their behalf, and their data stays private to them.Best for per-user actions, like a CRM where each sales rep sends email from their own Gmail.
Connectors for app builders
You connect a tool once at the workspace level, and the app uses that one connection for everyone.Best for a shared account or a data platform, like Slack alerts to your team’s channel, or a dashboard that queries Snowflake.
Connectors for app users
Connectors for app builders
Whose account
Each person’s own account
One account, connected once
Who connects it
Every person, the first time they use it
You, at the workspace level
Data the app sees
Only that person’s data, per their granted access
The single connected account’s data, shared across the app
Typical use
A CRM where reps use their own Gmail
Slack team alerts, or a Snowflake dashboard
Browsing available connectors
Find connectors in the Integrations tab of your app’s dashboard. Search for a specific connector or use the filter to sort the list. On the Browse tab, click Use to view example prompts for a connector. Connectors already used by your app show a check on their card and Used by this app in the connector details. You can also tell the AI chat what you want to connect and how you want to use it, and get relevant suggestions based on your app’s structure, pages, and data. To browse the full list with categories and example prompts, see the connectors catalog.Send reports and alerts
Email reports, alerts, or summaries through Gmail or Outlook.
Generate documents and files
Create documents, spreadsheets, presentations, or files using Google Workspace tools.
Manage events and availability
Create and manage events or availability using Google Calendar or Outlook.
Notify your team
Send notifications or updates to teams through Slack.
Track code and issues
Track code activity, issues, and pull requests with GitHub.
Query data and build dashboards
Query external data and build dashboards with Snowflake or Databricks.
Request a connector
You can also request a connector to add to Base44. Go to Integrations in
your app’s dashboard and click Request a connector at the bottom.
How connectors work in your app
Once you connect a tool, you can reuse it across pages, flows, and backend functions. In the AI chat, ask Base44 to build pages, tables, dashboards, or automations that read from or write to the connector. When you include a connector in a flow, Base44 creates a backend function in Dashboard → Code → Functions. Open that function to review the generated code. You can edit it yourself or prompt the AI chat to update it. For example: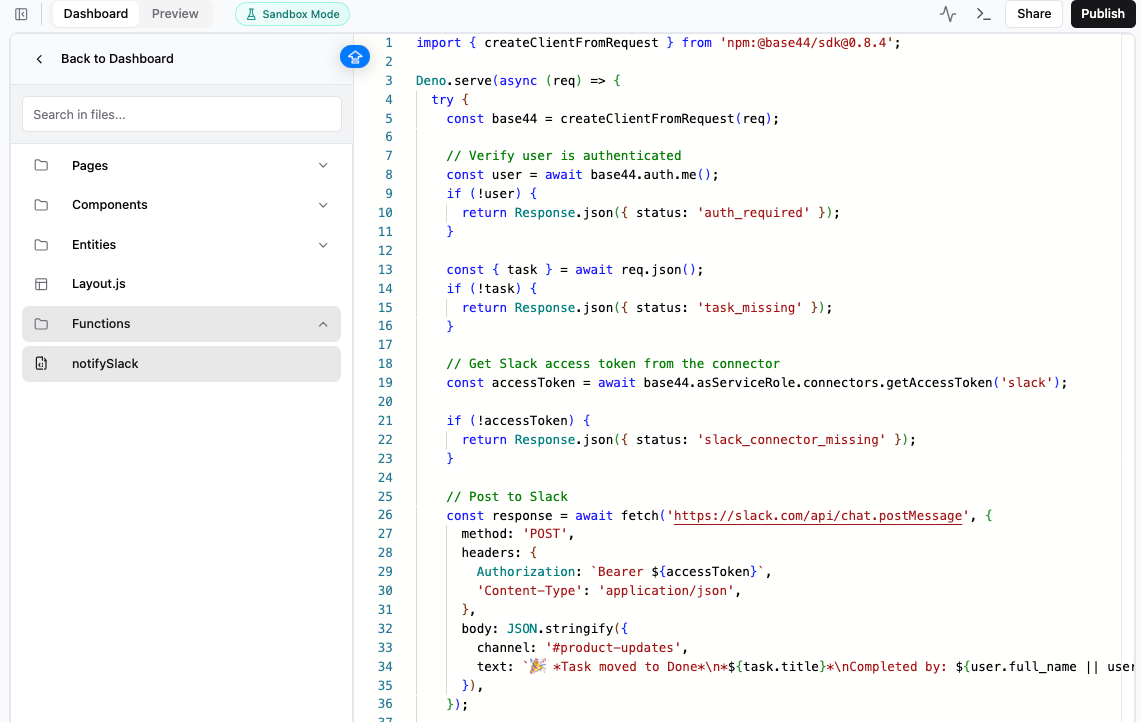
Slack connector in backend functions
Setting up custom OAuth for app users
When you use your own OAuth credentials, create a connection in your workspace settings. Each person using your app then authorizes their own account inside your app. Before you start, register an OAuth application with the provider and get its credentials. Add the callback URL to the provider’s allowed redirect URIs. To add a connector with your own OAuth credentials:- Open your workspace settings.
- Click Connectors under Build tools.
- Under Connectors For App Users, click Add Connector.
- Select the service, then click Add Connector on its details screen.
- Enter a Connector name to identify this configuration.
- Enter your Client ID and, if required, Client Secret. Complete any other fields shown for your connector.
- Choose permissions in Selected scopes. For permissions not listed, enter one scope per line in Additional scopes.
- Click Add Connector.
Registering callback URLs
When you set up a connector with your own OAuth credentials, you register a callback URL with your OAuth provider so it knows where to send people back after they authorize. Base44 uses one callback URL for every app in your workspace. Keep your Client Secret private. Do not share it or include it in screenshots.Using the single callback URL
Every connector you add uses one callback URL for all of your apps, so you register it with your OAuth provider once and it keeps working as you build more apps and connect custom domains. Add this URL to your OAuth provider’s allowed redirect URIs:Viewing your callback URLs
You can check the single callback URL at any time, and look up the per-app URLs for a specific app. To view your callback URLs:- Click your workspace name at the bottom left.
- Click Settings.
- Click Connectors under Build tools.
- Under Connectors For App Users, click View redirect URIs for your apps.
- Find the single callback URL under Callback URL.
- (Optional) Expand Per-app URLs (for legacy connectors), then select an app to see its per-app URLs.
Switching an older connection
Connections you added before August 17, 2026 register a separate URL for each app host, and they show a Per-app URLs badge next to their name. Each connection is switched over on its own, so one connector can have some connections on the single callback URL and others still on per-app URLs. Switching is worth doing if you are adding apps or custom domains and are tired of registering a new URL each time. If your setup is stable and working, there is no need to switch. Existing connections keep working on their per-app URLs for as long as you leave them there. To switch a connection to the single callback URL:- Click your workspace name at the bottom left.
- Click Settings.
- Click Connectors under Build tools.
- Under Connectors For App Users, next to the connector, click View.
- Under Connections, next to the connection you want to switch, click Edit.
- Under Callback URLs, click Switch to a single URL.
- Add the URL shown to your OAuth provider’s allowed redirect URIs.
- Select I’ve added the URL to my OAuth provider, then click Switch.
To move a connection back later, open it again and click Switch back to per-app URLs. Check that your provider still has the per-app URLs registered first, because a connection created on the single callback URL may never have had them.
Choosing Google scopes
Google sorts the permissions an app can ask for into 3 groups, and which group you land in decides how much you have to do before your app can go live. This matters most for Gmail, Drive, Calendar, and Google Fit. If you connect Google using your own Google Cloud project rather than Base44’s managed connector, your app is the one registered with Google, so anything Google asks for here is asked of you rather than of Base44.
That yearly assessment is called CASA, and it is run by the App Defense Alliance rather than by Google. It looks at your whole application, including how people sign in, how sessions are handled, and how third party code is managed.
Plan for this before you build rather than after. Verification takes weeks rather than days, and until it clears, Google caps your app at 100 users and shows everyone an unverified-app warning.
Where Base44 fits in:
- Your Google Cloud project, your OAuth app, and your verification are yours to manage. Base44 cannot submit them on your behalf.
- An assessment asks about the platform your app runs on as well as your own code. Contact support early if you are working through one, so the right people can help.
Managing your connectors
From Integrations in your app’s dashboard, you can view and manage your app’s connectors, review what each can access, and switch, disconnect, or reconnect the connected account per tool as needed. For connectors for app builders, reconnect from Integrations → My integrations. For connectors for app users, each person reconnects their own account from inside your app. To manage a connector:- Go to your app’s dashboard.
- Click Integrations.
- Click the My integrations tab.
- Find the connector.
- Click the More actions icon (
···) and choose an option:- View access to see the connector’s current permissions.
- Switch account to connect a different account.
- Reconnect to restore an expired connection.
- Disconnect to remove the connection from this app.
- Remove to delete the connector.
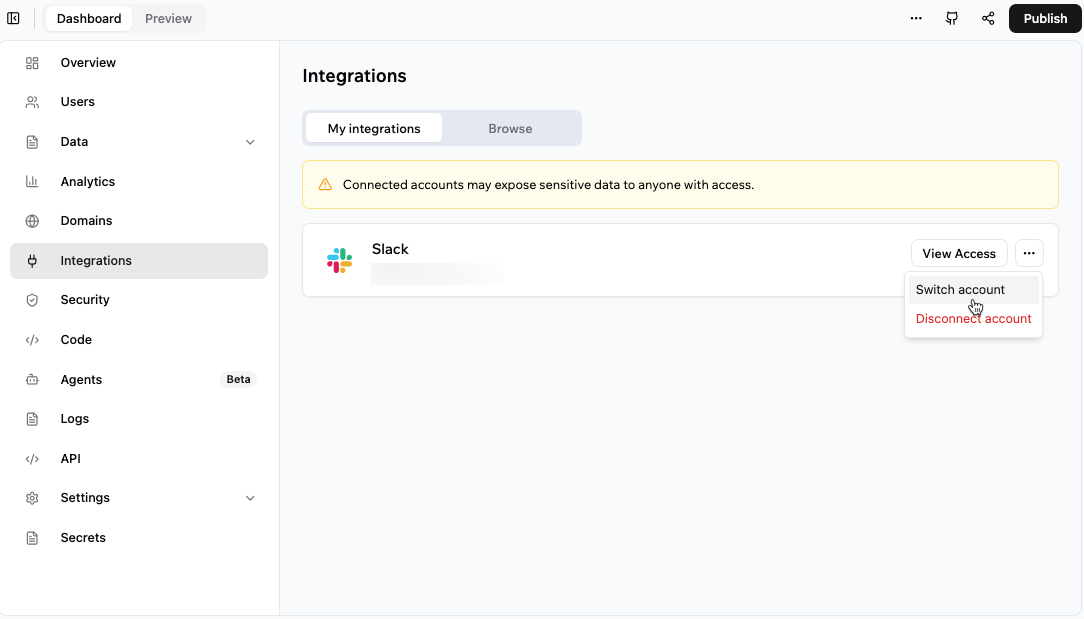
Viewing and managing your app connections
Managing workspace OAuth configurations
Workspace OAuth configurations are separate from the accounts connected inside an app. You can edit their credentials and scopes, add another named configuration, or remove a configuration. To manage a workspace OAuth configuration:- Open your workspace settings.
- Click Connectors under Build tools.
- Under Connectors For App Users, click View next to the connector.
- Under Connections, click Edit next to the configuration.
- Update the name, credentials, or scopes. Leave Client Secret empty to keep the existing secret.
- Click Save Changes.
- (Optional) Click Add Connection on the connector page to add another named configuration. Complete the form, then click Add Connector.
Controlling workspace availability
The steps above manage the connectors in one app. On an Enterprise plan (Business or Enterprise), workspace owners and admins can also decide which external services are available across the whole workspace, so a connector you disable is blocked everywhere it is used, including in apps, Superagents, and in-app agents. You can review which apps rely on a connector before you disable it, and you can allow or block several connectors at once. The 2 credential types are managed separately, so a service can stay enabled as a Shared Credential while being disabled as an App User Credential. For the steps, see Managing connector availability for your workspace.FAQs
Common questions about connecting tools to your app.Can I connect multiple tools to my app?
Can I connect multiple tools to my app?
Yes. You can connect multiple tools to the same app.
Why do I need to reconnect a connector?
Why do I need to reconnect a connector?
You may need to reconnect if the account was disconnected, its access was revoked, or the connected service requires you to sign in again. For the steps, see Managing your connectors above.