

Step 1 | Get started with SSO
Single Sign-On (SSO) lets people sign in to your Base44 app using an external identity provider that supports OpenID Connect (OIDC), such as Google, Microsoft, GitHub, Okta, Apple, or Kakao, instead of creating a separate login for your app.Notes:
- Single sign-on (SSO) for apps is available on an Enterprise plan (Business or Enterprise). Workspaces created before October 1, 2026 keep their earlier plan requirement, the Elite plan or higher.
- To connect a provider such as Kakao through SSO, you need your own account with that provider and an app configured there. You are responsible for creating and managing the client ID, client secret, redirect URI, and any other credentials in your identity provider’s dashboard.
- Go to your app editor in Base44.
- Check your browser’s address bar and find the app ID between
/apps/and/editor/in the URL. - Build your redirect URI by replacing
{{APP_ID}}in this format with your app ID:https://app.base44.com/api/apps/{{APP_ID}}/auth/sso/callback
Example: From app URL to redirect URI
Example: From app URL to redirect URI
With the app editor open, the URL might look like this:
https://app.base44.com/apps/686404784ac37377589a1f7f/editor/...Here, 686404784ac37377589a1f7f is the app ID. Plug that into the format:https://app.base44.com/api/apps/686404784ac37377589a1f7f/auth/sso/callbackThis is the redirect URI you’ll enter with your SSO provider.About callback URLs:
- Register every URL Base44 lists with your identity provider as an allowed redirect URI. Some providers, such as ClassLink, reject a login when the redirect URI does not exactly match a registered value.
- By default, an SSO login runs through
app.base44.comeven when your app has a custom domain. To keep it on your own domain, turn on Use this app’s custom domain as the SSO callback. This is off by default, and you need a verified custom domain on the Domains tab before you can turn it on. When you do turn it on, register the custom-domain callback URL with your provider as well. - Most providers, including Google, Microsoft, and Okta, work with the default. Turn the custom domain callback on for providers that require the redirect URI to match your domain, such as ClassLink, Clever, and strict Azure or Entra policies.
- If your app uses your workspace SSO provider instead of its own, Base44 shows a workspace app login callback URL. Ask your workspace admin to add that URL to the workspace identity provider. Learn more about enforcing SSO across all workspace apps.
Step 2 | Choose your provider
Start by choosing the identity provider your team already uses. You can pick a built-in option (Google, Microsoft, GitHub, or Okta), or use Advanced / Manual configuration to connect any OIDC provider, including Kakao, or your own IdP.Google Workspace
Allow sign-in with Google Workspace accounts.
Microsoft 365 / Entra ID
Allow sign-in with Microsoft 365 or Entra ID.
GitHub
Allow sign-in with GitHub accounts.
Okta
Allow sign-in with your Okta directory.
Advanced / Manual configuration
Connect any OIDC-compatible provider such as Kakao, or a custom IdP using custom endpoints.
Google Workspace
Use Google Workspace as your SSO provider with an OAuth 2.0 Web application. First, create an OAuth 2.0 client in Google Cloud Console for your project, then add those credentials in Base44. To set up Google Workspace SSO in Base44:- In your app editor, click Dashboard.
- Click Settings.
- Click Authentication.
- Click Set Up next to Single sign-on (SSO).
- In Select SSO provider, choose Google Workspace.
- Enter your Client ID and Client Secret from Google.
- Keep Scope as
openid email profile. - Leave Discovery URL set to the default value.
- Click Enable SSO.
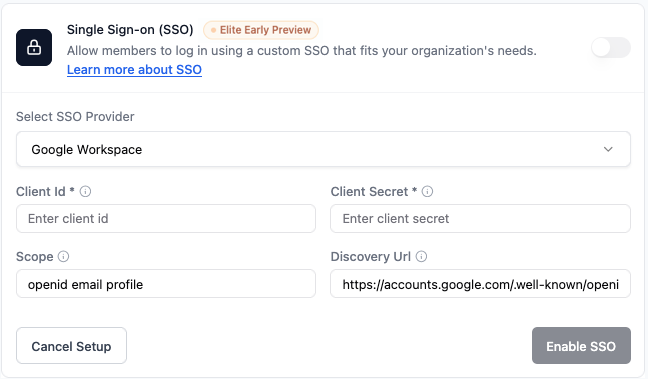
Google Workspace SSO settings in your Base44 app
Microsoft
Setting up SSO for an enterprise workspace rather than a single app? See SSO for Microsoft Entra ID.
- In your app editor, click Dashboard.
- Click Settings.
- Click Authentication.
- Click Set Up next to Single sign-on (SSO).
- In Select SSO provider, choose Microsoft Azure AD.
- Enter your Azure Client ID (Application (client) ID) and Client Secret.
- In the Tenant ID field, enter a value based on which accounts you want to allow:
- Your directory (tenant) ID from Azure: Only people from your specific organization.
common: Personal Microsoft accounts and work/school (Microsoft 365) accounts.organizations: Work and school accounts only (Microsoft 365).
- Keep Scope as
openid email profile. - The Discovery URL fills in automatically based on the tenant ID you entered. Confirm it looks correct before continuing.
- Click Enable SSO.
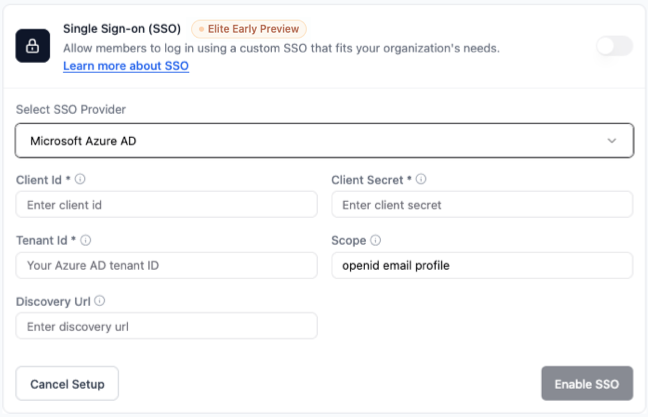
Microsoft Azure AD SSO settings in your Base44 app
GitHub
Use a GitHub OAuth app as your SSO provider. Create an OAuth app in GitHub Developer Settings, then connect it in Base44. To set up GitHub SSO in Base44:- In your app editor, click Dashboard.
- Click Settings.
- Click Authentication.
- Click Set Up next to Single sign-on (SSO).
- In Select SSO provider, choose GitHub.
- Enter your GitHub Client ID and Client Secret.
- Keep Scope as
user:email. - Keep the default Auth Endpoint, Token Endpoint, and Userinfo Endpoint values for GitHub.
- Click Enable SSO.
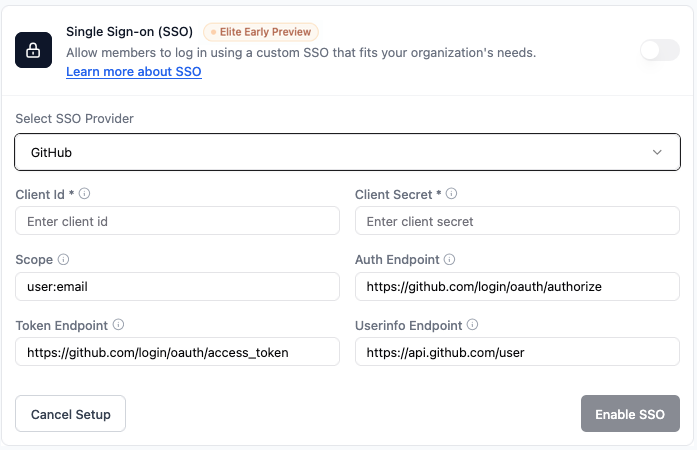
GitHub SSO settings in your Base44 app
Okta
Use Okta as your SSO provider. In your Okta Admin Console, create an OIDC Web application for your Base44 app, then add the credentials in Base44. To set up Okta SSO in Base44:- In your app editor, click Dashboard.
- Click Settings.
- Click Authentication.
- Click Set Up next to Single sign-on (SSO).
- In Select SSO provider, choose Okta.
- Enter the following:
- Client Id: Your Okta client ID.
- Client Secret: Your Okta client secret.
- Okta Domain: Enter this in whichever form matches your Okta org:
- Your Okta subdomain, for example
your-company. - Your full custom Okta URL domain, for example
login.your-company.com. - The issuer URL including the authorization server path, for example
https://login.your-company.com/oauth2/default, if your Okta org uses API Access Management with custom authorization servers.
- Your Okta subdomain, for example
- Scope: Keep
openid email profile. - Discovery URL: This is generated from your Okta domain and marked Auto. You can edit it if you need to point Base44 somewhere else, and it then shows as Modified. To go back to the generated value, click Reset to auto.
- Click Enable SSO.
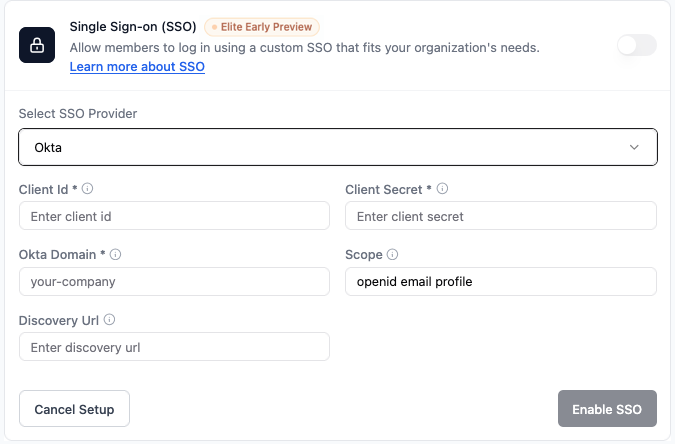
Okta SSO settings in your Base44 app
Advanced / Manual configuration
Use Advanced / Manual configuration to connect any OIDC compatible identity provider that is not covered by the built in options. This includes providers such as Kakao, as long as they support OIDC and you configure them with the correct details from your provider. To set up Advanced / Manual configuration in Base44:- In your app editor, click Dashboard.
- Click Settings.
- Click Authentication.
- Click Set Up next to Single sign-on (SSO).
- In Select SSO provider, choose Advanced / Manual Configuration.
- Fill in the following fields using your provider’s values:
- Name: A name for this SSO configuration (for example,
Auth0,Keycloak,Kakao, or your identity provider name). - Client Id: Your OIDC client ID.
- Client Secret: Your OIDC client secret.
- Scope: Keep
openid email profile. - Discovery URL: Your provider’s discovery URL, if available.
- Auth Endpoint, Token Endpoint, Userinfo Endpoint, Jwks Uri: If you are not using a discovery URL, paste each endpoint from your provider’s documentation.
- Name: A name for this SSO configuration (for example,
- Click Enable SSO.
- Use PKCE (recommended): Adds the standard OAuth 2.1 PKCE challenge to login. Turn it off only for providers that reject unknown OAuth parameters, such as ClassLink or older Shibboleth and ADFS deployments.
- Request offline access: Asks your provider for a refresh token. Turn it off only for providers that reject it, such as the ones above. It has no effect for providers that use
response_mode=form_post, such as Apple.
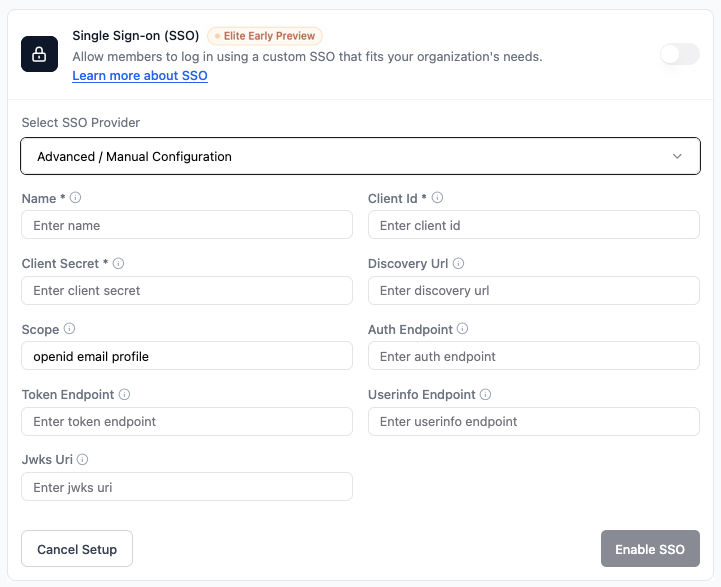
Advanced / Manual SSO configuration in your Base44 app
Step 3 | Test your SSO login
After setting up SSO, test that everything works as expected. To test your SSO login:- Log out of your app if you are currently signed in.
- Go to your app’s login screen.
- Click Log in with SSO or select the provider you configured.
- Sign in using an email address from your approved domain.
Automatically giving access to your app
Give people access to your app as soon as they sign in through SSO, with no invite. Auto-admit is a per-app setting that overrides your workspace default. It is off by default. To set the workspace default for all private SSO-only apps, see automatically giving access to private apps. To automatically give access to your app:- Go to your app’s Dashboard.
- Click Settings.
- Click Authentication.
- Next to your SSO provider, click Configure.
- Click the Auto-admit SSO users toggle.
- Click Save SSO Settings, or Enable SSO if the app uses your workspace SSO provider.
Notes:
- Turning off auto-admit stops new people being admitted. It does not remove anyone who already has access. To stop someone signing in again, remove or suspend them in your identity provider.
- If your workspace enforces SSO for all apps, Auto-admit SSO users takes effect immediately. If the setting is disabled, check that the app is private and that SSO is the only enabled sign-in method.
FAQs
Click a question to learn more about SSO.Do I need to set up SSO if I only use one login?
Do I need to set up SSO if I only use one login?
No, SSO is optional. You can continue using your existing login method if it works for you. If you want your team to log in with Google, Microsoft, GitHub, Okta, or another OIDC provider, you can set up SSO and configure the provider you use.
What is a redirect URI and where do I use it?
What is a redirect URI and where do I use it?
A redirect URI tells your identity provider (like Google or Microsoft) where to send people after they log in. You enter it when you set up SSO in your provider’s dashboard. It should look like this:
https://app.base44.com/api/apps/{{APP_ID}}/auth/sso/callbackMake sure to replace
{{APP_ID}} with your actual Base44 app ID.What is a discovery URL and do I need to add it?
What is a discovery URL and do I need to add it?
A discovery URL tells Base44 how to connect to your identity provider. It helps Base44 automatically find the right endpoints and configuration values. You only need this for some providers.
- For Google, you do not need to enter a discovery URL. Base44 handles it automatically.
- For Microsoft (Azure / Entra ID), the discovery URL fills in automatically based on the tenant ID you enter. The format is
https://login.microsoftonline.com/{TENANT_ID}/v2.0/.well-known/openid-configuration, where{TENANT_ID}is your directory tenant ID,common, ororganizations. - For Okta, the discovery URL fills in automatically from your subdomain, but many setups need a different URL (usually the
/oauth2/defaultform) so Okta returns your email. See the Okta setup notes for the exact format. - For GitHub, you can leave the discovery URL field blank.
- For Advanced / Manual providers such as Kakao, follow your provider’s documentation. If they give you a discovery URL, paste it into the Discovery URL field. If not, enter the individual endpoints instead.
If your provider gives you a discovery URL, paste it into the Discovery URL field in your Base44 SSO settings. If not, you can leave it empty and fill in the endpoints manually.
What if I see an error when logging in using SSO?
What if I see an error when logging in using SSO?
Check the following:
- Your redirect URI in Base44 exactly matches the one in your provider’s dashboard.
- Your client ID, client secret, and, if used, Discovery URL are correct.
- The scope is set as
openid email profilein both your provider’s configuration and in Base44 (or an equivalent email scope).
Why does the Google login still show "base44.com" instead of my app name after setting up custom SSO?
Why does the Google login still show "base44.com" instead of my app name after setting up custom SSO?
If Google still shows
base44.com as the app name or badge, your custom Google project has not been fully approved yet. Once Google approves your project, your app’s own name or branding appears instead of base44.com.How can I make sure my app name appears in the Google login instead of "base44.com"?
How can I make sure my app name appears in the Google login instead of "base44.com"?
Finish setting up your custom SSO, publish your app, and submit your Google project for approval. After Google approves the project, your app name or branding appears during sign-in instead of
base44.com.Which applications commonly use SSO or OAuth?
Which applications commonly use SSO or OAuth?
Many services support SSO or OAuth when working with enterprise or managed accounts, including: Langfuse, OpenAI, Anthropic, Mongo, Mixpanel, Mintlify, SendGrid, FeatureBase, Cloudflare, Logfire, GitHub, GCP, Render, AWS, Deno, Gong, Appspot, DocuSign, and Modal.