

hello@yourhairsalon.com instead of your personal Gmail address. Buy a business email on your custom domain directly in Base44, and get a full Google Workspace account with Gmail, Calendar, Drive, Meet, and Docs.
Buying a business email
Buy your business email in your app dashboard. Choose how many users you need, pick a Google Workspace plan and billing cycle, then pay. To buy a business email:- Click Dashboard in your app editor.
- Click Domains.
- Click Get a business email next to Business email.
- If you have more than one domain, choose your domain and click Select.
- Choose how many users to include.
- (Optional) Set a custom address for each user, such as
info@yourdomain.com. You can set these later instead. - Click Continue.
- Click Select on a plan: Business Starter, Business Standard, or Business Plus.
- Choose a billing cycle and click Continue to Checkout. Longer cycles, such as yearly or 2 years, cost less per user.
- Choose a payment method and click Submit Purchase.
Setting up your business email
Once you pay, you’ll need to set up your users, activate your account, then let Google verify your domain. Your business email can take a few minutes to appear in your dashboard, where it shows Action required until you finish.Setting up your users
Set up each user with a username and password, and confirm your contact details. The username becomes the part of the address before the @, such asdana@yourdomain.com. Your users sign in to Gmail, Calendar, Drive, Meet, and Docs with that address, and Google Workspace services can take up to 24 hours to become available. Repeat these steps whenever you buy more users.
To set up your users:
- Click Dashboard in your app editor.
- Click Domains.
- Click Manage next to Business email.
- Next to your account, click Set Up Users.
- Under Admin user, choose an admin email address, create and confirm a password, then enter your first and last name.
- Under Contact info, enter an alternate email address at a different domain, your company or organization name, your country, and your postal code.
- (Optional) Expand each additional user and fill in their details the same way.
- Click Complete Setup.
Activating your email
Activate the account to accept Google’s Terms of Service and switch your business email to Active. To activate your business email:- Click Dashboard in your app editor.
- Click Domains.
- Click Manage next to Business email.
- Next to your account, click Go to Google.
- Sign in with your admin user, then accept Google’s Terms of Service in the Google Admin console.
Verifying your domain
Google also confirms that you own your domain. Your mailboxes become active once verification completes. If your domain uses Base44’s nameservers, such as a domain you bought in Base44, the required TXT record is added to your DNS settings for you, and Google confirms it automatically within a few hours. While verification runs, the Google Admin console may prompt you to verify your domain in several places, such as a Verify domain banner at the top. You can safely ignore these prompts. The record is already in place, and they disappear once verification completes. To view your DNS records or add your own, see Managing DNS records.Verifying an external domain you connected yourself
Verifying an external domain you connected yourself
- Sign in to the Google Admin console with your admin user.
- Click Domains. If you do not see it, click More Controls at the bottom, then click Domains.
- Click Manage Domains.
- Next to the domain you want to verify, click Set up Admin Console.
- Click Next, then click Continue to choose TXT verification.
- Copy the TXT record.
- Sign in to your domain host or registrar.
- Open your domain’s DNS settings.
- Add a TXT record and paste the value you copied. If your domain host manages your records, ask them to add it.
- Back in the Google Admin console, click Verify.
Managing your business email
Manage all of your business emails from the Business Email page, which lists a separate Google Workspace account for each domain. Your app dashboard shows a single business email under Emails no matter how many domains you connect, because a business email is tied to a domain rather than to your app.Opening the Business Email page
You reach the Business Email page from your app’s Domains page. To open the Business Email page:- Click Dashboard in your app editor.
- Click Domains.
- Click Manage next to Business email.
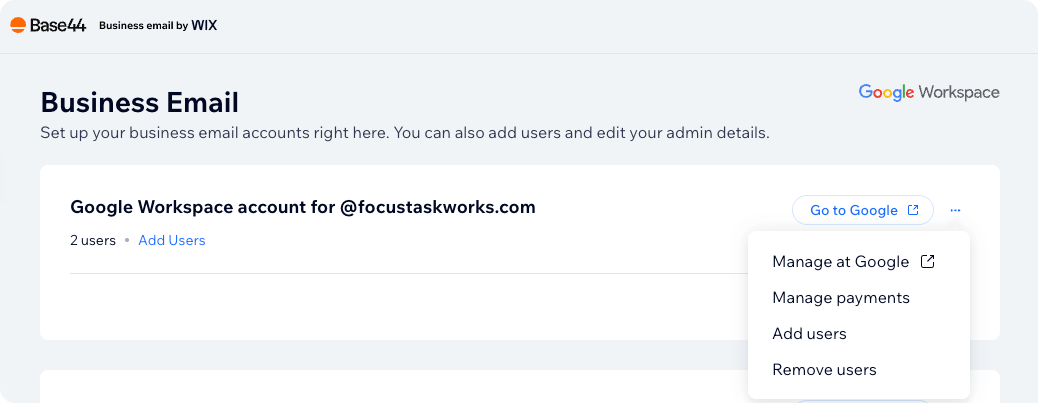
Clicking the More actions icon on a Google Workspace account
Review your users
Review your users
- Next to your account, click Show User Info.
- Review each user’s name, email address, and status in the table.
Reset your admin password
Reset your admin password
- Next to your account, click Show User Info.
- Next to your admin user, click the More actions icon .
- Click Reset admin password.
Open the Google Admin console
Open the Google Admin console
- Next to your account, click Go to Google.
- Sign in with your admin user.
Manage payments
Manage payments
- Next to your account, click the More actions icon .
- Click Manage payments.
Adding users
Each user has their own email address at your domain. You can add more users at any time.- Click Dashboard in your app editor.
- Click Domains.
- Click Manage next to Business email.
- Next to your account, click Add Users.
- Choose how many users to add, choose a payment method, then click Submit Purchase.
Renaming a user
You can rename any of your business email users, including their first name, last name, and email address at your domain. For example, if a new employee takes over yourinfo@yourdomain.com inbox, update the name on the account, or change the address to sales@yourdomain.com.
Renaming a user changes it everywhere in your Google Workspace, and can take up to 10 minutes. The user keeps their inbox, files, and calendar, and email sent to their old address is forwarded to the new address.
To rename a business email user:
- Click Dashboard in your app editor.
- Click Domains.
- Click Manage next to Business email.
- Next to your account, click Show User Info.
- Next to the user you want to rename, click the More actions icon .
- Click Rename your user.
- Update the user’s First name, Last name, or Email address.
- Click Rename User.
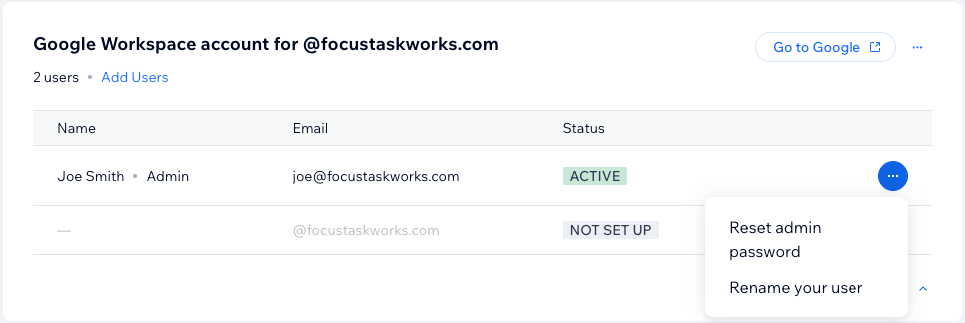
Clicking the More actions icon on a business email user
Renaming a user in the Google Admin console instead
Renaming a user in the Google Admin console instead
- On the Business Email page, next to your account, click Go to Google, then sign in with your admin user.
- Go to Directory, then Users.
- Next to the user you want to rename, click the Rename icon.
- Edit the user details, then click Rename user.
Removing users
You can remove business email users you no longer need so you are not billed for them. It takes 2 steps: delete the user in Google, then remove the inactive users from your subscription. Step 1 | Delete the user in Google Deleting the user in Google removes their mailbox and access. To delete a user in Google:- Click Dashboard in your app editor.
- Click Domains.
- Click Manage next to Business email.
- Next to your account, click Go to Google, or click the More actions icon and click Manage at Google.
- Sign in with your admin user.
- In the Google Admin console, go to Directory, then Users.
- Find the user and remove them.
- Click Dashboard in your app editor.
- Click Domains.
- Click Manage next to Business email.
- Next to your account, click the More actions icon .
- Click Remove users.
- Review what happens when you remove them, including your new renewal date and user count.
- Select Remove inactive users, then click Remove Users.
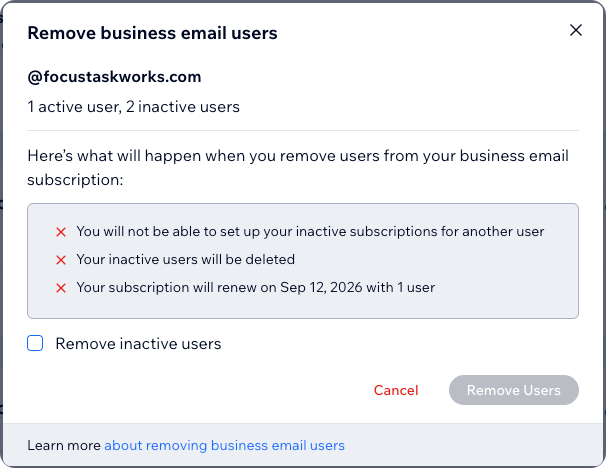
Reviewing what happens before you remove inactive users
Managing your subscription
Your business email is a separate subscription from your Base44 plan and your domains. It stays active and keeps billing even if you cancel or downgrade your Base44 plan, and renews automatically on the billing cycle you chose. Each business email appears in your workspace settings under Plan & Subscriptions, as a Google Workspace subscription listed with your domain. From there you manage its renewal and payment method, and you can open the Business Email page with Manage Google Workspace.Checking your renewal date
Your business email is listed alongside your plan and any domains you bought, each with its own renewal date and billing cycle. To check your renewal date:- Click your workspace name at the bottom left of your account.
- Click Settings.
- Under General, click Plan & Subscriptions.
- Find the Google Workspace subscription listed with your domain.
- Check the Next Billing Date column. It shows the date and your billing cycle, such as Yearly cycle.
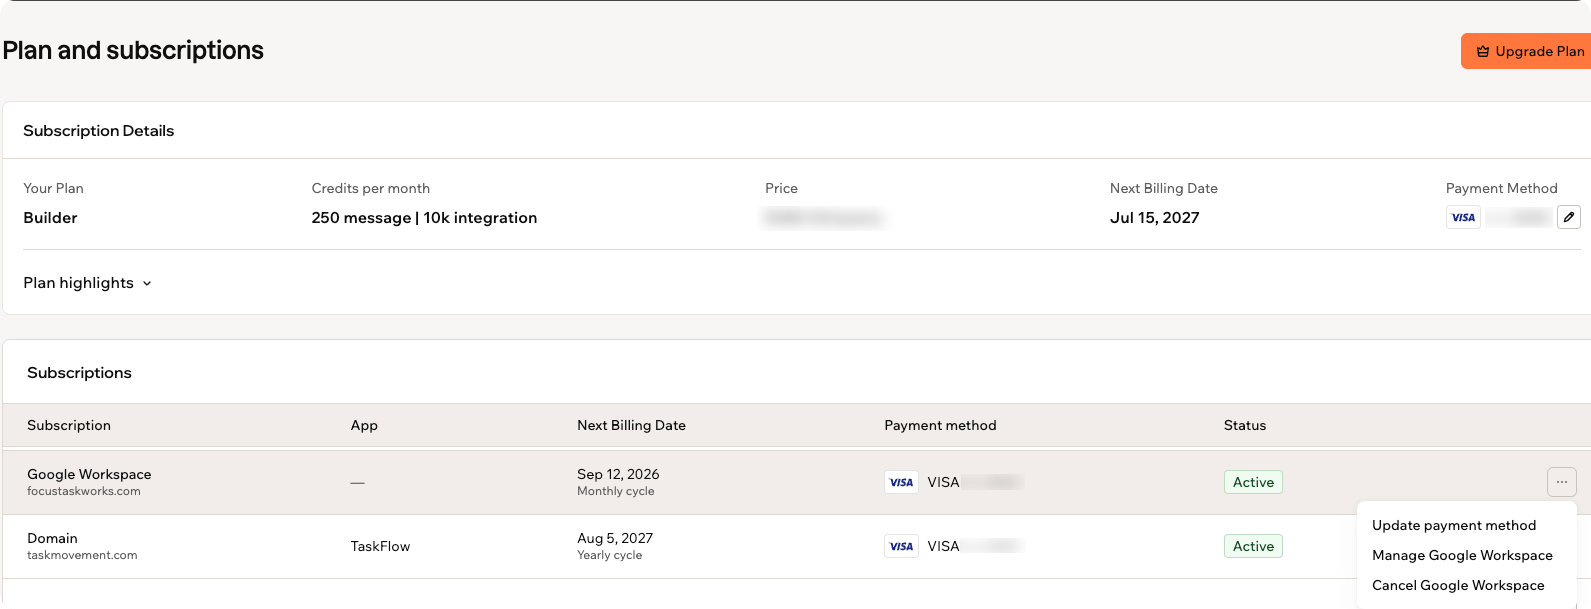
Finding your Google Workspace subscription on the Plan & Subscriptions page
- Active: your subscription renews automatically on the next billing date.
- Auto Renew Off: your subscription expires on that date instead of renewing. To keep it, click Turn On.
- Payment Problem: your last renewal charge needs attention. Click Update Payment to keep your subscription active.
- Your renewal payment can be processed up to 30 days early, so your next billing date can be earlier than your expiration date.
- Once a subscription ends, you no longer see it in Subscriptions. You can still view your past charges on the Billing History page, and you can buy business email for this domain again from the Domains page.
Canceling your business email
You can cancel your business email subscription at any time. Canceling turns off automatic renewal, so your business email stays active until the end of the period you paid for, and you are not charged again. Your renewal payment can be processed up to 30 days before your subscription expires, so cancel before your next payment date to avoid being charged for another period. To cancel your business email:- Click your workspace name at the bottom left of your account.
- Click Settings.
- Under General, click Plan & Subscriptions.
- Next to your Google Workspace subscription, click the More actions icon .
- Click Cancel Google Workspace.
- In the Cancel Google Workspace subscription dialog, review the expiry date and what you lose, then click Cancel subscription. To keep it instead, click Keep active.
- Choose the reason you are canceling, then click Cancel subscription.
Turning renewal back on
If you change your mind before the expiry date, turn automatic renewal back on to keep your business email without interruption. To turn automatic renewal back on:- Click your workspace name at the bottom left of your account.
- Click Settings.
- Under General, click Plan & Subscriptions.
- Next to your Google Workspace subscription, click Turn On.
FAQs
Click a question below to read more about buying a business email.What is the difference between a sending address and a business email?
What is the difference between a sending address and a business email?
- A sending address is how your app sends automated emails to your clients, such as a booking confirmation from
hello@yourhairsalon.com. It only sends, so no one can email it back and replies do not reach an inbox. You set it up under Emails on the Domains page. See Sending emails from a custom domain. - A business email is a full Google Workspace inbox that sends and receives email, so clients can reply and reach a real inbox. To route replies to your app’s emails into your business inbox, use the same address for your sending address and your business email.
Can I use my business email with Gmail and the other Google apps?
Can I use my business email with Gmail and the other Google apps?
Why can't I see the business email option?
Why can't I see the business email option?
- You need the Starter plan or higher to buy a business email.
- Only the workspace owner can set up and manage business email.
- You need a verified custom domain connected. See Buying a domain with Wix or Connecting an external domain.
- If you are the workspace owner with a verified domain and you still do not see it, your workspace may not support business email. Contact support and we can check.
Do I need to set up MX records or other DNS settings?
Do I need to set up MX records or other DNS settings?
What if my domain is verified but I still cannot set up my business email?
What if my domain is verified but I still cannot set up my business email?
info@yourdomain.com, try info1@yourdomain.com. You can change it back at any time.How many users can I add?
How many users can I add?
Can I cancel immediately and get a refund?
Can I cancel immediately and get a refund?
Why do I see one charge for several services?
Why do I see one charge for several services?
My saved card expired. Do renewals still go through?
My saved card expired. Do renewals still go through?
I bought my business email during a sale. What do renewals cost?
I bought my business email during a sale. What do renewals cost?
What happens to my data after my subscription expires?
What happens to my data after my subscription expires?
I have business emails on more than one domain. Can I cancel only one of them?
I have business emails on more than one domain. Can I cancel only one of them?
I think I was charged in error. What should I do?
I think I was charged in error. What should I do?