

What you can do with App MCP
App MCP lets you and other people work with your published app directly from an AI assistant such as Claude, ChatGPT, or Cursor. What an assistant can do depends on your server’s access mode:- Public · No sign-in: Anyone can connect when your app is open to everyone without sign-in. Assistants can view records from the entities you make available, but cannot change records, message agents, or run custom tools.
- Sign in required · OAuth: People with an account in your app can connect by signing in. Assistants work as the signed-in user and can view or change records, message agents, and run custom tools based on that person’s app permissions. Base44 checks those permissions on every request.
How App MCP works
Set up MCP access for AI assistants from your app dashboard. Once you publish your app, connected assistants can work with the entities, agents, and custom tools you make available. App MCP controls access at three levels:- Access mode: Determines who can connect and whether they need to sign in. The Access badge on the Overview card shows the current mode. To change it, ask the AI chat.
- Tool access: Defines what AI assistants can do in your app, including which entities, agents, and custom tools they can use. Edit these settings on the MCP page, or ask Base in the AI chat to change them.
- App permissions: Determine what each signed-in user can view or change through an assistant.
Looking for a different MCP connection?
App MCP connects external AI assistants to one published app. For other types of MCP connections:
- Base44 MCP lets you build and manage Base44 apps from an external AI assistant.
- Custom MCP connections let you connect the Base44 AI chat to external MCP servers while you build your app.
Setting up MCP access
Set up MCP access for each app to choose who can connect and whether they need to sign in.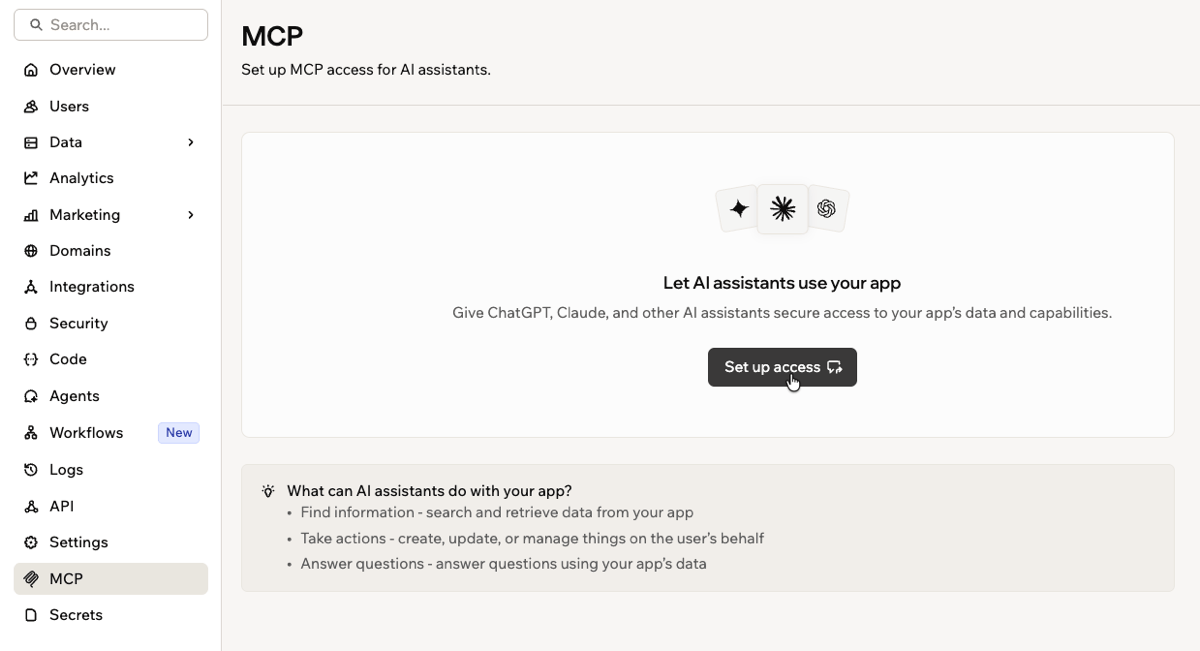
The MCP page when your app is ready to set up access
If MCP is turned off, reach out to your workspace owner or admin. Learn more about managing MCP access for your workspace.
- Go to your app’s dashboard.
- Click MCP.
- Click Set up access. If you see Enable custom authentication instead, click it and set up your app’s custom login pages. Then return to the MCP page and click Set up access.
- Choose Public or Sign in required · OAuth when prompted.
- Click Publish to publish your app and activate the server.
If you change the access mode or tool access, publish your app again. Changes to tool access require each connected user to reconnect their assistant and approve the updated permissions.
Managing tool access
Choose which entities, agents, and custom tools connected assistants can use. To manage tool access:- Go to your app’s dashboard.
- Click MCP.
- In the Tool access section, click Edit.
- Choose what assistants can access:
- Entities: Turn an entity on or off. For enabled entities, choose Full access to allow Read, Create, Update, and Delete actions, or choose Custom access to select specific permissions.
- Agents: Set each agent to Enabled or Disabled.
- Custom tools: Turn on each custom tool you want assistants to use.
- Click Save changes.
- Click Publish to activate your changes.
Connecting an AI assistant
Connect your AI client to your app’s MCP server using the connection URL. To connect an AI assistant:- Go to your app’s dashboard.
- Click MCP.
- Click Copy URL next to Connection URL.
- Connect your AI client:
Claude
Claude
- Add the connector in one click. Click Add connector, and Claude opens with the connector’s details pre-filled.
- Review the pre-filled details. If the connection URL is missing, paste it manually.
- Click Add and start using it in chat.
ChatGPT
ChatGPT
- Open Settings and choose Plugins in the ChatGPT desktop app. On the web, custom MCP servers go through Developer mode instead.
- Open the MCPs tab and click Add server.
- Name the server, set Type to Streamable HTTP, and paste the connection URL.
- Click Save.
- Click Restart, then enable the server. The app restarts to load it, and the server’s tools become available in chat.
Cursor
Cursor
- Open Cursor Settings, then Tools & Integrations.
- Click New MCP Server. Cursor opens your
mcp.jsonconfiguration. - Add a server entry with the connection URL. Set the entry’s
urlfield to the connection URL and save. - Toggle the server on.
Others
Others
- Copy the connection URL.
- Add it to your client as a streamable HTTP MCP server. Most clients ask for a name and a URL, with no extra configuration.
- Reload the client and start using the tools.
If your server uses Sign in required · OAuth, the client opens your app’s consent page. Sign in with your app account and approve access.
Adding in-app connection guidance
After setting up App MCP, you can add a page to your app that shows people how to connect their own AI assistants. They use the instructions to configure their external AI client. To add in-app connection guidance:- Go to your app’s dashboard.
- Click MCP.
- On the How to connect AI assistant card, click the Send to chat icon next to Ask Base to add in-app guidance to help your users connect AI assistants.
- Wait for the AI chat to finish, then click Publish.
/connect page with instructions for Claude, ChatGPT, Cursor, and custom AI clients.
Managing MCP access for your workspace
The workspace MCP policy controls whether apps in the workspace can use App MCP. It applies to every app and overrides app-level settings.Only workspace owners and admins can update the MCP policy. Policy changes take effect immediately and do not require publishing.
- Open your workspace Settings.
- Click Governance.
- Under MCP access for AI assistants, select a policy:
- Allowed: Apps can use App MCP, with or without sign-in.
- Sign-in required: Apps can use App MCP, but assistants must sign in. Every App MCP server in the workspace uses OAuth.
- Not allowed: Apps in the workspace cannot use App MCP.
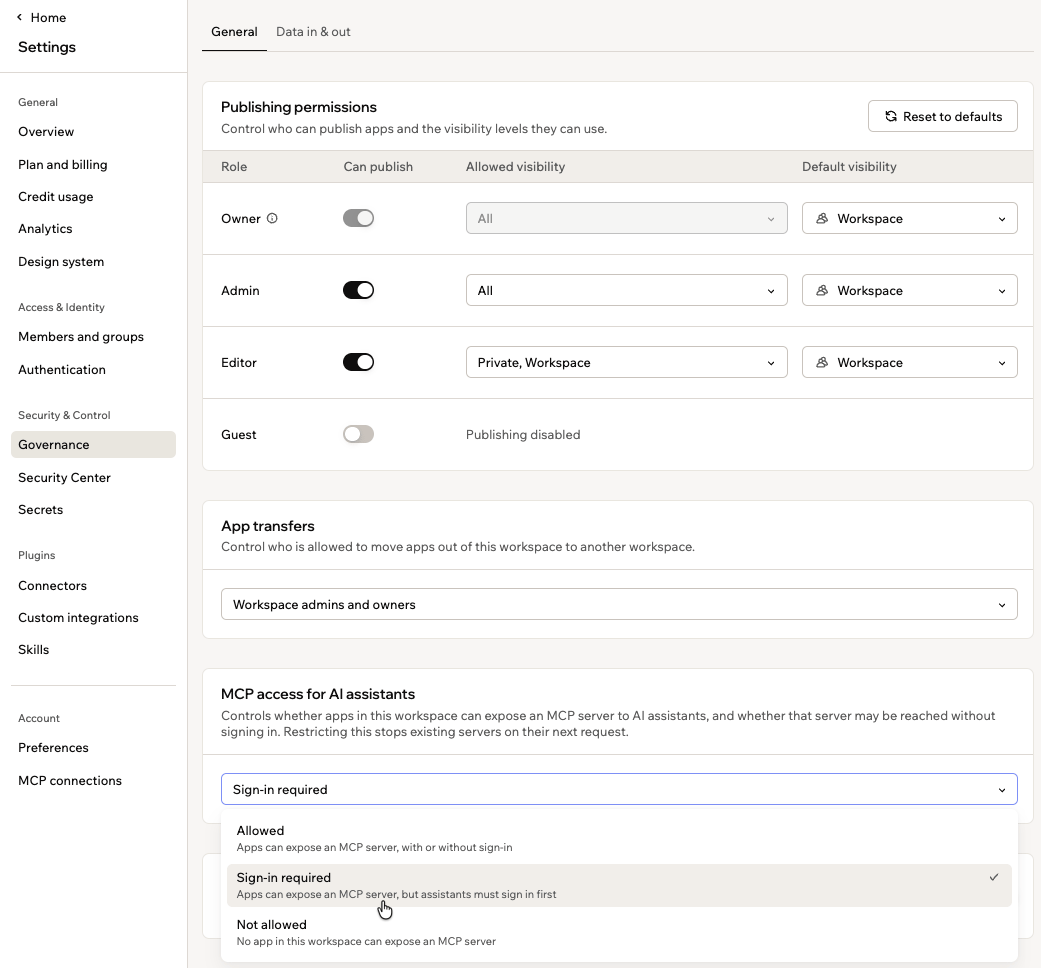
The MCP access for AI assistants policy on the Governance page
Troubleshooting
MCP is turned off for this workspace
MCP is turned off for this workspace
Your workspace policy is blocking App MCP. The notice tells you whether to ask an admin or to change it yourself, and owners and admins can click Open workspace settings.
Your Public server won't activate
Your Public server won't activate
Your app requires sign-in, but the server is set to Public, so it will not run. On the MCP page you see Your app requires login but your MCP server is exposed publicly. Ask in the AI chat to switch the server to OAuth, or make the app public, then publish.
Claude has no custom connector option
Claude has no custom connector option
Your Claude organization may restrict custom connectors. Ask your Claude admin whether custom connectors are enabled for your account.
Assistants stopped connecting after you published a change
Assistants stopped connecting after you published a change
After you publish changes to the available tools, reconnect the app from the AI client and approve the updated access.