Turn your Base44 app’s workflows and hooks on or off, edit, rename, run and archive them, review every run, and keep their integration credit use under control.
Listen to this pageabout 13 min
After you create a workflow, you manage it from the Workflows page in your app’s dashboard. Turn it on or off, change what it does, run it on demand, review every run and keep an eye on the credits it uses.Hooks, the workflows that check your rules before an action in your app, work the same way. Where something is different for a hook, the section says so.
After you start using workflows, you can control when they run, change what they do, rename them, trigger them on demand, or clean up workflows you no longer need. Each workflow shows an Active or Inactive status, and you can deactivate one to pause it and reactivate it whenever you need it.
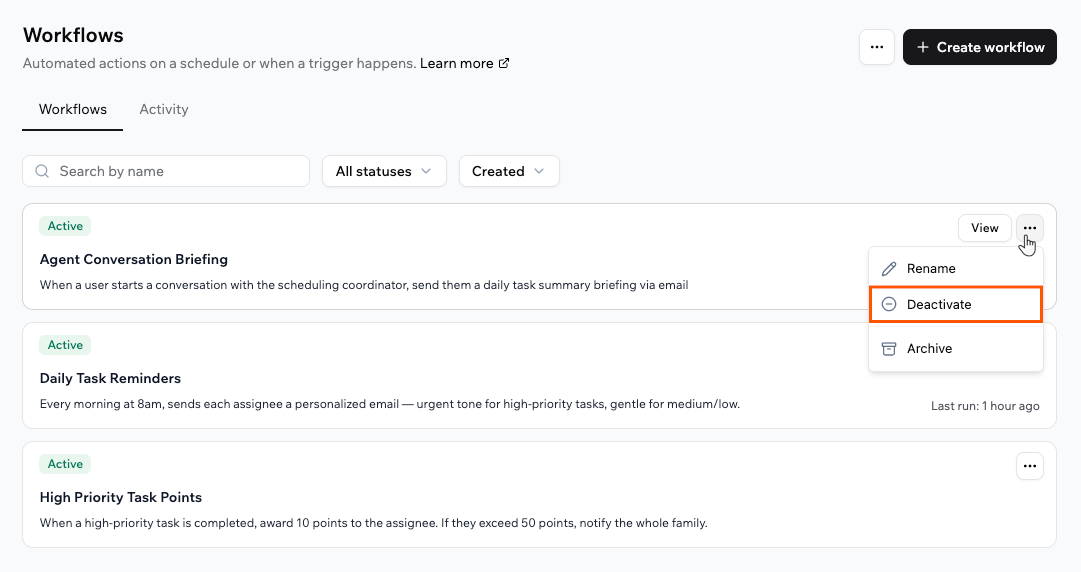
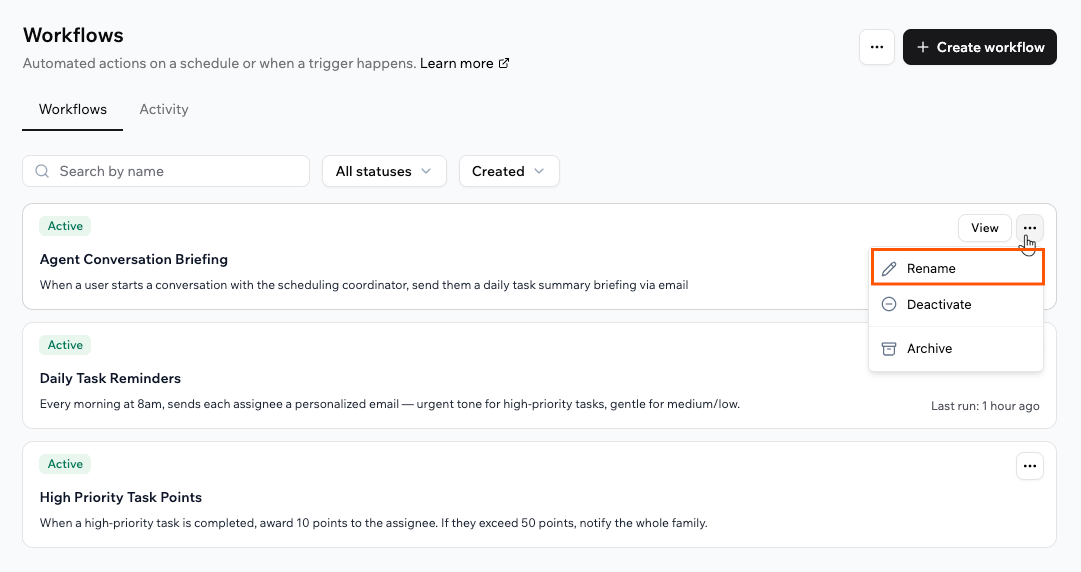
Deactivate a workflow when you want to stop it running, and activate it again when you need it. Deactivating stops new runs from starting, but the run history stays available.Turning a hook off turns its rule off, so the action it protects goes through without any check until you turn it back on. When you turn off a hook, your app asks you to confirm, so click Deactivate in the dialog.To turn a workflow on or off:
Click Dashboard in your app editor.
Click Workflows.
Click the More actions icon on the workflow.
Click Deactivate or Activate.
You can also open a workflow and use the Active toggle in the details panel.
Deactivating a workflow from the More actions menu.
To change what a workflow does, edit it from its diagram or just describe the change in the AI chat. Every edit option opens the AI chat with a pre-filled prompt and the AI makes the change for you, so there is nothing to edit by hand.
Editing a step
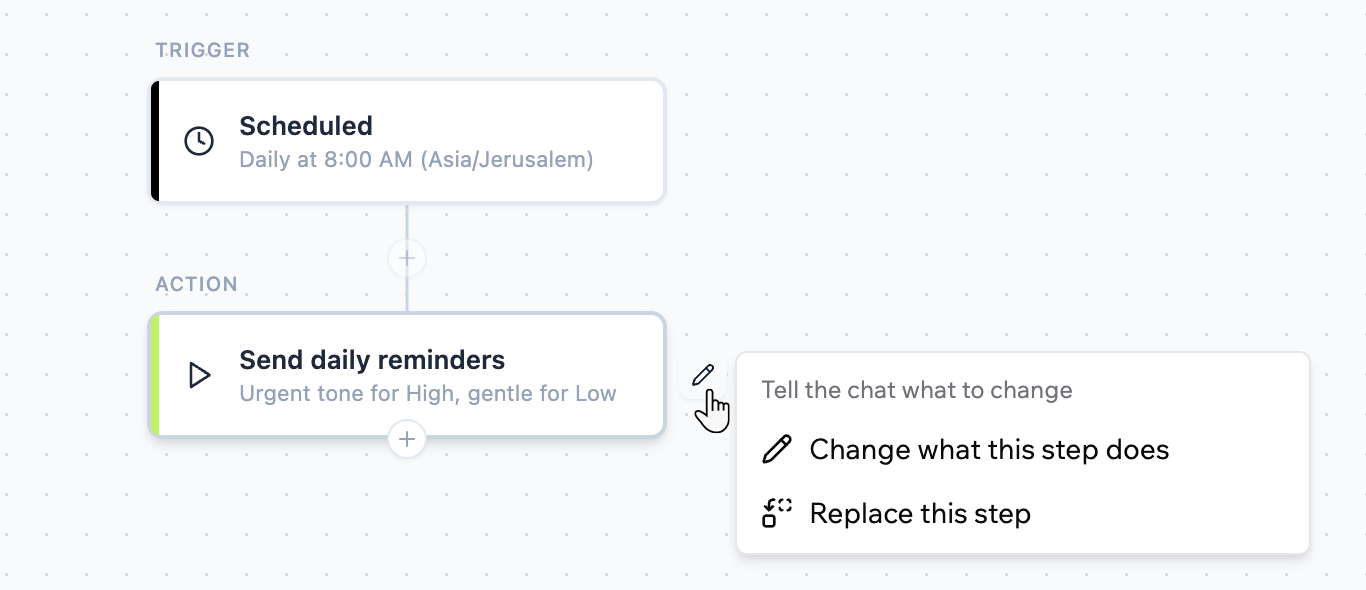
Click a step’s Edit icon to change what the step does or replace it with a different step.
Editing a step.
Editing the trigger
Click the trigger’s Edit icon to change which events trigger the workflow.
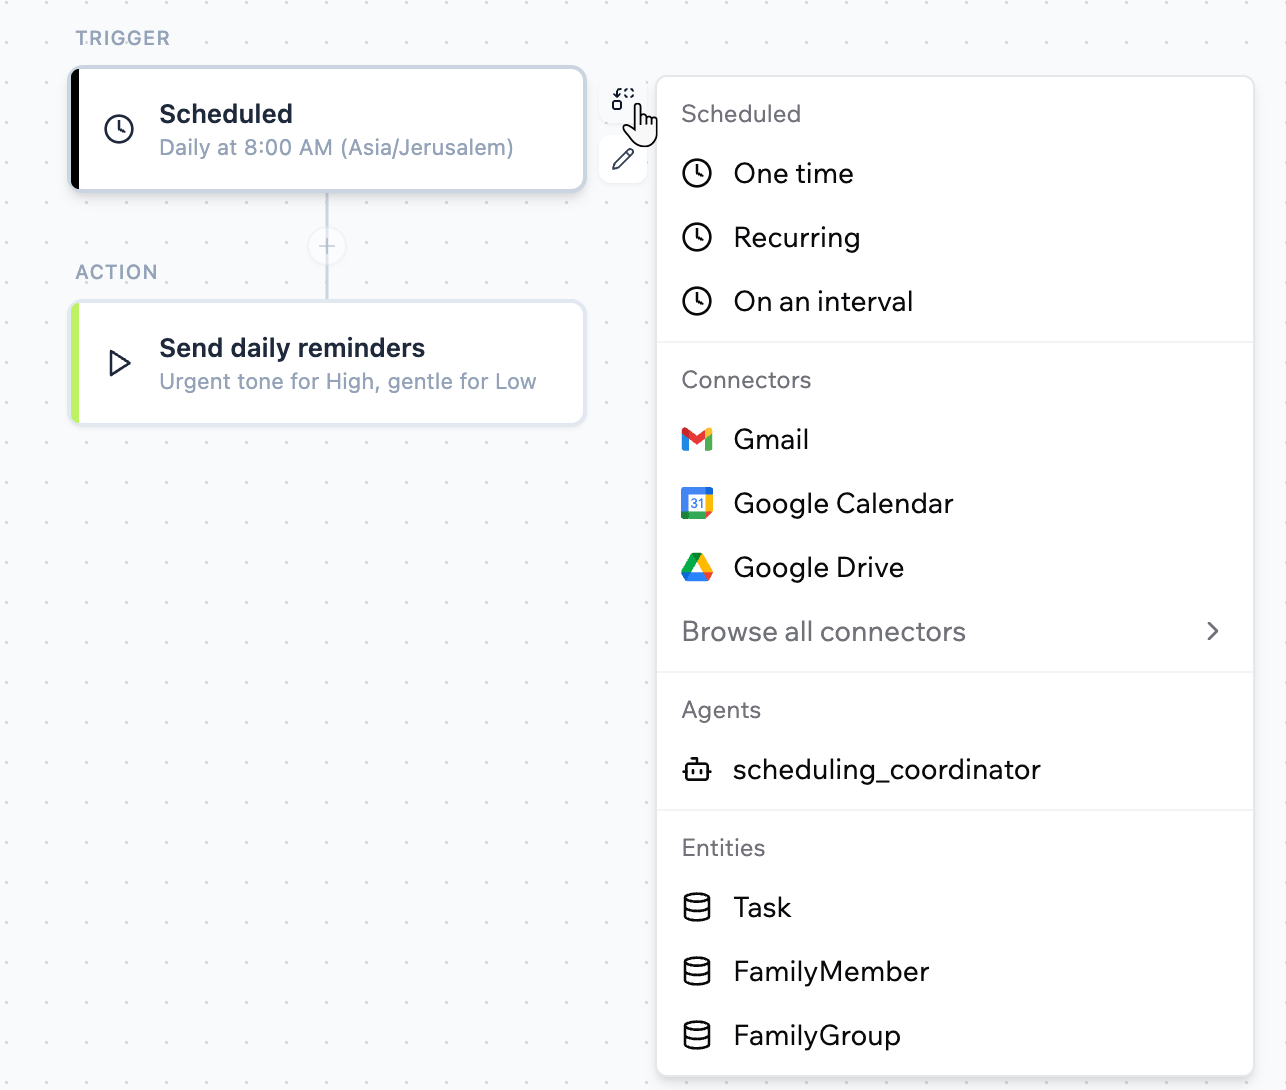
Click the Replace trigger icon to switch to a different trigger, such as a scheduled, connector, in-app agent, or entity trigger.
Replacing a workflow's trigger.
Adding a step
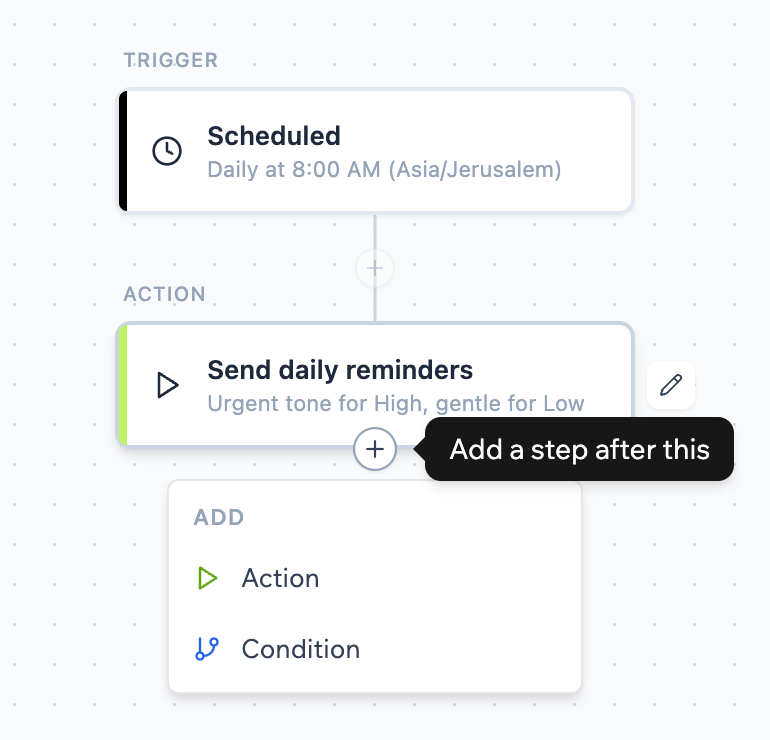
Click the add button below a step, then choose Action or Condition.
Adding a step to a workflow.
Changing a workflow’s steps creates a new version. Runs already in progress finish on the version they started with, and new runs use the latest version.
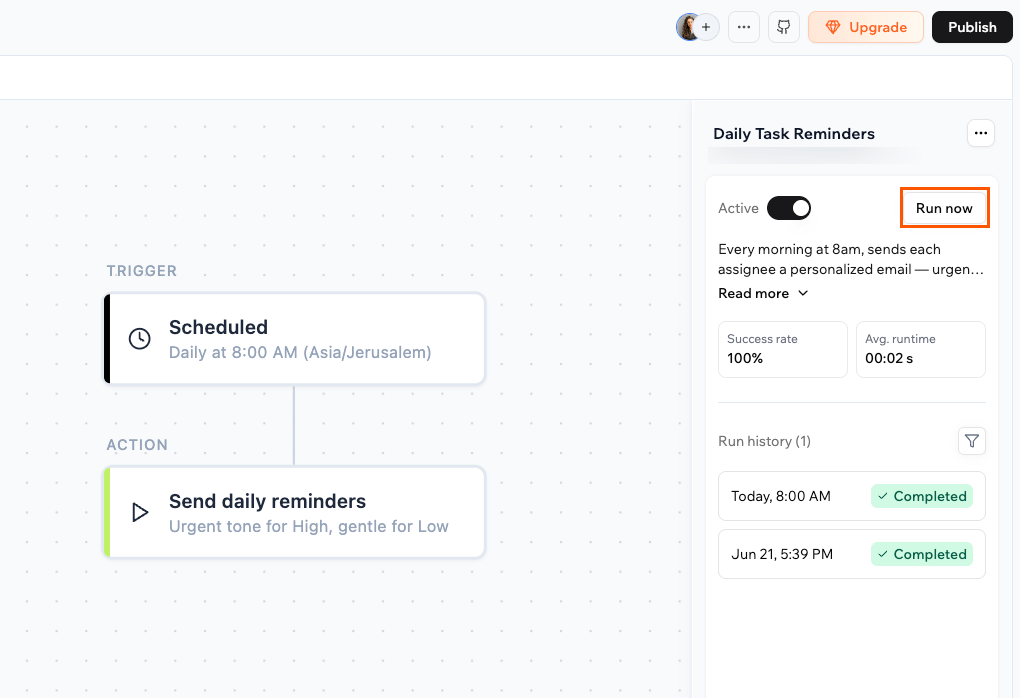
Run a workflow right away when you want to start it on demand. This helps you test changes, confirm that your configuration works, or handle something urgent between scheduled runs.For a hook, Run now tests it with data from a previous run instead. Learn how testing a hook works.
What Run now does:
It executes real actions using your current configuration, such as sending real emails or updating real records.
It’s a one-time manual run that doesn’t affect your schedule or trigger, and it appears in the run history labeled as a test.
When earlier runs exist, you can also replay the workflow using the data from a previous run.
If a workflow is running and you need to stop it, you can cancel the run while it is still in progress. The cancelled run shows as Cancelled in the run history.To cancel a run:
Click Dashboard in your app editor.
Click Workflows.
Click the workflow to open it.
Click the run that is in progress, then click Cancel run.
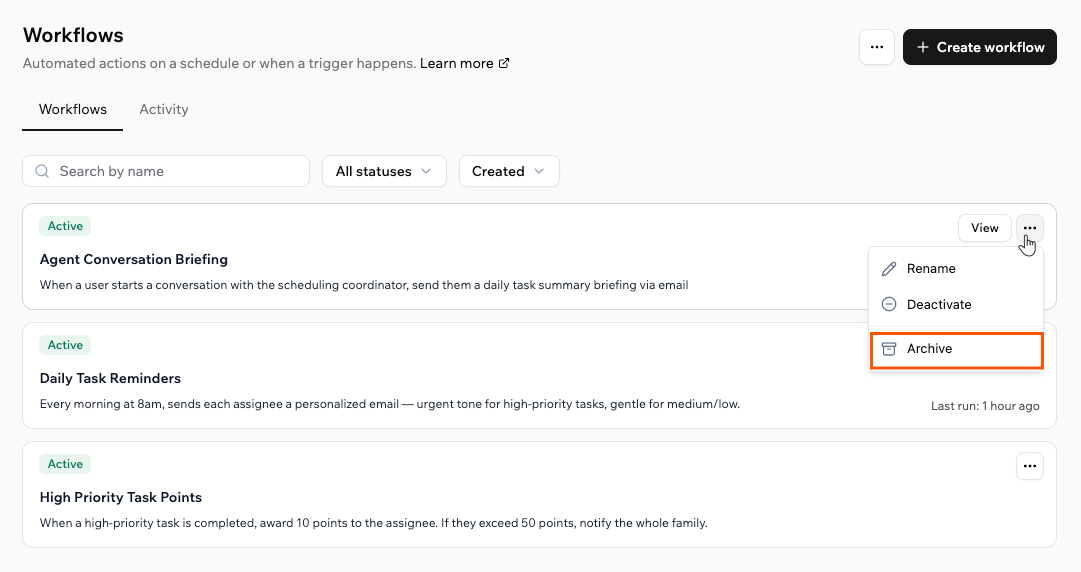
If you do not need a workflow anymore, you can archive it to keep your active list clean.Archiving a hook turns its rule off too, so your app asks you to confirm before it archives one.To archive a workflow:
Click Dashboard in your app editor.
Click Workflows.
Click the More actions icon on the workflow.
Click Archive.
Archiving a workflow from the More actions menu.
To see or restore archived workflows, click the More actions icon next to Create workflow, then click View archive.
Every workflow records each run so you can watch it happen in real time and review it afterward. Review a single workflow’s runs from its details panel, or see runs across all your workflows on the Activity tab.
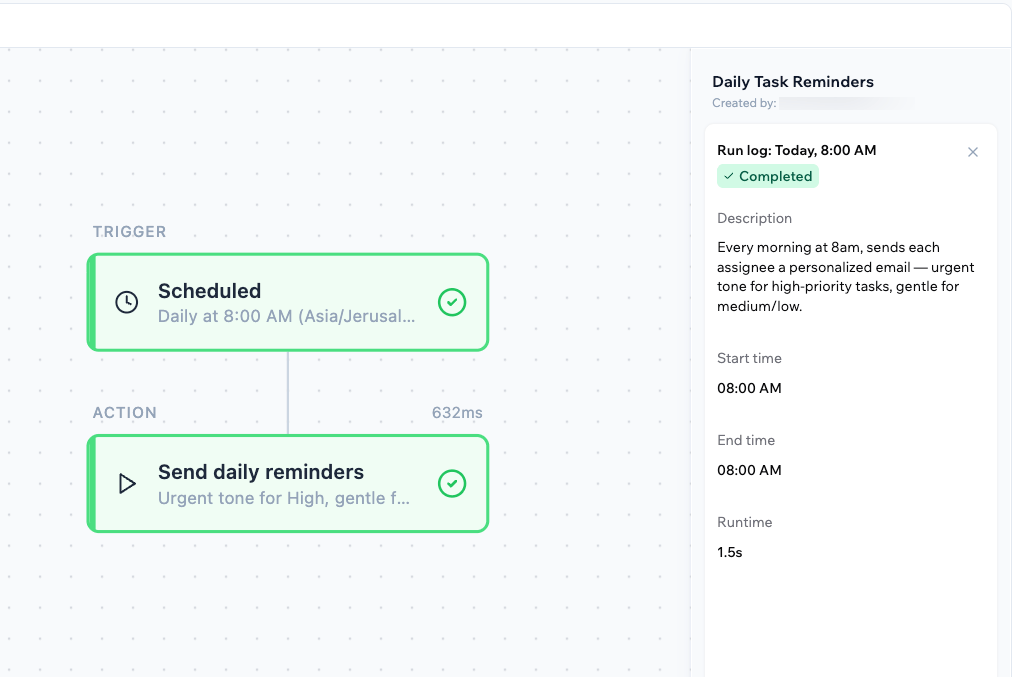
As a workflow runs, each step in the diagram shows a green checkmark when it completes successfully, so you can confirm at a glance that it works and see exactly where it stops if a step fails.
When you open a workflow, the details panel shows its Success rate, Avg. runtime, and a Run history of every run. When something goes wrong, the run shows the exact step that failed and the error, so you know where to look without guessing.A hook’s details panel shows only its Run history. When you open one of its runs, it shows whether the hook allowed or blocked the action, and a failed hook run counts as blocked.To view a workflow’s runs:
Click Dashboard in your app editor.
Click Workflows.
Click the workflow you want to inspect.
In the details panel, review Run history, where each run shows its time and status, such as Completed.
Click a run to open its Run log, including the start time, end time, and runtime.
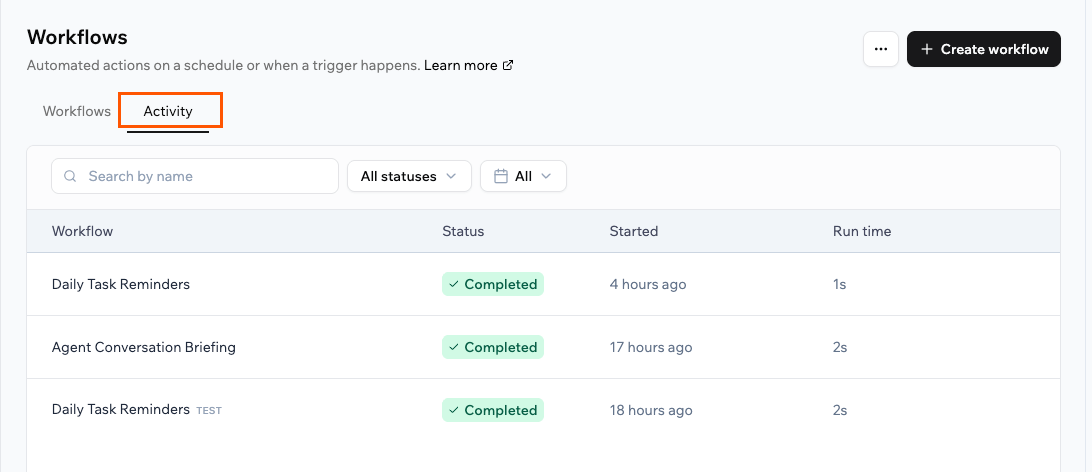
The Activity tab under Workflows in your app dashboard brings together runs from all your workflows in one place. Runs from hooks are labeled as hooks.
Runs you start with Run now are labeled TEST, so you can tell them apart from runs that fired automatically.
To view activity across workflows:
Click Dashboard in your app editor.
Click Workflows.
Click the Activity tab.
Review the list of runs, where each one shows its workflow, status, start time, and run time. Filter by status (Running, Completed, Failed, or Cancelled) or by time range.
Click View on a run to open it in the workflow’s diagram alongside its run log.
The Activity tab, showing runs across all your workflows.
Workflows are billed by the steps that run. Each step that runs a backend function uses a fraction of an integration credit, and the charges add up across all the steps in a single run. Built-in integrations that a step uses, such as sending an email or calling an AI model, can use credits too, as they do elsewhere in your app.A workflow with several steps therefore costs more per run than a single-step one, so keep an eye on how often your workflows run and what each step does. If you run out of integration credits while a run is in progress, that run is cancelled. Learn more about credits.
Tips for managing credit usage
Workflows that run frequently or chain several actions can drain your credit balance quickly. Here are some ways to keep usage under control:
Add specific trigger conditions: Narrow the criteria that start a workflow so it does not run unnecessarily.
Use conditions to skip unneeded steps: Branch the workflow so expensive steps only run when they are actually needed.
Consolidate redundant workflows: If several workflows perform overlapping tasks, combine them into fewer, smarter ones.
Resolve failing workflows promptly: Workflows that error can still consume credits on each retry. Check your run history regularly and fix or disable problem workflows as soon as you spot them.
Review the frequency of scheduled workflows: Consider whether recurring workflows, such as daily reports or reminders, need to run as often as configured.
Be sparing with AI calls: If a step calls an AI model, that uses credits too, so only call it when you actually need the result.
Test on a small dataset first: Run a workflow manually and check its run history to estimate the per-run credit cost before enabling it at scale.
Yes. Ask the AI chat to add conditions to any workflow or step. For example:
After the wait, only send the reminder when the task is still incomplete.
The workflow then takes different paths based on the conditions you describe, so different steps run depending on your data. A condition can have several paths, plus a catch-all for anything that does not match, and the diagram shows each path separately.
What happens when a workflow fails?
Open the workflow and check its Run history to find the step that failed. Ask the AI in your dashboard to explain the error and suggest a fix, then use Run now to confirm the workflow succeeds.If a workflow keeps failing, Base44 deactivates it automatically and emails you, so you can fix it before turning it back on. A scheduled workflow is deactivated after 5 consecutive failures, because it runs the same way every time, so repeated failures usually mean something is wrong. Workflows with any other trigger are deactivated after 50 consecutive failures, because their incoming data varies and the occasional failure is more expected. Fixing the workflow and reactivating it resets the count.
Why does Run now ask me to choose a previous run?
It depends on how the workflow starts. A scheduled workflow can run on demand at any time, because it does not need any input. A workflow that starts from an entity, connector, or in-app agent trigger needs the trigger’s data to run, such as the specific task that was created, so Run now replays the data from a previous run. This means the workflow has to run at least once before you can run it on demand.If you see No previous runs, trigger the workflow for real once, for example by creating a task for the task follow-up workflow, and then use Run now to replay that run.
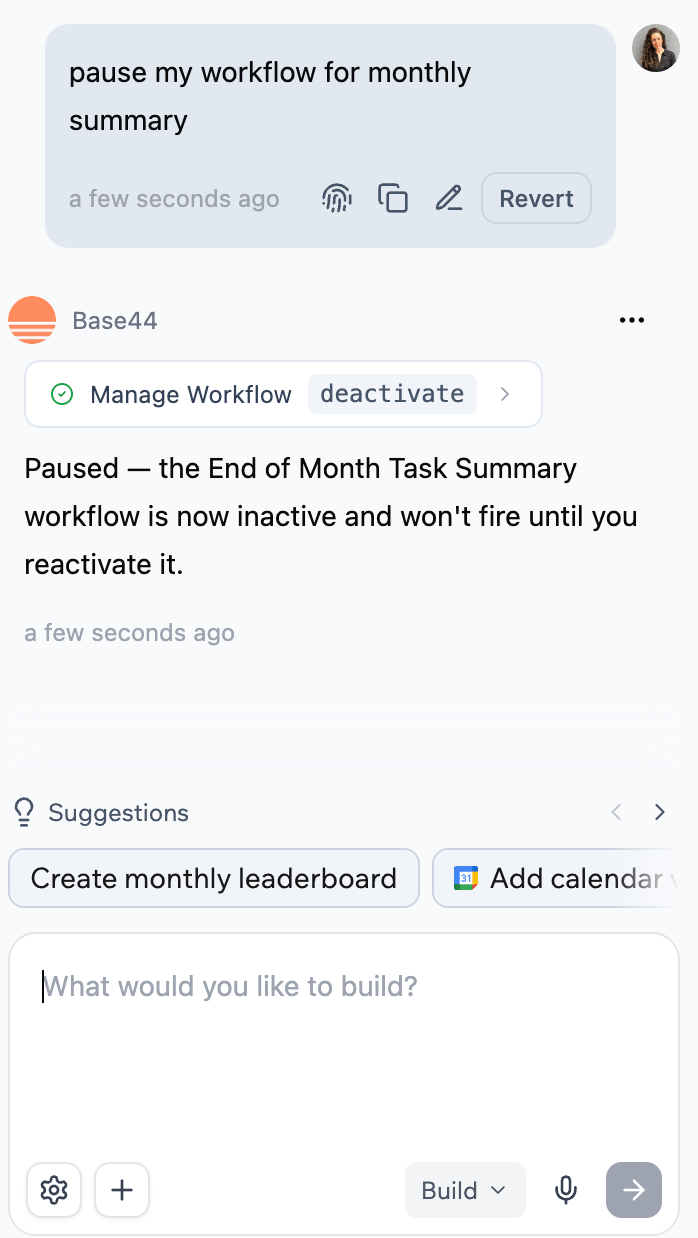
Can I manage workflows from the AI chat?
Yes. Ask the AI to activate, deactivate, archive, or restore a workflow, and it makes the change for you without opening the dashboard menus.
Managing a workflow from the AI chat.
How many workflows does the Workflows page show?
The Workflows page lists all of your workflows, paging through up to 1,000.
Where did my app's automations go?
In November 2026, Base44 moved every app’s automations to workflows. If your app had any automations, you’ll find them on the Workflows page in your app’s dashboard. Each one is now a workflow with the same trigger and schedule. Old links to the automations page open Workflows too.Automations you archived stay archived. To see them, click the More actions icon at the top of the page, then click View archive.If a workflow couldn’t turn on after the move, a banner at the top of the Workflows page tells you, and the workflow shows a warning icon. Fix its trigger, for example by reconnecting an integration, then turn the workflow on. You can also ask the AI chat to fix it for you.Runs from before the move don’t appear in the workflow’s run history.
Was this page helpful?
{"docsConfig":{"theme":"mint","$schema":"https://mintlify.com/docs.json","name":"Base44 Support Documentation","colors":{"primary":"#FF6A00","light":"#FF8E5D","dark":"#FF6A00"},"logo":{"light":"https://mintcdn.com/base44/jhCpOaGylNweq32m/logo/new-brand-light.svg?fit=max\u0026auto=format\u0026n=jhCpOaGylNweq32m\u0026q=85\u0026s=7724705143e6cfece3b0a237be2a6890","dark":"https://mintcdn.com/base44/jhCpOaGylNweq32m/logo/new-brand-dark.svg?fit=max\u0026auto=format\u0026n=jhCpOaGylNweq32m\u0026q=85\u0026s=6c3ad8a8d1ae8299c119d554dc371843","href":"/"},"favicon":"https://mintcdn.com/base44/XkAHbvyG1CwOBCSP/images/base44-favicon.svg?fit=max\u0026auto=format\u0026n=XkAHbvyG1CwOBCSP\u0026q=85\u0026s=2a7fda75e5497e8b44f47f01bb3aa807","api":{"playground":{}},"background":{"color":{"light":"#FAF9F7","dark":"#1E1E24"}},"navbar":{"links":[{"href":"https://app.base44.com/support/conversations","label":"Support"},{"href":"/changelog/product","label":"Changelog"}],"primary":{"type":"button","label":"Base44","href":"https://base44.com/?utm_source=Mintlify\u0026utm_medium=Main\u0026utm_content=menu"}},"footer":{"socials":{"twitter":"https://x.com/base44","discord":"https://discord.com/invite/ThpYPZpVts","linkedin":"https://www.linkedin.com/company/base44"}},"seo":{"metatags":{"canonical":"https://docs.base44.com","og:image":"https://docs.base44.com/images/base44-docs-og.png","og:image:width":"2400","og:image:height":"1260","twitter:image":"https://docs.base44.com/images/base44-docs-og.png","twitter:card":"summary_large_image"},"indexing":"all"},"integrations":{"mixpanel":{"projectToken":"cc6e9e106e4b833fc3a3819c11b74138"}},"contextual":{"options":["copy","view","mcp","cursor","vscode"],"display":"header"},"metadata":{"timestamp":false},"styling":{"latex":true},"navigation":{"languages":[{"language":"en","default":true,"href":""},{"language":"pt-BR","navbar":{"links":[{"href":"https://app.base44.com/support/conversations","label":"Support"},{"href":"/pt-BR/changelog/product","label":"Registro de alterações"}],"primary":{"type":"button","label":"Base44","href":"https://base44.com/?utm_source=Mintlify\u0026utm_medium=Main\u0026utm_content=menu"}},"href":"pt-BR"},{"language":"es","navbar":{"links":[{"href":"https://app.base44.com/support/conversations","label":"Support"},{"href":"/es/changelog/product","label":"Registro de cambios"}],"primary":{"type":"button","label":"Base44","href":"https://base44.com/?utm_source=Mintlify\u0026utm_medium=Main\u0026utm_content=menu"}},"href":"es"},{"language":"he","hidden":true,"navbar":{"links":[{"href":"https://app.base44.com/support/conversations","label":"Support"},{"href":"/he/changelog/product","label":"יומן שינויים"}],"primary":{"type":"button","label":"Base44","href":"https://base44.com/?utm_source=Mintlify\u0026utm_medium=Main\u0026utm_content=menu"}},"href":"he"},{"language":"ja","navbar":{"links":[{"href":"https://app.base44.com/support/conversations","label":"Support"},{"href":"/ja/changelog/product","label":"変更履歴"}],"primary":{"type":"button","label":"Base44","href":"https://base44.com/?utm_source=Mintlify\u0026utm_medium=Main\u0026utm_content=menu"}},"href":"ja"},{"language":"de","navbar":{"links":[{"href":"https://app.base44.com/support/conversations","label":"Support"},{"href":"/de/changelog/product","label":"Änderungsprotokoll"}],"primary":{"type":"button","label":"Base44","href":"https://base44.com/?utm_source=Mintlify\u0026utm_medium=Main\u0026utm_content=menu"}},"href":"de"},{"language":"fr","navbar":{"links":[{"href":"https://app.base44.com/support/conversations","label":"Support"},{"href":"/fr/changelog/product","label":"Notes de version"}],"primary":{"type":"button","label":"Base44","href":"https://base44.com/?utm_source=Mintlify\u0026utm_medium=Main\u0026utm_content=menu"}},"href":"fr"},{"language":"it","navbar":{"links":[{"href":"https://app.base44.com/support/conversations","label":"Support"},{"href":"/it/changelog/product","label":"Registro modifiche"}],"primary":{"type":"button","label":"Base44","href":"https://base44.com/?utm_source=Mintlify\u0026utm_medium=Main\u0026utm_content=menu"}},"href":"it"}]}},"deployment":{"deploymentMetadataValue":{"subdomain":"base44","hasAudioNarration":true,"actualSubdomain":"base44","customDomains":["docs.base44.com"],"gitSource":{"type":"github","owner":"base44-dev","repo":"mintlify-docs","deployBranch":"main","contentDirectory":"","isPrivate":true,"mountPath":"","label":""},"feedback":{"thumbs":true},"entitlements":{"AI_CHAT":{"status":"ENABLED"},"WEB_MCP":{"status":"ENABLED"},"NARRATION":{"status":"ENABLED"}},"buildId":"6af342c78b1d48fe4630f64f","clientVersion":"0.0.4094","searchFilterCounts":[{"language":"en","tag":"Developers","count":862},{"language":"en","tag":"APIs","count":606},{"language":"en","tag":"Apps API (Beta)","count":465},{"language":"de","tag":"Entwickler","count":140},{"language":"es","tag":"Desarrolladores","count":140},{"language":"fr","tag":"Développeurs","count":140},{"language":"he","tag":"מפתחים","count":140},{"language":"it","tag":"Sviluppatori","count":140},{"language":"ja","tag":"開発者","count":140},{"language":"pt-BR","tag":"Desenvolvedores","count":140},{"language":"en","tag":"API Reference","count":128},{"language":"en","tag":"Apps","count":113},{"language":"en","tag":"Skills","count":109},{"language":"en","tag":"Google Ads","count":90},{"language":"en","tag":"Workspace API (Beta)","count":77},{"language":"de","tag":"Apps","count":68},{"language":"es","tag":"Aplicaciones","count":68},{"language":"fr","tag":"Applications","count":68},{"language":"it","tag":"App","count":68},{"language":"ja","tag":"アプリ","count":68},{"language":"pt-BR","tag":"Apps","count":68},{"language":"he","tag":"אפליקציות","count":67},{"language":"en","tag":"CLI","count":59},{"language":"de","tag":"CLI","count":59},{"language":"es","tag":"CLI","count":59},{"language":"fr","tag":"CLI","count":59},{"language":"he","tag":"CLI","count":59},{"language":"it","tag":"CLI","count":59},{"language":"ja","tag":"CLI","count":59},{"language":"pt-BR","tag":"CLI","count":59},{"language":"en","tag":"Commands","count":57},{"language":"de","tag":"Commands","count":57},{"language":"es","tag":"Commands","count":57},{"language":"fr","tag":"Commands","count":57},{"language":"he","tag":"Commands","count":57},{"language":"it","tag":"Commands","count":57},{"language":"ja","tag":"Commands","count":57},{"language":"pt-BR","tag":"Commands","count":57},{"language":"de","tag":"Backend (Beta)","count":42},{"language":"es","tag":"Backend (Beta)","count":42},{"language":"fr","tag":"Backend (Beta)","count":42},{"language":"he","tag":"Backend (בטא)","count":42},{"language":"it","tag":"Backend (Beta)","count":42},{"language":"ja","tag":"バックエンド (Beta)","count":42},{"language":"pt-BR","tag":"Backend (Beta)","count":42},{"language":"de","tag":"Konto \u0026 Abrechnung","count":31},{"language":"de","tag":"SDKs","count":31},{"language":"es","tag":"Cuenta y facturación","count":31},{"language":"es","tag":"SDKs","count":31},{"language":"fr","tag":"Compte et facturation","count":31},{"language":"fr","tag":"SDKs","count":31},{"language":"he","tag":"חשבון וחיוב","count":31},{"language":"he","tag":"SDKs","count":31},{"language":"it","tag":"Account e fatturazione","count":31},{"language":"it","tag":"SDKs","count":31},{"language":"ja","tag":"アカウントと請求","count":31},{"language":"ja","tag":"SDKs","count":31},{"language":"pt-BR","tag":"Conta e faturamento","count":31},{"language":"pt-BR","tag":"SDKs","count":31},{"language":"de","tag":"Integrationen","count":24},{"language":"de","tag":"App SDK","count":24},{"language":"es","tag":"Integraciones","count":24},{"language":"es","tag":"App SDK","count":24},{"language":"fr","tag":"Intégrations","count":24},{"language":"fr","tag":"App SDK","count":24},{"language":"he","tag":"אינטגרציות","count":24},{"language":"he","tag":"App SDK","count":24},{"language":"it","tag":"Integrazioni","count":24},{"language":"it","tag":"App SDK","count":24},{"language":"ja","tag":"インテグレーション","count":24},{"language":"ja","tag":"App SDK","count":24},{"language":"pt-BR","tag":"Integrações","count":24},{"language":"pt-BR","tag":"App SDK","count":24},{"language":"de","tag":"Unternehmen","count":22},{"language":"es","tag":"Empresas","count":22},{"language":"fr","tag":"Entreprise","count":22},{"language":"he","tag":"ארגונים","count":22},{"language":"it","tag":"Aziende","count":22},{"language":"ja","tag":"エンタープライズ","count":22},{"language":"pt-BR","tag":"Empresas","count":22},{"language":"default","tag":"Developers","count":2},{"language":"default","tag":"APIs","count":2},{"language":"default","tag":"Audit Logs API","count":2},{"language":"default","tag":"API Reference","count":2},{"language":"default","tag":"audit-logs","count":2}],"searchSettings":{"showContentSnippets":true,"maxResults":10}},"assistantConfig":{"enableStarterQuestions":true},"basePath":"","hasChatPermissions":true,"hasWebMcpPermissions":true,"toggles":[{"name":"kill-isr","enabled":true,"variant":{"name":"disabled","enabled":false,"feature_enabled":true},"impressionData":false},{"name":"custom-rbac-roles","enabled":true,"variant":{"name":"disabled","enabled":false,"feature_enabled":true},"impressionData":false},{"name":"agent-mintlify-slack","enabled":true,"variant":{"name":"disabled","enabled":false,"feature_enabled":true},"impressionData":false},{"name":"agent-integrations-settings","enabled":true,"variant":{"name":"disabled","enabled":false,"feature_enabled":true},"impressionData":false},{"name":"rbac-expansion","enabled":true,"variant":{"name":"disabled","enabled":false,"feature_enabled":true},"impressionData":false},{"name":"automations-pr-grouping","enabled":true,"variant":{"name":"disabled","enabled":false,"feature_enabled":true},"impressionData":false},{"name":"custom-prefix","enabled":true,"variant":{"name":"disabled","enabled":false,"feature_enabled":true},"impressionData":false},{"name":"analytics-v7","enabled":true,"variant":{"name":"disabled","enabled":false,"feature_enabled":true},"impressionData":false},{"name":"user-flows-analytics","enabled":true,"variant":{"name":"disabled","enabled":false,"feature_enabled":true},"impressionData":false},{"name":"no-publish-flow","enabled":true,"variant":{"name":"disabled","enabled":false,"feature_enabled":true},"impressionData":false},{"name":"workos-onboarding","enabled":true,"variant":{"name":"disabled","enabled":false,"feature_enabled":true},"impressionData":false},{"name":"llms-txt-v2","enabled":true,"variant":{"name":"disabled","enabled":false,"feature_enabled":true},"impressionData":false},{"name":"snapshot-serving-live","enabled":true,"variant":{"name":"disabled","enabled":false,"feature_enabled":true},"impressionData":false},{"name":"stripTemperatureMiddleware","enabled":true,"variant":{"name":"disabled","enabled":false,"feature_enabled":true},"impressionData":false},{"name":"support-platform-pylon-zendesk","enabled":true,"variant":{"name":"disabled","enabled":false,"feature_enabled":true},"impressionData":false},{"name":"snapshot-serving","enabled":true,"variant":{"name":"disabled","enabled":false,"feature_enabled":true},"impressionData":false},{"name":"instant-rollback","enabled":true,"variant":{"name":"disabled","enabled":false,"feature_enabled":true},"impressionData":false},{"name":"granular-notifications-server","enabled":true,"variant":{"name":"disabled","enabled":false,"feature_enabled":true},"impressionData":false},{"name":"granular-notifications","enabled":true,"variant":{"name":"disabled","enabled":false,"feature_enabled":true},"impressionData":false},{"name":"automations-fable","enabled":true,"variant":{"name":"disabled","enabled":false,"feature_enabled":true},"impressionData":false},{"name":"fixed-ai-action-pricing","enabled":true,"variant":{"name":"disabled","enabled":false,"feature_enabled":true},"impressionData":false},{"name":"automation-resolve-merge-conflict","enabled":true,"variant":{"name":"disabled","enabled":false,"feature_enabled":true},"impressionData":false},{"name":"scoped-publishing","enabled":true,"variant":{"name":"disabled","enabled":false,"feature_enabled":true},"impressionData":false},{"name":"mintql","enabled":true,"variant":{"name":"disabled","enabled":false,"feature_enabled":true},"impressionData":false},{"name":"page-level-analytics","enabled":true,"variant":{"name":"disabled","enabled":false,"feature_enabled":true},"impressionData":false},{"name":"editor-version-history-v2","enabled":true,"variant":{"name":"disabled","enabled":false,"feature_enabled":true},"impressionData":false},{"name":"billing-page-v2","enabled":true,"variant":{"name":"disabled","enabled":false,"feature_enabled":true},"impressionData":false},{"name":"full-page-search","enabled":true,"variant":{"name":"disabled","enabled":false,"feature_enabled":true},"impressionData":false},{"name":"workspace-projects","enabled":true,"variant":{"name":"disabled","enabled":false,"feature_enabled":true},"impressionData":false},{"name":"assistant-v5","enabled":true,"variant":{"name":"disabled","enabled":false,"feature_enabled":true},"impressionData":false},{"name":"fork-pr-previews","enabled":true,"variant":{"name":"disabled","enabled":false,"feature_enabled":true},"impressionData":false},{"name":"revalidation-jwt","enabled":true,"variant":{"name":"disabled","enabled":false,"feature_enabled":true},"impressionData":false},{"name":"workos-sso-scim","enabled":true,"variant":{"name":"disabled","enabled":false,"feature_enabled":true},"impressionData":false},{"name":"hobby-abuse-scan","enabled":true,"variant":{"name":"disabled","enabled":false,"feature_enabled":true},"impressionData":false},{"name":"dashboard-inbox","enabled":true,"variant":{"name":"disabled","enabled":false,"feature_enabled":true},"impressionData":false},{"name":"workos-signup","enabled":true,"variant":{"name":"disabled","enabled":false,"feature_enabled":true},"impressionData":false},{"name":"turbopuffer-dual-write","enabled":true,"variant":{"name":"disabled","enabled":false,"feature_enabled":true},"impressionData":false},{"name":"workos-enabled","enabled":true,"variant":{"name":"disabled","enabled":false,"feature_enabled":true},"impressionData":false},{"name":"approve-review-flow","enabled":true,"variant":{"name":"disabled","enabled":false,"feature_enabled":true},"impressionData":false},{"name":"editor-metadata","enabled":true,"variant":{"name":"disabled","enabled":false,"feature_enabled":true},"impressionData":false},{"name":"sso-setup-deadline-banner","enabled":true,"variant":{"name":"disabled","enabled":false,"feature_enabled":true},"impressionData":false},{"name":"turbopuffer-serve","enabled":true,"variant":{"name":"disabled","enabled":false,"feature_enabled":true},"impressionData":false},{"name":"live-agents","enabled":true,"variant":{"name":"disabled","enabled":false,"feature_enabled":true},"impressionData":false}],"starterQuestions":[{"_id":"68f8934ac32e3459832881b0","deploymentId":"6792c6d6e85c02040dc386df","questionText":"Which plans come with a free domain?","status":"active","generatedBy":"manual","createdAt":"2025-10-22T08:18:18.293Z","updatedAt":"2025-10-22T08:18:18.293Z","__v":0},{"_id":"68f892c4c32e345983287064","deploymentId":"6792c6d6e85c02040dc386df","questionText":"How are credits used?","status":"active","generatedBy":"manual","createdAt":"2025-10-22T08:16:04.700Z","updatedAt":"2025-10-22T08:16:24.261Z","__v":0},{"_id":"68f892aec32e345983286ddf","deploymentId":"6792c6d6e85c02040dc386df","questionText":"How do I use Discuss mode?","status":"active","generatedBy":"manual","createdAt":"2025-10-22T08:15:42.469Z","updatedAt":"2025-10-22T08:15:42.469Z","__v":0}],"googleFontsInlined":false},"customCss":[{"filePath":"custom.css","href":"/_mintlify/custom/base44/5b5842685c884e06/custom.css"}],"page":{"pagePath":"Building-your-app/managing-workflows","slug":"/Building-your-app/managing-workflows","pageMetadata":{"title":"Managing workflows","description":"Turn your Base44 app's workflows and hooks on or off, edit, rename, run and archive them, review every run, and keep their integration credit use under control.","sidebarTitle":"Managing workflows","href":"/Building-your-app/managing-workflows"},"description":{"compiledSource":"\"use strict\";\nconst {jsx: _jsx} = arguments[0];\nconst {useMDXComponents: _provideComponents} = arguments[0];\nfunction _createMdxContent(props) {\n const _components = {\n p: \"p\",\n ..._provideComponents(),\n ...props.components\n };\n return _jsx(_components.p, {\n children: \"Turn your Base44 app’s workflows and hooks on or off, edit, rename, run and archive them, review every run, and keep their integration credit use under control.\"\n });\n}\nfunction MDXContent(props = {}) {\n const {wrapper: MDXLayout} = {\n ..._provideComponents(),\n ...props.components\n };\n return MDXLayout ? _jsx(MDXLayout, {\n ...props,\n children: _jsx(_createMdxContent, {\n ...props\n })\n }) : _createMdxContent(props);\n}\nreturn {\n default: MDXContent\n};\n","frontmatter":{},"scope":{}},"pageType":"default","mdx":{"mdxSource":{"compiledSource":"\"use strict\";const{Fragment:_Fragment,jsx:_jsx,jsxs:_jsxs}=arguments[0];const{useMDXComponents:_provideComponents}=arguments[0];function _createMdxContent(props){const _components={a:`a`,code:`code`,hr:`hr`,li:`li`,ol:`ol`,p:`p`,pre:`pre`,span:`span`,strong:`strong`,ul:`ul`,..._provideComponents(),...props.components},{Accordion,AccordionGroup,Card,CodeBlock,Frame,Heading,Icon,Note,OptimizedImage,Tip,Warning}=_components;if(!Accordion)_missingMdxReference(`Accordion`,true);if(!AccordionGroup)_missingMdxReference(`AccordionGroup`,true);if(!Card)_missingMdxReference(`Card`,true);if(!CodeBlock)_missingMdxReference(`CodeBlock`,true);if(!Frame)_missingMdxReference(`Frame`,true);if(!Heading)_missingMdxReference(`Heading`,true);if(!Icon)_missingMdxReference(`Icon`,true);if(!Note)_missingMdxReference(`Note`,true);if(!OptimizedImage)_missingMdxReference(`OptimizedImage`,true);if(!Tip)_missingMdxReference(`Tip`,true);if(!Warning)_missingMdxReference(`Warning`,true);return _jsxs(_Fragment,{children:[_jsxs(_components.p,{children:[`After you `,_jsx(_components.a,{href:`/Building-your-app/Creating-workflows`,children:`create a workflow`}),`, you manage it from the `,_jsx(_components.strong,{children:`Workflows`}),` page in your app’s dashboard. Turn it on or off, change what it does, run it on demand, review every run and keep an eye on the credits it uses.`]}),`\n`,_jsxs(_components.p,{children:[_jsx(_components.a,{href:`/Building-your-app/creating-hooks`,children:`Hooks`}),`, the workflows that check your rules before an action in your app, work the same way. Where something is different for a hook, the section says so.`]}),`\n`,_jsx(_components.hr,{}),`\n`,_jsx(Heading,{level:`2`,id:`changing-a-workflow`,children:`Changing a workflow`}),`\n`,_jsxs(_components.p,{children:[`After you start using workflows, you can control when they run, change what they do, rename them, trigger them on demand, or clean up workflows you no longer need. Each workflow shows an `,_jsx(_components.strong,{children:`Active`}),` or `,_jsx(_components.strong,{children:`Inactive`}),` status, and you can deactivate one to pause it and reactivate it whenever you need it.`]}),`\n`,_jsx(Heading,{level:`3`,id:`turning-a-workflow-on-or-off`,children:`Turning a workflow on or off`}),`\n`,_jsx(_components.p,{children:`Deactivate a workflow when you want to stop it running, and activate it again when you need it. Deactivating stops new runs from starting, but the run history stays available.`}),`\n`,_jsxs(_components.p,{children:[`Turning a `,_jsx(_components.a,{href:`/Building-your-app/creating-hooks`,children:`hook`}),` off turns its rule off, so the action it protects goes through without any check until you turn it back on. When you turn off a hook, your app asks you to confirm, so click `,_jsx(_components.strong,{children:`Deactivate`}),` in the dialog.`]}),`\n`,_jsx(_components.p,{children:_jsx(_components.strong,{children:`To turn a workflow on or off:`})}),`\n`,_jsxs(_components.ol,{children:[`\n`,_jsxs(_components.li,{children:[`Click `,_jsx(_components.strong,{children:`Dashboard`}),` in your app editor.`]}),`\n`,_jsxs(_components.li,{children:[`Click `,_jsx(_components.strong,{children:`Workflows`}),`.`]}),`\n`,_jsxs(_components.li,{children:[`Click the `,_jsx(_components.strong,{children:`More actions`}),` icon `,_jsx(Icon,{icon:`ellipsis`}),` on the workflow.`]}),`\n`,_jsxs(_components.li,{children:[`Click `,_jsx(_components.strong,{children:`Deactivate`}),` or `,_jsx(_components.strong,{children:`Activate`}),`.`]}),`\n`]}),`\n`,_jsxs(_components.p,{children:[`You can also open a workflow and use the `,_jsx(_components.strong,{children:`Active`}),` toggle in the details panel.`]}),`\n`,_jsx(Frame,{caption:`Deactivating a workflow from the More actions menu.`,children:_jsx(OptimizedImage,{src:`https://mintcdn.com/base44/PZ7PRS_0Vw5N4HxF/images/deactivateworkflow.png?fit=max\u0026auto=format\u0026n=PZ7PRS_0Vw5N4HxF\u0026q=85\u0026s=942750c997392bee69281fafda0d77ab`,alt:`Workflow menu with the Deactivate option highlighted`,\"data-og-width\":`1081`,width:`1081`,\"data-og-height\":`572`,height:`572`,\"data-path\":`images/deactivateworkflow.png`,\"data-optimize\":`true`,\"data-opv\":`3`,srcset:`https://mintcdn.com/base44/PZ7PRS_0Vw5N4HxF/images/deactivateworkflow.png?w=280\u0026fit=max\u0026auto=format\u0026n=PZ7PRS_0Vw5N4HxF\u0026q=85\u0026s=9bdf40296270008fc14b4dac275ae9df 280w, https://mintcdn.com/base44/PZ7PRS_0Vw5N4HxF/images/deactivateworkflow.png?w=560\u0026fit=max\u0026auto=format\u0026n=PZ7PRS_0Vw5N4HxF\u0026q=85\u0026s=f8881d1d5c0bac8a8246e7b820b1b97f 560w, https://mintcdn.com/base44/PZ7PRS_0Vw5N4HxF/images/deactivateworkflow.png?w=840\u0026fit=max\u0026auto=format\u0026n=PZ7PRS_0Vw5N4HxF\u0026q=85\u0026s=5c5a22f5f2cc54c40603450e022d7890 840w, https://mintcdn.com/base44/PZ7PRS_0Vw5N4HxF/images/deactivateworkflow.png?w=1100\u0026fit=max\u0026auto=format\u0026n=PZ7PRS_0Vw5N4HxF\u0026q=85\u0026s=37f820bbb528038c8851834df9901a90 1100w, https://mintcdn.com/base44/PZ7PRS_0Vw5N4HxF/images/deactivateworkflow.png?w=1650\u0026fit=max\u0026auto=format\u0026n=PZ7PRS_0Vw5N4HxF\u0026q=85\u0026s=0b249a50562fe6ddd15451b6a186f274 1650w, https://mintcdn.com/base44/PZ7PRS_0Vw5N4HxF/images/deactivateworkflow.png?w=2500\u0026fit=max\u0026auto=format\u0026n=PZ7PRS_0Vw5N4HxF\u0026q=85\u0026s=6a82bd44659da3a9f935bcde78daa097 2500w`})}),`\n`,_jsx(Heading,{level:`3`,id:`editing-a-workflow`,children:`Editing a workflow`}),`\n`,_jsx(_components.p,{children:`To change what a workflow does, edit it from its diagram or just describe the change in the AI chat. Every edit option opens the AI chat with a pre-filled prompt and the AI makes the change for you, so there is nothing to edit by hand.`}),`\n`,_jsxs(AccordionGroup,{children:[_jsxs(Accordion,{title:`Editing a step`,id:`editing-a-step`,children:[_jsxs(_components.p,{children:[`Click a step’s `,_jsx(_components.strong,{children:`Edit`}),` icon to change what the step does or replace it with a different step.`]}),_jsx(Frame,{caption:`Editing a step.`,children:_jsx(OptimizedImage,{src:`https://mintcdn.com/base44/I1QI0alPKQovwbjh/images/editing-a-step.png?fit=max\u0026auto=format\u0026n=I1QI0alPKQovwbjh\u0026q=85\u0026s=1ffb17c143ef9e8f24f56015cb89cf03`,alt:`A workflow with a scheduled trigger and a send daily reminders action, and the edit menu open on Change what this step does and Replace this step`,\"data-og-width\":`1366`,width:`1366`,\"data-og-height\":`590`,height:`590`,\"data-path\":`images/editing-a-step.png`,\"data-optimize\":`true`,\"data-opv\":`3`,srcset:`https://mintcdn.com/base44/I1QI0alPKQovwbjh/images/editing-a-step.png?w=280\u0026fit=max\u0026auto=format\u0026n=I1QI0alPKQovwbjh\u0026q=85\u0026s=08583b4623b66cb31a0756a6b438a594 280w, https://mintcdn.com/base44/I1QI0alPKQovwbjh/images/editing-a-step.png?w=560\u0026fit=max\u0026auto=format\u0026n=I1QI0alPKQovwbjh\u0026q=85\u0026s=1307260166da84908497179f32bbfd9b 560w, https://mintcdn.com/base44/I1QI0alPKQovwbjh/images/editing-a-step.png?w=840\u0026fit=max\u0026auto=format\u0026n=I1QI0alPKQovwbjh\u0026q=85\u0026s=f168d42b56a600eaed910df01d06a1d2 840w, https://mintcdn.com/base44/I1QI0alPKQovwbjh/images/editing-a-step.png?w=1100\u0026fit=max\u0026auto=format\u0026n=I1QI0alPKQovwbjh\u0026q=85\u0026s=09ba571404467aff86818782c5ce0e58 1100w, https://mintcdn.com/base44/I1QI0alPKQovwbjh/images/editing-a-step.png?w=1650\u0026fit=max\u0026auto=format\u0026n=I1QI0alPKQovwbjh\u0026q=85\u0026s=1635211aa7f5ff7f0d47640f766ab01f 1650w, https://mintcdn.com/base44/I1QI0alPKQovwbjh/images/editing-a-step.png?w=2500\u0026fit=max\u0026auto=format\u0026n=I1QI0alPKQovwbjh\u0026q=85\u0026s=f16e32345048c878e63bdaef4e4562b0 2500w`})})]}),_jsxs(Accordion,{title:`Editing the trigger`,id:`editing-the-trigger`,children:[_jsxs(_components.ul,{children:[`\n`,_jsxs(_components.li,{children:[`Click the trigger’s `,_jsx(_components.strong,{children:`Edit`}),` icon to change which events trigger the workflow.`]}),`\n`,_jsxs(_components.li,{children:[`Click the `,_jsx(_components.strong,{children:`Replace trigger`}),` icon to switch to a different trigger, such as a scheduled, connector, in-app agent, or entity trigger.`]}),`\n`]}),_jsx(Frame,{caption:`Replacing a workflow's trigger.`,children:_jsx(OptimizedImage,{src:`https://mintcdn.com/base44/I1QI0alPKQovwbjh/images/edit-workflow-trigger.png?fit=max\u0026auto=format\u0026n=I1QI0alPKQovwbjh\u0026q=85\u0026s=1c2ab8eeee27eea931bb25ac37171051`,alt:`The trigger picker open beside a workflow, offering the scheduled options One time, Recurring and On an interval, then connectors, agents and entities`,\"data-og-width\":`1286`,width:`1286`,\"data-og-height\":`1090`,height:`1090`,\"data-path\":`images/edit-workflow-trigger.png`,\"data-optimize\":`true`,\"data-opv\":`3`,srcset:`https://mintcdn.com/base44/I1QI0alPKQovwbjh/images/edit-workflow-trigger.png?w=280\u0026fit=max\u0026auto=format\u0026n=I1QI0alPKQovwbjh\u0026q=85\u0026s=d218043993bb5da9954eef15a9e3fcc1 280w, https://mintcdn.com/base44/I1QI0alPKQovwbjh/images/edit-workflow-trigger.png?w=560\u0026fit=max\u0026auto=format\u0026n=I1QI0alPKQovwbjh\u0026q=85\u0026s=f7167717770ba0555dc0ef120eb07b36 560w, https://mintcdn.com/base44/I1QI0alPKQovwbjh/images/edit-workflow-trigger.png?w=840\u0026fit=max\u0026auto=format\u0026n=I1QI0alPKQovwbjh\u0026q=85\u0026s=1f0a6e90c9654e81fddacd61efaba755 840w, https://mintcdn.com/base44/I1QI0alPKQovwbjh/images/edit-workflow-trigger.png?w=1100\u0026fit=max\u0026auto=format\u0026n=I1QI0alPKQovwbjh\u0026q=85\u0026s=82d02a52dc348f8eced8dc751db6b206 1100w, https://mintcdn.com/base44/I1QI0alPKQovwbjh/images/edit-workflow-trigger.png?w=1650\u0026fit=max\u0026auto=format\u0026n=I1QI0alPKQovwbjh\u0026q=85\u0026s=083523dce4fc2e842ffbc5cc5cbf485c 1650w, https://mintcdn.com/base44/I1QI0alPKQovwbjh/images/edit-workflow-trigger.png?w=2500\u0026fit=max\u0026auto=format\u0026n=I1QI0alPKQovwbjh\u0026q=85\u0026s=75add243a4df46b8cdaaca37bce10451 2500w`})})]}),_jsxs(Accordion,{title:`Adding a step`,id:`adding-a-step`,children:[_jsxs(_components.p,{children:[`Click the add button below a step, then choose `,_jsx(_components.strong,{children:`Action`}),` or `,_jsx(_components.strong,{children:`Condition`}),`.`]}),_jsx(Frame,{caption:`Adding a step to a workflow.`,children:_jsx(OptimizedImage,{src:`https://mintcdn.com/base44/I1QI0alPKQovwbjh/images/adding-a-step-workflow.png?fit=max\u0026auto=format\u0026n=I1QI0alPKQovwbjh\u0026q=85\u0026s=af4a3ab487ca56da3a2828ba72f87096`,alt:`The plus control below a workflow action, with an Add a step after this tooltip and a menu offering Action or Condition`,\"data-og-width\":`770`,width:`770`,\"data-og-height\":`740`,height:`740`,\"data-path\":`images/adding-a-step-workflow.png`,\"data-optimize\":`true`,\"data-opv\":`3`,srcset:`https://mintcdn.com/base44/I1QI0alPKQovwbjh/images/adding-a-step-workflow.png?w=280\u0026fit=max\u0026auto=format\u0026n=I1QI0alPKQovwbjh\u0026q=85\u0026s=6f5d14949a787623495241f8f78f7e52 280w, https://mintcdn.com/base44/I1QI0alPKQovwbjh/images/adding-a-step-workflow.png?w=560\u0026fit=max\u0026auto=format\u0026n=I1QI0alPKQovwbjh\u0026q=85\u0026s=9c91187cfb5cc41425073eb74873b10d 560w, https://mintcdn.com/base44/I1QI0alPKQovwbjh/images/adding-a-step-workflow.png?w=840\u0026fit=max\u0026auto=format\u0026n=I1QI0alPKQovwbjh\u0026q=85\u0026s=053adeebedbf4eaa9518a1997645eb31 840w, https://mintcdn.com/base44/I1QI0alPKQovwbjh/images/adding-a-step-workflow.png?w=1100\u0026fit=max\u0026auto=format\u0026n=I1QI0alPKQovwbjh\u0026q=85\u0026s=71156a3e88896d7c4dd69ee9580e317f 1100w, https://mintcdn.com/base44/I1QI0alPKQovwbjh/images/adding-a-step-workflow.png?w=1650\u0026fit=max\u0026auto=format\u0026n=I1QI0alPKQovwbjh\u0026q=85\u0026s=1b2d871b330e6e7dacc11d6a698c9b9d 1650w, https://mintcdn.com/base44/I1QI0alPKQovwbjh/images/adding-a-step-workflow.png?w=2500\u0026fit=max\u0026auto=format\u0026n=I1QI0alPKQovwbjh\u0026q=85\u0026s=06aca8227fdf9342d6627780de4ad28c 2500w`})})]})]}),`\n`,_jsx(Note,{children:_jsx(_components.p,{children:`Changing a workflow’s steps creates a new version. Runs already in progress finish on the version they started with, and new runs use the latest version.`})}),`\n`,_jsx(Heading,{level:`3`,id:`renaming-a-workflow`,children:`Renaming a workflow`}),`\n`,_jsx(_components.p,{children:`Give a workflow a clearer name at any time. Renaming does not create a new version.`}),`\n`,_jsx(_components.p,{children:_jsx(_components.strong,{children:`To rename a workflow:`})}),`\n`,_jsxs(_components.ol,{children:[`\n`,_jsxs(_components.li,{children:[`Click `,_jsx(_components.strong,{children:`Dashboard`}),` in your app editor.`]}),`\n`,_jsxs(_components.li,{children:[`Click `,_jsx(_components.strong,{children:`Workflows`}),`.`]}),`\n`,_jsxs(_components.li,{children:[`Click the `,_jsx(_components.strong,{children:`More actions`}),` icon `,_jsx(Icon,{icon:`ellipsis`}),` on the workflow.`]}),`\n`,_jsxs(_components.li,{children:[`Click `,_jsx(_components.strong,{children:`Rename`}),` and enter the new name.`]}),`\n`]}),`\n`,_jsx(Frame,{caption:`Renaming a workflow from the More actions menu.`,children:_jsx(OptimizedImage,{src:`https://mintcdn.com/base44/1snwrMHc8GN-cqaS/images/renameworkflow.png?fit=max\u0026auto=format\u0026n=1snwrMHc8GN-cqaS\u0026q=85\u0026s=ab9e40010d4ef4eb6a680e829bf6a764`,alt:`The Workflows list with 3 active workflows and a menu open on the first, with Rename above Deactivate and Archive`,\"data-og-width\":`1081`,width:`1081`,\"data-og-height\":`572`,height:`572`,\"data-path\":`images/renameworkflow.png`,\"data-optimize\":`true`,\"data-opv\":`3`,srcset:`https://mintcdn.com/base44/1snwrMHc8GN-cqaS/images/renameworkflow.png?w=280\u0026fit=max\u0026auto=format\u0026n=1snwrMHc8GN-cqaS\u0026q=85\u0026s=40e3da3f86e1429b35d348273c691bb9 280w, https://mintcdn.com/base44/1snwrMHc8GN-cqaS/images/renameworkflow.png?w=560\u0026fit=max\u0026auto=format\u0026n=1snwrMHc8GN-cqaS\u0026q=85\u0026s=39834bbb8a171a60d3cc568ee7e4f8f2 560w, https://mintcdn.com/base44/1snwrMHc8GN-cqaS/images/renameworkflow.png?w=840\u0026fit=max\u0026auto=format\u0026n=1snwrMHc8GN-cqaS\u0026q=85\u0026s=65c253200305decea64d31a88aed20f2 840w, https://mintcdn.com/base44/1snwrMHc8GN-cqaS/images/renameworkflow.png?w=1100\u0026fit=max\u0026auto=format\u0026n=1snwrMHc8GN-cqaS\u0026q=85\u0026s=f005b5853fcb2604cce225da587e454c 1100w, https://mintcdn.com/base44/1snwrMHc8GN-cqaS/images/renameworkflow.png?w=1650\u0026fit=max\u0026auto=format\u0026n=1snwrMHc8GN-cqaS\u0026q=85\u0026s=12e46ed2fdb9b100a6890b406b141dda 1650w, https://mintcdn.com/base44/1snwrMHc8GN-cqaS/images/renameworkflow.png?w=2500\u0026fit=max\u0026auto=format\u0026n=1snwrMHc8GN-cqaS\u0026q=85\u0026s=3182f6638bcb3063cc69b5b03646e07a 2500w`})}),`\n`,_jsx(Heading,{level:`3`,id:`running-a-workflow-immediately`,children:`Running a workflow immediately`}),`\n`,_jsx(_components.p,{children:`Run a workflow right away when you want to start it on demand. This helps you test changes, confirm that your configuration works, or handle something urgent between scheduled runs.`}),`\n`,_jsxs(_components.p,{children:[`For a hook, `,_jsx(_components.strong,{children:`Run now`}),` tests it with data from a previous run instead. `,_jsx(_components.a,{href:`/Building-your-app/creating-hooks#testing-a-hook`,children:`Learn how testing a hook works`}),`.`]}),`\n`,_jsxs(Warning,{children:[_jsx(_components.p,{children:_jsx(_components.strong,{children:`What Run now does:`})}),_jsxs(_components.ul,{children:[`\n`,_jsx(_components.li,{children:`It executes real actions using your current configuration, such as sending real emails or updating real records.`}),`\n`,_jsx(_components.li,{children:`It’s a one-time manual run that doesn’t affect your schedule or trigger, and it appears in the run history labeled as a test.`}),`\n`,_jsx(_components.li,{children:`When earlier runs exist, you can also replay the workflow using the data from a previous run.`}),`\n`]})]}),`\n`,_jsx(_components.p,{children:_jsx(_components.strong,{children:`To run a workflow:`})}),`\n`,_jsxs(_components.ol,{children:[`\n`,_jsxs(_components.li,{children:[`Click `,_jsx(_components.strong,{children:`Dashboard`}),` in your app editor.`]}),`\n`,_jsxs(_components.li,{children:[`Click `,_jsx(_components.strong,{children:`Workflows`}),`.`]}),`\n`,_jsx(_components.li,{children:`Click the workflow to open it.`}),`\n`,_jsxs(_components.li,{children:[`Click `,_jsx(_components.strong,{children:`Run now`}),` in the details panel.`]}),`\n`,_jsxs(_components.li,{children:[`In the confirmation dialog, click `,_jsx(_components.strong,{children:`Run now`}),` again.`]}),`\n`]}),`\n`,_jsx(Frame,{caption:`Running a workflow on demand with Run now.`,children:_jsx(OptimizedImage,{src:`https://mintcdn.com/base44/1snwrMHc8GN-cqaS/images/runnowworkflow.png?fit=max\u0026auto=format\u0026n=1snwrMHc8GN-cqaS\u0026q=85\u0026s=24b22abea53f715b43638bc84f42f3b7`,alt:`Workflow side panel with Run now outlined above its run history`,\"data-og-width\":`1020`,width:`1020`,\"data-og-height\":`698`,height:`698`,\"data-path\":`images/runnowworkflow.png`,\"data-optimize\":`true`,\"data-opv\":`3`,srcset:`https://mintcdn.com/base44/1snwrMHc8GN-cqaS/images/runnowworkflow.png?w=280\u0026fit=max\u0026auto=format\u0026n=1snwrMHc8GN-cqaS\u0026q=85\u0026s=4bd2919f514bc1dfeda42f1a2280b7d7 280w, https://mintcdn.com/base44/1snwrMHc8GN-cqaS/images/runnowworkflow.png?w=560\u0026fit=max\u0026auto=format\u0026n=1snwrMHc8GN-cqaS\u0026q=85\u0026s=39b82c7294de44d12ac9ef7da7d272bc 560w, https://mintcdn.com/base44/1snwrMHc8GN-cqaS/images/runnowworkflow.png?w=840\u0026fit=max\u0026auto=format\u0026n=1snwrMHc8GN-cqaS\u0026q=85\u0026s=a7810eb10e7732b0b430dd0ed9923cfe 840w, https://mintcdn.com/base44/1snwrMHc8GN-cqaS/images/runnowworkflow.png?w=1100\u0026fit=max\u0026auto=format\u0026n=1snwrMHc8GN-cqaS\u0026q=85\u0026s=f11a9d3daf886400f3fbdcca47b20551 1100w, https://mintcdn.com/base44/1snwrMHc8GN-cqaS/images/runnowworkflow.png?w=1650\u0026fit=max\u0026auto=format\u0026n=1snwrMHc8GN-cqaS\u0026q=85\u0026s=4fe4dd893b9ac8e5887fe78b4fcd65f5 1650w, https://mintcdn.com/base44/1snwrMHc8GN-cqaS/images/runnowworkflow.png?w=2500\u0026fit=max\u0026auto=format\u0026n=1snwrMHc8GN-cqaS\u0026q=85\u0026s=0890c253fb80c0c8fbd782a50e5d4db2 2500w`})}),`\n`,_jsx(Heading,{level:`3`,id:`cancelling-a-run`,children:`Cancelling a run`}),`\n`,_jsxs(_components.p,{children:[`If a workflow is running and you need to stop it, you can cancel the run while it is still in progress. The cancelled run shows as `,_jsx(_components.strong,{children:`Cancelled`}),` in the run history.`]}),`\n`,_jsx(_components.p,{children:_jsx(_components.strong,{children:`To cancel a run:`})}),`\n`,_jsxs(_components.ol,{children:[`\n`,_jsxs(_components.li,{children:[`Click `,_jsx(_components.strong,{children:`Dashboard`}),` in your app editor.`]}),`\n`,_jsxs(_components.li,{children:[`Click `,_jsx(_components.strong,{children:`Workflows`}),`.`]}),`\n`,_jsx(_components.li,{children:`Click the workflow to open it.`}),`\n`,_jsxs(_components.li,{children:[`Click the run that is in progress, then click `,_jsx(_components.strong,{children:`Cancel run`}),`.`]}),`\n`]}),`\n`,_jsx(Heading,{level:`3`,id:`archiving-a-workflow`,children:`Archiving a workflow`}),`\n`,_jsx(_components.p,{children:`If you do not need a workflow anymore, you can archive it to keep your active list clean.`}),`\n`,_jsxs(_components.p,{children:[`Archiving a `,_jsx(_components.a,{href:`/Building-your-app/creating-hooks`,children:`hook`}),` turns its rule off too, so your app asks you to confirm before it archives one.`]}),`\n`,_jsx(_components.p,{children:_jsx(_components.strong,{children:`To archive a workflow:`})}),`\n`,_jsxs(_components.ol,{children:[`\n`,_jsxs(_components.li,{children:[`Click `,_jsx(_components.strong,{children:`Dashboard`}),` in your app editor.`]}),`\n`,_jsxs(_components.li,{children:[`Click `,_jsx(_components.strong,{children:`Workflows`}),`.`]}),`\n`,_jsxs(_components.li,{children:[`Click the `,_jsx(_components.strong,{children:`More actions`}),` icon `,_jsx(Icon,{icon:`ellipsis`}),` on the workflow.`]}),`\n`,_jsxs(_components.li,{children:[`Click `,_jsx(_components.strong,{children:`Archive`}),`.`]}),`\n`]}),`\n`,_jsx(Frame,{caption:`Archiving a workflow from the More actions menu.`,children:_jsx(OptimizedImage,{src:`https://mintcdn.com/base44/NYgUQIX5TN3t0K3a/images/archiveworkflow.png?fit=max\u0026auto=format\u0026n=NYgUQIX5TN3t0K3a\u0026q=85\u0026s=01d21d2aae7bb866e3e5c70f70588a13`,alt:`The Workflows list with a menu open on the first workflow and Archive outlined, below Rename and Deactivate`,\"data-og-width\":`1081`,width:`1081`,\"data-og-height\":`572`,height:`572`,\"data-path\":`images/archiveworkflow.png`,\"data-optimize\":`true`,\"data-opv\":`3`,srcset:`https://mintcdn.com/base44/NYgUQIX5TN3t0K3a/images/archiveworkflow.png?w=280\u0026fit=max\u0026auto=format\u0026n=NYgUQIX5TN3t0K3a\u0026q=85\u0026s=a51c9dca3ac89c345db43fe678da7b5e 280w, https://mintcdn.com/base44/NYgUQIX5TN3t0K3a/images/archiveworkflow.png?w=560\u0026fit=max\u0026auto=format\u0026n=NYgUQIX5TN3t0K3a\u0026q=85\u0026s=94d2f29bfad1275db898da6e5bda03b7 560w, https://mintcdn.com/base44/NYgUQIX5TN3t0K3a/images/archiveworkflow.png?w=840\u0026fit=max\u0026auto=format\u0026n=NYgUQIX5TN3t0K3a\u0026q=85\u0026s=0bd4be32cc64c1aceb4fcdcbfc373864 840w, https://mintcdn.com/base44/NYgUQIX5TN3t0K3a/images/archiveworkflow.png?w=1100\u0026fit=max\u0026auto=format\u0026n=NYgUQIX5TN3t0K3a\u0026q=85\u0026s=fdeb0a54c50b311ed3bcc80f82c23bbf 1100w, https://mintcdn.com/base44/NYgUQIX5TN3t0K3a/images/archiveworkflow.png?w=1650\u0026fit=max\u0026auto=format\u0026n=NYgUQIX5TN3t0K3a\u0026q=85\u0026s=917875a161428b9882ee410d477af4bf 1650w, https://mintcdn.com/base44/NYgUQIX5TN3t0K3a/images/archiveworkflow.png?w=2500\u0026fit=max\u0026auto=format\u0026n=NYgUQIX5TN3t0K3a\u0026q=85\u0026s=324321dd1b9997797f701eb5e61df266 2500w`})}),`\n`,_jsx(Tip,{children:_jsxs(_components.p,{children:[`To see or restore archived workflows, click the `,_jsx(_components.strong,{children:`More actions`}),` icon `,_jsx(Icon,{icon:`ellipsis`}),` next to `,_jsx(_components.strong,{children:`Create workflow`}),`, then click `,_jsx(_components.strong,{children:`View archive`}),`.`]})}),`\n`,_jsx(_components.hr,{}),`\n`,_jsx(Heading,{level:`2`,id:`monitoring-runs`,children:`Monitoring runs`}),`\n`,_jsxs(_components.p,{children:[`Every workflow records each run so you can watch it happen in real time and review it afterward. Review a single workflow’s runs from its details panel, or see runs across all your workflows on the `,_jsx(_components.strong,{children:`Activity`}),` tab.`]}),`\n`,_jsx(Tip,{children:_jsx(_components.p,{children:`As a workflow runs, each step in the diagram shows a green checkmark when it completes successfully, so you can confirm at a glance that it works and see exactly where it stops if a step fails.`})}),`\n`,_jsx(Heading,{level:`3`,id:`viewing-a-workflow’s-runs`,children:`Viewing a workflow’s runs`}),`\n`,_jsxs(_components.p,{children:[`When you open a workflow, the details panel shows its `,_jsx(_components.strong,{children:`Success rate`}),`, `,_jsx(_components.strong,{children:`Avg. runtime`}),`, and a `,_jsx(_components.strong,{children:`Run history`}),` of every run. When something goes wrong, the run shows the exact step that failed and the error, so you know where to look without guessing.`]}),`\n`,_jsxs(_components.p,{children:[`A `,_jsx(_components.a,{href:`/Building-your-app/creating-hooks`,children:`hook’s`}),` details panel shows only its `,_jsx(_components.strong,{children:`Run history`}),`. When you open one of its runs, it shows whether the hook allowed or blocked the action, and a failed hook run counts as blocked.`]}),`\n`,_jsx(_components.p,{children:_jsx(_components.strong,{children:`To view a workflow’s runs:`})}),`\n`,_jsxs(_components.ol,{children:[`\n`,_jsxs(_components.li,{children:[`Click `,_jsx(_components.strong,{children:`Dashboard`}),` in your app editor.`]}),`\n`,_jsxs(_components.li,{children:[`Click `,_jsx(_components.strong,{children:`Workflows`}),`.`]}),`\n`,_jsx(_components.li,{children:`Click the workflow you want to inspect.`}),`\n`,_jsxs(_components.li,{children:[`In the details panel, review `,_jsx(_components.strong,{children:`Run history`}),`, where each run shows its time and status, such as `,_jsx(_components.strong,{children:`Completed`}),`.`]}),`\n`,_jsxs(_components.li,{children:[`Click a run to open its `,_jsx(_components.strong,{children:`Run log`}),`, including the start time, end time, and runtime.`]}),`\n`]}),`\n`,_jsx(Frame,{caption:`A workflow's details panel with its run history.`,children:_jsx(OptimizedImage,{src:`https://mintcdn.com/base44/2miaRY-R6HMQU8Ti/images/viewrunsworkflow.png?fit=max\u0026auto=format\u0026n=2miaRY-R6HMQU8Ti\u0026q=85\u0026s=cab18e8ee3074c3cccef1a83e80c84f7`,alt:`A completed workflow run shown in green on the canvas, beside a run log panel giving the description, start and end times and a runtime of 1.5 seconds`,\"data-og-width\":`1012`,width:`1012`,\"data-og-height\":`677`,height:`677`,\"data-path\":`images/viewrunsworkflow.png`,\"data-optimize\":`true`,\"data-opv\":`3`,srcset:`https://mintcdn.com/base44/2miaRY-R6HMQU8Ti/images/viewrunsworkflow.png?w=280\u0026fit=max\u0026auto=format\u0026n=2miaRY-R6HMQU8Ti\u0026q=85\u0026s=a90519b7cfe972c1c83f6a39dcf38635 280w, https://mintcdn.com/base44/2miaRY-R6HMQU8Ti/images/viewrunsworkflow.png?w=560\u0026fit=max\u0026auto=format\u0026n=2miaRY-R6HMQU8Ti\u0026q=85\u0026s=90f0269e48df185d4a6490744b06959b 560w, https://mintcdn.com/base44/2miaRY-R6HMQU8Ti/images/viewrunsworkflow.png?w=840\u0026fit=max\u0026auto=format\u0026n=2miaRY-R6HMQU8Ti\u0026q=85\u0026s=90b0316727c5fed2ae19f91cd41f5fe5 840w, https://mintcdn.com/base44/2miaRY-R6HMQU8Ti/images/viewrunsworkflow.png?w=1100\u0026fit=max\u0026auto=format\u0026n=2miaRY-R6HMQU8Ti\u0026q=85\u0026s=77d9fe3b4c1224d4751cce79a7fe0cb0 1100w, https://mintcdn.com/base44/2miaRY-R6HMQU8Ti/images/viewrunsworkflow.png?w=1650\u0026fit=max\u0026auto=format\u0026n=2miaRY-R6HMQU8Ti\u0026q=85\u0026s=afb2f8c6a3f3cbb4dcb1ca2a2f256ec8 1650w, https://mintcdn.com/base44/2miaRY-R6HMQU8Ti/images/viewrunsworkflow.png?w=2500\u0026fit=max\u0026auto=format\u0026n=2miaRY-R6HMQU8Ti\u0026q=85\u0026s=f47e79af9bd6cc263c62d12a54aefddb 2500w`})}),`\n`,_jsx(Heading,{level:`3`,id:`using-the-activity-tab`,children:`Using the Activity tab`}),`\n`,_jsxs(_components.p,{children:[`The `,_jsx(_components.strong,{children:`Activity`}),` tab under `,_jsx(_components.strong,{children:`Workflows`}),` in your app dashboard brings together runs from all your workflows in one place. Runs from `,_jsx(_components.a,{href:`/Building-your-app/creating-hooks`,children:`hooks`}),` are labeled as hooks.`]}),`\n`,_jsx(Tip,{children:_jsxs(_components.p,{children:[`Runs you start with `,_jsx(_components.strong,{children:`Run now`}),` are labeled `,_jsx(_components.strong,{children:`TEST`}),`, so you can tell them apart from runs that fired automatically.`]})}),`\n`,_jsx(_components.p,{children:_jsx(_components.strong,{children:`To view activity across workflows:`})}),`\n`,_jsxs(_components.ol,{children:[`\n`,_jsxs(_components.li,{children:[`Click `,_jsx(_components.strong,{children:`Dashboard`}),` in your app editor.`]}),`\n`,_jsxs(_components.li,{children:[`Click `,_jsx(_components.strong,{children:`Workflows`}),`.`]}),`\n`,_jsxs(_components.li,{children:[`Click the `,_jsx(_components.strong,{children:`Activity`}),` tab.`]}),`\n`,_jsxs(_components.li,{children:[`Review the list of runs, where each one shows its workflow, status, start time, and run time. Filter by status (`,_jsx(_components.strong,{children:`Running`}),`, `,_jsx(_components.strong,{children:`Completed`}),`, `,_jsx(_components.strong,{children:`Failed`}),`, or `,_jsx(_components.strong,{children:`Cancelled`}),`) or by time range.`]}),`\n`,_jsxs(_components.li,{children:[`Click `,_jsx(_components.strong,{children:`View`}),` on a run to open it in the workflow’s diagram alongside its run log.`]}),`\n`]}),`\n`,_jsx(Frame,{caption:`The Activity tab, showing runs across all your workflows.`,children:_jsx(OptimizedImage,{src:`https://mintcdn.com/base44/2miaRY-R6HMQU8Ti/images/workflowactivity.png?fit=max\u0026auto=format\u0026n=2miaRY-R6HMQU8Ti\u0026q=85\u0026s=f6e8b12bfc1065e10436ade1e0dd7c7f`,alt:`The Activity tab with search and status filters above a table of 3 completed workflow runs, each with its status, start time and run time`,\"data-og-width\":`1092`,width:`1092`,\"data-og-height\":`472`,height:`472`,\"data-path\":`images/workflowactivity.png`,\"data-optimize\":`true`,\"data-opv\":`3`,srcset:`https://mintcdn.com/base44/2miaRY-R6HMQU8Ti/images/workflowactivity.png?w=280\u0026fit=max\u0026auto=format\u0026n=2miaRY-R6HMQU8Ti\u0026q=85\u0026s=4899be7145da73ae752877031523b72b 280w, https://mintcdn.com/base44/2miaRY-R6HMQU8Ti/images/workflowactivity.png?w=560\u0026fit=max\u0026auto=format\u0026n=2miaRY-R6HMQU8Ti\u0026q=85\u0026s=6acd16df103f3a088af9a98c0c2511fa 560w, https://mintcdn.com/base44/2miaRY-R6HMQU8Ti/images/workflowactivity.png?w=840\u0026fit=max\u0026auto=format\u0026n=2miaRY-R6HMQU8Ti\u0026q=85\u0026s=a8962c232a17d811ea3313769b989691 840w, https://mintcdn.com/base44/2miaRY-R6HMQU8Ti/images/workflowactivity.png?w=1100\u0026fit=max\u0026auto=format\u0026n=2miaRY-R6HMQU8Ti\u0026q=85\u0026s=c561db124f73fb3e712efe95ccb0ee95 1100w, https://mintcdn.com/base44/2miaRY-R6HMQU8Ti/images/workflowactivity.png?w=1650\u0026fit=max\u0026auto=format\u0026n=2miaRY-R6HMQU8Ti\u0026q=85\u0026s=1a051fbabf0a7646b751832442308be7 1650w, https://mintcdn.com/base44/2miaRY-R6HMQU8Ti/images/workflowactivity.png?w=2500\u0026fit=max\u0026auto=format\u0026n=2miaRY-R6HMQU8Ti\u0026q=85\u0026s=6b9fab6a541b272c32e7da658bcd5efe 2500w`})}),`\n`,_jsx(_components.hr,{}),`\n`,_jsx(Heading,{level:`2`,id:`workflows-and-integration-credits`,children:`Workflows and integration credits`}),`\n`,_jsx(_components.p,{children:`Workflows are billed by the steps that run. Each step that runs a backend function uses a fraction of an integration credit, and the charges add up across all the steps in a single run. Built-in integrations that a step uses, such as sending an email or calling an AI model, can use credits too, as they do elsewhere in your app.`}),`\n`,_jsxs(_components.p,{children:[`A workflow with several steps therefore costs more per run than a single-step one, so keep an eye on how often your workflows run and what each step does. If you run out of integration credits while a run is in progress, that run is cancelled. `,_jsx(_components.a,{href:`/Account-and-billing/Credits`,children:`Learn more about credits.`})]}),`\n`,_jsxs(Card,{title:`Tips for managing credit usage`,color:`#FF5500`,icon:`lightbulb`,children:[_jsx(_components.p,{children:`Workflows that run frequently or chain several actions can drain your credit balance quickly. Here are some ways to keep usage under control:`}),_jsxs(_components.ul,{children:[`\n`,_jsxs(_components.li,{children:[_jsx(_components.strong,{children:`Add specific trigger conditions:`}),` Narrow the criteria that start a workflow so it does not run unnecessarily.`]}),`\n`,_jsxs(_components.li,{children:[_jsx(_components.strong,{children:`Use conditions to skip unneeded steps:`}),` Branch the workflow so expensive steps only run when they are actually needed.`]}),`\n`,_jsxs(_components.li,{children:[_jsx(_components.strong,{children:`Consolidate redundant workflows:`}),` If several workflows perform overlapping tasks, combine them into fewer, smarter ones.`]}),`\n`,_jsxs(_components.li,{children:[_jsx(_components.strong,{children:`Resolve failing workflows promptly:`}),` Workflows that error can still consume credits on each retry. Check your run history regularly and fix or disable problem workflows as soon as you spot them.`]}),`\n`,_jsxs(_components.li,{children:[_jsx(_components.strong,{children:`Review the frequency of scheduled workflows:`}),` Consider whether recurring workflows, such as daily reports or reminders, need to run as often as configured.`]}),`\n`,_jsxs(_components.li,{children:[_jsx(_components.strong,{children:`Be sparing with AI calls:`}),` If a step calls an AI model, that uses credits too, so only call it when you actually need the result.`]}),`\n`,_jsxs(_components.li,{children:[_jsx(_components.strong,{children:`Test on a small dataset first:`}),` Run a workflow manually and check its run history to estimate the per-run credit cost before enabling it at scale.`]}),`\n`]})]}),`\n`,_jsx(_components.hr,{}),`\n`,_jsx(Heading,{level:`2`,id:`faqs`,children:`FAQs`}),`\n`,_jsx(_components.p,{children:`Click a question below to learn more.`}),`\n`,_jsxs(AccordionGroup,{children:[_jsxs(Accordion,{title:`Can I add conditions to control when a step runs?`,id:`can-i-add-conditions-to-control-when-a-step-runs`,children:[_jsx(_components.p,{children:`Yes. Ask the AI chat to add conditions to any workflow or step. For example:`}),_jsx(CodeBlock,{filename:``,numberOfLines:`2`,language:`text`,children:_jsx(_components.pre,{className:`shiki shiki-themes github-light-default dark-plus`,style:{backgroundColor:`#ffffff`,\"--shiki-dark-bg\":`#0B0C0E`,color:`#1f2328`,\"--shiki-dark\":`#D4D4D4`},language:`text`,children:_jsxs(_components.code,{language:`text`,numberOfLines:`2`,children:[_jsx(_components.span,{className:`line`,children:_jsx(_components.span,{children:`After the wait, only send the reminder when the task is still incomplete.`})}),`\n`,_jsx(_components.span,{className:`line`,children:_jsx(_components.span,{})})]})})}),_jsx(_components.p,{children:`The workflow then takes different paths based on the conditions you describe, so different steps run depending on your data. A condition can have several paths, plus a catch-all for anything that does not match, and the diagram shows each path separately.`})]}),_jsxs(Accordion,{title:`What happens when a workflow fails?`,id:`what-happens-when-a-workflow-fails`,children:[_jsxs(_components.p,{children:[`Open the workflow and check its `,_jsx(_components.strong,{children:`Run history`}),` to find the step that failed. Ask the AI in your dashboard to explain the error and suggest a fix, then use `,_jsx(_components.strong,{children:`Run now`}),` to confirm the workflow succeeds.`]}),_jsx(_components.p,{children:`If a workflow keeps failing, Base44 deactivates it automatically and emails you, so you can fix it before turning it back on. A scheduled workflow is deactivated after 5 consecutive failures, because it runs the same way every time, so repeated failures usually mean something is wrong. Workflows with any other trigger are deactivated after 50 consecutive failures, because their incoming data varies and the occasional failure is more expected. Fixing the workflow and reactivating it resets the count.`})]}),_jsxs(Accordion,{title:`Why does Run now ask me to choose a previous run?`,id:`why-does-run-now-ask-me-to-choose-a-previous-run`,children:[_jsxs(_components.p,{children:[`It depends on how the workflow starts. A scheduled workflow can run on demand at any time, because it does not need any input. A workflow that starts from an entity, connector, or in-app agent trigger needs the trigger’s data to run, such as the specific task that was created, so `,_jsx(_components.strong,{children:`Run now`}),` replays the data from a previous run. This means the workflow has to run at least once before you can run it on demand.`]}),_jsxs(_components.p,{children:[`If you see `,_jsx(_components.strong,{children:`No previous runs`}),`, trigger the workflow for real once, for example by creating a task for the task follow-up workflow, and then use `,_jsx(_components.strong,{children:`Run now`}),` to replay that run.`]})]}),_jsxs(Accordion,{title:`Can I manage workflows from the AI chat?`,id:`can-i-manage-workflows-from-the-ai-chat`,children:[_jsx(_components.p,{children:`Yes. Ask the AI to activate, deactivate, archive, or restore a workflow, and it makes the change for you without opening the dashboard menus.`}),_jsx(Frame,{caption:`Managing a workflow from the AI chat.`,children:_jsx(OptimizedImage,{src:`https://mintcdn.com/base44/I1QI0alPKQovwbjh/images/ai-chat-manage-workflow.png?fit=max\u0026auto=format\u0026n=I1QI0alPKQovwbjh\u0026q=85\u0026s=6f28125c2cedba6774dc865a99762aec`,alt:`AI chat confirming that a workflow is paused`,width:`350`,className:`mint-mx-auto`,style:{width:`41%`},\"data-og-width\":`698`,\"data-og-height\":`1238`,\"data-path\":`images/ai-chat-manage-workflow.png`,\"data-optimize\":`true`,\"data-opv\":`3`,srcset:`https://mintcdn.com/base44/I1QI0alPKQovwbjh/images/ai-chat-manage-workflow.png?w=280\u0026fit=max\u0026auto=format\u0026n=I1QI0alPKQovwbjh\u0026q=85\u0026s=6415bf5f750b3d4fe688abc459ef6b03 280w, https://mintcdn.com/base44/I1QI0alPKQovwbjh/images/ai-chat-manage-workflow.png?w=560\u0026fit=max\u0026auto=format\u0026n=I1QI0alPKQovwbjh\u0026q=85\u0026s=bedd084b59d680b59a4bdfe62de7fc9f 560w, https://mintcdn.com/base44/I1QI0alPKQovwbjh/images/ai-chat-manage-workflow.png?w=840\u0026fit=max\u0026auto=format\u0026n=I1QI0alPKQovwbjh\u0026q=85\u0026s=4cdd5dce111f744e500b83a5c42e06df 840w, https://mintcdn.com/base44/I1QI0alPKQovwbjh/images/ai-chat-manage-workflow.png?w=1100\u0026fit=max\u0026auto=format\u0026n=I1QI0alPKQovwbjh\u0026q=85\u0026s=0e3927269905744a538d3c42edfa0656 1100w, https://mintcdn.com/base44/I1QI0alPKQovwbjh/images/ai-chat-manage-workflow.png?w=1650\u0026fit=max\u0026auto=format\u0026n=I1QI0alPKQovwbjh\u0026q=85\u0026s=928324868c37c27b2e500520a4f33aff 1650w, https://mintcdn.com/base44/I1QI0alPKQovwbjh/images/ai-chat-manage-workflow.png?w=2500\u0026fit=max\u0026auto=format\u0026n=I1QI0alPKQovwbjh\u0026q=85\u0026s=0d7fe514d77dabd164e938bfd41382b7 2500w`})})]}),_jsx(Accordion,{title:`How many workflows does the Workflows page show?`,id:`how-many-workflows-does-the-workflows-page-show`,children:_jsx(_components.p,{children:`The Workflows page lists all of your workflows, paging through up to 1,000.`})}),_jsxs(Accordion,{title:`Where did my app's automations go?`,id:`where-did-my-apps-automations-go`,children:[_jsxs(_components.p,{children:[`In November 2026, Base44 moved every app’s automations to workflows. If your app had any automations, you’ll find them on the `,_jsx(_components.strong,{children:`Workflows`}),` page in your app’s dashboard. Each one is now a workflow with the same trigger and schedule. Old links to the automations page open `,_jsx(_components.strong,{children:`Workflows`}),` too.`]}),_jsxs(_components.p,{children:[`Automations you archived stay archived. To see them, click the `,_jsx(_components.strong,{children:`More actions`}),` icon `,_jsx(Icon,{icon:`ellipsis`,color:`currentColor`}),` at the top of the page, then click `,_jsx(_components.strong,{children:`View archive`}),`.`]}),_jsxs(_components.p,{children:[`If a workflow couldn’t turn on after the move, a banner at the top of the `,_jsx(_components.strong,{children:`Workflows`}),` page tells you, and the workflow shows a warning icon. Fix its trigger, for example by reconnecting an integration, then `,_jsx(_components.a,{href:`#turning-a-workflow-on-or-off`,children:`turn the workflow on`}),`. You can also ask the AI chat to fix it for you.`]}),_jsx(_components.p,{children:`Runs from before the move don’t appear in the workflow’s run history.`})]})]})]})}function MDXContent(props={}){const{wrapper:MDXLayout}={..._provideComponents(),...props.components};return MDXLayout?_jsx(MDXLayout,{...props,children:_jsx(_createMdxContent,{...props})}):_createMdxContent(props)}return{default:MDXContent};function _missingMdxReference(id,component){throw new Error(`Expected `+(component?`component`:`object`)+\" `\"+id+\"` to be defined: you likely forgot to import, pass, or provide it.\")}","frontmatter":{},"scope":{"config":{},"pageMetadata":{"title":"Managing workflows","description":"Turn your Base44 app's workflows and hooks on or off, edit, rename, run and archive them, review every run, and keep their integration credit use under control.","sidebarTitle":"Managing workflows","href":"/Building-your-app/managing-workflows"}}},"mdxSourceWithNoJs":null},"mdxExtracts":{"tableOfContents":[{"title":"Changing a workflow","slug":"changing-a-workflow","depth":2,"children":[{"title":"Turning a workflow on or off","slug":"turning-a-workflow-on-or-off","depth":3,"children":[]},{"title":"Editing a workflow","slug":"editing-a-workflow","depth":3,"children":[]},{"title":"Renaming a workflow","slug":"renaming-a-workflow","depth":3,"children":[]},{"title":"Running a workflow immediately","slug":"running-a-workflow-immediately","depth":3,"children":[]},{"title":"Cancelling a run","slug":"cancelling-a-run","depth":3,"children":[]},{"title":"Archiving a workflow","slug":"archiving-a-workflow","depth":3,"children":[]}]},{"title":"Monitoring runs","slug":"monitoring-runs","depth":2,"children":[{"title":"Viewing a workflow’s runs","slug":"viewing-a-workflow’s-runs","depth":3,"children":[]},{"title":"Using the Activity tab","slug":"using-the-activity-tab","depth":3,"children":[]}]},{"title":"Workflows and integration credits","slug":"workflows-and-integration-credits","depth":2,"children":[]},{"title":"FAQs","slug":"faqs","depth":2,"children":[]}],"codeExamples":{}},"jsLinks":["/_mintlify/custom/base44/ca59cb34fe66af72/custom-analytics.js","/_mintlify/custom/base44/878f3d61142901ae/changelog-display.js","/_mintlify/custom/base44/655d636252386031/cta-cards.js"],"dynamicCss":".mint-mx-auto {\n margin-left: auto;\n margin-right: auto\n}","narration":{"path":"Building-your-app/managing-workflows","locale":"en","estimatedDurationSec":753},"subdomain":"base44","siteName":"Base44 Support Documentation","title":"Managing workflows - Base44 Support Documentation","navMaps":{"firstHrefInVersion":{},"firstHrefInLanguage":{"en":{"href":"/Building-your-app/managing-workflows","matchLevel":0},"pt-BR":{"href":"/pt-BR","matchLevel":4},"es":{"href":"/es","matchLevel":4},"he":{"href":"/he/index","matchLevel":4},"ja":{"href":"/ja","matchLevel":4},"de":{"href":"/de","matchLevel":4},"fr":{"href":"/fr","matchLevel":4},"it":{"href":"/it","matchLevel":4}}},"lastModified":"2026-11-10T14:33:29.503Z","originalFileLocation":"Building-your-app/managing-workflows.mdx","locale":"en"},"headHtml":"\u003cscript data-mint-head>(function(){var d=document.documentElement,p=null;if(!p){try{p=localStorage.getItem(\"isDarkMode\")}catch(e){}if(p==='true')p='dark';else if(p==='false')p='light';if(p!=='light'\u0026\u0026p!=='dark'\u0026\u0026p!=='system')p=\"system\"}var r=p==='system'?(matchMedia(\"(prefers-color-scheme: dark)\").matches?'dark':'light'):p;d.classList.remove(r==='dark'?'light':'dark');d.classList.add(r);d.setAttribute(\"data-theme-preference\",p)})();\u003c/script>\u003cmeta data-mint-head name=\"description\" content=\"Turn your Base44 app\u0026#x27;s workflows and hooks on or off, edit, rename, run and archive them, review every run, and keep their integration credit use under control.\">\u003cmeta data-mint-head name=\"application-name\" content=\"Base44 Support Documentation\">\u003cmeta data-mint-head name=\"generator\" content=\"Mintlify\">\u003clink data-mint-head rel=\"icon\" type=\"image/png\" sizes=\"192x192\" href=\"/mintlify-assets/_mintlify/favicons/base44/nuCdY9ZGKAmI8mvz/_generated/favicon/android-chrome-192x192.png\" media=\"(prefers-color-scheme: light)\">\u003clink data-mint-head rel=\"apple-touch-icon\" type=\"image/png\" sizes=\"180x180\" href=\"/mintlify-assets/_mintlify/favicons/base44/nuCdY9ZGKAmI8mvz/_generated/favicon/apple-touch-icon.png\">\u003clink data-mint-head rel=\"icon\" type=\"image/png\" sizes=\"16x16\" href=\"/mintlify-assets/_mintlify/favicons/base44/nuCdY9ZGKAmI8mvz/_generated/favicon/favicon-16x16.png\" media=\"(prefers-color-scheme: light)\">\u003clink data-mint-head rel=\"icon\" type=\"image/png\" sizes=\"32x32\" href=\"/mintlify-assets/_mintlify/favicons/base44/nuCdY9ZGKAmI8mvz/_generated/favicon/favicon-32x32.png\" media=\"(prefers-color-scheme: light)\">\u003clink data-mint-head rel=\"shortcut icon\" type=\"image/x-icon\" href=\"/mintlify-assets/_mintlify/favicons/base44/nuCdY9ZGKAmI8mvz/_generated/favicon/favicon.ico\" media=\"(prefers-color-scheme: light)\">\u003clink data-mint-head rel=\"icon\" type=\"image/png\" sizes=\"192x192\" href=\"/mintlify-assets/_mintlify/favicons/base44/nuCdY9ZGKAmI8mvz/_generated/favicon-dark/android-chrome-192x192.png\" media=\"(prefers-color-scheme: dark)\">\u003clink data-mint-head rel=\"icon\" type=\"image/png\" sizes=\"16x16\" href=\"/mintlify-assets/_mintlify/favicons/base44/nuCdY9ZGKAmI8mvz/_generated/favicon-dark/favicon-16x16.png\" media=\"(prefers-color-scheme: dark)\">\u003clink data-mint-head rel=\"icon\" type=\"image/png\" sizes=\"32x32\" href=\"/mintlify-assets/_mintlify/favicons/base44/nuCdY9ZGKAmI8mvz/_generated/favicon-dark/favicon-32x32.png\" media=\"(prefers-color-scheme: dark)\">\u003clink data-mint-head rel=\"shortcut icon\" type=\"image/x-icon\" href=\"/mintlify-assets/_mintlify/favicons/base44/nuCdY9ZGKAmI8mvz/_generated/favicon-dark/favicon.ico\" media=\"(prefers-color-scheme: dark)\">\u003cmeta data-mint-head property=\"og:title\" content=\"Managing workflows - Base44 Support Documentation\">\u003cmeta data-mint-head property=\"og:description\" content=\"Turn your Base44 app\u0026#x27;s workflows and hooks on or off, edit, rename, run and archive them, review every run, and keep their integration credit use under control.\">\u003cmeta data-mint-head property=\"og:site_name\" content=\"Base44 Support Documentation\">\u003cmeta data-mint-head property=\"og:url\" content=\"https://docs.base44.com/Building-your-app/managing-workflows\">\u003cmeta data-mint-head property=\"og:type\" content=\"website\">\u003cmeta data-mint-head property=\"og:image\" content=\"https://docs.base44.com/images/base44-docs-og.png\">\u003cmeta data-mint-head property=\"og:image:width\" content=\"1200\">\u003cmeta data-mint-head property=\"og:image:height\" content=\"630\">\u003cmeta data-mint-head name=\"twitter:card\" content=\"summary_large_image\">\u003cmeta data-mint-head name=\"twitter:title\" content=\"Managing workflows - Base44 Support Documentation\">\u003cmeta data-mint-head name=\"twitter:description\" content=\"Turn your Base44 app\u0026#x27;s workflows and hooks on or off, edit, rename, run and archive them, review every run, and keep their integration credit use under control.\">\u003cmeta data-mint-head name=\"twitter:image\" content=\"https://docs.base44.com/images/base44-docs-og.png\">\u003cmeta data-mint-head name=\"twitter:image:width\" content=\"1200\">\u003cmeta data-mint-head name=\"twitter:image:height\" content=\"630\">\u003cmeta data-mint-head name=\"msapplication-config\" content=\"/mintlify-assets/_mintlify/favicons/base44/nuCdY9ZGKAmI8mvz/_generated/favicon/browserconfig.xml\">\u003cmeta data-mint-head name=\"apple-mobile-web-app-title\" content=\"Base44 Support Documentation\">\u003cmeta data-mint-head name=\"msapplication-TileColor\" content=\"#FF6A00\">\u003clink data-mint-head rel=\"canonical\" href=\"https://docs.base44.com/Building-your-app/managing-workflows\">\u003clink data-mint-head rel=\"alternate\" type=\"application/xml\" href=\"/sitemap.xml\">\u003clink data-mint-head rel=\"alternate\" type=\"text/markdown\" href=\"/Building-your-app/managing-workflows.md\">\u003cscript data-mint-head type=\"application/ld+json\">{\"@context\":\"https://schema.org\",\"@graph\":[{\"@type\":\"Organization\",\"@id\":\"https://docs.base44.com/#organization\",\"name\":\"Base44 Support Documentation\",\"url\":\"https://docs.base44.com\",\"logo\":{\"@type\":\"ImageObject\",\"url\":\"https://mintcdn.com/base44/jhCpOaGylNweq32m/logo/new-brand-light.svg?fit=max\u0026auto=format\u0026n=jhCpOaGylNweq32m\u0026q=85\u0026s=7724705143e6cfece3b0a237be2a6890\"}},{\"@type\":\"WebSite\",\"@id\":\"https://docs.base44.com#website\",\"name\":\"Base44 Support Documentation\",\"url\":\"https://docs.base44.com\",\"publisher\":{\"@id\":\"https://docs.base44.com/#organization\"}},{\"@type\":\"WebPage\",\"@id\":\"https://docs.base44.com/Building-your-app/managing-workflows#webpage\",\"url\":\"https://docs.base44.com/Building-your-app/managing-workflows\",\"name\":\"Managing workflows\",\"description\":\"Turn your Base44 app's workflows and hooks on or off, edit, rename, run and archive them, review every run, and keep their integration credit use under control.\",\"dateModified\":\"2026-11-10T14:33:29.503Z\",\"isPartOf\":{\"@id\":\"https://docs.base44.com#website\"},\"breadcrumb\":{\"@id\":\"https://docs.base44.com/Building-your-app/managing-workflows#breadcrumb\"}},{\"@type\":\"BreadcrumbList\",\"@id\":\"https://docs.base44.com/Building-your-app/managing-workflows#breadcrumb\",\"itemListElement\":[{\"@type\":\"ListItem\",\"position\":1,\"name\":\"Adding logic to your app\",\"item\":\"https://docs.base44.com/documentation/building-your-app/sending-emails\"},{\"@type\":\"ListItem\",\"position\":2,\"name\":\"Using workflows\",\"item\":\"https://docs.base44.com/Building-your-app/Creating-workflows\"},{\"@type\":\"ListItem\",\"position\":3,\"name\":\"Managing workflows\",\"item\":\"https://docs.base44.com/Building-your-app/managing-workflows\"}]},{\"@type\":[\"Article\",\"TechArticle\"],\"@id\":\"https://docs.base44.com/Building-your-app/managing-workflows#article\",\"headline\":\"Managing workflows\",\"name\":\"Managing workflows\",\"description\":\"Turn your Base44 app's workflows and hooks on or off, edit, rename, run and archive them, review every run, and keep their integration credit use under control.\",\"url\":\"https://docs.base44.com/Building-your-app/managing-workflows\",\"mainEntityOfPage\":{\"@id\":\"https://docs.base44.com/Building-your-app/managing-workflows#webpage\"},\"image\":\"https://docs.base44.com/images/base44-docs-og.png\",\"dateModified\":\"2026-11-10T14:33:29.503Z\",\"publisher\":{\"@id\":\"https://docs.base44.com/#organization\"},\"isPartOf\":{\"@id\":\"https://docs.base44.com#website\"}}]}\u003c/script>\u003cscript data-mint-head type=\"application/ld+json\">{\"@context\":\"https://schema.org\",\"@type\":\"WebSite\",\"name\":\"Base44 Support Documentation\",\"creator\":{\"@type\":\"Organization\",\"name\":\"Mintlify\",\"url\":\"https://mintlify.com\"}}\u003c/script>","siteName":"Base44 Support Documentation","nav":{"global":null,"languages":[{"language":"en","default":true,"tabs":[{"tab":"Apps","pages":[{"group":"Getting started","icon":"rocket","pages":[{"title":"Build apps, websites, and AI agents","sidebarTitle":"Welcome to Base44","mode":"wide","href":""},{"title":"Building an app","sidebarTitle":"Building an app","href":"/Getting-Started/Quick-start-guide"},{"title":"Building a website","sidebarTitle":"Building a website","href":"/Getting-Started/building-a-website"},{"title":"Building a game","sidebarTitle":"Building a game","href":"/Getting-Started/building-a-game"},{"title":"Starting from your first prompt","sidebarTitle":"Starting from your first prompt","href":"/Getting-Started/starting-from-your-first-prompt"},{"title":"Migrating a project to Base44","sidebarTitle":"Migrating a project","href":"/Getting-Started/migrating-an-existing-app"},{"title":"Using Base Code","sidebarTitle":"Using Base Code","href":"/Getting-Started/base-code"},{"title":"Importing from Figma","sidebarTitle":"Importing from Figma","href":"/Getting-Started/import-from-figma"},{"title":"Hiring a Base44 partner","sidebarTitle":"Hiring a partner","href":"/Getting-Started/Hiring-a-partner"}]},{"title":"Import from Figma into Base44","sidebarTitle":"Figma import guidelines","hidden":true,"href":"/Getting-Started/import-from-figma-guidelines"},{"group":"Building your app","icon":"screwdriver-wrench","pages":[{"title":"Using app templates","sidebarTitle":"Using templates","href":"/Getting-Started/App-templates"},{"title":"Getting to know the app editor","sidebarTitle":"Exploring the app editor","href":"/Getting-Started/app-editor-overview"},{"title":"Using the AI Chat in Base44","sidebarTitle":"Using the AI chat","href":"/Building-your-app/AI-chat-modes"},{"title":"Working with branches","sidebarTitle":"Working with branches","href":"/Building-your-app/working-with-branches"},{"title":"Commenting on your app","sidebarTitle":"Adding comments","href":"/Building-your-app/Commenting-on-your-app"},{"title":"Building a presentation","sidebarTitle":"Building a presentation","href":"/Building-your-app/building-a-presentation"},{"title":"Prompt library","sidebarTitle":"Prompt library","href":"/Getting-Started/Prompt-library"},{"title":"Writing effective prompts in Base44","sidebarTitle":"Writing better prompts","href":"/Getting-Started/Prompt-guide"}]},{"group":"Designing your app","icon":"palette","pages":[{"title":"Designing with AI","sidebarTitle":"Designing with AI","href":"/Building-your-app/Designing-with-AI"},{"title":"Customizing the design of your app","sidebarTitle":"Customizing design","href":"/Building-your-app/Design"},{"title":"Design foundations and layout","sidebarTitle":"Setting foundations \u0026 layout","href":"/Building-your-app/Design-foundations-and-layout"},{"title":"Design system","sidebarTitle":"Creating design systems","href":"/Building-your-app/Design-system"},{"title":"Adding components to your app","sidebarTitle":"Adding components","href":"/Building-your-app/Components-library"},{"title":"Uploading and managing media","sidebarTitle":"Managing media","href":"/Building-your-app/Using-media"},{"title":"Managing your app pages","sidebarTitle":"Managing pages","href":"/Building-your-app/managing-your-pages"},{"title":"Using the canvas","sidebarTitle":"Using the canvas","href":"/Building-your-app/Canvas"},{"title":"Adding and using npm packages","sidebarTitle":"Adding npm packages","href":"/Building-your-app/NPM-packages"}]},{"group":"Managing app data","icon":"database","pages":[{"title":"Managing your app data","sidebarTitle":"Working with your data","href":"/Building-your-app/Managing-your-app-data"},{"title":"Testing your app with test data","sidebarTitle":"Testing with test data","href":"/documentation/managing-app-data/testing-your-data"},{"title":"Testing your app's flows","sidebarTitle":"Using the testing agent","href":"/documentation/managing-app-data/testing-agent"},{"title":"Backup \u0026 Restore","sidebarTitle":"Backing up and restoring data","href":"/Enterprise/backup-and-restore"}]},{"group":"Adding logic to your app","icon":"gears","pages":[{"title":"Sending emails from your app","sidebarTitle":"Sending emails","href":"/documentation/building-your-app/sending-emails"},{"title":"Designing your app's emails","sidebarTitle":"Designing emails","href":"/Building-your-app/Designing-emails"},{"title":"Setting up an AI agent for your app","sidebarTitle":"Building AI agents","href":"/Building-your-app/AI-agents-for-apps"},{"group":"Using workflows","pages":[{"title":"Creating workflows for your app","description":"Create workflows that run multi-step backend work on a schedule, when data changes, or when your app is published or takes a payment, then monitor every run.","sidebarTitle":"Creating workflows","href":"/Building-your-app/Creating-workflows"},{"title":"Managing workflows","sidebarTitle":"Managing workflows","href":"/Building-your-app/managing-workflows"},{"title":"Adding rules with hooks","description":"Use hooks to check your own rules before your Base44 app saves data, lets someone sign up, runs an integration or passes a message to one of its in-app agents.","sidebarTitle":"Adding rules with hooks","href":"/Building-your-app/creating-hooks"}]},{"title":"Browsing websites from your app","sidebarTitle":"Browsing websites","href":"/Building-your-app/browser-automation"},{"title":"Base44 developer tools","sidebarTitle":"Using developer tools","href":"/documentation/building-your-app/developer-tools"},{"title":"Using your app's API page","sidebarTitle":"Using your app's API","href":"/Building-your-app/your-apps-api-page"}]},{"group":"Selling on your app","icon":"credit-card","pages":[{"title":"Setting up Base44 Payments powered by Wix","sidebarTitle":"Setting up Base44 Payments","href":"/Setting-up-your-app/setting-up-wix-payments"},{"title":"Setting up Stripe","sidebarTitle":"Setting up Stripe","href":"/documentation/setting-up-your-app/setting-up-payments"},{"title":"Setting up PayPal","sidebarTitle":"Setting up PayPal","href":"/Setting-up-your-app/setting-up-paypal"},{"title":"Tracking payments in your app","sidebarTitle":"Tracking payments","href":"/Setting-up-your-app/tracking-payments"}]},{"group":"Using on mobile","icon":"mobile","pages":[{"title":"Creating and using your app on mobile","sidebarTitle":"Using apps on mobile","href":"/Building-your-app/Mobile-experience"},{"title":"Submitting your app to app stores","sidebarTitle":"Submitting to app stores","href":"/documentation/building-your-app/uploading-to-app-stores"}]},{"group":"Domains","icon":"globe","pages":[{"title":"Connecting a domain to your app","sidebarTitle":"Domains overview","href":"/Setting-up-your-app/Setting-up-your-custom-domain"},{"title":"Buying a domain with Wix","sidebarTitle":"Buying a domain with Wix","href":"/Setting-up-your-app/Buying-a-domain-with-Wix"},{"title":"Managing a GoDaddy or IONOS domain","sidebarTitle":"Managing a GoDaddy domain","href":"/Setting-up-your-app/Buying-a-domain-from-Base44"},{"title":"Connecting an external domain","sidebarTitle":"Connecting an external domain","href":"/Setting-up-your-app/Connecting-an-external-domain"},{"title":"Sending emails from a custom domain","sidebarTitle":"Sending emails from a domain","href":"/Setting-up-your-app/Sending-emails-from-a-custom-domain"},{"title":"Buying a business email","sidebarTitle":"Buying a business email","href":"/Setting-up-your-app/Buying-a-business-email"}]},{"group":"Securing your app","icon":"shield","pages":[{"title":"Base44 security: An overview","sidebarTitle":"Security overview","href":"/Setting-up-your-app/security-overview"},{"title":"Managing login and registration","sidebarTitle":"Managing login \u0026 registration","href":"/Setting-up-your-app/Managing-login-and-registration"},{"title":"Choosing who can access your app","sidebarTitle":"Managing access \u0026 roles","href":"/Setting-up-your-app/Managing-access"},{"title":"Managing data permissions","sidebarTitle":"Managing data permissions","href":"/Setting-up-your-app/Managing-security-settings"},{"title":"Running a security scan","sidebarTitle":"Running a security scan","href":"/Setting-up-your-app/running-a-security-scan"},{"title":"Scanning your app for vulnerabilities with Wiz","sidebarTitle":"Scanning with Wiz","href":"/Setting-up-your-app/scanning-with-wiz"},{"title":"Testing your app's security with Tenzai","sidebarTitle":"Testing with Tenzai","href":"/Setting-up-your-app/security-testing-with-tenzai"},{"title":"Setting up single sign-on (SSO) for your app","sidebarTitle":"Setting up SSO","href":"/Setting-up-your-app/Setting-up-SSO"}]},{"group":"Measuring your app","icon":"chart-line","pages":[{"title":"Exploring app logs","sidebarTitle":"Exploring logs","href":"/Building-your-app/exploring-app-logs"},{"title":"Viewing and customizing your app analytics","sidebarTitle":"Viewing analytics","href":"/documentation/performance-and-seo/app-analytics"},{"title":"Recording and replaying user sessions","sidebarTitle":"Reviewing session recordings","href":"/documentation/performance-and-seo/session-recordings"},{"title":"Managing cookies and visitor consent","sidebarTitle":"Cookies and consent","href":"/documentation/performance-and-seo/cookies-and-consent"},{"title":"Optimizing App Performance","sidebarTitle":"Monitoring performance","href":"/Performance-and-SEO/App-performance"}]},{"group":"Growing your app's reach","icon":"megaphone","pages":[{"title":"Using the Marketing Agent for your app","sidebarTitle":"Creating a marketing plan","href":"/promoting-your-app/creating-a-marketing-plan"},{"title":"Getting your app found in search","sidebarTitle":"Following SEO best practices","href":"/Performance-and-SEO/SEO-and-search-visibility"},{"title":"Optimizing your app's SEO \u0026 GEO","sidebarTitle":"Optimizing SEO \u0026 GEO","href":"/Performance-and-SEO/checking-your-seo-and-geo"},{"title":"Connecting Google Search Console","sidebarTitle":"Connecting Google Search Console","href":"/Performance-and-SEO/connecting-google-search-console"},{"title":"Promoting your app on social media","sidebarTitle":"Creating social content","href":"/promoting-your-app/social-content"},{"title":"Creating Google Ads campaigns","sidebarTitle":"Create Google Ads campaigns","href":"/promoting-your-app/google-ads-campaigns"},{"title":"Submitting your app to Launchpad","sidebarTitle":"Submitting to Launchpad","href":"/promoting-your-app/submitting-to-launchpad"}]},{"group":"Changelog","boost":0.3,"icon":"clock-rotate-left","pages":[{"title":"Product changelog","sidebarTitle":"Product","href":"/changelog/product"},{"title":"Developer changelog","sidebarTitle":"Developer","href":"/changelog/developers"}]}]},{"tab":"Superagents","pages":[{"title":"Superagents","href":"/Getting-Started/superagent"}]},{"tab":"Integrations","pages":[{"title":"Integrations","href":"/Integrations/Using-integrations"}]},{"tab":"Developers","dropdowns":[{"dropdown":"Home","icon":"house","pages":[{"title":"Base44 Developer Platform","mode":"wide","href":"/developers/home"}],"global":{"anchors":[{"anchor":"Backend","icon":"server","href":"/developers/backend/overview/introduction"},{"anchor":"App Code","icon":"code","href":"/developers/app-code/overview/introduction"},{"anchor":"SDKs","icon":"brackets-curly","href":"/developers/references/sdks/overview"},{"anchor":"CLI","icon":"terminal","href":"/developers/references/cli/get-started/overview"},{"anchor":"APIs","icon":"plug","href":"/developers/references/apis/overview"},{"anchor":"White label (Beta)","icon":"tag","href":"/developers/white-label/overview"}]}},{"dropdown":"Backend (Beta)","icon":"server","groups":[{"group":"Overview","icon":"compass","pages":[{"title":"Introduction","href":"/developers/backend/overview/introduction"},{"title":"Backend Service Basics","sidebarTitle":"Backend Service Basics","href":"/developers/backend/overview/backend-service-basics"},{"title":"Features","href":"/developers/backend/overview/features"},{"title":"Pricing","href":"/developers/backend/overview/pricing"},{"title":"Troubleshoot your project","sidebarTitle":"Troubleshooting","href":"/developers/backend/overview/troubleshooting"}]},{"group":"Quickstarts","icon":"rocket","pages":[{"title":"Build with AI","sidebarTitle":"Build with AI","href":"/developers/backend/quickstart/quickstart-with-ai"},{"group":"Templates","pages":[{"title":"Backend only","href":"/developers/backend/quickstart/templates/quickstart-backend-only"},{"title":"React Quickstart","sidebarTitle":"React","href":"/developers/backend/quickstart/templates/quickstart-react-template"}]},{"group":"Frameworks","pages":[{"title":"React Quickstart","sidebarTitle":"React","href":"/developers/backend/quickstart/frameworks/quickstart-with-react"},{"title":"Vue Quickstart","sidebarTitle":"Vue","href":"/developers/backend/quickstart/frameworks/quickstart-vue"},{"title":"Solid JS Quickstart","sidebarTitle":"Solid JS","href":"/developers/backend/quickstart/frameworks/quickstart-solid-js"},{"title":"Refine Quickstart","sidebarTitle":"Refine","href":"/developers/backend/quickstart/frameworks/quickstart-refine"},{"title":"Hono Quickstart","sidebarTitle":"Hono","href":"/developers/backend/quickstart/frameworks/quickstart-hono"},{"title":"React Native (Expo) Quickstart","sidebarTitle":"React Native (Expo)","href":"/developers/backend/quickstart/frameworks/quickstart-with-react-native"}]}]},{"group":"Project","icon":"folder-open","pages":[{"title":"Project Structure","href":"/developers/backend/overview/project-structure"},{"title":"Start from an Existing Base44 App","sidebarTitle":"Start from an Existing Base44 App","href":"/developers/backend/overview/start-from-existing-app"},{"title":"Set Up Local Dev for an Existing App","sidebarTitle":"Set Up Local Dev for an Existing App","href":"/developers/backend/overview/set-up-local-dev-existing-app"},{"title":"Link an Existing Backend Project","sidebarTitle":"Link an Existing Backend Project","href":"/developers/backend/overview/link-existing-project"},{"group":"Local Development","expanded":false,"pages":[{"title":"Local development","sidebarTitle":"Overview","href":"/developers/backend/overview/local-dev/local-development-overview"},{"title":"Local development setup","sidebarTitle":"Setup","href":"/developers/backend/overview/local-dev/get-started"}]},{"title":"Standalone scripts","sidebarTitle":"Standalone scripts","href":"/developers/backend/overview/run-scripts"}]},{"group":"AI Development Tools","icon":"wand-magic-sparkles","pages":[{"title":"AI development tools overview","sidebarTitle":"Overview","href":"/developers/backend/overview/agent-extensions"},{"title":"Skills","sidebarTitle":"Skills","href":"/developers/backend/overview/skills"},{"title":"Base44 MCP server","sidebarTitle":"Base44 MCP server","href":"/developers/backend/overview/mcp-server"},{"title":"Base44 Docs MCP","sidebarTitle":"Docs MCP server","href":"/developers/backend/overview/base44-docs-mcp"}]},{"group":"Resources","icon":"cubes","pages":[{"group":"Agents","expanded":false,"pages":[{"title":"About Agents","sidebarTitle":"Agents","href":"/developers/backend/resources/agents/overview"},{"title":"Agent Skills","sidebarTitle":"Agent Skills","href":"/developers/backend/resources/agents/agent-skills"}]},{"group":"Actors","expanded":false,"pages":[{"title":"Actors Overview","sidebarTitle":"Overview","href":"/developers/backend/resources/actors/overview"},{"title":"Create an Actor","sidebarTitle":"Create an Actor","href":"/developers/backend/resources/actors/create-actor"},{"title":"Actors: Sample Flows","sidebarTitle":"Sample Flows","href":"/developers/backend/resources/actors/sample-flows"},{"title":"Actors Files and Code","sidebarTitle":"Actors Files and Code","href":"/developers/backend/resources/actors/reference"}]},{"title":"Supported Models","sidebarTitle":"Models","href":"/developers/backend/resources/models"},{"title":"Auth","sidebarTitle":"Auth","href":"/developers/backend/resources/auth"},{"group":"Backend Functions","expanded":false,"pages":[{"title":"Backend Functions Overview","sidebarTitle":"Overview","href":"/developers/backend/resources/backend-functions/overview"},{"title":"Automations","href":"/developers/backend/resources/backend-functions/automations"}]},{"group":"Connectors","expanded":false,"pages":[{"title":"Connectors overview","sidebarTitle":"Overview","href":"/developers/backend/resources/connectors"},{"title":"Shared connectors","sidebarTitle":"Shared connectors","href":"/developers/backend/resources/connectors/shared-connectors"},{"title":"App user connectors","sidebarTitle":"App user connectors","href":"/developers/backend/resources/connectors/app-user-connectors"}]},{"group":"Entities","expanded":false,"pages":[{"title":"Entities Overview","sidebarTitle":"Overview","href":"/developers/backend/resources/entities/overview"},{"title":"Entity Schemas","href":"/developers/backend/resources/entities/entity-schemas"},{"title":"User Schema","href":"/developers/backend/resources/entities/user-schema"},{"title":"Security","href":"/developers/backend/resources/entities/security"}]}]}],"global":{"anchors":[{"anchor":"Developer Platform","icon":"arrow-left","href":"/developers/home"}]}},{"dropdown":"App Code","icon":"grid-2","groups":[{"group":"Overview","icon":"compass","pages":[{"title":"Introduction","sidebarTitle":"Base44 for Devs","href":"/developers/app-code/overview/introduction"},{"title":"Project Structure","href":"/developers/app-code/overview/project-structure"}]},{"group":"Base44 Editor","icon":"code","pages":[{"title":"Code Tab","href":"/developers/app-code/editor/code-tab"},{"title":"Activity Monitor","sidebarTitle":"Activity Monitor","href":"/developers/app-code/editor/activity-monitor"}]},{"group":"Local Development","icon":"laptop","pages":[{"title":"GitHub Integration","sidebarTitle":"GitHub Integration","href":"/developers/app-code/local-development/github"}]},{"group":"Cloud Sandbox","icon":"cloud","pages":[{"title":"Cloud sandbox","sidebarTitle":"Overview","href":"/developers/app-code/sandbox/overview"},{"title":"Bring your own agent","sidebarTitle":"Bring your own agent","href":"/developers/app-code/sandbox/bring-your-own-agent"}]},{"group":"Enterprise","icon":"building","pages":[{"title":"Enterprise APIs","href":"/developers/references/enterprise-apis"}]}],"global":{"anchors":[{"anchor":"Developer Platform","icon":"arrow-left","href":"/developers/home"}]}},{"dropdown":"SDKs","icon":"brackets-curly","groups":[{"group":"Base44 SDKs","icon":"book-open","expanded":false,"pages":[{"title":"Base44 SDKs","sidebarTitle":"Overview","href":"/developers/references/sdks/overview"}]},{"group":"App SDK","icon":"brackets-curly","expanded":false,"pages":[{"group":"Get Started","icon":"book-open","expanded":false,"pages":[{"title":"SDK overview","href":"/developers/references/sdk/getting-started/overview"},{"title":"Base44 client","href":"/developers/references/sdk/getting-started/client"},{"title":"Work with data","href":"/developers/references/sdk/getting-started/work-with-data"},{"title":"Dynamic Types","href":"/developers/references/sdk/getting-started/dynamic-types"},{"title":"Common SDK uses","href":"/developers/references/sdk/getting-started/work-with-sdk"},{"title":"Connect to third-party APIs","href":"/developers/references/sdk/getting-started/third-party-apis"},{"title":"Generate images with the AI Gateway","sidebarTitle":"Generate images","href":"/developers/references/sdk/getting-started/ai-gateway-images"},{"title":"Generate video with the AI Gateway","sidebarTitle":"Generate video","href":"/developers/references/sdk/getting-started/ai-gateway-video"}]},{"group":"SDK Reference","boost":0.5,"icon":"brackets-curly","expanded":true,"pages":[{"group":"Client","expanded":false,"pages":[{"title":"createClient","href":"/developers/references/sdk/docs/functions/createClient"},{"title":"createClientFromRequest","href":"/developers/references/sdk/docs/functions/createClientFromRequest"}]},{"group":"Modules","expanded":false,"pages":[{"title":"actors","href":"/developers/references/sdk/docs/type-aliases/actors"},{"title":"agents","href":"/developers/references/sdk/docs/interfaces/agents"},{"title":"ai-gateway","href":"/developers/references/sdk/docs/interfaces/ai-gateway"},{"title":"analytics","href":"/developers/references/sdk/docs/interfaces/analytics"},{"title":"app","href":"/developers/references/sdk/docs/interfaces/app"},{"title":"app-logs","href":"/developers/references/sdk/docs/interfaces/app-logs"},{"title":"auth","href":"/developers/references/sdk/docs/interfaces/auth"},{"title":"browser","href":"/developers/references/sdk/docs/interfaces/browser"},{"title":"connectors","href":"/developers/references/sdk/docs/interfaces/connectors"},{"title":"entities","href":"/developers/references/sdk/docs/type-aliases/entities"},{"title":"functions","href":"/developers/references/sdk/docs/interfaces/functions"},{"title":"integrations","href":"/developers/references/sdk/docs/type-aliases/integrations"},{"title":"payments","href":"/developers/references/sdk/docs/interfaces/payments"},{"title":"sso","href":"/developers/references/sdk/docs/interfaces/sso"}]}]}]},{"group":"Platform SDK (Beta)","boost":0.75,"icon":"layer-group","expanded":false,"pages":[{"group":"Get Started","icon":"book-open","expanded":false,"pages":[{"title":"Platform SDK overview","sidebarTitle":"Overview","href":"/developers/references/platform-sdk/overview"}]},{"group":"Platform SDK Reference","icon":"brackets-curly","expanded":true,"pages":[{"group":"Client","expanded":false,"pages":[{"title":"createPlatformClient","href":"/developers/references/platform-sdk/docs/functions/createPlatformClient"},{"title":"createPlatformServer","href":"/developers/references/platform-sdk/docs/functions/createPlatformServer"}]},{"group":"Modules","expanded":false,"pages":[{"title":"chat","href":"/developers/references/platform-sdk/docs/interfaces/chat"},{"title":"webhooks","href":"/developers/references/platform-sdk/docs/interfaces/webhooks"}]},{"group":"React","expanded":false,"pages":[{"title":"useChat","href":"/developers/references/platform-sdk/docs/functions/useChat"}]}]}]}],"global":{"anchors":[{"anchor":"Developer Platform","icon":"arrow-left","href":"/developers/home"}]}},{"dropdown":"CLI","icon":"terminal","groups":[{"group":"Get Started","icon":"book-open","expanded":true,"pages":[{"title":"CLI Overview","href":"/developers/references/cli/get-started/overview"},{"title":"CLI Commands Overview","href":"/developers/references/cli/commands/introduction"}]},{"group":"Commands","boost":0.75,"icon":"terminal","pages":[{"group":"Account","pages":[{"title":"login","href":"/developers/references/cli/commands/login"},{"title":"logout","href":"/developers/references/cli/commands/logout"},{"title":"whoami","href":"/developers/references/cli/commands/whoami"}]},{"group":"Projects","pages":[{"title":"create","href":"/developers/references/cli/commands/create"},{"title":"link","href":"/developers/references/cli/commands/link"},{"title":"eject","href":"/developers/references/cli/commands/eject"},{"title":"scaffold","href":"/developers/references/cli/commands/scaffold"},{"title":"dashboard open","href":"/developers/references/cli/commands/dashboard-open"}]},{"group":"Workspaces","pages":[{"title":"workspace get","href":"/developers/references/cli/commands/workspace-get"},{"title":"workspace list","href":"/developers/references/cli/commands/workspace-list"},{"title":"workspace move","href":"/developers/references/cli/commands/workspace-move"}]},{"group":"Functions","pages":[{"title":"functions pull","href":"/developers/references/cli/commands/functions-pull"},{"title":"functions deploy","href":"/developers/references/cli/commands/functions-deploy"},{"title":"functions delete","href":"/developers/references/cli/commands/functions-delete"},{"title":"functions list","href":"/developers/references/cli/commands/functions-list"}]},{"group":"Entities","pages":[{"title":"entities push","href":"/developers/references/cli/commands/entities-push"}]},{"group":"Agents","pages":[{"title":"agents pull","href":"/developers/references/cli/commands/agents-pull"},{"title":"agents push","href":"/developers/references/cli/commands/agents-push"},{"title":"agent-skills pull","href":"/developers/references/cli/commands/agent-skills-pull"},{"title":"agent-skills push","href":"/developers/references/cli/commands/agent-skills-push"}]},{"group":"Actors","pages":[{"title":"actors delete","href":"/developers/references/cli/commands/actors-delete"},{"title":"actors deploy","href":"/developers/references/cli/commands/actors-deploy"}]},{"group":"Workflows","pages":[{"title":"workflows list","href":"/developers/references/cli/commands/workflows-list"},{"title":"workflows runs","href":"/developers/references/cli/commands/workflows-runs"}]},{"group":"Connectors","pages":[{"title":"connectors initiate","href":"/developers/references/cli/commands/connectors-initiate"},{"title":"connectors list-available","href":"/developers/references/cli/commands/connectors-list-available"},{"title":"connectors pull","href":"/developers/references/cli/commands/connectors-pull"},{"title":"connectors push","href":"/developers/references/cli/commands/connectors-push"}]},{"group":"Auth","pages":[{"title":"auth password-login","href":"/developers/references/cli/commands/auth-password-login"},{"title":"auth pull","href":"/developers/references/cli/commands/auth-pull"},{"title":"auth push","href":"/developers/references/cli/commands/auth-push"},{"title":"auth social-login","href":"/developers/references/cli/commands/auth-social-login"},{"title":"auth sso","href":"/developers/references/cli/commands/auth-sso"}]},{"group":"Secrets","pages":[{"title":"secrets set","href":"/developers/references/cli/commands/secrets-set"},{"title":"secrets list","href":"/developers/references/cli/commands/secrets-list"},{"title":"secrets delete","href":"/developers/references/cli/commands/secrets-delete"}]},{"group":"Development","pages":[{"title":"dev","href":"/developers/references/cli/commands/dev"},{"title":"exec","href":"/developers/references/cli/commands/exec"},{"title":"types generate","href":"/developers/references/cli/commands/types-generate"},{"title":"site open","href":"/developers/references/cli/commands/site-open"},{"title":"logs","href":"/developers/references/cli/commands/logs"}]},{"group":"API","pages":[{"title":"api catalog","href":"/developers/references/cli/commands/api-catalog"},{"title":"api fetch","href":"/developers/references/cli/commands/api-fetch"},{"title":"api grep","href":"/developers/references/cli/commands/api-grep"},{"title":"api search","href":"/developers/references/cli/commands/api-search"}]},{"group":"Sandbox","pages":[{"title":"sandbox ls","href":"/developers/references/cli/commands/sandbox-ls"},{"title":"sandbox read","href":"/developers/references/cli/commands/sandbox-read"},{"title":"sandbox grep","href":"/developers/references/cli/commands/sandbox-grep"},{"title":"sandbox write","href":"/developers/references/cli/commands/sandbox-write"},{"title":"sandbox edit","href":"/developers/references/cli/commands/sandbox-edit"},{"title":"sandbox run","href":"/developers/references/cli/commands/sandbox-run"},{"title":"sandbox checkpoint","href":"/developers/references/cli/commands/sandbox-checkpoint"},{"title":"branches list","href":"/developers/references/cli/commands/branches-list"}]},{"group":"Deployment","pages":[{"title":"build","sidebarTitle":"build","href":"/developers/references/cli/commands/build"},{"title":"deploy","href":"/developers/references/cli/commands/deploy"},{"title":"site deploy","href":"/developers/references/cli/commands/site-deploy"},{"title":"visibility","href":"/developers/references/cli/commands/visibility"}]}]}],"global":{"anchors":[{"anchor":"Developer Platform","icon":"arrow-left","href":"/developers/home"}]}},{"dropdown":"APIs","icon":"plug","groups":[{"group":"Base44 APIs","icon":"book-open","pages":[{"title":"Base44 APIs","sidebarTitle":"Overview","href":"/developers/references/apis/overview"}]},{"group":"Apps API (Beta)","boost":0.75,"icon":"rocket","expanded":false,"pages":[{"group":"Get Started","icon":"book-open","pages":[{"title":"Apps API Overview","sidebarTitle":"Overview","href":"/developers/references/apps-api/get-started/overview"},{"title":"Authentication","sidebarTitle":"Authentication","href":"/developers/references/apps-api/get-started/authentication"},{"title":"Apps API Concepts","sidebarTitle":"Concepts","href":"/developers/references/apps-api/get-started/concepts"},{"title":"Rate Limits","href":"/developers/references/apps-api/get-started/rate-limits"}]},{"group":"Apps","icon":"grid-2","pages":[{"title":"Apps","sidebarTitle":"Overview","href":"/developers/references/apps-api/sections/apps"},{"group":"Management","pages":[{"title":"List apps","deprecated":null,"version":null,"openapi":"/developers/references/app-management/app-management-openapi.json get /api/apps","href":"/api-reference/list-apps"},{"title":"Create app","deprecated":null,"version":null,"openapi":"/developers/references/app-management/app-management-openapi.json post /api/apps","href":"/api-reference/create-app"},{"title":"Get app","deprecated":null,"version":null,"openapi":"/developers/references/app-management/app-management-openapi.json get /api/apps/{app_id}","href":"/api-reference/get-app"},{"title":"Update app","deprecated":null,"version":null,"openapi":"/developers/references/app-management/app-management-openapi.json put /api/apps/{app_id}","href":"/api-reference/update-app"},{"title":"Patch app","deprecated":null,"version":null,"openapi":"/developers/references/app-management/app-management-openapi.json patch /api/apps/{app_id}","href":"/api-reference/patch-app"},{"title":"Get remix requirements","deprecated":null,"version":null,"openapi":"/developers/references/app-management/app-management-openapi.json get /api/apps/{app_id}/remix/requirements","href":"/api-reference/get-remix-requirements"},{"title":"Remix an app","deprecated":null,"version":null,"openapi":"/developers/references/app-management/app-management-openapi.json post /api/apps/{app_id}/remix","href":"/api-reference/remix-an-app"},{"title":"Export app source code","deprecated":null,"version":null,"openapi":"/developers/references/app-management/app-management-openapi.json get /api/apps/{app_id}/coding/export-to-zip","href":"/api-reference/export-app-source-code"},{"title":"Check app delete impact","deprecated":null,"version":null,"openapi":"/developers/references/app-management/app-management-openapi.json get /api/apps/{app_id}/delete-check","href":"/api-reference/check-app-delete-impact"},{"title":"Delete app","deprecated":null,"version":null,"openapi":"/developers/references/app-management/app-management-openapi.json delete /api/apps/{app_id}","href":"/api-reference/delete-app"},{"title":"Restore deleted app","deprecated":null,"version":null,"openapi":"/developers/references/app-management/app-management-openapi.json post /api/apps-trash/{app_id}/restore","href":"/api-reference/restore-deleted-app"}]},{"group":"Branding","pages":[{"title":"Change app slug","deprecated":null,"version":null,"openapi":"/developers/references/app-management/app-management-openapi.json patch /api/apps/{app_id}/metadata/slug","href":"/api-reference/change-app-slug"},{"title":"Generate app logo","deprecated":null,"version":null,"openapi":"/developers/references/app-management/app-management-openapi.json post /api/apps/{app_id}/metadata/generate-logo","href":"/api-reference/generate-app-logo"},{"title":"Set app logo","deprecated":null,"version":null,"openapi":"/developers/references/app-management/app-management-openapi.json post /api/apps/{app_id}/metadata/update-logo","href":"/api-reference/set-app-logo"},{"title":"Set social image","deprecated":null,"version":null,"openapi":"/developers/references/app-management/app-management-openapi.json post /api/apps/{app_id}/metadata/social-image","href":"/api-reference/set-social-image"},{"title":"Upload app file","deprecated":null,"version":null,"openapi":"/developers/references/app-management/app-management-openapi.json post /api/files/apps/{app_id}/upload","href":"/api-reference/upload-app-file"},{"title":"List assets","deprecated":null,"version":null,"openapi":"/developers/references/app-management/app-management-openapi.json get /api/apps/{app_id}/assets","href":"/api-reference/list-assets"},{"title":"Create asset","deprecated":null,"version":null,"openapi":"/developers/references/app-management/app-management-openapi.json post /api/apps/{app_id}/assets","href":"/api-reference/create-asset"},{"title":"Upload asset","deprecated":null,"version":null,"openapi":"/developers/references/app-management/app-management-openapi.json post /api/apps/{app_id}/assets/upload","href":"/api-reference/upload-asset"},{"title":"Rename asset","deprecated":null,"version":null,"openapi":"/developers/references/app-management/app-management-openapi.json patch /api/apps/{app_id}/assets/{asset_id}","href":"/api-reference/rename-asset"},{"title":"Delete asset","deprecated":null,"version":null,"openapi":"/developers/references/app-management/app-management-openapi.json delete /api/apps/{app_id}/assets/{asset_id}","href":"/api-reference/delete-asset"},{"title":"Import asset","deprecated":null,"version":null,"openapi":"/developers/references/app-management/app-management-openapi.json post /api/apps/{app_id}/assets/import","href":"/api-reference/import-asset"}]},{"group":"Secrets","pages":[{"title":"List secrets","deprecated":null,"version":null,"openapi":"/developers/references/app-management/app-management-openapi.json get /api/apps/{app_id}/secrets","href":"/api-reference/list-secrets"},{"title":"Set secret","deprecated":null,"version":null,"openapi":"/developers/references/app-management/app-management-openapi.json post /api/apps/{app_id}/secrets","href":"/api-reference/set-secret"},{"title":"Delete secret","deprecated":null,"version":null,"openapi":"/developers/references/app-management/app-management-openapi.json delete /api/apps/{app_id}/secrets","href":"/api-reference/delete-secret"}]},{"group":"Ownership transfer","pages":[{"title":"Check ownership transfer","deprecated":null,"version":null,"openapi":"/developers/references/app-management/app-management-openapi.json post /api/apps/{app_id}/ownership/transfer/preflight","href":"/api-reference/check-ownership-transfer"},{"title":"Start ownership transfer","deprecated":null,"version":null,"openapi":"/developers/references/app-management/app-management-openapi.json post /api/apps/{app_id}/ownership/transfer","href":"/api-reference/start-ownership-transfer"},{"title":"Transfer ownership to a workspace member","deprecated":null,"version":null,"openapi":"/developers/references/app-management/app-management-openapi.json post /api/apps/{app_id}/ownership/transfer/workspace-member","href":"/api-reference/transfer-ownership-to-a-workspace-member"},{"title":"Get pending ownership transfer","deprecated":null,"version":null,"openapi":"/developers/references/app-management/app-management-openapi.json get /api/apps/{app_id}/ownership/transfer/pending","href":"/api-reference/get-pending-ownership-transfer"},{"title":"Resend ownership transfer","deprecated":null,"version":null,"openapi":"/developers/references/app-management/app-management-openapi.json post /api/apps/{app_id}/ownership/transfer/resend","href":"/api-reference/resend-ownership-transfer"},{"title":"Cancel ownership transfer","deprecated":null,"version":null,"openapi":"/developers/references/app-management/app-management-openapi.json post /api/apps/{app_id}/ownership/transfer/cancel","href":"/api-reference/cancel-ownership-transfer"}]},{"group":"Template listings","pages":[{"title":"Get template listing pending update","deprecated":null,"version":null,"openapi":"/developers/references/app-management/app-management-openapi.json get /api/app-catalog-items/catalog/{item_id}/pending-changes","href":"/api-reference/get-template-listing-pending-update"},{"title":"Submit template listing update","deprecated":null,"version":null,"openapi":"/developers/references/app-management/app-management-openapi.json post /api/app-catalog-items/catalog/{item_id}/submit-update","href":"/api-reference/submit-template-listing-update"},{"title":"Archive template listing","deprecated":null,"version":null,"openapi":"/developers/references/app-management/app-management-openapi.json post /api/app-catalog-items/catalog/{item_id}/archive","href":"/api-reference/archive-template-listing"}]},{"group":"SSO and MCP","pages":[{"title":"Get app SSO settings","deprecated":null,"version":null,"openapi":"/developers/references/app-management/app-management-openapi.json get /api/apps/{app_id}/sso/settings","href":"/api-reference/get-app-sso-settings"},{"title":"Update app SSO settings","deprecated":null,"version":null,"openapi":"/developers/references/app-management/app-management-openapi.json put /api/apps/{app_id}/sso/settings","href":"/api-reference/update-app-sso-settings"},{"title":"Get MCP status","deprecated":null,"version":null,"openapi":"/developers/references/app-management/app-management-openapi.json get /api/apps/platform/{app_id}/mcp-status","href":"/api-reference/get-mcp-status"},{"title":"Get MCP config","deprecated":null,"version":null,"openapi":"/developers/references/app-management/app-management-openapi.json get /api/apps/platform/{app_id}/mcp/config","href":"/api-reference/get-mcp-config"},{"title":"Update MCP config","deprecated":null,"version":null,"openapi":"/developers/references/app-management/app-management-openapi.json patch /api/apps/platform/{app_id}/mcp/config","href":"/api-reference/update-mcp-config"},{"title":"Get app API reference","deprecated":null,"version":null,"openapi":"/developers/references/app-management/app-management-openapi.json get /api/apps/{app_id}/openapi-spec","href":"/api-reference/get-app-api-reference"}]}]},{"group":"Code and sandbox","icon":"code","pages":[{"title":"Code and sandbox","sidebarTitle":"Overview","href":"/developers/references/apps-api/sections/code-and-sandbox"},{"title":"List app code files","deprecated":null,"version":null,"openapi":"/developers/references/app-management/app-management-openapi.json get /api/apps/{app_id}/code/file-list","href":"/api-reference/list-app-code-files"},{"title":"Get an app code file","deprecated":null,"version":null,"openapi":"/developers/references/app-management/app-management-openapi.json get /api/apps/{app_id}/code/content","href":"/api-reference/get-an-app-code-file"},{"title":"Get app code files","deprecated":null,"version":null,"openapi":"/developers/references/app-management/app-management-openapi.json post /api/apps/{app_id}/code/content/batch","href":"/api-reference/get-app-code-files"},{"title":"Search app code","deprecated":null,"version":null,"openapi":"/developers/references/app-management/app-management-openapi.json post /api/apps/{app_id}/code/search","href":"/api-reference/search-app-code"},{"title":"Save an app file","deprecated":null,"version":null,"openapi":"/developers/references/app-management/app-management-openapi.json post /api/apps/{app_id}/coding/write","href":"/api-reference/save-an-app-file"},{"title":"Save several app files","deprecated":null,"version":null,"openapi":"/developers/references/app-management/app-management-openapi.json post /api/apps/{app_id}/coding/write-batch","href":"/api-reference/save-several-app-files"},{"title":"List app files","deprecated":null,"version":null,"openapi":"/developers/references/app-management/app-management-openapi.json post /api/apps/{app_id}/sandbox-bridge/list_directory","href":"/api-reference/list-app-files"},{"title":"Read app files","deprecated":null,"version":null,"openapi":"/developers/references/app-management/app-management-openapi.json post /api/apps/{app_id}/sandbox-bridge/read_file","href":"/api-reference/read-app-files"},{"title":"Search app files","deprecated":null,"version":null,"openapi":"/developers/references/app-management/app-management-openapi.json post /api/apps/{app_id}/sandbox-bridge/grep","href":"/api-reference/search-app-files"},{"title":"Write an app file","deprecated":null,"version":null,"openapi":"/developers/references/app-management/app-management-openapi.json post /api/apps/{app_id}/sandbox-bridge/write_file","href":"/api-reference/write-an-app-file"},{"title":"Edit an app file","deprecated":null,"version":null,"openapi":"/developers/references/app-management/app-management-openapi.json post /api/apps/{app_id}/sandbox-bridge/edit_file","href":"/api-reference/edit-an-app-file"},{"title":"Run a sandbox command","deprecated":null,"version":null,"openapi":"/developers/references/app-management/app-management-openapi.json post /api/apps/{app_id}/sandbox-bridge/run_command","href":"/api-reference/run-a-sandbox-command"},{"title":"Create a sandbox checkpoint","deprecated":null,"version":null,"openapi":"/developers/references/app-management/app-management-openapi.json post /api/apps/{app_id}/sandbox-bridge/create_checkpoint","href":"/api-reference/create-a-sandbox-checkpoint"},{"title":"List backend functions","deprecated":null,"version":null,"openapi":"/developers/references/app-management/app-management-openapi.json get /api/apps/{app_id}/backend-functions","href":"/api-reference/list-backend-functions"},{"title":"Get backend function logs","deprecated":null,"version":null,"openapi":"/developers/references/app-management/app-management-openapi.json get /api/apps/{app_id}/functions-mgmt/{function_name}/logs","href":"/api-reference/get-backend-function-logs"},{"title":"Redeploy a backend function","deprecated":null,"version":null,"openapi":"/developers/references/app-management/app-management-openapi.json post /api/apps/{app_id}/coding/redeploy-function/{function_name}","href":"/api-reference/redeploy-a-backend-function"},{"title":"Delete a backend function","deprecated":null,"version":null,"openapi":"/developers/references/app-management/app-management-openapi.json delete /api/apps/{app_id}/backend-functions/{function_name}","href":"/api-reference/delete-a-backend-function"},{"title":"List branches","deprecated":null,"version":null,"openapi":"/developers/references/app-management/app-management-openapi.json get /api/apps/{app_id}/branches","href":"/api-reference/list-branches"},{"title":"Create branch","deprecated":null,"version":null,"openapi":"/developers/references/app-management/app-management-openapi.json post /api/apps/{app_id}/branches","href":"/api-reference/create-branch"},{"title":"Get branch","deprecated":null,"version":null,"openapi":"/developers/references/app-management/app-management-openapi.json get /api/apps/{app_id}/branches/{branch_id}","href":"/api-reference/get-branch"},{"title":"Get branch sync status","deprecated":null,"version":null,"openapi":"/developers/references/app-management/app-management-openapi.json get /api/apps/{app_id}/branches/{branch_id}/sync-status","href":"/api-reference/get-branch-sync-status"},{"title":"Update branch from main","deprecated":null,"version":null,"openapi":"/developers/references/app-management/app-management-openapi.json post /api/apps/{app_id}/branches/{branch_id}/sync-from-main","href":"/api-reference/update-branch-from-main"},{"title":"Merge branch","deprecated":null,"version":null,"openapi":"/developers/references/app-management/app-management-openapi.json post /api/apps/{app_id}/branches/{branch_id}/merge","href":"/api-reference/merge-branch"},{"title":"Delete branch","deprecated":null,"version":null,"openapi":"/developers/references/app-management/app-management-openapi.json delete /api/apps/{app_id}/branches/{branch_id}","href":"/api-reference/delete-branch"},{"title":"Set main branch protection (owner or admin only)","deprecated":null,"version":null,"openapi":"/developers/references/app-management/app-management-openapi.json put /api/apps/{app_id}/branches/main/protection","href":"/api-reference/set-main-branch-protection-owner-or-admin-only"}]},{"group":"Chat","icon":"comments","pages":[{"title":"Chat","sidebarTitle":"Overview","href":"/developers/references/apps-api/sections/chat"},{"title":"Retry chat requests","sidebarTitle":"Retries","href":"/developers/references/apps-api/sections/chat-retries"},{"title":"Read conversation messages","deprecated":null,"version":null,"openapi":"/developers/references/app-management/app-management-openapi.json get /api/apps/{app_id}/chat/full-conversation","href":"/api-reference/read-conversation-messages"},{"title":"Send chat message","deprecated":null,"version":null,"openapi":"/developers/references/app-management/app-management-openapi.json post /api/apps/{app_id}/chat/message","href":"/api-reference/send-chat-message"},{"title":"Stop generation","deprecated":null,"version":null,"openapi":"/developers/references/app-management/app-management-openapi.json post /api/apps/{app_id}/chat/stop","href":"/api-reference/stop-generation"},{"title":"Submit tool-call input","deprecated":null,"version":null,"openapi":"/developers/references/app-management/app-management-openapi.json post /api/apps/{app_id}/chat/submit-tool-call-input","href":"/api-reference/submit-tool-call-input"},{"title":"Submit tool-call input (batch)","deprecated":null,"version":null,"openapi":"/developers/references/app-management/app-management-openapi.json post /api/apps/{app_id}/chat/submit-tool-call-input/batch","href":"/api-reference/submit-tool-call-input-batch"},{"title":"Edit and resend","deprecated":null,"version":null,"openapi":"/developers/references/app-management/app-management-openapi.json post /api/apps/{app_id}/chat/edit-and-resend","href":"/api-reference/edit-and-resend"},{"title":"Undo message","deprecated":null,"version":null,"openapi":"/developers/references/app-management/app-management-openapi.json post /api/apps/{app_id}/chat/message/{message_id}/undo","href":"/api-reference/undo-message"},{"title":"Get message queue","deprecated":null,"version":null,"openapi":"/developers/references/app-management/app-management-openapi.json get /api/apps/{app_id}/chat/queue","href":"/api-reference/get-message-queue"},{"title":"Edit queued message","deprecated":null,"version":null,"openapi":"/developers/references/app-management/app-management-openapi.json put /api/apps/{app_id}/chat/queue/{item_id}","href":"/api-reference/edit-queued-message"},{"title":"Reorder message queue","deprecated":null,"version":null,"openapi":"/developers/references/app-management/app-management-openapi.json put /api/apps/{app_id}/chat/queue/reorder","href":"/api-reference/reorder-message-queue"},{"title":"Pause message queue","deprecated":null,"version":null,"openapi":"/developers/references/app-management/app-management-openapi.json post /api/apps/{app_id}/chat/queue/pause","href":"/api-reference/pause-message-queue"},{"title":"Resume message queue","deprecated":null,"version":null,"openapi":"/developers/references/app-management/app-management-openapi.json post /api/apps/{app_id}/chat/queue/resume","href":"/api-reference/resume-message-queue"},{"title":"Remove queued message","deprecated":null,"version":null,"openapi":"/developers/references/app-management/app-management-openapi.json delete /api/apps/{app_id}/chat/queue/{item_id}","href":"/api-reference/remove-queued-message"},{"title":"Clear message queue","deprecated":null,"version":null,"openapi":"/developers/references/app-management/app-management-openapi.json delete /api/apps/{app_id}/chat/queue","href":"/api-reference/clear-message-queue"}]},{"group":"Comments","icon":"comment-dots","pages":[{"title":"List comments","deprecated":null,"version":null,"openapi":"/developers/references/app-management/app-management-openapi.json get /api/apps/{app_id}/comments","href":"/api-reference/list-comments"},{"title":"List mentionable users","deprecated":null,"version":null,"openapi":"/developers/references/app-management/app-management-openapi.json get /api/apps/{app_id}/comments/mentionable","href":"/api-reference/list-mentionable-users"},{"title":"Create comment","deprecated":null,"version":null,"openapi":"/developers/references/app-management/app-management-openapi.json post /api/apps/{app_id}/comments","href":"/api-reference/create-comment"},{"title":"Reply to comment","deprecated":null,"version":null,"openapi":"/developers/references/app-management/app-management-openapi.json post /api/apps/{app_id}/comments/threads/{thread_id}/replies","href":"/api-reference/reply-to-comment"},{"title":"Edit comment","deprecated":null,"version":null,"openapi":"/developers/references/app-management/app-management-openapi.json patch /api/apps/{app_id}/comments/threads/{thread_id}/messages/{message_id}","href":"/api-reference/edit-comment"},{"title":"Update comment anchor","deprecated":null,"version":null,"openapi":"/developers/references/app-management/app-management-openapi.json patch /api/apps/{app_id}/comments/threads/{thread_id}/anchor","href":"/api-reference/update-comment-anchor"},{"title":"Toggle comment reaction","deprecated":null,"version":null,"openapi":"/developers/references/app-management/app-management-openapi.json post /api/apps/{app_id}/comments/threads/{thread_id}/messages/{message_id}/reactions","href":"/api-reference/toggle-comment-reaction"},{"title":"Resolve comment thread","deprecated":null,"version":null,"openapi":"/developers/references/app-management/app-management-openapi.json post /api/apps/{app_id}/comments/threads/{thread_id}/resolve","href":"/api-reference/resolve-comment-thread"},{"title":"Reopen comment thread","deprecated":null,"version":null,"openapi":"/developers/references/app-management/app-management-openapi.json post /api/apps/{app_id}/comments/threads/{thread_id}/unresolve","href":"/api-reference/reopen-comment-thread"},{"title":"Mark comment thread read","deprecated":null,"version":null,"openapi":"/developers/references/app-management/app-management-openapi.json post /api/apps/{app_id}/comments/threads/{thread_id}/read","href":"/api-reference/mark-comment-thread-read"},{"title":"Mark all comments read","deprecated":null,"version":null,"openapi":"/developers/references/app-management/app-management-openapi.json post /api/apps/{app_id}/comments/read-all","href":"/api-reference/mark-all-comments-read"},{"title":"Create comment screenshot link","deprecated":null,"version":null,"openapi":"/developers/references/app-management/app-management-openapi.json post /api/apps/{app_id}/comments/threads/{thread_id}/chat-screenshot-url","href":"/api-reference/create-comment-screenshot-link"},{"title":"Delete comment reply","deprecated":null,"version":null,"openapi":"/developers/references/app-management/app-management-openapi.json delete /api/apps/{app_id}/comments/threads/{thread_id}/messages/{message_id}","href":"/api-reference/delete-comment-reply"},{"title":"Delete comment thread","deprecated":null,"version":null,"openapi":"/developers/references/app-management/app-management-openapi.json delete /api/apps/{app_id}/comments/threads/{thread_id}","href":"/api-reference/delete-comment-thread"}]},{"group":"Email","icon":"envelope","pages":[{"title":"List email templates","deprecated":null,"version":null,"openapi":"/developers/references/app-management/app-management-openapi.json get /api/apps/{app_id}/emails","href":"/api-reference/list-email-templates"},{"title":"Get email template","deprecated":null,"version":null,"openapi":"/developers/references/app-management/app-management-openapi.json get /api/apps/{app_id}/emails/{template_id}","href":"/api-reference/get-email-template"},{"title":"Send email template test","deprecated":null,"version":null,"openapi":"/developers/references/app-management/app-management-openapi.json post /api/apps/{app_id}/emails/{template_id}/test","href":"/api-reference/send-email-template-test"},{"title":"Delete email template","deprecated":null,"version":null,"openapi":"/developers/references/app-management/app-management-openapi.json delete /api/apps/{app_id}/emails/{template_id}","href":"/api-reference/delete-email-template"},{"title":"Preview application email","deprecated":null,"version":null,"openapi":"/developers/references/app-management/app-management-openapi.json get /api/apps/{app_id}/emails/system/{email_type}/preview","href":"/api-reference/preview-application-email"},{"title":"Customize application email","deprecated":null,"version":null,"openapi":"/developers/references/app-management/app-management-openapi.json post /api/apps/{app_id}/emails/system/{email_type}/materialize","href":"/api-reference/customize-application-email"},{"title":"Send application email test","deprecated":null,"version":null,"openapi":"/developers/references/app-management/app-management-openapi.json post /api/apps/{app_id}/emails/system/{email_type}/test","href":"/api-reference/send-application-email-test"},{"title":"Get email stats","deprecated":null,"version":null,"openapi":"/developers/references/app-management/app-management-openapi.json get /api/apps/{app_id}/emails/stats","href":"/api-reference/get-email-stats"}]},{"group":"Checkpoints","icon":"clock-rotate-left","pages":[{"title":"Checkpoints","sidebarTitle":"Overview","href":"/developers/references/apps-api/sections/checkpoints"},{"title":"List checkpoints","deprecated":null,"version":null,"openapi":"/developers/references/app-management/app-management-openapi.json get /api/apps/{app_id}/app-checkpoints","href":"/api-reference/list-checkpoints"},{"title":"Create checkpoint","deprecated":null,"version":null,"openapi":"/developers/references/app-management/app-management-openapi.json post /api/apps/{app_id}/app-checkpoints","href":"/api-reference/create-checkpoint"},{"title":"Get checkpoint files","deprecated":null,"version":null,"openapi":"/developers/references/app-management/app-management-openapi.json get /api/apps/{app_id}/app-checkpoints/{checkpoint_id}/file-tree","href":"/api-reference/get-checkpoint-files"},{"title":"Restore checkpoint","deprecated":null,"version":null,"openapi":"/developers/references/app-management/app-management-openapi.json post /api/apps/{app_id}/app-checkpoints/{checkpoint_id}/load","href":"/api-reference/restore-checkpoint"},{"title":"Retry checkpoint build","deprecated":null,"version":null,"openapi":"/developers/references/app-management/app-management-openapi.json post /api/apps/{app_id}/app-checkpoints/{checkpoint_id}/retry-build","href":"/api-reference/retry-checkpoint-build"}]},{"group":"Deployment","icon":"cloud-arrow-up","pages":[{"title":"Deployment","sidebarTitle":"Overview","href":"/developers/references/apps-api/sections/deployment"},{"title":"Get preview URL","deprecated":null,"version":null,"openapi":"/developers/references/app-management/app-management-openapi.json get /api/apps/{app_id}/sandbox/preview-url","href":"/api-reference/get-preview-url"},{"title":"Deploy an app","deprecated":null,"version":null,"openapi":"/developers/references/app-management/app-management-openapi.json post /api/apps/{app_id}/deploy","href":"/api-reference/deploy-an-app"},{"title":"Deploy a prebuilt site","deprecated":null,"version":null,"openapi":"/developers/references/app-management/app-management-openapi.json post /api/apps/{app_id}/deploy-dist","href":"/api-reference/deploy-a-prebuilt-site"},{"title":"Request deploy approval","deprecated":null,"version":null,"openapi":"/developers/references/app-management/app-management-openapi.json post /api/apps/{app_id}/request-deploy","href":"/api-reference/request-deploy-approval"},{"title":"Get published URL","deprecated":null,"version":null,"openapi":"/developers/references/app-management/app-management-openapi.json get /api/apps/platform/{app_id}/published-url","href":"/api-reference/get-published-url"},{"title":"Unpublish app","deprecated":null,"version":null,"openapi":"/developers/references/app-management/app-management-openapi.json post /api/apps/{app_id}/undeploy","href":"/api-reference/unpublish-app"}]},{"group":"Entities","icon":"table","pages":[{"title":"Overview","sidebarTitle":"Overview","href":"/developers/references/apps-api/sections/entities"},{"group":"Schemas","pages":[{"title":"List entity schemas","deprecated":null,"version":null,"openapi":"/developers/references/app-management/app-management-openapi.json get /api/apps/{app_id}/entity-schemas","href":"/api-reference/list-entity-schemas"},{"title":"Get entity schema","deprecated":null,"version":null,"openapi":"/developers/references/app-management/app-management-openapi.json get /api/apps/{app_id}/entity-schemas/{entity_name}","href":"/api-reference/get-entity-schema"},{"title":"Create entity schema","deprecated":null,"version":null,"openapi":"/developers/references/app-management/app-management-openapi.json post /api/apps/{app_id}/entity-schemas","href":"/api-reference/create-entity-schema"},{"title":"Update entity schema","deprecated":null,"version":null,"openapi":"/developers/references/app-management/app-management-openapi.json put /api/apps/{app_id}/entity-schemas/{entity_name}","href":"/api-reference/update-entity-schema"},{"title":"Sync entity schemas","deprecated":null,"version":null,"openapi":"/developers/references/app-management/app-management-openapi.json put /api/apps/{app_id}/entity-schemas","href":"/api-reference/sync-entity-schemas"},{"title":"Delete entity schema","deprecated":null,"version":null,"openapi":"/developers/references/app-management/app-management-openapi.json delete /api/apps/{app_id}/entity-schemas/{entity_name}","href":"/api-reference/delete-entity-schema"}]},{"group":"Records","pages":[{"title":"List entity records","deprecated":null,"version":null,"openapi":"/developers/references/app-management/app-management-openapi.json get /api/apps/{app_id}/entities/{entity_name}/v2/list","href":"/api-reference/list-entity-records"},{"title":"Get entity record","deprecated":null,"version":null,"openapi":"/developers/references/app-management/app-management-openapi.json get /api/apps/{app_id}/entities/{entity_name}/{entity_id}","href":"/api-reference/get-entity-record"},{"title":"Create entity record","deprecated":null,"version":null,"openapi":"/developers/references/app-management/app-management-openapi.json post /api/apps/{app_id}/entities/{entity_name}","href":"/api-reference/create-entity-record"},{"title":"Update entity record","deprecated":null,"version":null,"openapi":"/developers/references/app-management/app-management-openapi.json put /api/apps/{app_id}/entities/{entity_name}/{entity_id}","href":"/api-reference/update-entity-record"},{"title":"Delete entity record","deprecated":null,"version":null,"openapi":"/developers/references/app-management/app-management-openapi.json delete /api/apps/{app_id}/entities/{entity_name}/{entity_id}","href":"/api-reference/delete-entity-record"},{"title":"Count entity records","deprecated":null,"version":null,"openapi":"/developers/references/app-management/app-management-openapi.json get /api/apps/{app_id}/entities/{entity_name}/count","href":"/api-reference/count-entity-records"},{"title":"Aggregate entity records","deprecated":null,"version":null,"openapi":"/developers/references/app-management/app-management-openapi.json post /api/apps/{app_id}/entities/{entity_name}/aggregate","href":"/api-reference/aggregate-entity-records"}]},{"group":"Bulk operations","pages":[{"title":"Create entity records","deprecated":null,"version":null,"openapi":"/developers/references/app-management/app-management-openapi.json post /api/apps/{app_id}/entities/{entity_name}/bulk","href":"/api-reference/create-entity-records"},{"title":"Update entity records","deprecated":null,"version":null,"openapi":"/developers/references/app-management/app-management-openapi.json put /api/apps/{app_id}/entities/{entity_name}/bulk","href":"/api-reference/update-entity-records"},{"title":"Update entity records by filter","deprecated":null,"version":null,"openapi":"/developers/references/app-management/app-management-openapi.json patch /api/apps/{app_id}/entities/{entity_name}/update-many","href":"/api-reference/update-entity-records-by-filter"},{"title":"Upsert entity records","deprecated":null,"version":null,"openapi":"/developers/references/app-management/app-management-openapi.json post /api/apps/{app_id}/entities/{entity_name}/upsert","href":"/api-reference/upsert-entity-records"},{"title":"Import entity records from CSV","deprecated":null,"version":null,"openapi":"/developers/references/app-management/app-management-openapi.json post /api/apps/{app_id}/entities/{entity_name}/import","href":"/api-reference/import-entity-records-from-csv"},{"title":"Delete entity records","deprecated":null,"version":null,"openapi":"/developers/references/app-management/app-management-openapi.json delete /api/apps/{app_id}/entities/{entity_name}","href":"/api-reference/delete-entity-records"}]},{"group":"Trash","pages":[{"title":"List deleted entity records","deprecated":null,"version":null,"openapi":"/developers/references/app-management/app-management-openapi.json get /api/apps/{app_id}/entities/{entity_name}/trash","href":"/api-reference/list-deleted-entity-records"},{"title":"Restore entity record","deprecated":null,"version":null,"openapi":"/developers/references/app-management/app-management-openapi.json put /api/apps/{app_id}/entities/{entity_name}/{entity_id}/restore","href":"/api-reference/restore-entity-record"},{"title":"Restore entity records","deprecated":null,"version":null,"openapi":"/developers/references/app-management/app-management-openapi.json put /api/apps/{app_id}/entities/{entity_name}/trash/restore","href":"/api-reference/restore-entity-records"},{"title":"Permanently delete entity record","deprecated":null,"version":null,"openapi":"/developers/references/app-management/app-management-openapi.json delete /api/apps/{app_id}/entities/{entity_name}/{entity_id}/permanent","href":"/api-reference/permanently-delete-entity-record"}]},{"group":"Data checkpoints","pages":[{"title":"Get data version history status","deprecated":null,"version":null,"openapi":"/developers/references/app-management/app-management-openapi.json get /api/apps/{app_id}/entities/versions/info","href":"/api-reference/get-data-version-history-status"},{"title":"List data checkpoints","deprecated":null,"version":null,"openapi":"/developers/references/app-management/app-management-openapi.json get /api/apps/{app_id}/entities/versions/checkpoints","href":"/api-reference/list-data-checkpoints"},{"title":"Download data checkpoint","deprecated":null,"version":null,"openapi":"/developers/references/app-management/app-management-openapi.json get /api/apps/{app_id}/entities/{entity_name}/versions/checkpoints/{checkpoint_id}/snapshot","href":"/api-reference/download-data-checkpoint"},{"title":"Restore data to checkpoint","deprecated":null,"version":null,"openapi":"/developers/references/app-management/app-management-openapi.json post /api/apps/{app_id}/entities/versions/checkpoints/{checkpoint_id}/restore","href":"/api-reference/restore-data-to-checkpoint"},{"title":"Get data restore status","deprecated":null,"version":null,"openapi":"/developers/references/app-management/app-management-openapi.json get /api/apps/{app_id}/entities/versions/restores/batch/{batch_id}","href":"/api-reference/get-data-restore-status"}]}]},{"group":"Users","icon":"users","pages":[{"title":"Users","sidebarTitle":"Overview","href":"/developers/references/apps-api/sections/users"},{"title":"List app users","deprecated":null,"version":null,"openapi":"/developers/references/app-management/app-management-openapi.json get /api/apps/{app_id}/entities/User","href":"/api-reference/list-app-users"},{"title":"Count app users","deprecated":null,"version":null,"openapi":"/developers/references/app-management/app-management-openapi.json get /api/apps/{app_id}/entities/User/count","href":"/api-reference/count-app-users"},{"title":"Get app user","deprecated":null,"version":null,"openapi":"/developers/references/app-management/app-management-openapi.json get /api/apps/{app_id}/entities/User/{user_id}","href":"/api-reference/get-app-user"},{"title":"Update app user","deprecated":null,"version":null,"openapi":"/developers/references/app-management/app-management-openapi.json put /api/apps/{app_id}/entities/User/{user_id}","href":"/api-reference/update-app-user"},{"title":"Remove app user","deprecated":null,"version":null,"openapi":"/developers/references/app-management/app-management-openapi.json delete /api/apps/{app_id}/entities/User/{user_id}","href":"/api-reference/remove-app-user"},{"title":"Invite app users","deprecated":null,"version":null,"openapi":"/developers/references/app-management/app-management-openapi.json post /api/apps/{app_id}/users/invite-users","href":"/api-reference/invite-app-users"},{"title":"Provision an app user","deprecated":null,"version":null,"openapi":"/developers/references/app-management/app-management-openapi.json post /api/apps/{app_id}/users/provisions","href":"/api-reference/provision-an-app-user"},{"title":"Deprovision an app user","deprecated":null,"version":null,"openapi":"/developers/references/app-management/app-management-openapi.json delete /api/apps/{app_id}/users/provisions","href":"/api-reference/deprovision-an-app-user"},{"title":"List access requests","deprecated":null,"version":null,"openapi":"/developers/references/app-management/app-management-openapi.json get /api/apps/{app_id}/access-requests/all","href":"/api-reference/list-access-requests"},{"title":"Approve or deny access request","deprecated":null,"version":null,"openapi":"/developers/references/app-management/app-management-openapi.json post /api/apps/{app_id}/access-requests/{request_id}/{action}","href":"/api-reference/approve-or-deny-access-request"},{"title":"Update pending invitee","deprecated":null,"version":null,"openapi":"/developers/references/app-management/app-management-openapi.json put /api/apps/{app_id}/access-requests/{request_id}","href":"/api-reference/update-pending-invitee"},{"title":"List collaborators","deprecated":null,"version":null,"openapi":"/developers/references/app-management/app-management-openapi.json get /api/apps/{app_id}/users/collaborators","href":"/api-reference/list-collaborators"},{"title":"Remove collaborator","deprecated":null,"version":null,"openapi":"/developers/references/app-management/app-management-openapi.json delete /api/apps/{app_id}/users/collaborators/{collaborator_id}","href":"/api-reference/remove-collaborator"},{"title":"List group shares","deprecated":null,"version":null,"openapi":"/developers/references/app-management/app-management-openapi.json get /api/apps/{app_id}/group-shares","href":"/api-reference/list-group-shares"},{"title":"Share app with groups","deprecated":null,"version":null,"openapi":"/developers/references/app-management/app-management-openapi.json post /api/apps/{app_id}/group-shares","href":"/api-reference/share-app-with-groups"},{"title":"Update group share","deprecated":null,"version":null,"openapi":"/developers/references/app-management/app-management-openapi.json put /api/apps/{app_id}/group-shares/{share_id}","href":"/api-reference/update-group-share"},{"title":"Remove group share","deprecated":null,"version":null,"openapi":"/developers/references/app-management/app-management-openapi.json delete /api/apps/{app_id}/group-shares/{share_id}","href":"/api-reference/remove-group-share"}]},{"group":"Workflows","icon":"diagram-project","pages":[{"title":"Overview","sidebarTitle":"Overview","href":"/developers/references/apps-api/sections/workflows"},{"group":"Management","pages":[{"title":"List workflows","deprecated":null,"version":null,"openapi":"/developers/references/app-management/app-management-openapi.json get /api/apps/{app_id}/workflows","href":"/api-reference/list-workflows"},{"title":"Validate a workflow definition","deprecated":null,"version":null,"openapi":"/developers/references/app-management/app-management-openapi.json post /api/apps/{app_id}/workflows/validate-definition","href":"/api-reference/validate-a-workflow-definition"},{"title":"Create a workflow (not imported apps)","deprecated":null,"version":null,"openapi":"/developers/references/app-management/app-management-openapi.json post /api/apps/{app_id}/workflows","href":"/api-reference/create-a-workflow-not-imported-apps"},{"title":"Get workflow","deprecated":null,"version":null,"openapi":"/developers/references/app-management/app-management-openapi.json get /api/apps/{app_id}/workflows/{workflow_id}","href":"/api-reference/get-workflow"},{"title":"Update workflow (not imported apps)","deprecated":null,"version":null,"openapi":"/developers/references/app-management/app-management-openapi.json put /api/apps/{app_id}/workflows/{workflow_id}","href":"/api-reference/update-workflow-not-imported-apps"},{"title":"Toggle workflow status (not imported apps)","deprecated":null,"version":null,"openapi":"/developers/references/app-management/app-management-openapi.json post /api/apps/{app_id}/workflows/{workflow_id}/toggle-status","href":"/api-reference/toggle-workflow-status-not-imported-apps"},{"title":"Archive workflow (not imported apps)","deprecated":null,"version":null,"openapi":"/developers/references/app-management/app-management-openapi.json delete /api/apps/{app_id}/workflows/{workflow_id}","href":"/api-reference/archive-workflow-not-imported-apps"},{"title":"Restore workflow (not imported apps)","deprecated":null,"version":null,"openapi":"/developers/references/app-management/app-management-openapi.json post /api/apps/{app_id}/workflows/{workflow_id}/unarchive","href":"/api-reference/restore-workflow-not-imported-apps"}]},{"group":"Versions","pages":[{"title":"List workflow versions","deprecated":null,"version":null,"openapi":"/developers/references/app-management/app-management-openapi.json get /api/apps/{app_id}/workflows/{workflow_id}/versions","href":"/api-reference/list-workflow-versions"},{"title":"Get workflow version","deprecated":null,"version":null,"openapi":"/developers/references/app-management/app-management-openapi.json get /api/apps/{app_id}/workflows/{workflow_id}/versions/{version_id}","href":"/api-reference/get-workflow-version"}]},{"group":"Runs","pages":[{"title":"Get workflow run-now options","deprecated":null,"version":null,"openapi":"/developers/references/app-management/app-management-openapi.json get /api/apps/{app_id}/workflows/{workflow_id}/run-now-info","href":"/api-reference/get-workflow-run-now-options"},{"title":"Run a workflow now","deprecated":null,"version":null,"openapi":"/developers/references/app-management/app-management-openapi.json post /api/apps/{app_id}/workflows/{workflow_id}/run-now","href":"/api-reference/run-a-workflow-now"},{"title":"List workflow runs for an app","deprecated":null,"version":null,"openapi":"/developers/references/app-management/app-management-openapi.json get /api/apps/{app_id}/workflows/runs","href":"/api-reference/list-workflow-runs-for-an-app"},{"title":"List runs for a workflow","deprecated":null,"version":null,"openapi":"/developers/references/app-management/app-management-openapi.json get /api/apps/{app_id}/workflows/{workflow_id}/runs","href":"/api-reference/list-runs-for-a-workflow"},{"title":"Get workflow run","deprecated":null,"version":null,"openapi":"/developers/references/app-management/app-management-openapi.json get /api/apps/{app_id}/workflows/{workflow_id}/runs/{run_id}","href":"/api-reference/get-workflow-run"},{"title":"Cancel a workflow run","deprecated":null,"version":null,"openapi":"/developers/references/app-management/app-management-openapi.json post /api/apps/{app_id}/workflows/{workflow_id}/runs/{run_id}/cancel","href":"/api-reference/cancel-a-workflow-run"},{"title":"Analyze a failed workflow run","deprecated":null,"version":null,"openapi":"/developers/references/app-management/app-management-openapi.json post /api/apps/{app_id}/workflows/{workflow_id}/runs/{run_id}/analyze","href":"/api-reference/analyze-a-failed-workflow-run"}]},{"group":"Insights","pages":[{"title":"Get workflow stats","deprecated":null,"version":null,"openapi":"/developers/references/app-management/app-management-openapi.json get /api/apps/{app_id}/workflows/stats","href":"/api-reference/get-workflow-stats"},{"title":"Suggest workflows","deprecated":null,"version":null,"openapi":"/developers/references/app-management/app-management-openapi.json get /api/apps/{app_id}/workflows/suggestions","href":"/api-reference/suggest-workflows"}]}]},{"group":"Agents","icon":"user-robot","pages":[{"title":"Agents","sidebarTitle":"Overview","href":"/developers/references/apps-api/sections/agents"},{"title":"Get the agent profile","deprecated":null,"version":null,"openapi":"/developers/references/app-management/app-management-openapi.json get /api/apps/{app_id}/agent-profile","href":"/api-reference/get-the-agent-profile"},{"title":"Get agent setup suggestions","deprecated":null,"version":null,"openapi":"/developers/references/app-management/app-management-openapi.json get /api/apps/{app_id}/agent-configs/setup-suggestions","href":"/api-reference/get-agent-setup-suggestions"},{"title":"List agent conversation users","deprecated":null,"version":null,"openapi":"/developers/references/app-management/app-management-openapi.json get /api/apps/{app_id}/agent-configs/conversation-users","href":"/api-reference/list-agent-conversation-users"},{"title":"Get agent conversation","deprecated":null,"version":null,"openapi":"/developers/references/app-management/app-management-openapi.json get /api/apps/{app_id}/agent-configs/conversations/{conversation_id}","href":"/api-reference/get-agent-conversation"},{"title":"List agent memories","deprecated":null,"version":null,"openapi":"/developers/references/app-management/app-management-openapi.json get /api/apps/{app_id}/agent-configs/{name}/memory","href":"/api-reference/list-agent-memories"},{"title":"Get agent usage","deprecated":null,"version":null,"openapi":"/developers/references/app-management/app-management-openapi.json get /api/apps/{app_id}/agent-configs/usage","href":"/api-reference/get-agent-usage"}]},{"group":"Domains and redirects","icon":"globe","pages":[{"title":"Overview","sidebarTitle":"Overview","href":"/developers/references/apps-api/sections/domains"},{"group":"Custom domains","pages":[{"title":"Check domain availability","deprecated":null,"version":null,"openapi":"/developers/references/app-management/app-management-openapi.json get /api/apps/{app_id}/custom-domains/availability","href":"/api-reference/check-domain-availability"},{"title":"Get domain purchase provider","deprecated":null,"version":null,"openapi":"/developers/references/app-management/app-management-openapi.json get /api/apps/{app_id}/custom-domains/purchase-provider","href":"/api-reference/get-domain-purchase-provider"},{"title":"Create domain checkout link","deprecated":null,"version":null,"openapi":"/developers/references/app-management/app-management-openapi.json post /api/apps/{app_id}/custom-domains/purchase-url","href":"/api-reference/create-domain-checkout-link"},{"title":"List domain registrations","deprecated":null,"version":null,"openapi":"/developers/references/app-management/app-management-openapi.json get /api/apps/{app_id}/custom-domains/registrations","href":"/api-reference/list-domain-registrations"},{"title":"Update a domain registration","deprecated":null,"version":null,"openapi":"/developers/references/app-management/app-management-openapi.json patch /api/apps/{app_id}/custom-domains/{domain_id}/registration","href":"/api-reference/update-a-domain-registration"},{"title":"List custom domains","deprecated":null,"version":null,"openapi":"/developers/references/app-management/app-management-openapi.json get /api/apps/{app_id}/custom-domains","href":"/api-reference/list-custom-domains"},{"title":"Add custom domain","deprecated":null,"version":null,"openapi":"/developers/references/app-management/app-management-openapi.json post /api/apps/{app_id}/custom-domains","href":"/api-reference/add-custom-domain"},{"title":"Get custom domain","deprecated":null,"version":null,"openapi":"/developers/references/app-management/app-management-openapi.json get /api/apps/{app_id}/custom-domains/{domain_id}","href":"/api-reference/get-custom-domain"},{"title":"Get custom domain DNS records","deprecated":null,"version":null,"openapi":"/developers/references/app-management/app-management-openapi.json get /api/apps/{app_id}/custom-domains/{domain_id}/dns-records","href":"/api-reference/get-custom-domain-dns-records"},{"title":"Verify custom domain","deprecated":null,"version":null,"openapi":"/developers/references/app-management/app-management-openapi.json post /api/apps/{app_id}/custom-domains/{domain_id}/verify","href":"/api-reference/verify-custom-domain"},{"title":"Get custom domain status","deprecated":null,"version":null,"openapi":"/developers/references/app-management/app-management-openapi.json post /api/apps/{app_id}/custom-domains/{domain_id}/status","href":"/api-reference/get-custom-domain-status"},{"title":"Link custom domain","deprecated":null,"version":null,"openapi":"/developers/references/app-management/app-management-openapi.json post /api/apps/{app_id}/custom-domains/{domain_id}/link","href":"/api-reference/link-custom-domain"},{"title":"Set custom domain redirect","deprecated":null,"version":null,"openapi":"/developers/references/app-management/app-management-openapi.json put /api/apps/{app_id}/custom-domains/{domain_id}/redirect","href":"/api-reference/set-custom-domain-redirect"},{"title":"Unlink custom domain","deprecated":null,"version":null,"openapi":"/developers/references/app-management/app-management-openapi.json post /api/apps/{app_id}/custom-domains/{domain_id}/unlink","href":"/api-reference/unlink-custom-domain"},{"title":"Delete custom domain","deprecated":null,"version":null,"openapi":"/developers/references/app-management/app-management-openapi.json delete /api/apps/{app_id}/custom-domains/{domain_id}","href":"/api-reference/delete-custom-domain"}]},{"group":"Email domains","pages":[{"title":"List email domains","deprecated":null,"version":null,"openapi":"/developers/references/app-management/app-management-openapi.json get /api/apps/{app_id}/custom-email-domains","href":"/api-reference/list-email-domains"},{"title":"Enable email sending for a domain","deprecated":null,"version":null,"openapi":"/developers/references/app-management/app-management-openapi.json post /api/apps/{app_id}/custom-email-domains","href":"/api-reference/enable-email-sending-for-a-domain"},{"title":"Retry email domain setup","deprecated":null,"version":null,"openapi":"/developers/references/app-management/app-management-openapi.json post /api/apps/{app_id}/custom-email-domains/configure","href":"/api-reference/retry-email-domain-setup"},{"title":"Update email sender details","deprecated":null,"version":null,"openapi":"/developers/references/app-management/app-management-openapi.json patch /api/apps/{app_id}/custom-email-domains","href":"/api-reference/update-email-sender-details"},{"title":"Replace the email domain","deprecated":null,"version":null,"openapi":"/developers/references/app-management/app-management-openapi.json post /api/apps/{app_id}/custom-email-domains/replace","href":"/api-reference/replace-the-email-domain"},{"title":"Disable email sending for a domain","deprecated":null,"version":null,"openapi":"/developers/references/app-management/app-management-openapi.json delete /api/apps/{app_id}/custom-email-domains","href":"/api-reference/disable-email-sending-for-a-domain"}]},{"group":"URL redirects","pages":[{"title":"List URL redirects","deprecated":null,"version":null,"openapi":"/developers/references/app-management/app-management-openapi.json get /api/apps/{app_id}/url-redirects","href":"/api-reference/list-url-redirects"},{"title":"Create URL redirect","deprecated":null,"version":null,"openapi":"/developers/references/app-management/app-management-openapi.json post /api/apps/{app_id}/url-redirects","href":"/api-reference/create-url-redirect"},{"title":"Update URL redirect","deprecated":null,"version":null,"openapi":"/developers/references/app-management/app-management-openapi.json put /api/apps/{app_id}/url-redirects/{redirect_id}","href":"/api-reference/update-url-redirect"},{"title":"Delete URL redirect","deprecated":null,"version":null,"openapi":"/developers/references/app-management/app-management-openapi.json delete /api/apps/{app_id}/url-redirects/{redirect_id}","href":"/api-reference/delete-url-redirect"}]}]},{"group":"GitHub","icon":"github","pages":[{"title":"GitHub","sidebarTitle":"Overview","href":"/developers/references/apps-api/sections/github"},{"title":"List workspace GitHub installations","deprecated":null,"version":null,"openapi":"/developers/references/app-management/app-management-openapi.json get /api/apps/{app_id}/github/workspace-installations","href":"/api-reference/list-workspace-github-installations"},{"title":"List GitHub organizations","deprecated":null,"version":null,"openapi":"/developers/references/app-management/app-management-openapi.json get /api/apps/{app_id}/github/organizations","href":"/api-reference/list-github-organizations"},{"title":"Get GitHub organization policy","deprecated":null,"version":null,"openapi":"/developers/references/app-management/app-management-openapi.json get /api/apps/{app_id}/github/org-policy","href":"/api-reference/get-github-organization-policy"},{"title":"Connect an app to GitHub","deprecated":null,"version":null,"openapi":"/developers/references/app-management/app-management-openapi.json post /api/apps/{app_id}/github/connect","href":"/api-reference/connect-an-app-to-github"},{"title":"Link a CLI app’s GitHub repository","deprecated":null,"version":null,"openapi":"/developers/references/app-management/app-management-openapi.json post /api/apps/{app_id}/github/link-existing","href":"/api-reference/link-a-cli-app’s-github-repository"},{"title":"Get GitHub connection","deprecated":null,"version":null,"openapi":"/developers/references/app-management/app-management-openapi.json get /api/apps/{app_id}/github/connection","href":"/api-reference/get-github-connection"},{"title":"Turn automatic GitHub sync on or off","deprecated":null,"version":null,"openapi":"/developers/references/app-management/app-management-openapi.json post /api/apps/{app_id}/github/sync/toggle","href":"/api-reference/turn-automatic-github-sync-on-or-off"},{"title":"Pull changes from GitHub","deprecated":null,"version":null,"openapi":"/developers/references/app-management/app-management-openapi.json post /api/apps/{app_id}/github/sync","href":"/api-reference/pull-changes-from-github"},{"title":"Push changes to GitHub","deprecated":null,"version":null,"openapi":"/developers/references/app-management/app-management-openapi.json post /api/apps/{app_id}/github/sync/manual","href":"/api-reference/push-changes-to-github"},{"title":"Resolve GitHub sync conflicts","deprecated":null,"version":null,"openapi":"/developers/references/app-management/app-management-openapi.json post /api/apps/{app_id}/github/sync/resolve-conflicts","href":"/api-reference/resolve-github-sync-conflicts"},{"title":"Import a GitHub branch","deprecated":null,"version":null,"openapi":"/developers/references/app-management/app-management-openapi.json post /api/apps/{app_id}/github/branches/import","href":"/api-reference/import-a-github-branch"},{"title":"Reconnect a GitHub repository","deprecated":null,"version":null,"openapi":"/developers/references/app-management/app-management-openapi.json post /api/apps/{app_id}/github/reconnect","href":"/api-reference/reconnect-a-github-repository"},{"title":"Disconnect a GitHub repository","deprecated":null,"version":null,"openapi":"/developers/references/app-management/app-management-openapi.json delete /api/apps/{app_id}/github/disconnect","href":"/api-reference/disconnect-a-github-repository"}]},{"group":"Base code","icon":"laptop-code","pages":[{"title":"Base code","sidebarTitle":"Overview","href":"/developers/references/apps-api/sections/imported-app-sessions"},{"title":"Check for main sandbox updates on an imported app","deprecated":null,"version":null,"openapi":"/developers/references/app-management/app-management-openapi.json post /api/apps/{app_id}/imported/main-update/check","href":"/api-reference/check-for-main-sandbox-updates-on-an-imported-app"},{"title":"Get main sandbox update status on an imported app","deprecated":null,"version":null,"openapi":"/developers/references/app-management/app-management-openapi.json get /api/apps/{app_id}/imported/main-update","href":"/api-reference/get-main-sandbox-update-status-on-an-imported-app"},{"title":"Retry main sandbox update","deprecated":null,"version":null,"openapi":"/developers/references/app-management/app-management-openapi.json post /api/apps/{app_id}/imported/main-update/failures/{failure_id}/retry","href":"/api-reference/retry-main-sandbox-update"},{"title":"Investigate main sandbox update failure","deprecated":null,"version":null,"openapi":"/developers/references/app-management/app-management-openapi.json post /api/apps/{app_id}/imported/main-update/failures/{failure_id}/investigations","href":"/api-reference/investigate-main-sandbox-update-failure"},{"title":"List coding sessions on an imported app","deprecated":null,"version":null,"openapi":"/developers/references/app-management/app-management-openapi.json get /api/apps/{app_id}/imported/sessions","href":"/api-reference/list-coding-sessions-on-an-imported-app"},{"title":"Launch coding session on an imported app","deprecated":null,"version":null,"openapi":"/developers/references/app-management/app-management-openapi.json post /api/apps/{app_id}/imported/sessions","href":"/api-reference/launch-coding-session-on-an-imported-app"},{"title":"Import a Claude Code or Codex session on an imported app","deprecated":null,"version":null,"openapi":"/developers/references/app-management/app-management-openapi.json post /api/apps/{app_id}/imported/session-imports","href":"/api-reference/import-a-claude-code-or-codex-session-on-an-imported-app"},{"title":"Get coding session on an imported app","deprecated":null,"version":null,"openapi":"/developers/references/app-management/app-management-openapi.json get /api/apps/{app_id}/imported/sessions/{session_id}","href":"/api-reference/get-coding-session-on-an-imported-app"},{"title":"Get coding session by launch key on an imported app","deprecated":null,"version":null,"openapi":"/developers/references/app-management/app-management-openapi.json get /api/apps/{app_id}/imported/sessions/launch-requests/{launch_key}","href":"/api-reference/get-coding-session-by-launch-key-on-an-imported-app"},{"title":"Get latest coding sessions by reference on an imported app","deprecated":null,"version":null,"openapi":"/developers/references/app-management/app-management-openapi.json get /api/apps/{app_id}/imported/sessions/latest","href":"/api-reference/get-latest-coding-sessions-by-reference-on-an-imported-app"},{"title":"Get a coding session's open question on an imported app","deprecated":null,"version":null,"openapi":"/developers/references/app-management/app-management-openapi.json get /api/apps/{app_id}/imported/sessions/{session_id}/input-request","href":"/api-reference/get-a-coding-sessions-open-question-on-an-imported-app"},{"title":"Send a message to a coding session on an imported app","deprecated":null,"version":null,"openapi":"/developers/references/app-management/app-management-openapi.json post /api/apps/{app_id}/imported/sessions/{session_id}/messages","href":"/api-reference/send-a-message-to-a-coding-session-on-an-imported-app"},{"title":"Get a message sent to a coding session on an imported app","deprecated":null,"version":null,"openapi":"/developers/references/app-management/app-management-openapi.json get /api/apps/{app_id}/imported/sessions/{session_id}/messages/{input_id}","href":"/api-reference/get-a-message-sent-to-a-coding-session-on-an-imported-app"},{"title":"Cancel coding session on an imported app","deprecated":null,"version":null,"openapi":"/developers/references/app-management/app-management-openapi.json post /api/apps/{app_id}/imported/sessions/{session_id}/cancel","href":"/api-reference/cancel-coding-session-on-an-imported-app"},{"title":"Import repository branch","deprecated":null,"version":null,"openapi":"/developers/references/app-management/app-management-openapi.json post /api/apps/{app_id}/branches/import-from-repo","href":"/api-reference/import-repository-branch"},{"title":"Get branch pull request","deprecated":null,"version":null,"openapi":"/developers/references/app-management/app-management-openapi.json get /api/apps/{app_id}/imported/git/pull-request","href":"/api-reference/get-branch-pull-request"},{"title":"Open pull request","deprecated":null,"version":null,"openapi":"/developers/references/app-management/app-management-openapi.json post /api/apps/{app_id}/imported/git/pull-request","href":"/api-reference/open-pull-request"},{"title":"Update pull request","deprecated":null,"version":null,"openapi":"/developers/references/app-management/app-management-openapi.json patch /api/apps/{app_id}/imported/git/pull-request","href":"/api-reference/update-pull-request"},{"title":"Get pull requests for branches","deprecated":null,"version":null,"openapi":"/developers/references/app-management/app-management-openapi.json get /api/apps/{app_id}/imported/git/pull-requests/by-branch","href":"/api-reference/get-pull-requests-for-branches"},{"title":"List pull requests","deprecated":null,"version":null,"openapi":"/developers/references/app-management/app-management-openapi.json get /api/apps/{app_id}/imported/git/pull-requests","href":"/api-reference/list-pull-requests"},{"title":"Get branch git status","deprecated":null,"version":null,"openapi":"/developers/references/app-management/app-management-openapi.json get /api/apps/{app_id}/imported/git/status","href":"/api-reference/get-branch-git-status"},{"title":"Commit branch changes","deprecated":null,"version":null,"openapi":"/developers/references/app-management/app-management-openapi.json post /api/apps/{app_id}/imported/git/commit","href":"/api-reference/commit-branch-changes"},{"title":"Discard branch changes","deprecated":null,"version":null,"openapi":"/developers/references/app-management/app-management-openapi.json post /api/apps/{app_id}/imported/git/discard","href":"/api-reference/discard-branch-changes"}]},{"group":"Agent deployments","icon":"rocket","pages":[{"title":"List agent deployments","deprecated":null,"version":null,"openapi":"/developers/references/app-management/app-management-openapi.json get /api/apps/{app_id}/imported/agent-deployments","href":"/api-reference/list-agent-deployments"},{"title":"Deploy agent version","deprecated":null,"version":null,"openapi":"/developers/references/app-management/app-management-openapi.json post /api/apps/{app_id}/imported/agent-deployments","href":"/api-reference/deploy-agent-version"},{"title":"Get agent deployment","deprecated":null,"version":null,"openapi":"/developers/references/app-management/app-management-openapi.json get /api/apps/{app_id}/imported/agent-deployments/{deployment_id}","href":"/api-reference/get-agent-deployment"},{"title":"Disable agent deployment","deprecated":null,"version":null,"openapi":"/developers/references/app-management/app-management-openapi.json patch /api/apps/{app_id}/imported/agent-deployments/{deployment_id}","href":"/api-reference/disable-agent-deployment"}]},{"group":"Agent runs","icon":"circle-play","pages":[{"title":"List agent runs","deprecated":null,"version":null,"openapi":"/developers/references/app-management/app-management-openapi.json get /api/apps/{app_id}/imported/agent-runs","href":"/api-reference/list-agent-runs"},{"title":"Start agent run","deprecated":null,"version":null,"openapi":"/developers/references/app-management/app-management-openapi.json post /api/apps/{app_id}/imported/agent-runs","href":"/api-reference/start-agent-run"},{"title":"Get agent run","deprecated":null,"version":null,"openapi":"/developers/references/app-management/app-management-openapi.json get /api/apps/{app_id}/imported/agent-runs/{run_id}","href":"/api-reference/get-agent-run"},{"title":"Observe agent completion","deprecated":null,"version":null,"openapi":"/developers/references/app-management/app-management-openapi.json get /api/apps/{app_id}/imported/agent-runs/{run_id}/events","href":"/api-reference/observe-agent-completion"},{"title":"Publish agent review","deprecated":null,"version":null,"openapi":"/developers/references/app-management/app-management-openapi.json post /api/apps/{app_id}/imported/agent-runs/{run_id}/publications","href":"/api-reference/publish-agent-review"},{"title":"Cancel agent run","deprecated":null,"version":null,"openapi":"/developers/references/app-management/app-management-openapi.json post /api/apps/{app_id}/imported/agent-runs/{run_id}/cancellations","href":"/api-reference/cancel-agent-run"}]},{"group":"Integrations","icon":"plug","pages":[{"title":"Integrations","sidebarTitle":"Overview","href":"/developers/references/apps-api/sections/integrations"},{"title":"List connectors","deprecated":null,"version":null,"openapi":"/developers/references/app-management/app-management-openapi.json get /api/external-auth/available-integrations","href":"/api-reference/list-connectors"},{"title":"Get connector policies","deprecated":null,"version":null,"openapi":"/developers/references/app-management/app-management-openapi.json get /api/apps/{app_id}/external-auth/connector-governance","href":"/api-reference/get-connector-policies"},{"title":"List connector connections","deprecated":null,"version":null,"openapi":"/developers/references/app-management/app-management-openapi.json get /api/apps/{app_id}/external-auth/list","href":"/api-reference/list-connector-connections"},{"title":"Get connector connection status","deprecated":null,"version":null,"openapi":"/developers/references/app-management/app-management-openapi.json get /api/apps/{app_id}/external-auth/status","href":"/api-reference/get-connector-connection-status"},{"title":"Get connector connection fields","deprecated":null,"version":null,"openapi":"/developers/references/app-management/app-management-openapi.json get /api/apps/{app_id}/external-auth/connection-config/{integration_type}","href":"/api-reference/get-connector-connection-fields"},{"title":"Get OAuth redirect URIs","deprecated":null,"version":null,"openapi":"/developers/references/app-management/app-management-openapi.json get /api/apps/{app_id}/oauth-redirect-uris","href":"/api-reference/get-oauth-redirect-uris"},{"title":"Start connector connection","deprecated":null,"version":null,"openapi":"/developers/references/app-management/app-management-openapi.json post /api/apps/{app_id}/external-auth/initiate","href":"/api-reference/start-connector-connection"},{"title":"Set connector scopes","deprecated":null,"version":null,"openapi":"/developers/references/app-management/app-management-openapi.json put /api/apps/{app_id}/external-auth/integrations/{integration_type}","href":"/api-reference/set-connector-scopes"},{"title":"Disconnect connector","deprecated":null,"version":null,"openapi":"/developers/references/app-management/app-management-openapi.json delete /api/apps/{app_id}/external-auth/integrations/{integration_type}","href":"/api-reference/disconnect-connector"},{"title":"Remove connector","deprecated":null,"version":null,"openapi":"/developers/references/app-management/app-management-openapi.json delete /api/apps/{app_id}/external-auth/integrations/{integration_type}/remove","href":"/api-reference/remove-connector"}]},{"group":"Security","icon":"shield-halved","pages":[{"title":"Security","sidebarTitle":"Overview","href":"/developers/references/apps-api/sections/security"},{"title":"Run security scan","deprecated":null,"version":null,"openapi":"/developers/references/app-management/app-management-openapi.json post /api/apps/{app_id}/security/scan","href":"/api-reference/run-security-scan"},{"title":"Get security scan","deprecated":null,"version":null,"openapi":"/developers/references/app-management/app-management-openapi.json get /api/apps/{app_id}/security/scan","href":"/api-reference/get-security-scan"},{"title":"Fix RLS recommendations","deprecated":null,"version":null,"openapi":"/developers/references/app-management/app-management-openapi.json post /api/apps/{app_id}/security/scan/rls/fix","href":"/api-reference/fix-rls-recommendations"},{"title":"Dismiss RLS recommendation","deprecated":null,"version":null,"openapi":"/developers/references/app-management/app-management-openapi.json delete /api/apps/{app_id}/security/scan/rls-recommendation/{entity_name}","href":"/api-reference/dismiss-rls-recommendation"},{"title":"Dismiss header recommendation","deprecated":null,"version":null,"openapi":"/developers/references/app-management/app-management-openapi.json delete /api/apps/{app_id}/security/scan/header-recommendations/{flag}","href":"/api-reference/dismiss-header-recommendation"},{"title":"Enable core integration protection","deprecated":null,"version":null,"openapi":"/developers/references/app-management/app-management-openapi.json post /api/apps/{app_id}/security/scan/core-integrations/protect","href":"/api-reference/enable-core-integration-protection"},{"title":"Ignore security finding","deprecated":null,"version":null,"openapi":"/developers/references/app-management/app-management-openapi.json post /api/apps/{app_id}/security/scan/ignore","href":"/api-reference/ignore-security-finding"},{"title":"Restore security finding","deprecated":null,"version":null,"openapi":"/developers/references/app-management/app-management-openapi.json delete /api/apps/{app_id}/security/scan/ignore/{fingerprint}","href":"/api-reference/restore-security-finding"},{"title":"Get security headers","deprecated":null,"version":null,"openapi":"/developers/references/app-management/app-management-openapi.json get /api/apps/{app_id}/security/headers","href":"/api-reference/get-security-headers"},{"title":"Update security headers","deprecated":null,"version":null,"openapi":"/developers/references/app-management/app-management-openapi.json put /api/apps/{app_id}/security/headers","href":"/api-reference/update-security-headers"}]},{"group":"Testing","icon":"vial","pages":[{"title":"Testing","sidebarTitle":"Overview","href":"/developers/references/apps-api/sections/testing"},{"title":"List tests","deprecated":null,"version":null,"openapi":"/developers/references/app-management/app-management-openapi.json get /api/apps/{app_id}/testing-agent/flows","href":"/api-reference/list-tests"},{"title":"Create test","deprecated":null,"version":null,"openapi":"/developers/references/app-management/app-management-openapi.json post /api/apps/{app_id}/testing-agent/flows","href":"/api-reference/create-test"},{"title":"Get test","deprecated":null,"version":null,"openapi":"/developers/references/app-management/app-management-openapi.json get /api/apps/{app_id}/testing-agent/flows/{flow_id}","href":"/api-reference/get-test"},{"title":"Update test","deprecated":null,"version":null,"openapi":"/developers/references/app-management/app-management-openapi.json patch /api/apps/{app_id}/testing-agent/flows/{flow_id}","href":"/api-reference/update-test"},{"title":"Delete test","deprecated":null,"version":null,"openapi":"/developers/references/app-management/app-management-openapi.json delete /api/apps/{app_id}/testing-agent/flows/{flow_id}","href":"/api-reference/delete-test"},{"title":"Refine test description","deprecated":null,"version":null,"openapi":"/developers/references/app-management/app-management-openapi.json post /api/apps/{app_id}/testing-agent/refine","href":"/api-reference/refine-test-description"},{"title":"Generate tests from app","deprecated":null,"version":null,"openapi":"/developers/references/app-management/app-management-openapi.json post /api/apps/{app_id}/testing-agent/flows/generate-from-app-context","href":"/api-reference/generate-tests-from-app"},{"title":"Suggest new tests","deprecated":null,"version":null,"openapi":"/developers/references/app-management/app-management-openapi.json post /api/apps/{app_id}/testing-agent/flows/suggest-new-tests","href":"/api-reference/suggest-new-tests"},{"title":"Save test generation checkpoint","deprecated":null,"version":null,"openapi":"/developers/references/app-management/app-management-openapi.json post /api/apps/{app_id}/testing-agent/flows/save-generation-checkpoint","href":"/api-reference/save-test-generation-checkpoint"},{"title":"Seed test data","deprecated":null,"version":null,"openapi":"/developers/references/app-management/app-management-openapi.json post /api/apps/{app_id}/testing-agent/data/seed","href":"/api-reference/seed-test-data"},{"title":"Run test","deprecated":null,"version":null,"openapi":"/developers/references/app-management/app-management-openapi.json post /api/apps/{app_id}/testing-agent/executions","href":"/api-reference/run-test"},{"title":"List test runs","deprecated":null,"version":null,"openapi":"/developers/references/app-management/app-management-openapi.json get /api/apps/{app_id}/testing-agent/executions","href":"/api-reference/list-test-runs"},{"title":"Get latest run per test","deprecated":null,"version":null,"openapi":"/developers/references/app-management/app-management-openapi.json get /api/apps/{app_id}/testing-agent/executions/latest-by-flow","href":"/api-reference/get-latest-run-per-test"},{"title":"Get test run","deprecated":null,"version":null,"openapi":"/developers/references/app-management/app-management-openapi.json get /api/apps/{app_id}/testing-agent/executions/{execution_id}","href":"/api-reference/get-test-run"},{"title":"Pause test run","deprecated":null,"version":null,"openapi":"/developers/references/app-management/app-management-openapi.json post /api/apps/{app_id}/testing-agent/executions/{execution_id}/pause","href":"/api-reference/pause-test-run"},{"title":"Cancel test run","deprecated":null,"version":null,"openapi":"/developers/references/app-management/app-management-openapi.json post /api/apps/{app_id}/testing-agent/executions/{execution_id}/cancel","href":"/api-reference/cancel-test-run"},{"title":"Get test run report","deprecated":null,"version":null,"openapi":"/developers/references/app-management/app-management-openapi.json get /api/apps/{app_id}/testing-agent/analysis/{execution_id}","href":"/api-reference/get-test-run-report"},{"title":"Reanalyze test run","deprecated":null,"version":null,"openapi":"/developers/references/app-management/app-management-openapi.json post /api/apps/{app_id}/testing-agent/analysis/{execution_id}/reanalyze","href":"/api-reference/reanalyze-test-run"},{"title":"Resolve test run issue","deprecated":null,"version":null,"openapi":"/developers/references/app-management/app-management-openapi.json post /api/apps/{app_id}/testing-agent/analysis/{execution_id}/issues/resolve","href":"/api-reference/resolve-test-run-issue"},{"title":"Delete test run issue","deprecated":null,"version":null,"openapi":"/developers/references/app-management/app-management-openapi.json post /api/apps/{app_id}/testing-agent/analysis/{execution_id}/issues/delete","href":"/api-reference/delete-test-run-issue"}]},{"group":"SEO","icon":"magnifying-glass","pages":[{"title":"SEO","sidebarTitle":"Overview","href":"/developers/references/apps-api/sections/seo"},{"title":"Get SEO settings","deprecated":null,"version":null,"openapi":"/developers/references/app-management/app-management-openapi.json get /api/apps/{app_id}/seo/settings","href":"/api-reference/get-seo-settings"},{"title":"Update SEO settings","deprecated":null,"version":null,"openapi":"/developers/references/app-management/app-management-openapi.json put /api/apps/{app_id}/seo/settings","href":"/api-reference/update-seo-settings"},{"title":"Get page visibility","deprecated":null,"version":null,"openapi":"/developers/references/app-management/app-management-openapi.json get /api/apps/{app_id}/seo/page-visibility","href":"/api-reference/get-page-visibility"},{"title":"Update page SEO settings","deprecated":null,"version":null,"openapi":"/developers/references/app-management/app-management-openapi.json patch /api/apps/{app_id}/seo/page-settings/{page_name}","href":"/api-reference/update-page-seo-settings"},{"title":"Run SEO scan","deprecated":null,"version":null,"openapi":"/developers/references/app-management/app-management-openapi.json post /api/apps/{app_id}/seo/scan","href":"/api-reference/run-seo-scan"},{"title":"Get last SEO scan","deprecated":null,"version":null,"openapi":"/developers/references/app-management/app-management-openapi.json get /api/apps/{app_id}/seo/last-scan","href":"/api-reference/get-last-seo-scan"},{"title":"Get SEO score","deprecated":null,"version":null,"openapi":"/developers/references/app-management/app-management-openapi.json get /api/apps/{app_id}/seo/summary","href":"/api-reference/get-seo-score"},{"title":"Apply SEO fix","deprecated":null,"version":null,"openapi":"/developers/references/app-management/app-management-openapi.json post /api/apps/{app_id}/seo/fix","href":"/api-reference/apply-seo-fix"},{"title":"Preview llms.txt","deprecated":null,"version":null,"openapi":"/developers/references/app-management/app-management-openapi.json get /api/apps/{app_id}/seo/preview/llms-txt","href":"/api-reference/preview-llmstxt"},{"title":"Preview JSON-LD","deprecated":null,"version":null,"openapi":"/developers/references/app-management/app-management-openapi.json get /api/apps/{app_id}/seo/preview/json-ld","href":"/api-reference/preview-json-ld"}]},{"group":"SEO research","icon":"microscope","pages":[{"title":"Get keyword ideas","deprecated":null,"version":null,"openapi":"/developers/references/app-management/app-management-openapi.json get /api/apps/{app_id}/seo/research/keyword-ideas","href":"/api-reference/get-keyword-ideas"},{"title":"Get Google's top 10 for a keyword","deprecated":null,"version":null,"openapi":"/developers/references/app-management/app-management-openapi.json get /api/apps/{app_id}/seo/research/serp","href":"/api-reference/get-googles-top-10-for-a-keyword"},{"title":"Get search performance","deprecated":null,"version":null,"openapi":"/developers/references/app-management/app-management-openapi.json get /api/apps/{app_id}/seo/research/search-performance","href":"/api-reference/get-search-performance"},{"title":"Get keywords a competitor wins","deprecated":null,"version":null,"openapi":"/developers/references/app-management/app-management-openapi.json get /api/apps/{app_id}/seo/research/competitor-gap","href":"/api-reference/get-keywords-a-competitor-wins"},{"title":"Get sites linking to a competitor","deprecated":null,"version":null,"openapi":"/developers/references/app-management/app-management-openapi.json get /api/apps/{app_id}/seo/research/backlink-gap","href":"/api-reference/get-sites-linking-to-a-competitor"},{"title":"Ask AI assistants about this app's market","deprecated":null,"version":null,"openapi":"/developers/references/app-management/app-management-openapi.json get /api/apps/{app_id}/seo/research/ai-answers","href":"/api-reference/ask-ai-assistants-about-this-apps-market"},{"title":"Read a live SEO data endpoint","deprecated":null,"version":null,"openapi":"/developers/references/app-management/app-management-openapi.json get /api/apps/{app_id}/seo/research/raw","href":"/api-reference/read-a-live-seo-data-endpoint"}]},{"group":"Analytics","icon":"chart-column","pages":[{"title":"Overview","sidebarTitle":"Overview","href":"/developers/references/apps-api/sections/analytics"},{"title":"Suggest analytics events to track","deprecated":null,"version":null,"openapi":"/developers/references/app-management/app-management-openapi.json get /api/apps/{app_id}/analytics/suggestions","href":"/api-reference/suggest-analytics-events-to-track"},{"title":"List analytics event names","deprecated":null,"version":null,"openapi":"/developers/references/app-management/app-management-openapi.json get /api/apps/{app_id}/analytics/names","href":"/api-reference/list-analytics-event-names"},{"title":"List analytics event properties","deprecated":null,"version":null,"openapi":"/developers/references/app-management/app-management-openapi.json get /api/apps/{app_id}/analytics/{event_name}/properties","href":"/api-reference/list-analytics-event-properties"},{"title":"Query analytics events","deprecated":null,"version":null,"openapi":"/developers/references/app-management/app-management-openapi.json post /api/apps/{app_id}/analytics/query","href":"/api-reference/query-analytics-events"},{"title":"Aggregate analytics events over time","deprecated":null,"version":null,"openapi":"/developers/references/app-management/app-management-openapi.json post /api/apps/{app_id}/analytics/timeseries","href":"/api-reference/aggregate-analytics-events-over-time"},{"title":"Aggregate analytics events by field","deprecated":null,"version":null,"openapi":"/developers/references/app-management/app-management-openapi.json post /api/apps/{app_id}/analytics/grouped","href":"/api-reference/aggregate-analytics-events-by-field"},{"title":"Get analytics user stats","deprecated":null,"version":null,"openapi":"/developers/references/app-management/app-management-openapi.json get /api/apps/{app_id}/analytics/stats/users","href":"/api-reference/get-analytics-user-stats"},{"title":"Get session recording settings","deprecated":null,"version":null,"openapi":"/developers/references/app-management/app-management-openapi.json get /api/session-recordings/apps/{app_id}/recording-settings","href":"/api-reference/get-session-recording-settings"},{"title":"Turn session recordings on or off","deprecated":null,"version":null,"openapi":"/developers/references/app-management/app-management-openapi.json post /api/session-recordings/apps/{app_id}/recording-settings","href":"/api-reference/turn-session-recordings-on-or-off"},{"title":"Update session recording capture settings","deprecated":null,"version":null,"openapi":"/developers/references/app-management/app-management-openapi.json patch /api/session-recordings/apps/{app_id}/recording-settings","href":"/api-reference/update-session-recording-capture-settings"}]},{"group":"Payments","icon":"credit-card","pages":[{"title":"Overview","sidebarTitle":"Overview","href":"/developers/references/apps-api/sections/payments"},{"group":"Stripe","pages":[{"title":"Overview","sidebarTitle":"Overview","href":"/developers/references/apps-api/sections/payments-stripe"},{"title":"Install Stripe integration","deprecated":null,"version":null,"openapi":"/developers/references/app-management/app-management-openapi.json post /api/apps/{app_id}/payments/stripe/install","href":"/api-reference/install-stripe-integration"},{"title":"Get Stripe integration status","deprecated":null,"version":null,"openapi":"/developers/references/app-management/app-management-openapi.json get /api/apps/{app_id}/payments/stripe/status","href":"/api-reference/get-stripe-integration-status"},{"title":"Get Stripe sandbox","deprecated":null,"version":null,"openapi":"/developers/references/app-management/app-management-openapi.json get /api/apps/{app_id}/payments/stripe/sandbox","href":"/api-reference/get-stripe-sandbox"},{"title":"Get Stripe onboarding link","deprecated":null,"version":null,"openapi":"/developers/references/app-management/app-management-openapi.json get /api/apps/{app_id}/payments/stripe/sandbox/claim-url","href":"/api-reference/get-stripe-onboarding-link"},{"title":"Provision live Stripe keys","deprecated":null,"version":null,"openapi":"/developers/references/app-management/app-management-openapi.json post /api/apps/{app_id}/payments/stripe/provision-live-keys","href":"/api-reference/provision-live-stripe-keys"},{"title":"Configure live Stripe keys","deprecated":null,"version":null,"openapi":"/developers/references/app-management/app-management-openapi.json post /api/apps/{app_id}/payments/stripe/configure-live-keys","href":"/api-reference/configure-live-stripe-keys"},{"title":"List Stripe products","deprecated":null,"version":null,"openapi":"/developers/references/app-management/app-management-openapi.json get /api/apps/{app_id}/payments/stripe/products","href":"/api-reference/list-stripe-products"},{"title":"Create Stripe product","deprecated":null,"version":null,"openapi":"/developers/references/app-management/app-management-openapi.json post /api/apps/{app_id}/payments/stripe/products","href":"/api-reference/create-stripe-product"},{"title":"Get Stripe product","deprecated":null,"version":null,"openapi":"/developers/references/app-management/app-management-openapi.json get /api/apps/{app_id}/payments/stripe/products/{product_id}","href":"/api-reference/get-stripe-product"},{"title":"Update Stripe product","deprecated":null,"version":null,"openapi":"/developers/references/app-management/app-management-openapi.json put /api/apps/{app_id}/payments/stripe/products/{product_id}","href":"/api-reference/update-stripe-product"},{"title":"List Stripe prices","deprecated":null,"version":null,"openapi":"/developers/references/app-management/app-management-openapi.json get /api/apps/{app_id}/payments/stripe/prices","href":"/api-reference/list-stripe-prices"},{"title":"Create Stripe price","deprecated":null,"version":null,"openapi":"/developers/references/app-management/app-management-openapi.json post /api/apps/{app_id}/payments/stripe/prices","href":"/api-reference/create-stripe-price"},{"title":"Update Stripe price","deprecated":null,"version":null,"openapi":"/developers/references/app-management/app-management-openapi.json put /api/apps/{app_id}/payments/stripe/prices/{price_id}","href":"/api-reference/update-stripe-price"},{"title":"Remove Stripe integration","deprecated":null,"version":null,"openapi":"/developers/references/app-management/app-management-openapi.json delete /api/apps/{app_id}/payments/stripe","href":"/api-reference/remove-stripe-integration"}]},{"group":"Wix Payments","pages":[{"title":"Overview","sidebarTitle":"Overview","href":"/developers/references/apps-api/sections/payments-wix"},{"title":"Resolve Wix Payments onboarding name","deprecated":null,"version":null,"openapi":"/developers/references/app-management/app-management-openapi.json get /api/payments/wix/resolve-name","href":"/api-reference/resolve-wix-payments-onboarding-name"},{"title":"Get Wix Payments status","deprecated":null,"version":null,"openapi":"/developers/references/app-management/app-management-openapi.json get /api/apps/{app_id}/payments/wix/status","href":"/api-reference/get-wix-payments-status"},{"title":"Get Wix Payments dashboard link","deprecated":null,"version":null,"openapi":"/developers/references/app-management/app-management-openapi.json get /api/apps/{app_id}/payments/wix/dashboard-url","href":"/api-reference/get-wix-payments-dashboard-link"},{"title":"Switch Wix Payments test mode","deprecated":null,"version":null,"openapi":"/developers/references/app-management/app-management-openapi.json put /api/apps/{app_id}/payments/wix/test-mode","href":"/api-reference/switch-wix-payments-test-mode"},{"title":"List Wix Payments payouts","deprecated":null,"version":null,"openapi":"/developers/references/app-management/app-management-openapi.json get /api/apps/{app_id}/payments/wix/payouts","href":"/api-reference/list-wix-payments-payouts"},{"title":"Get Wix Payments payout","deprecated":null,"version":null,"openapi":"/developers/references/app-management/app-management-openapi.json get /api/apps/{app_id}/payments/wix/payouts/{payout_id}","href":"/api-reference/get-wix-payments-payout"},{"title":"Disconnect Wix Payments","deprecated":null,"version":null,"openapi":"/developers/references/app-management/app-management-openapi.json delete /api/apps/{app_id}/payments/wix","href":"/api-reference/disconnect-wix-payments"},{"title":"Get Payments by Wix dashboard link","deprecated":null,"version":null,"openapi":"/developers/references/app-management/app-management-openapi.json get /api/apps/{app_id}/payments/payments-by-wix/dashboard-url","href":"/api-reference/get-payments-by-wix-dashboard-link"},{"title":"Disconnect Payments by Wix","deprecated":null,"version":null,"openapi":"/developers/references/app-management/app-management-openapi.json delete /api/apps/{app_id}/payments/payments-by-wix","href":"/api-reference/disconnect-payments-by-wix"}]},{"group":"Analytics","pages":[{"title":"Get payment analytics","deprecated":null,"version":null,"openapi":"/developers/references/app-management/app-management-openapi.json get /api/apps/{app_id}/payments/analytics","href":"/api-reference/get-payment-analytics"},{"title":"Get recent payment transactions","deprecated":null,"version":null,"openapi":"/developers/references/app-management/app-management-openapi.json get /api/apps/{app_id}/payments/analytics/recent-transactions","href":"/api-reference/get-recent-payment-transactions"},{"title":"Get top payment customers","deprecated":null,"version":null,"openapi":"/developers/references/app-management/app-management-openapi.json get /api/apps/{app_id}/payments/analytics/top-customers","href":"/api-reference/get-top-payment-customers"}]},{"group":"Transactions","pages":[{"title":"List payment transactions","deprecated":null,"version":null,"openapi":"/developers/references/app-management/app-management-openapi.json get /api/apps/{app_id}/payments/analytics/transactions","href":"/api-reference/list-payment-transactions"},{"title":"Export payment transactions","deprecated":null,"version":null,"openapi":"/developers/references/app-management/app-management-openapi.json get /api/apps/{app_id}/payments/analytics/transactions/export","href":"/api-reference/export-payment-transactions"},{"title":"Get payment transaction","deprecated":null,"version":null,"openapi":"/developers/references/app-management/app-management-openapi.json get /api/apps/{app_id}/payments/analytics/transactions/{transaction_id}","href":"/api-reference/get-payment-transaction"},{"title":"Refund payment transaction","deprecated":null,"version":null,"openapi":"/developers/references/app-management/app-management-openapi.json post /api/apps/{app_id}/payments/analytics/transactions/{transaction_id}/refund","href":"/api-reference/refund-payment-transaction"}]},{"group":"Webhooks","pages":[{"title":"Receive Stripe sandbox event","deprecated":null,"version":null,"openapi":"/developers/references/app-management/app-management-openapi.json post /api/payment-webhooks/stripe","href":"/api-reference/receive-stripe-sandbox-event"},{"title":"Receive Stripe live event","deprecated":null,"version":null,"openapi":"/developers/references/app-management/app-management-openapi.json post /api/payment-webhooks/stripe/live","href":"/api-reference/receive-stripe-live-event"},{"title":"Receive Wix Payments event","deprecated":null,"version":null,"openapi":"/developers/references/app-management/app-management-openapi.json post /api/payment-webhooks/wix-payments","href":"/api-reference/receive-wix-payments-event"}]}]},{"group":"Marketing Agent","icon":"wand-magic-sparkles","pages":[{"title":"Marketing Agent","sidebarTitle":"Overview","href":"/developers/references/apps-api/sections/marketing-agent"},{"title":"Start Marketing Agent setup (web apps)","deprecated":null,"version":null,"openapi":"/developers/references/app-management/app-management-openapi.json post /api/apps/{app_id}/cmo/setup/start","href":"/api-reference/start-marketing-agent-setup-web-apps"},{"title":"Answer Marketing Agent setup step (web apps)","deprecated":null,"version":null,"openapi":"/developers/references/app-management/app-management-openapi.json post /api/apps/{app_id}/cmo/setup/answer","href":"/api-reference/answer-marketing-agent-setup-step-web-apps"},{"title":"Get Marketing Agent state (web apps)","deprecated":null,"version":null,"openapi":"/developers/references/app-management/app-management-openapi.json get /api/apps/{app_id}/cmo/state","href":"/api-reference/get-marketing-agent-state-web-apps"},{"title":"Get Marketing Agent KPI values (web apps)","deprecated":null,"version":null,"openapi":"/developers/references/app-management/app-management-openapi.json get /api/apps/{app_id}/cmo/kpi-values","href":"/api-reference/get-marketing-agent-kpi-values-web-apps"},{"title":"Message the Marketing Agent (web apps)","deprecated":null,"version":null,"openapi":"/developers/references/app-management/app-management-openapi.json post /api/apps/{app_id}/cmo/messages","href":"/api-reference/message-the-marketing-agent-web-apps"},{"title":"Reset Marketing Agent setup (web apps)","deprecated":null,"version":null,"openapi":"/developers/references/app-management/app-management-openapi.json post /api/apps/{app_id}/cmo/setup/reset","href":"/api-reference/reset-marketing-agent-setup-web-apps"}]},{"group":"Virality and social content","icon":"share-nodes","pages":[{"title":"Overview","sidebarTitle":"Overview","href":"/developers/references/apps-api/sections/virality"},{"group":"Virality","pages":[{"title":"Start social content flow","deprecated":null,"version":null,"openapi":"/developers/references/app-management/app-management-openapi.json post /api/apps/{app_id}/virality/start","href":"/api-reference/start-social-content-flow"},{"title":"Submit answers","deprecated":null,"version":null,"openapi":"/developers/references/app-management/app-management-openapi.json post /api/apps/{app_id}/virality/submit-answers","href":"/api-reference/submit-answers"},{"title":"Refine content strategy","deprecated":null,"version":null,"openapi":"/developers/references/app-management/app-management-openapi.json post /api/apps/{app_id}/virality/refine-strategy","href":"/api-reference/refine-content-strategy"},{"title":"Generate content plan","deprecated":null,"version":null,"openapi":"/developers/references/app-management/app-management-openapi.json post /api/apps/{app_id}/virality/generate","href":"/api-reference/generate-content-plan"},{"title":"Get social content state","deprecated":null,"version":null,"openapi":"/developers/references/app-management/app-management-openapi.json get /api/apps/{app_id}/virality/state","href":"/api-reference/get-social-content-state"},{"title":"Update post content","deprecated":null,"version":null,"openapi":"/developers/references/app-management/app-management-openapi.json put /api/apps/{app_id}/virality/posts/{post_id}","href":"/api-reference/update-post-content"},{"title":"Refine a post","deprecated":null,"version":null,"openapi":"/developers/references/app-management/app-management-openapi.json post /api/apps/{app_id}/virality/posts/{post_id}/refine","href":"/api-reference/refine-a-post"},{"title":"Generate a post image","deprecated":null,"version":null,"openapi":"/developers/references/app-management/app-management-openapi.json post /api/apps/{app_id}/virality/posts/{post_id}/generate-image","href":"/api-reference/generate-a-post-image"},{"title":"Generate teaser posts","deprecated":null,"version":null,"openapi":"/developers/references/app-management/app-management-openapi.json post /api/apps/{app_id}/virality/teaser","href":"/api-reference/generate-teaser-posts"},{"title":"Reset social content flow","deprecated":null,"version":null,"openapi":"/developers/references/app-management/app-management-openapi.json post /api/apps/{app_id}/virality/reset","href":"/api-reference/reset-social-content-flow"}]}]},{"group":"Google Ads","icon":"bullhorn","pages":[{"title":"Overview","sidebarTitle":"Overview","href":"/developers/references/apps-api/sections/google-ads"},{"group":"Accounts","pages":[{"title":"Create Google Ads account for tracking","deprecated":null,"version":null,"openapi":"/developers/references/app-management/app-management-openapi.json post /api/apps/{app_id}/google-ads/accounts/ensure-for-tracking","href":"/api-reference/create-google-ads-account-for-tracking"},{"title":"Get Google Ads account","deprecated":null,"version":null,"openapi":"/developers/references/app-management/app-management-openapi.json get /api/apps/{app_id}/google-ads/accounts","href":"/api-reference/get-google-ads-account"},{"title":"Accept Google Ads terms","deprecated":null,"version":null,"openapi":"/developers/references/app-management/app-management-openapi.json post /api/apps/{app_id}/google-ads/accounts/{account_id}/accept-terms","href":"/api-reference/accept-google-ads-terms"},{"title":"Retry Google Ads billing setup","deprecated":null,"version":null,"openapi":"/developers/references/app-management/app-management-openapi.json post /api/apps/{app_id}/google-ads/accounts/{account_id}/retry-billing-setup","href":"/api-reference/retry-google-ads-billing-setup"},{"title":"Update Google Ads monthly spend cap","deprecated":null,"version":null,"openapi":"/developers/references/app-management/app-management-openapi.json patch /api/apps/{app_id}/google-ads/accounts/{account_id}/budget-limit","href":"/api-reference/update-google-ads-monthly-spend-cap"},{"title":"Update Google Ads billing cadence","deprecated":null,"version":null,"openapi":"/developers/references/app-management/app-management-openapi.json patch /api/apps/{app_id}/google-ads/accounts/{account_id}/cadence","href":"/api-reference/update-google-ads-billing-cadence"},{"title":"Turn on Google Ads budget auto-renewal","deprecated":null,"version":null,"openapi":"/developers/references/app-management/app-management-openapi.json post /api/apps/{app_id}/google-ads/accounts/{account_id}/auto-renewal/on","href":"/api-reference/turn-on-google-ads-budget-auto-renewal"},{"title":"Turn off Google Ads budget auto-renewal","deprecated":null,"version":null,"openapi":"/developers/references/app-management/app-management-openapi.json post /api/apps/{app_id}/google-ads/accounts/{account_id}/auto-renewal/off","href":"/api-reference/turn-off-google-ads-budget-auto-renewal"},{"title":"Link a Google Business Profile","deprecated":null,"version":null,"openapi":"/developers/references/app-management/app-management-openapi.json post /api/apps/{app_id}/google-ads/accounts/{account_id}/business-profile/link","href":"/api-reference/link-a-google-business-profile"},{"title":"Unlink the Google Business Profile","deprecated":null,"version":null,"openapi":"/developers/references/app-management/app-management-openapi.json post /api/apps/{app_id}/google-ads/accounts/{account_id}/business-profile/unlink","href":"/api-reference/unlink-the-google-business-profile"},{"title":"Disconnect the Google Ads account","deprecated":null,"version":null,"openapi":"/developers/references/app-management/app-management-openapi.json post /api/apps/{app_id}/google-ads/accounts/{account_id}/disconnect","href":"/api-reference/disconnect-the-google-ads-account"}]},{"group":"Campaigns","pages":[{"title":"List Google Ads campaign briefs","deprecated":null,"version":null,"openapi":"/developers/references/app-management/app-management-openapi.json get /api/apps/{app_id}/google-ads/campaign-briefs","href":"/api-reference/list-google-ads-campaign-briefs"},{"title":"Generate Google Ads campaign brief","deprecated":null,"version":null,"openapi":"/developers/references/app-management/app-management-openapi.json post /api/apps/{app_id}/google-ads/campaign-briefs/generate","href":"/api-reference/generate-google-ads-campaign-brief"},{"title":"Create Google Ads campaign brief","deprecated":null,"version":null,"openapi":"/developers/references/app-management/app-management-openapi.json post /api/apps/{app_id}/google-ads/campaign-briefs","href":"/api-reference/create-google-ads-campaign-brief"},{"title":"Get Google Ads campaign brief","deprecated":null,"version":null,"openapi":"/developers/references/app-management/app-management-openapi.json get /api/apps/{app_id}/google-ads/campaign-briefs/{brief_id}","href":"/api-reference/get-google-ads-campaign-brief"},{"title":"Update Google Ads campaign brief","deprecated":null,"version":null,"openapi":"/developers/references/app-management/app-management-openapi.json patch /api/apps/{app_id}/google-ads/campaign-briefs/{brief_id}","href":"/api-reference/update-google-ads-campaign-brief"},{"title":"Delete Google Ads campaign brief","deprecated":null,"version":null,"openapi":"/developers/references/app-management/app-management-openapi.json delete /api/apps/{app_id}/google-ads/campaign-briefs/{brief_id}","href":"/api-reference/delete-google-ads-campaign-brief"},{"title":"Suggest Google Ads campaigns","deprecated":null,"version":null,"openapi":"/developers/references/app-management/app-management-openapi.json post /api/apps/{app_id}/google-ads/campaigns/ai-suggestions","href":"/api-reference/suggest-google-ads-campaigns"},{"title":"Suggest Google Ads budget options","deprecated":null,"version":null,"openapi":"/developers/references/app-management/app-management-openapi.json post /api/apps/{app_id}/google-ads/campaigns/suggestions","href":"/api-reference/suggest-google-ads-budget-options"},{"title":"Get Google Ads budget boundaries","deprecated":null,"version":null,"openapi":"/developers/references/app-management/app-management-openapi.json get /api/apps/{app_id}/google-ads/campaigns/budget-boundaries","href":"/api-reference/get-google-ads-budget-boundaries"},{"title":"Estimate a Google Ads campaign budget","deprecated":null,"version":null,"openapi":"/developers/references/app-management/app-management-openapi.json post /api/apps/{app_id}/google-ads/campaigns/estimate","href":"/api-reference/estimate-a-google-ads-campaign-budget"},{"title":"Estimate Google Ads cost per click","deprecated":null,"version":null,"openapi":"/developers/references/app-management/app-management-openapi.json post /api/apps/{app_id}/google-ads/campaigns/cpc-estimate","href":"/api-reference/estimate-google-ads-cost-per-click"},{"title":"List Google Ads campaigns","deprecated":null,"version":null,"openapi":"/developers/references/app-management/app-management-openapi.json get /api/apps/{app_id}/google-ads/campaigns","href":"/api-reference/list-google-ads-campaigns"},{"title":"Create Google Ads campaign","deprecated":null,"version":null,"openapi":"/developers/references/app-management/app-management-openapi.json post /api/apps/{app_id}/google-ads/campaigns","href":"/api-reference/create-google-ads-campaign"},{"title":"Get Google Ads campaign","deprecated":null,"version":null,"openapi":"/developers/references/app-management/app-management-openapi.json get /api/apps/{app_id}/google-ads/campaigns/{campaign_id}","href":"/api-reference/get-google-ads-campaign"},{"title":"Update Google Ads campaign","deprecated":null,"version":null,"openapi":"/developers/references/app-management/app-management-openapi.json patch /api/apps/{app_id}/google-ads/campaigns/{campaign_id}","href":"/api-reference/update-google-ads-campaign"},{"title":"Delete Google Ads campaign","deprecated":null,"version":null,"openapi":"/developers/references/app-management/app-management-openapi.json delete /api/apps/{app_id}/google-ads/campaigns/{campaign_id}","href":"/api-reference/delete-google-ads-campaign"},{"title":"Get Google Ads campaign targeting","deprecated":null,"version":null,"openapi":"/developers/references/app-management/app-management-openapi.json get /api/apps/{app_id}/google-ads/campaigns/{campaign_id}/targeting","href":"/api-reference/get-google-ads-campaign-targeting"},{"title":"Suggest keyword themes for a Google Ads campaign","deprecated":null,"version":null,"openapi":"/developers/references/app-management/app-management-openapi.json get /api/apps/{app_id}/google-ads/campaigns/{campaign_id}/keyword-theme-suggestions","href":"/api-reference/suggest-keyword-themes-for-a-google-ads-campaign"},{"title":"List Google Ads campaign optimization suggestions","deprecated":null,"version":null,"openapi":"/developers/references/app-management/app-management-openapi.json get /api/apps/{app_id}/google-ads/campaigns/{campaign_id}/optimization-suggestions","href":"/api-reference/list-google-ads-campaign-optimization-suggestions"},{"title":"Apply a Google Ads budget recommendation","deprecated":null,"version":null,"openapi":"/developers/references/app-management/app-management-openapi.json post /api/apps/{app_id}/google-ads/campaigns/{campaign_id}/recommendations/apply-budget","href":"/api-reference/apply-a-google-ads-budget-recommendation"},{"title":"Get Google Ads campaign conversion breakdown","deprecated":null,"version":null,"openapi":"/developers/references/app-management/app-management-openapi.json get /api/apps/{app_id}/google-ads/campaigns/{campaign_id}/impact","href":"/api-reference/get-google-ads-campaign-conversion-breakdown"},{"title":"List Google Ads campaign changes","deprecated":null,"version":null,"openapi":"/developers/references/app-management/app-management-openapi.json get /api/apps/{app_id}/google-ads/campaigns/{campaign_id}/change-log","href":"/api-reference/list-google-ads-campaign-changes"},{"title":"Pause Google Ads campaign","deprecated":null,"version":null,"openapi":"/developers/references/app-management/app-management-openapi.json post /api/apps/{app_id}/google-ads/campaigns/{campaign_id}/pause","href":"/api-reference/pause-google-ads-campaign"},{"title":"Resume Google Ads campaign","deprecated":null,"version":null,"openapi":"/developers/references/app-management/app-management-openapi.json post /api/apps/{app_id}/google-ads/campaigns/{campaign_id}/resume","href":"/api-reference/resume-google-ads-campaign"},{"title":"Get Google Ads campaign metrics","deprecated":null,"version":null,"openapi":"/developers/references/app-management/app-management-openapi.json get /api/apps/{app_id}/google-ads/campaigns/metrics","href":"/api-reference/get-google-ads-campaign-metrics"},{"title":"Bulk update Google Ads campaign budgets","deprecated":null,"version":null,"openapi":"/developers/references/app-management/app-management-openapi.json patch /api/apps/{app_id}/google-ads/campaigns/bulk-budget","href":"/api-reference/bulk-update-google-ads-campaign-budgets"},{"title":"Pause all Google Ads campaigns","deprecated":null,"version":null,"openapi":"/developers/references/app-management/app-management-openapi.json post /api/apps/{app_id}/google-ads/campaigns/pause-all","href":"/api-reference/pause-all-google-ads-campaigns"},{"title":"Sync Google Ads campaigns","deprecated":null,"version":null,"openapi":"/developers/references/app-management/app-management-openapi.json post /api/apps/{app_id}/google-ads/campaigns/sync","href":"/api-reference/sync-google-ads-campaigns"}]},{"group":"Assets","pages":[{"title":"List Google Ads generated assets","deprecated":null,"version":null,"openapi":"/developers/references/app-management/app-management-openapi.json get /api/apps/{app_id}/google-ads/assets","href":"/api-reference/list-google-ads-generated-assets"},{"title":"Generate Google Ads assets","deprecated":null,"version":null,"openapi":"/developers/references/app-management/app-management-openapi.json post /api/apps/{app_id}/google-ads/assets/generate-all","href":"/api-reference/generate-google-ads-assets"},{"title":"Generate Google Ads text assets","deprecated":null,"version":null,"openapi":"/developers/references/app-management/app-management-openapi.json post /api/apps/{app_id}/google-ads/assets/generate-text","href":"/api-reference/generate-google-ads-text-assets"},{"title":"Generate Google Ads image assets","deprecated":null,"version":null,"openapi":"/developers/references/app-management/app-management-openapi.json post /api/apps/{app_id}/google-ads/assets/generate-images","href":"/api-reference/generate-google-ads-image-assets"},{"title":"Upload a Google Ads video","deprecated":null,"version":null,"openapi":"/developers/references/app-management/app-management-openapi.json post /api/apps/{app_id}/google-ads/assets/upload-video","href":"/api-reference/upload-a-google-ads-video"},{"title":"Poll a Google Ads video upload","deprecated":null,"version":null,"openapi":"/developers/references/app-management/app-management-openapi.json post /api/apps/{app_id}/google-ads/assets/upload-video/poll","href":"/api-reference/poll-a-google-ads-video-upload"},{"title":"Accept a generated Google Ads asset","deprecated":null,"version":null,"openapi":"/developers/references/app-management/app-management-openapi.json post /api/apps/{app_id}/google-ads/assets/{session_asset_id}/accept","href":"/api-reference/accept-a-generated-google-ads-asset"},{"title":"Regenerate Google Ads asset group creative","deprecated":null,"version":null,"openapi":"/developers/references/app-management/app-management-openapi.json post /api/apps/{app_id}/google-ads/asset-groups/{asset_group_id}/regenerate-assets","href":"/api-reference/regenerate-google-ads-asset-group-creative"}]},{"group":"Launch","pages":[{"title":"Get Google Ads launch readiness","deprecated":null,"version":null,"openapi":"/developers/references/app-management/app-management-openapi.json get /api/apps/{app_id}/google-ads/launch-readiness","href":"/api-reference/get-google-ads-launch-readiness"},{"title":"Get Google Ads campaign launch draft","deprecated":null,"version":null,"openapi":"/developers/references/app-management/app-management-openapi.json get /api/apps/{app_id}/google-ads/campaign-launch-drafts/{draft_id}","href":"/api-reference/get-google-ads-campaign-launch-draft"},{"title":"Launch Google Ads campaign","deprecated":null,"version":null,"openapi":"/developers/references/app-management/app-management-openapi.json post /api/apps/{app_id}/google-ads/launch","href":"/api-reference/launch-google-ads-campaign"}]},{"group":"Reporting","pages":[{"title":"Get Google Ads performance dashboard","deprecated":null,"version":null,"openapi":"/developers/references/app-management/app-management-openapi.json get /api/apps/{app_id}/google-ads/analytics/dashboard","href":"/api-reference/get-google-ads-performance-dashboard"},{"title":"Get Google Ads metric trend","deprecated":null,"version":null,"openapi":"/developers/references/app-management/app-management-openapi.json get /api/apps/{app_id}/google-ads/analytics/trend","href":"/api-reference/get-google-ads-metric-trend"},{"title":"List Google Ads insights","deprecated":null,"version":null,"openapi":"/developers/references/app-management/app-management-openapi.json get /api/apps/{app_id}/google-ads/analytics/insights","href":"/api-reference/list-google-ads-insights"},{"title":"Dismiss Google Ads insight","deprecated":null,"version":null,"openapi":"/developers/references/app-management/app-management-openapi.json post /api/apps/{app_id}/google-ads/analytics/insights/dismiss","href":"/api-reference/dismiss-google-ads-insight"},{"title":"List Google Ads search terms","deprecated":null,"version":null,"openapi":"/developers/references/app-management/app-management-openapi.json get /api/apps/{app_id}/google-ads/analytics/search-terms","href":"/api-reference/list-google-ads-search-terms"},{"title":"List Google Ads asset performance","deprecated":null,"version":null,"openapi":"/developers/references/app-management/app-management-openapi.json get /api/apps/{app_id}/google-ads/analytics/asset-performance","href":"/api-reference/list-google-ads-asset-performance"},{"title":"List Google Ads top asset combinations","deprecated":null,"version":null,"openapi":"/developers/references/app-management/app-management-openapi.json get /api/apps/{app_id}/google-ads/analytics/asset-group-top-combinations","href":"/api-reference/list-google-ads-top-asset-combinations"}]},{"group":"Conversions","pages":[{"title":"Scan Google Ads conversion tracking","deprecated":null,"version":null,"openapi":"/developers/references/app-management/app-management-openapi.json get /api/apps/{app_id}/google-ads/tracking-scan","href":"/api-reference/scan-google-ads-conversion-tracking"},{"title":"Build Google Ads tracking fix prompt","deprecated":null,"version":null,"openapi":"/developers/references/app-management/app-management-openapi.json post /api/apps/{app_id}/google-ads/tracking-scan/build-bootstrap-prompt","href":"/api-reference/build-google-ads-tracking-fix-prompt"},{"title":"Get Google Ads tracking script","deprecated":null,"version":null,"openapi":"/developers/references/app-management/app-management-openapi.json get /api/apps/{app_id}/google-ads/tracking-script","href":"/api-reference/get-google-ads-tracking-script"},{"title":"List Google Ads conversion actions","deprecated":null,"version":null,"openapi":"/developers/references/app-management/app-management-openapi.json get /api/apps/{app_id}/google-ads/conversion-actions","href":"/api-reference/list-google-ads-conversion-actions"},{"title":"List Google Ads conversion mappings","deprecated":null,"version":null,"openapi":"/developers/references/app-management/app-management-openapi.json get /api/apps/{app_id}/google-ads/conversion-mappings","href":"/api-reference/list-google-ads-conversion-mappings"},{"title":"Create Google Ads conversion mapping","deprecated":null,"version":null,"openapi":"/developers/references/app-management/app-management-openapi.json post /api/apps/{app_id}/google-ads/conversion-mappings","href":"/api-reference/create-google-ads-conversion-mapping"},{"title":"Update Google Ads conversion mapping","deprecated":null,"version":null,"openapi":"/developers/references/app-management/app-management-openapi.json patch /api/apps/{app_id}/google-ads/conversion-mappings/{mapping_id}","href":"/api-reference/update-google-ads-conversion-mapping"},{"title":"Delete Google Ads conversion mapping","deprecated":null,"version":null,"openapi":"/developers/references/app-management/app-management-openapi.json delete /api/apps/{app_id}/google-ads/conversion-mappings/{mapping_id}","href":"/api-reference/delete-google-ads-conversion-mapping"},{"title":"Upload Google Ads conversions","deprecated":null,"version":null,"openapi":"/developers/references/app-management/app-management-openapi.json post /api/apps/{app_id}/google-ads/conversions/upload","href":"/api-reference/upload-google-ads-conversions"},{"title":"Upload enhanced Google Ads conversions","deprecated":null,"version":null,"openapi":"/developers/references/app-management/app-management-openapi.json post /api/apps/{app_id}/google-ads/conversions/upload-enhanced","href":"/api-reference/upload-enhanced-google-ads-conversions"},{"title":"Get Google Ads conversion stats","deprecated":null,"version":null,"openapi":"/developers/references/app-management/app-management-openapi.json get /api/apps/{app_id}/google-ads/conversions/stats","href":"/api-reference/get-google-ads-conversion-stats"}]},{"group":"Billing","pages":[{"title":"Get Google Ads billing status","deprecated":null,"version":null,"openapi":"/developers/references/app-management/app-management-openapi.json get /api/apps/{app_id}/google-ads/billing/status","href":"/api-reference/get-google-ads-billing-status"},{"title":"Create Google Ads payment setup","deprecated":null,"version":null,"openapi":"/developers/references/app-management/app-management-openapi.json post /api/apps/{app_id}/google-ads/billing/payment-setup","href":"/api-reference/create-google-ads-payment-setup"},{"title":"Create embedded Google Ads payment setup","deprecated":null,"version":null,"openapi":"/developers/references/app-management/app-management-openapi.json post /api/apps/{app_id}/google-ads/billing/payment-setup-embedded","href":"/api-reference/create-embedded-google-ads-payment-setup"},{"title":"List Google Ads invoices","deprecated":null,"version":null,"openapi":"/developers/references/app-management/app-management-openapi.json get /api/apps/{app_id}/google-ads/billing/invoices","href":"/api-reference/list-google-ads-invoices"},{"title":"List Google Ads promotional credits","deprecated":null,"version":null,"openapi":"/developers/references/app-management/app-management-openapi.json get /api/apps/{app_id}/google-ads/billing/credits","href":"/api-reference/list-google-ads-promotional-credits"},{"title":"List Google Ads incentives","deprecated":null,"version":null,"openapi":"/developers/references/app-management/app-management-openapi.json get /api/apps/{app_id}/google-ads/incentives","href":"/api-reference/list-google-ads-incentives"},{"title":"Apply a Google Ads incentive","deprecated":null,"version":null,"openapi":"/developers/references/app-management/app-management-openapi.json post /api/apps/{app_id}/google-ads/accounts/{account_id}/incentives/apply","href":"/api-reference/apply-a-google-ads-incentive"},{"title":"Get Google Ads account debt","deprecated":null,"version":null,"openapi":"/developers/references/app-management/app-management-openapi.json get /api/apps/{app_id}/google-ads/accounts/{account_id}/billing/debt","href":"/api-reference/get-google-ads-account-debt"},{"title":"Get Google Ads workspace debt","deprecated":null,"version":null,"openapi":"/developers/references/app-management/app-management-openapi.json get /api/apps/{app_id}/google-ads/billing/workspace-debt","href":"/api-reference/get-google-ads-workspace-debt"},{"title":"Pay Google Ads workspace debt","deprecated":null,"version":null,"openapi":"/developers/references/app-management/app-management-openapi.json post /api/apps/{app_id}/google-ads/billing/workspace-pay-now","href":"/api-reference/pay-google-ads-workspace-debt"}]},{"group":"Suggestions and lookups","pages":[{"title":"Search Google Ads locations","deprecated":null,"version":null,"openapi":"/developers/references/app-management/app-management-openapi.json get /api/apps/{app_id}/google-ads/geo-targets/search","href":"/api-reference/search-google-ads-locations"},{"title":"List Google Ads advertising languages","deprecated":null,"version":null,"openapi":"/developers/references/app-management/app-management-openapi.json get /api/apps/{app_id}/google-ads/languages","href":"/api-reference/list-google-ads-advertising-languages"},{"title":"Suggest Google Ads setup targeting","deprecated":null,"version":null,"openapi":"/developers/references/app-management/app-management-openapi.json post /api/apps/{app_id}/google-ads/setup-suggestions","href":"/api-reference/suggest-google-ads-setup-targeting"},{"title":"Suggest Google Ads setup keyword themes","deprecated":null,"version":null,"openapi":"/developers/references/app-management/app-management-openapi.json post /api/apps/{app_id}/google-ads/setup-suggestions/keyword-themes","href":"/api-reference/suggest-google-ads-setup-keyword-themes"},{"title":"Regenerate a Google Ads setup keyword theme","deprecated":null,"version":null,"openapi":"/developers/references/app-management/app-management-openapi.json post /api/apps/{app_id}/google-ads/setup-suggestions/regenerate-keyword","href":"/api-reference/regenerate-a-google-ads-setup-keyword-theme"},{"title":"Autocomplete Google Ads keyword themes","deprecated":null,"version":null,"openapi":"/developers/references/app-management/app-management-openapi.json get /api/apps/{app_id}/google-ads/suggestions/keyword-themes","href":"/api-reference/autocomplete-google-ads-keyword-themes"},{"title":"Suggest Google Ads search themes","deprecated":null,"version":null,"openapi":"/developers/references/app-management/app-management-openapi.json post /api/apps/{app_id}/google-ads/suggestions/search-themes","href":"/api-reference/suggest-google-ads-search-themes"},{"title":"Suggest Google Ads text assets","deprecated":null,"version":null,"openapi":"/developers/references/app-management/app-management-openapi.json post /api/apps/{app_id}/google-ads/suggestions/text-assets","href":"/api-reference/suggest-google-ads-text-assets"},{"title":"Generate Google Ads ad copy","deprecated":null,"version":null,"openapi":"/developers/references/app-management/app-management-openapi.json post /api/apps/{app_id}/google-ads/ai/generate-copy","href":"/api-reference/generate-google-ads-ad-copy"},{"title":"Enhance a Google Ads image prompt","deprecated":null,"version":null,"openapi":"/developers/references/app-management/app-management-openapi.json post /api/apps/{app_id}/google-ads/suggestions/enhance-prompt","href":"/api-reference/enhance-a-google-ads-image-prompt"},{"title":"Get a Google Ads hero preview","deprecated":null,"version":null,"openapi":"/developers/references/app-management/app-management-openapi.json get /api/apps/{app_id}/google-ads/ai/hero-preview","href":"/api-reference/get-a-google-ads-hero-preview"},{"title":"Ask the Google Ads assistant","deprecated":null,"version":null,"openapi":"/developers/references/app-management/app-management-openapi.json post /api/apps/{app_id}/google-ads/troubleshoot/ask","href":"/api-reference/ask-the-google-ads-assistant"}]}]},{"group":"Embed Tokens","icon":"key","pages":[{"title":"Create an embed sign-in token","deprecated":null,"version":null,"openapi":"/developers/references/app-management/app-management-openapi.json post /api/apps/{app_id}/embed-url","href":"/api-reference/create-an-embed-sign-in-token"}]},{"group":"Socket sessions","icon":"tower-broadcast","pages":[{"title":"Socket sessions","sidebarTitle":"Overview","href":"/developers/references/apps-api/sections/socket-sessions"},{"title":"Socket messages","sidebarTitle":"Socket messages","href":"/developers/references/apps-api/sections/socket-messages"},{"title":"Create socket session","deprecated":null,"version":null,"openapi":"/developers/references/app-management/app-management-openapi.json post /api/v1/socket-sessions","href":"/api-reference/create-socket-session"},{"title":"Add app to session","deprecated":null,"version":null,"openapi":"/developers/references/app-management/app-management-openapi.json put /api/v1/socket-sessions/{session_id}/apps/{app_id}","href":"/api-reference/add-app-to-session"},{"title":"Remove app from session","deprecated":null,"version":null,"openapi":"/developers/references/app-management/app-management-openapi.json delete /api/v1/socket-sessions/{session_id}/apps/{app_id}","href":"/api-reference/remove-app-from-session"},{"title":"End socket session","deprecated":null,"version":null,"openapi":"/developers/references/app-management/app-management-openapi.json delete /api/v1/socket-sessions/{session_id}","href":"/api-reference/end-socket-session"}]}]},{"group":"Workspace API (Beta)","boost":0.75,"icon":"building","expanded":false,"pages":[{"group":"Get Started","icon":"book-open","pages":[{"title":"Workspace API Overview","sidebarTitle":"Overview","href":"/developers/references/workspace-api/get-started/overview"},{"title":"Authentication","sidebarTitle":"Authentication","href":"/developers/references/workspace-api/get-started/authentication"}]},{"group":"API Reference","icon":"brackets-curly","pages":[{"group":"Members","pages":[{"title":"List workspace members","deprecated":null,"version":null,"openapi":"/developers/references/app-management/app-management-openapi.json post /api/workspace/members/list","href":"/api-reference/list-workspace-members"},{"title":"Update workspace member role","deprecated":null,"version":null,"openapi":"/developers/references/app-management/app-management-openapi.json put /api/workspace/members/{email}/role","href":"/api-reference/update-workspace-member-role"},{"title":"Update workspace member roles in bulk","deprecated":null,"version":null,"openapi":"/developers/references/app-management/app-management-openapi.json put /api/workspace/members/bulk/role","href":"/api-reference/update-workspace-member-roles-in-bulk"},{"title":"Remove workspace member","deprecated":null,"version":null,"openapi":"/developers/references/app-management/app-management-openapi.json delete /api/workspace/members/{email}","href":"/api-reference/remove-workspace-member"},{"title":"Remove workspace members in bulk","deprecated":null,"version":null,"openapi":"/developers/references/app-management/app-management-openapi.json post /api/workspace/members/bulk/remove","href":"/api-reference/remove-workspace-members-in-bulk"}]},{"group":"Groups","pages":[{"title":"List workspace groups","deprecated":null,"version":null,"openapi":"/developers/references/app-management/app-management-openapi.json get /api/workspace/groups","href":"/api-reference/list-workspace-groups"},{"title":"Create workspace group","deprecated":null,"version":null,"openapi":"/developers/references/app-management/app-management-openapi.json post /api/workspace/groups","href":"/api-reference/create-workspace-group"},{"title":"Update workspace group","deprecated":null,"version":null,"openapi":"/developers/references/app-management/app-management-openapi.json put /api/workspace/groups/{group_id}","href":"/api-reference/update-workspace-group"},{"title":"Delete workspace group","deprecated":null,"version":null,"openapi":"/developers/references/app-management/app-management-openapi.json delete /api/workspace/groups/{group_id}","href":"/api-reference/delete-workspace-group"},{"title":"List group members","deprecated":null,"version":null,"openapi":"/developers/references/app-management/app-management-openapi.json get /api/workspace/groups/{group_id}/members","href":"/api-reference/list-group-members"},{"title":"Add group members","deprecated":null,"version":null,"openapi":"/developers/references/app-management/app-management-openapi.json post /api/workspace/groups/{group_id}/members","href":"/api-reference/add-group-members"},{"title":"Remove group members","deprecated":null,"version":null,"openapi":"/developers/references/app-management/app-management-openapi.json post /api/workspace/groups/{group_id}/members/remove","href":"/api-reference/remove-group-members"}]},{"group":"Invitations","pages":[{"title":"Invite workspace member","deprecated":null,"version":null,"openapi":"/developers/references/app-management/app-management-openapi.json post /api/workspace/invitations/invite","href":"/api-reference/invite-workspace-member"},{"title":"Invite workspace members in bulk","deprecated":null,"version":null,"openapi":"/developers/references/app-management/app-management-openapi.json post /api/workspace/invitations/bulk-invite","href":"/api-reference/invite-workspace-members-in-bulk"},{"title":"Resend workspace invitation","deprecated":null,"version":null,"openapi":"/developers/references/app-management/app-management-openapi.json post /api/workspace/invitations/resend","href":"/api-reference/resend-workspace-invitation"},{"title":"Resend workspace invitations in bulk","deprecated":null,"version":null,"openapi":"/developers/references/app-management/app-management-openapi.json post /api/workspace/invitations/bulk-resend","href":"/api-reference/resend-workspace-invitations-in-bulk"}]},{"group":"Credit limits","pages":[{"title":"Set default member credit limit","deprecated":null,"version":null,"openapi":"/developers/references/app-management/app-management-openapi.json put /api/workspace/default-credit-limit","href":"/api-reference/set-default-member-credit-limit"},{"title":"Set member credit limit","deprecated":null,"version":null,"openapi":"/developers/references/app-management/app-management-openapi.json put /api/workspace/members/{email}/credit-limit","href":"/api-reference/set-member-credit-limit"},{"title":"Set member credit limits in bulk","deprecated":null,"version":null,"openapi":"/developers/references/app-management/app-management-openapi.json put /api/workspace/members/bulk/credit-limit","href":"/api-reference/set-member-credit-limits-in-bulk"}]},{"group":"App folders","pages":[{"title":"List app folders","deprecated":null,"version":null,"openapi":"/developers/references/app-management/app-management-openapi.json get /api/app-folders/tree","href":"/api-reference/list-app-folders"},{"title":"Create app folder","deprecated":null,"version":null,"openapi":"/developers/references/app-management/app-management-openapi.json post /api/app-folders","href":"/api-reference/create-app-folder"},{"title":"Update app folder","deprecated":null,"version":null,"openapi":"/developers/references/app-management/app-management-openapi.json put /api/app-folders/{item_id}","href":"/api-reference/update-app-folder"},{"title":"Delete app folder","deprecated":null,"version":null,"openapi":"/developers/references/app-management/app-management-openapi.json delete /api/app-folders/{item_id}","href":"/api-reference/delete-app-folder"},{"title":"Add apps to folder","deprecated":null,"version":null,"openapi":"/developers/references/app-management/app-management-openapi.json post /api/app-folders/{folder_id}/items","href":"/api-reference/add-apps-to-folder"},{"title":"Remove app from folder","deprecated":null,"version":null,"openapi":"/developers/references/app-management/app-management-openapi.json delete /api/app-folders/{folder_id}/items/{app_id}","href":"/api-reference/remove-app-from-folder"}]},{"group":"Fonts","pages":[{"title":"List workspace fonts","deprecated":null,"version":null,"openapi":"/developers/references/app-management/app-management-openapi.json get /api/fonts","href":"/api-reference/list-workspace-fonts"},{"title":"Upload workspace font","deprecated":null,"version":null,"openapi":"/developers/references/app-management/app-management-openapi.json post /api/fonts","href":"/api-reference/upload-workspace-font"},{"title":"Get workspace font","deprecated":null,"version":null,"openapi":"/developers/references/app-management/app-management-openapi.json get /api/fonts/{font_id}","href":"/api-reference/get-workspace-font"},{"title":"Delete workspace font","deprecated":null,"version":null,"openapi":"/developers/references/app-management/app-management-openapi.json delete /api/fonts/{font_id}","href":"/api-reference/delete-workspace-font"}]},{"group":"Connectors","pages":[{"title":"List workspace connectors","deprecated":null,"version":null,"openapi":"/developers/references/app-management/app-management-openapi.json get /api/workspace/{workspace_id}/connectors","href":"/api-reference/list-workspace-connectors"},{"title":"Create workspace connector","deprecated":null,"version":null,"openapi":"/developers/references/app-management/app-management-openapi.json post /api/workspace/{workspace_id}/connectors","href":"/api-reference/create-workspace-connector"},{"title":"Update workspace connector","deprecated":null,"version":null,"openapi":"/developers/references/app-management/app-management-openapi.json put /api/workspace/{workspace_id}/connectors/{connector_id}","href":"/api-reference/update-workspace-connector"},{"title":"Delete workspace connector","deprecated":null,"version":null,"openapi":"/developers/references/app-management/app-management-openapi.json delete /api/workspace/{workspace_id}/connectors/{connector_id}","href":"/api-reference/delete-workspace-connector"}]},{"group":"Connector governance","pages":[{"title":"Get workspace connector policies","deprecated":null,"version":null,"openapi":"/developers/references/app-management/app-management-openapi.json get /api/workspace/{workspace_id}/connector-governance","href":"/api-reference/get-workspace-connector-policies"},{"title":"Update builder connection policy","deprecated":null,"version":null,"openapi":"/developers/references/app-management/app-management-openapi.json put /api/workspace/{workspace_id}/connector-governance/{integration_type}/builder-connection","href":"/api-reference/update-builder-connection-policy"},{"title":"Update per-user connection policy","deprecated":null,"version":null,"openapi":"/developers/references/app-management/app-management-openapi.json put /api/workspace/{workspace_id}/connector-governance/{integration_type}/per-user-connection","href":"/api-reference/update-per-user-connection-policy"},{"title":"Update workspace connector policies in bulk","deprecated":null,"version":null,"openapi":"/developers/references/app-management/app-management-openapi.json put /api/workspace/{workspace_id}/connector-governance/bulk","href":"/api-reference/update-workspace-connector-policies-in-bulk"}]},{"group":"Brands","pages":[{"title":"List workspace brands","deprecated":null,"version":null,"openapi":"/developers/references/app-management/app-management-openapi.json get /api/workspace/{workspace_id}/brands","href":"/api-reference/list-workspace-brands"},{"title":"Create workspace brand","deprecated":null,"version":null,"openapi":"/developers/references/app-management/app-management-openapi.json post /api/workspace/{workspace_id}/brands","href":"/api-reference/create-workspace-brand"},{"title":"Generate workspace brand","deprecated":null,"version":null,"openapi":"/developers/references/app-management/app-management-openapi.json post /api/workspace/{workspace_id}/brands/generate","href":"/api-reference/generate-workspace-brand"},{"title":"Get workspace brand","deprecated":null,"version":null,"openapi":"/developers/references/app-management/app-management-openapi.json get /api/workspace/{workspace_id}/brands/{brand_id}","href":"/api-reference/get-workspace-brand"},{"title":"Update workspace brand","deprecated":null,"version":null,"openapi":"/developers/references/app-management/app-management-openapi.json put /api/workspace/{workspace_id}/brands/{brand_id}","href":"/api-reference/update-workspace-brand"},{"title":"Delete workspace brand","deprecated":null,"version":null,"openapi":"/developers/references/app-management/app-management-openapi.json delete /api/workspace/{workspace_id}/brands/{brand_id}","href":"/api-reference/delete-workspace-brand"},{"title":"Set default workspace brand","deprecated":null,"version":null,"openapi":"/developers/references/app-management/app-management-openapi.json put /api/workspace/{workspace_id}/brands/{brand_id}/default","href":"/api-reference/set-default-workspace-brand"},{"title":"Clear default workspace brand","deprecated":null,"version":null,"openapi":"/developers/references/app-management/app-management-openapi.json delete /api/workspace/{workspace_id}/brands/{brand_id}/default","href":"/api-reference/clear-default-workspace-brand"}]},{"group":"White label","pages":[{"title":"Get workspace white label","deprecated":null,"version":null,"openapi":"/developers/references/app-management/app-management-openapi.json get /api/workspace/{workspace_id}/white-label","href":"/api-reference/get-workspace-white-label"},{"title":"Update workspace white label","deprecated":null,"version":null,"openapi":"/developers/references/app-management/app-management-openapi.json patch /api/workspace/{workspace_id}/white-label","href":"/api-reference/update-workspace-white-label"}]},{"group":"Skills","pages":[{"title":"List workspace skills","deprecated":null,"version":null,"openapi":"/developers/references/app-management/app-management-openapi.json get /api/workspace/skills","href":"/api-reference/list-workspace-skills"},{"title":"Get workspace skill","deprecated":null,"version":null,"openapi":"/developers/references/app-management/app-management-openapi.json get /api/workspace/skills/{skill_id}","href":"/api-reference/get-workspace-skill"},{"title":"Create workspace skill","deprecated":null,"version":null,"openapi":"/developers/references/app-management/app-management-openapi.json post /api/workspace/skills","href":"/api-reference/create-workspace-skill"},{"title":"Update workspace skill","deprecated":null,"version":null,"openapi":"/developers/references/app-management/app-management-openapi.json put /api/workspace/skills/{skill_id}","href":"/api-reference/update-workspace-skill"},{"title":"Delete workspace skill","deprecated":null,"version":null,"openapi":"/developers/references/app-management/app-management-openapi.json delete /api/workspace/skills/{skill_id}","href":"/api-reference/delete-workspace-skill"}]},{"group":"Billing","pages":[{"title":"List plans","deprecated":null,"version":null,"openapi":"/developers/references/app-management/app-management-openapi.json get /api/billing/tiers","href":"/api-reference/list-plans"},{"title":"Get billing info","deprecated":null,"version":null,"openapi":"/developers/references/app-management/app-management-openapi.json get /api/billing/billing-info","href":"/api-reference/get-billing-info"},{"title":"Get mobile subscription status","deprecated":null,"version":null,"openapi":"/developers/references/app-management/app-management-openapi.json get /api/billing/mobile/subscription-status","href":"/api-reference/get-mobile-subscription-status"},{"title":"Create billing portal session","deprecated":null,"version":null,"openapi":"/developers/references/app-management/app-management-openapi.json post /api/billing/create-portal-session","href":"/api-reference/create-billing-portal-session"},{"title":"Create payment method update session","deprecated":null,"version":null,"openapi":"/developers/references/app-management/app-management-openapi.json post /api/billing/create-update-payment-method-portal-session","href":"/api-reference/create-payment-method-update-session"},{"title":"Open invoice","deprecated":null,"version":null,"openapi":"/developers/references/app-management/app-management-openapi.json post /api/billing/open-invoice/{invoice_id}","href":"/api-reference/open-invoice"},{"title":"Retry failed payment","deprecated":null,"version":null,"openapi":"/developers/references/app-management/app-management-openapi.json post /api/billing/retry-payment","href":"/api-reference/retry-failed-payment"},{"title":"Preview plan change","deprecated":null,"version":null,"openapi":"/developers/references/app-management/app-management-openapi.json post /api/billing/preview-upgrade/{price_id}","href":"/api-reference/preview-plan-change"},{"title":"Create plan checkout","deprecated":null,"version":null,"openapi":"/developers/references/app-management/app-management-openapi.json post /api/billing/create-checkout-session/{price_id}","href":"/api-reference/create-plan-checkout"},{"title":"Change plan","deprecated":null,"version":null,"openapi":"/developers/references/app-management/app-management-openapi.json post /api/billing/update-subscription/{price_id}","href":"/api-reference/change-plan"},{"title":"Preview Wix plan change","deprecated":null,"version":null,"openapi":"/developers/references/app-management/app-management-openapi.json post /api/billing/dynamic-offering/preview-subscription","href":"/api-reference/preview-wix-plan-change"},{"title":"Change Wix plan","deprecated":null,"version":null,"openapi":"/developers/references/app-management/app-management-openapi.json post /api/billing/dynamic-offering/update-subscription","href":"/api-reference/change-wix-plan"},{"title":"Turn on auto-renew","deprecated":null,"version":null,"openapi":"/developers/references/app-management/app-management-openapi.json post /api/billing/wix-turn-auto-renew-on","href":"/api-reference/turn-on-auto-renew"},{"title":"Get cancellation impact","deprecated":null,"version":null,"openapi":"/developers/references/app-management/app-management-openapi.json get /api/billing/cancel-subscription/impact","href":"/api-reference/get-cancellation-impact"},{"title":"Preview ILS refund","deprecated":null,"version":null,"openapi":"/developers/references/app-management/app-management-openapi.json get /api/billing/ils-refund-preview","href":"/api-reference/preview-ils-refund"},{"title":"Cancel subscription","deprecated":null,"version":null,"openapi":"/developers/references/app-management/app-management-openapi.json post /api/billing/cancel-subscription","href":"/api-reference/cancel-subscription"},{"title":"Reactivate subscription","deprecated":null,"version":null,"openapi":"/developers/references/app-management/app-management-openapi.json post /api/billing/reactivate-subscription","href":"/api-reference/reactivate-subscription"},{"title":"Cancel scheduled plan change","deprecated":null,"version":null,"openapi":"/developers/references/app-management/app-management-openapi.json delete /api/billing/cancel-schedule","href":"/api-reference/cancel-scheduled-plan-change"},{"title":"Refresh Google Play subscription","deprecated":null,"version":null,"openapi":"/developers/references/app-management/app-management-openapi.json post /api/billing/mobile/google-play/refresh","href":"/api-reference/refresh-google-play-subscription"}]},{"group":"Business email","pages":[{"title":"Get business email status","deprecated":null,"version":null,"openapi":"/developers/references/app-management/app-management-openapi.json get /api/billing/business-email/status","href":"/api-reference/get-business-email-status"},{"title":"Get business email discount","deprecated":null,"version":null,"openapi":"/developers/references/app-management/app-management-openapi.json get /api/billing/business-email/discount","href":"/api-reference/get-business-email-discount"},{"title":"Get business email purchase link","deprecated":null,"version":null,"openapi":"/developers/references/app-management/app-management-openapi.json post /api/billing/business-email/purchase-url","href":"/api-reference/get-business-email-purchase-link"},{"title":"Get business email setup link","deprecated":null,"version":null,"openapi":"/developers/references/app-management/app-management-openapi.json post /api/billing/business-email/setup-url","href":"/api-reference/get-business-email-setup-link"},{"title":"Get business email management link","deprecated":null,"version":null,"openapi":"/developers/references/app-management/app-management-openapi.json post /api/billing/business-email/manage-url","href":"/api-reference/get-business-email-management-link"},{"title":"Get business email admin console link","deprecated":null,"version":null,"openapi":"/developers/references/app-management/app-management-openapi.json get /api/billing/business-email/admin-console-url","href":"/api-reference/get-business-email-admin-console-link"}]}]}]},{"group":"Superagents API (Beta)","boost":0.75,"icon":"user-robot","pages":[{"group":"Get Started","icon":"book-open","pages":[{"title":"Superagents API Overview","sidebarTitle":"Overview","href":"/developers/references/superagents-api/get-started/overview"},{"title":"Authentication","sidebarTitle":"Authentication","href":"/developers/references/superagents-api/get-started/authentication"}]},{"group":"API Reference","icon":"brackets-curly","pages":[{"title":"Create Superagent","deprecated":null,"version":null,"openapi":"/developers/references/app-management/app-management-openapi.json post /api/agents","href":"/api-reference/create-superagent"},{"title":"List Superagent conversations","deprecated":null,"version":null,"openapi":"/developers/references/app-management/app-management-openapi.json get /api/agents/{agent_id}/conversations","href":"/api-reference/list-superagent-conversations"},{"title":"Create Superagent conversation","deprecated":null,"version":null,"openapi":"/developers/references/app-management/app-management-openapi.json post /api/agents/{agent_id}/conversations","href":"/api-reference/create-superagent-conversation"},{"title":"Get Superagent conversation","deprecated":null,"version":null,"openapi":"/developers/references/app-management/app-management-openapi.json get /api/agents/{agent_id}/conversations/{conversation_id}","href":"/api-reference/get-superagent-conversation"},{"title":"Send Superagent message","deprecated":null,"version":null,"openapi":"/developers/references/app-management/app-management-openapi.json post /api/agents/{agent_id}/conversations/{conversation_id}/messages","href":"/api-reference/send-superagent-message"},{"title":"Delete Superagent message","deprecated":null,"version":null,"openapi":"/developers/references/app-management/app-management-openapi.json delete /api/agents/{agent_id}/conversations/{conversation_id}/messages/{message_id}","href":"/api-reference/delete-superagent-message"},{"title":"List Superagent memories","deprecated":null,"version":null,"openapi":"/developers/references/app-management/app-management-openapi.json get /api/agents/{agent_id}/memory","href":"/api-reference/list-superagent-memories"},{"title":"Delete Superagent memory","deprecated":null,"version":null,"openapi":"/developers/references/app-management/app-management-openapi.json delete /api/agents/{agent_id}/memory/{memory_id}","href":"/api-reference/delete-superagent-memory"},{"title":"List Superagent webhooks","deprecated":null,"version":null,"openapi":"/developers/references/app-management/app-management-openapi.json get /api/agents/{agent_id}/webhooks","href":"/api-reference/list-superagent-webhooks"},{"title":"Create Superagent webhook","deprecated":null,"version":null,"openapi":"/developers/references/app-management/app-management-openapi.json post /api/agents/{agent_id}/webhooks","href":"/api-reference/create-superagent-webhook"},{"title":"Update Superagent webhook","deprecated":null,"version":null,"openapi":"/developers/references/app-management/app-management-openapi.json patch /api/agents/{agent_id}/webhooks/{webhook_id}","href":"/api-reference/update-superagent-webhook"},{"title":"Test Superagent webhook","deprecated":null,"version":null,"openapi":"/developers/references/app-management/app-management-openapi.json post /api/agents/{agent_id}/webhooks/{webhook_id}/test","href":"/api-reference/test-superagent-webhook"},{"title":"Delete Superagent webhook","deprecated":null,"version":null,"openapi":"/developers/references/app-management/app-management-openapi.json delete /api/agents/{agent_id}/webhooks/{webhook_id}","href":"/api-reference/delete-superagent-webhook"}]}]},{"group":"Monitoring API","icon":"chart-line","expanded":false,"pages":[{"group":"Get Started","icon":"book-open","pages":[{"title":"Enterprise Monitoring API Overview","href":"/developers/references/monitoring-api/get-started/overview"},{"title":"Authentication","href":"/developers/references/monitoring-api/get-started/authentication"},{"title":"Rate Limits","href":"/developers/references/monitoring-api/get-started/rate-limits"}]},{"group":"API Reference","icon":"brackets-curly","pages":[{"group":"system","pages":[{"title":"Health check","deprecated":null,"version":null,"openapi":"/developers/references/monitoring-api/monitoring-openapi.json get /health","href":"/api-reference/monitoring/system/health-check"}]},{"group":"analytics","pages":[{"title":"Get analytics","deprecated":null,"version":null,"openapi":"/developers/references/monitoring-api/monitoring-openapi.json get /analytics/{workspace_id}","href":"/api-reference/monitoring/analytics/get-analytics"}]},{"group":"users","pages":[{"title":"List users","deprecated":null,"version":null,"openapi":"/developers/references/monitoring-api/monitoring-openapi.json get /{workspace_id}/users","href":"/api-reference/monitoring/users/list-users"},{"title":"Get user","deprecated":null,"version":null,"openapi":"/developers/references/monitoring-api/monitoring-openapi.json get /{workspace_id}/users/{user_id}","href":"/api-reference/monitoring/users/get-user"},{"title":"List user apps","deprecated":null,"version":null,"openapi":"/developers/references/monitoring-api/monitoring-openapi.json get /{workspace_id}/users/{user_id}/apps","href":"/api-reference/monitoring/users/list-user-apps"},{"title":"List user Superagents","deprecated":null,"version":null,"openapi":"/developers/references/monitoring-api/monitoring-openapi.json get /{workspace_id}/users/{user_id}/superagents","href":"/api-reference/monitoring/users/list-user-superagents"}]},{"group":"apps","pages":[{"title":"List app metrics","deprecated":null,"version":null,"openapi":"/developers/references/monitoring-api/monitoring-openapi.json get /{workspace_id}/apps","href":"/api-reference/monitoring/apps/list-app-metrics"},{"title":"Get app analytics","deprecated":null,"version":null,"openapi":"/developers/references/monitoring-api/monitoring-openapi.json get /{workspace_id}/apps/{app_id}/analytics","href":"/api-reference/monitoring/apps/get-app-analytics"}]},{"group":"superagents","pages":[{"title":"List Superagents","deprecated":null,"version":null,"openapi":"/developers/references/monitoring-api/monitoring-openapi.json get /{workspace_id}/superagents","href":"/api-reference/monitoring/superagents/list-superagents"},{"title":"Get Superagent analytics","deprecated":null,"version":null,"openapi":"/developers/references/monitoring-api/monitoring-openapi.json get /{workspace_id}/superagents/{agent_id}/analytics","href":"/api-reference/monitoring/superagents/get-superagent-analytics"}]}]}]},{"group":"Audit Logs API","icon":"clipboard-list","expanded":false,"pages":[{"group":"Get Started","icon":"book-open","pages":[{"title":"Audit Logs API Overview","href":"/developers/references/audit-logs-api/get-started/overview"},{"title":"Authentication","sidebarTitle":"Authentication","href":"/developers/references/audit-logs-api/get-started/authentication"},{"title":"Rate Limits","href":"/developers/references/audit-logs-api/get-started/rate-limits"},{"title":"Event Types","sidebarTitle":"Event Types","href":"/developers/references/audit-logs-api/get-started/event-types"},{"title":"Security scan findings","sidebarTitle":"Security scan findings","href":"/developers/references/audit-logs-api/get-started/security-scan-findings"}]},{"group":"API Reference","icon":"brackets-curly","pages":[{"group":"audit-logs","pages":[{"title":"Get security scan findings","deprecated":null,"version":null,"openapi":"/developers/references/audit-logs-api/audit-logs-openapi.json get /{workspace_id}/security-scan-runs/{run_id}","href":"/api-reference/audit-logs/get-security-scan-findings"},{"title":"List audit logs","deprecated":null,"version":null,"openapi":"/developers/references/audit-logs-api/audit-logs-openapi.json post /{workspace_id}/list","href":"/api-reference/audit-logs/list-audit-logs"}]}]}]},{"group":"Compliance API","boost":0.75,"icon":"shield-check","expanded":false,"pages":[{"group":"Get Started","icon":"book-open","pages":[{"title":"Compliance API for security partners","sidebarTitle":"Overview","href":"/developers/references/compliance-api/get-started/overview"},{"title":"Register as a partner","sidebarTitle":"Register as a partner","href":"/developers/references/compliance-api/get-started/register-as-a-partner"},{"title":"Authentication","sidebarTitle":"Authentication","href":"/developers/references/compliance-api/get-started/authentication"},{"title":"Rate limits","href":"/developers/references/compliance-api/get-started/rate-limits"},{"title":"Error codes","sidebarTitle":"Error codes","href":"/developers/references/compliance-api/get-started/error-codes"}]},{"group":"API Reference","icon":"brackets-curly","pages":[{"title":"Get workspace configuration","deprecated":null,"version":null,"openapi":"/developers/references/compliance-api/compliance-openapi.json get /{workspace_id}","href":"/api-reference/compliance/get-workspace-configuration"},{"title":"List agents","deprecated":null,"version":null,"openapi":"/developers/references/compliance-api/compliance-openapi.json get /{workspace_id}/agents","href":"/api-reference/compliance/list-agents"},{"title":"List apps","deprecated":null,"version":null,"openapi":"/developers/references/compliance-api/compliance-openapi.json get /{workspace_id}/apps","href":"/api-reference/compliance/list-apps"},{"title":"List backend functions","deprecated":null,"version":null,"openapi":"/developers/references/compliance-api/compliance-openapi.json get /{workspace_id}/functions","href":"/api-reference/compliance/list-backend-functions"},{"title":"List domains","deprecated":null,"version":null,"openapi":"/developers/references/compliance-api/compliance-openapi.json get /{workspace_id}/domains","href":"/api-reference/compliance/list-domains"},{"title":"List entities","deprecated":null,"version":null,"openapi":"/developers/references/compliance-api/compliance-openapi.json get /{workspace_id}/entities","href":"/api-reference/compliance/list-entities"},{"title":"List integrations","deprecated":null,"version":null,"openapi":"/developers/references/compliance-api/compliance-openapi.json get /{workspace_id}/integrations","href":"/api-reference/compliance/list-integrations"},{"title":"List secrets","deprecated":null,"version":null,"openapi":"/developers/references/compliance-api/compliance-openapi.json get /{workspace_id}/secrets","href":"/api-reference/compliance/list-secrets"},{"title":"List security findings","deprecated":null,"version":null,"openapi":"/developers/references/compliance-api/compliance-openapi.json get /{workspace_id}/security-findings","href":"/api-reference/compliance/list-security-findings"},{"title":"List workspace API keys","deprecated":null,"version":null,"openapi":"/developers/references/compliance-api/compliance-openapi.json get /{workspace_id}/api-keys","href":"/api-reference/compliance/list-workspace-api-keys"},{"title":"List workspace members","deprecated":null,"version":null,"openapi":"/developers/references/compliance-api/compliance-openapi.json get /{workspace_id}/members","href":"/api-reference/compliance/list-workspace-members"}]}]},{"group":"Outbound webhooks","icon":"paper-plane","expanded":false,"pages":[{"group":"Get Started","icon":"book-open","pages":[{"title":"Outbound webhooks overview","sidebarTitle":"Overview","href":"/developers/references/outbound-webhooks/get-started/overview"},{"title":"Setting up endpoints","sidebarTitle":"Setting up endpoints","href":"/developers/references/outbound-webhooks/get-started/setting-up-endpoints"},{"title":"Verifying requests","sidebarTitle":"Verifying requests","href":"/developers/references/outbound-webhooks/get-started/verifying-requests"},{"title":"Event types","sidebarTitle":"Event types","href":"/developers/references/outbound-webhooks/get-started/event-types"},{"title":"Delivery and retries","sidebarTitle":"Delivery and retries","href":"/developers/references/outbound-webhooks/get-started/delivery-and-retries"}]},{"group":"Events","boost":0.5,"icon":"bolt","pages":[{"title":"app.created.v1","openapi":"developers/references/outbound-webhooks/outbound-webhooks-openapi.json webhook app.created.v1","href":"/developers/references/outbound-webhooks/events/app-created-v1"},{"title":"app.published.v1","openapi":"developers/references/outbound-webhooks/outbound-webhooks-openapi.json webhook app.published.v1","href":"/developers/references/outbound-webhooks/events/app-published-v1"},{"title":"app.unpublished.v1","openapi":"developers/references/outbound-webhooks/outbound-webhooks-openapi.json webhook app.unpublished.v1","href":"/developers/references/outbound-webhooks/events/app-unpublished-v1"},{"title":"app.deleted.v1","openapi":"developers/references/outbound-webhooks/outbound-webhooks-openapi.json webhook app.deleted.v1","href":"/developers/references/outbound-webhooks/events/app-deleted-v1"},{"title":"app.restored.v1","openapi":"developers/references/outbound-webhooks/outbound-webhooks-openapi.json webhook app.restored.v1","href":"/developers/references/outbound-webhooks/events/app-restored-v1"},{"title":"chat.turn_started.v1","openapi":"developers/references/outbound-webhooks/outbound-webhooks-openapi.json webhook chat.turn_started.v1","href":"/developers/references/outbound-webhooks/events/chat-turn-started-v1"},{"title":"chat.turn_ended.v1","openapi":"developers/references/outbound-webhooks/outbound-webhooks-openapi.json webhook chat.turn_ended.v1","href":"/developers/references/outbound-webhooks/events/chat-turn-ended-v1"},{"title":"webhook.test.v1","openapi":"developers/references/outbound-webhooks/outbound-webhooks-openapi.json webhook webhook.test.v1","href":"/developers/references/outbound-webhooks/events/webhook-test-v1"}]},{"group":"API Reference","icon":"brackets-curly","pages":[{"group":"outbound-webhooks","pages":[{"title":"List endpoints","deprecated":null,"version":null,"openapi":"/developers/references/outbound-webhooks/outbound-webhooks-openapi.json get /endpoints","href":"/api-reference/outbound-webhooks/list-endpoints"},{"title":"Register an endpoint","deprecated":null,"version":null,"openapi":"/developers/references/outbound-webhooks/outbound-webhooks-openapi.json post /endpoints","href":"/api-reference/outbound-webhooks/register-an-endpoint"},{"title":"Get an endpoint","deprecated":null,"version":null,"openapi":"/developers/references/outbound-webhooks/outbound-webhooks-openapi.json get /endpoints/{endpoint_id}","href":"/api-reference/outbound-webhooks/get-an-endpoint"},{"title":"Delete an endpoint","deprecated":null,"version":null,"openapi":"/developers/references/outbound-webhooks/outbound-webhooks-openapi.json delete /endpoints/{endpoint_id}","href":"/api-reference/outbound-webhooks/delete-an-endpoint"},{"title":"Update an endpoint","deprecated":null,"version":null,"openapi":"/developers/references/outbound-webhooks/outbound-webhooks-openapi.json patch /endpoints/{endpoint_id}","href":"/api-reference/outbound-webhooks/update-an-endpoint"},{"title":"Test an endpoint","deprecated":null,"version":null,"openapi":"/developers/references/outbound-webhooks/outbound-webhooks-openapi.json post /endpoints/{endpoint_id}/test","href":"/api-reference/outbound-webhooks/test-an-endpoint"},{"title":"Pause an endpoint","deprecated":null,"version":null,"openapi":"/developers/references/outbound-webhooks/outbound-webhooks-openapi.json post /endpoints/{endpoint_id}/pause","href":"/api-reference/outbound-webhooks/pause-an-endpoint"},{"title":"Resume an endpoint","deprecated":null,"version":null,"openapi":"/developers/references/outbound-webhooks/outbound-webhooks-openapi.json post /endpoints/{endpoint_id}/resume","href":"/api-reference/outbound-webhooks/resume-an-endpoint"},{"title":"Get the public key set","deprecated":null,"version":null,"openapi":"/developers/references/outbound-webhooks/outbound-webhooks-openapi.json get /workspaces/{workspace_id}/keys","href":"/api-reference/outbound-webhooks/get-the-public-key-set"}]},{"group":"events","pages":[{"title":"An app was created","version":null,"deprecated":null,"openapi":"/developers/references/outbound-webhooks/outbound-webhooks-openapi.json webhook app.created.v1","href":"/api-reference/events/an-app-was-created"},{"title":"An app version was published","version":null,"deprecated":null,"openapi":"/developers/references/outbound-webhooks/outbound-webhooks-openapi.json webhook app.published.v1","href":"/api-reference/events/an-app-version-was-published"},{"title":"An app was taken offline","version":null,"deprecated":null,"openapi":"/developers/references/outbound-webhooks/outbound-webhooks-openapi.json webhook app.unpublished.v1","href":"/api-reference/events/an-app-was-taken-offline"},{"title":"An app was moved to trash restorable not erased","version":null,"deprecated":null,"openapi":"/developers/references/outbound-webhooks/outbound-webhooks-openapi.json webhook app.deleted.v1","href":"/api-reference/events/an-app-was-moved-to-trash-restorable-not-erased"},{"title":"An app was restored from trash","version":null,"deprecated":null,"openapi":"/developers/references/outbound-webhooks/outbound-webhooks-openapi.json webhook app.restored.v1","href":"/api-reference/events/an-app-was-restored-from-trash"},{"title":"The ai started working on a message","version":null,"deprecated":null,"openapi":"/developers/references/outbound-webhooks/outbound-webhooks-openapi.json webhook chat.turn_started.v1","href":"/api-reference/events/the-ai-started-working-on-a-message"},{"title":"The ai finished responding to a message","version":null,"deprecated":null,"openapi":"/developers/references/outbound-webhooks/outbound-webhooks-openapi.json webhook chat.turn_ended.v1","href":"/api-reference/events/the-ai-finished-responding-to-a-message"},{"title":"Endpoint activation test","version":null,"deprecated":null,"openapi":"/developers/references/outbound-webhooks/outbound-webhooks-openapi.json webhook webhook.test.v1","href":"/api-reference/events/endpoint-activation-test"}]}]}]}],"global":{"anchors":[{"anchor":"Developer Platform","icon":"arrow-left","href":"/developers/home"}]}},{"dropdown":"White label (Beta)","icon":"tag","groups":[{"group":"Start here","icon":"flag","pages":[{"title":"White Label Overview","sidebarTitle":"Overview","href":"/developers/white-label/overview"},{"title":"Setup checklist","sidebarTitle":"Setup checklist","href":"/developers/white-label/setup-checklist"},{"title":"Tenancy and credentials","sidebarTitle":"Tenancy and credentials","href":"/developers/white-label/tenancy-and-credentials"}]},{"group":"Configure","icon":"gear","pages":[{"title":"Set your brand","sidebarTitle":"Brand","href":"/developers/white-label/brand"},{"title":"Configuring your system prompt","sidebarTitle":"System prompt","href":"/developers/white-label/system-prompt"},{"title":"Skills and MCP","sidebarTitle":"Skills and MCP","href":"/developers/white-label/skills-and-mcp"},{"title":"Custom instructions","sidebarTitle":"Custom instructions","href":"/developers/white-label/custom-instructions"}]},{"group":"Build an app","icon":"hammer","pages":[{"title":"The build turn","sidebarTitle":"The build turn","href":"/developers/white-label/the-build-turn"},{"title":"Live updates","sidebarTitle":"Live updates","href":"/developers/white-label/live-updates"},{"title":"Embed the app","sidebarTitle":"Embed the app","href":"/developers/white-label/embed-the-app"},{"title":"Common APIs","sidebarTitle":"Common APIs","href":"/developers/white-label/common-apis"}]},{"group":"Help","icon":"circle-question","pages":[{"title":"White label FAQs","sidebarTitle":"FAQs","href":"/developers/white-label/faqs"}]}],"global":{"anchors":[{"anchor":"Developer Platform","icon":"arrow-left","href":"/developers/home"}]}},{"dropdown":"Skills","icon":"wand-magic-sparkles","hidden":true,"groups":[{"group":"base44-cli","boost":0.3,"hidden":true,"pages":[{"title":"Base44 CLI","href":"/developers/skills/base44-cli/index"},{"title":"Creating Actors","href":"/developers/skills/base44-cli/references/actors-create"},{"title":"base44 actors deploy","href":"/developers/skills/base44-cli/references/actors-deploy"},{"title":"base44 agent-skills pull","href":"/developers/skills/base44-cli/references/agent-skills-pull"},{"title":"base44 agent-skills push","href":"/developers/skills/base44-cli/references/agent-skills-push"},{"title":"base44 agents pull","href":"/developers/skills/base44-cli/references/agents-pull"},{"title":"base44 agents push","href":"/developers/skills/base44-cli/references/agents-push"},{"title":"base44 api catalog","href":"/developers/skills/base44-cli/references/api-catalog"},{"title":"base44 api fetch","href":"/developers/skills/base44-cli/references/api-fetch"},{"title":"base44 api grep","href":"/developers/skills/base44-cli/references/api-grep"},{"title":"base44 api search","href":"/developers/skills/base44-cli/references/api-search"},{"title":"base44 login","href":"/developers/skills/base44-cli/references/auth-login"},{"title":"base44 logout","href":"/developers/skills/base44-cli/references/auth-logout"},{"title":"base44 auth password-login","href":"/developers/skills/base44-cli/references/auth-password-login"},{"title":"base44 auth pull","href":"/developers/skills/base44-cli/references/auth-pull"},{"title":"base44 auth push","href":"/developers/skills/base44-cli/references/auth-push"},{"title":"base44 auth social-login","href":"/developers/skills/base44-cli/references/auth-social-login"},{"title":"base44 auth sso","href":"/developers/skills/base44-cli/references/auth-sso"},{"title":"base44 whoami","href":"/developers/skills/base44-cli/references/auth-whoami"},{"title":"Creating Connectors","href":"/developers/skills/base44-cli/references/connectors-create"},{"title":"base44 connectors initiate","href":"/developers/skills/base44-cli/references/connectors-initiate"},{"title":"base44 connectors list-available","href":"/developers/skills/base44-cli/references/connectors-list-available"},{"title":"base44 connectors pull","href":"/developers/skills/base44-cli/references/connectors-pull"},{"title":"base44 connectors push","href":"/developers/skills/base44-cli/references/connectors-push"},{"title":"base44 create","href":"/developers/skills/base44-cli/references/create"},{"title":"base44 dashboard open","href":"/developers/skills/base44-cli/references/dashboard"},{"title":"base44 deploy","href":"/developers/skills/base44-cli/references/deploy"},{"title":"base44 dev","href":"/developers/skills/base44-cli/references/dev"},{"title":"base44 eject","href":"/developers/skills/base44-cli/references/eject"},{"title":"Creating Entities","href":"/developers/skills/base44-cli/references/entities-create"},{"title":"base44 entities push","href":"/developers/skills/base44-cli/references/entities-push"},{"title":"base44 exec","href":"/developers/skills/base44-cli/references/exec"},{"title":"Creating Functions","href":"/developers/skills/base44-cli/references/functions-create"},{"title":"base44 functions delete","href":"/developers/skills/base44-cli/references/functions-delete"},{"title":"base44 functions deploy","href":"/developers/skills/base44-cli/references/functions-deploy"},{"title":"base44 functions list","href":"/developers/skills/base44-cli/references/functions-list"},{"title":"base44 functions pull","href":"/developers/skills/base44-cli/references/functions-pull"},{"title":"base44 link","href":"/developers/skills/base44-cli/references/link"},{"title":"RLS Examples","href":"/developers/skills/base44-cli/references/rls-examples"},{"title":"base44 scaffold","href":"/developers/skills/base44-cli/references/scaffold"},{"title":"base44 secrets delete","href":"/developers/skills/base44-cli/references/secrets-delete"},{"title":"base44 secrets list","href":"/developers/skills/base44-cli/references/secrets-list"},{"title":"base44 secrets set","href":"/developers/skills/base44-cli/references/secrets-set"},{"title":"base44 site deploy","href":"/developers/skills/base44-cli/references/site-deploy"},{"title":"base44 site open","href":"/developers/skills/base44-cli/references/site-open"},{"title":"`base44 types generate`","href":"/developers/skills/base44-cli/references/types-generate"},{"title":"base44 visibility","href":"/developers/skills/base44-cli/references/visibility"},{"title":"base44 workflows list","href":"/developers/skills/base44-cli/references/workflows-list"},{"title":"base44 workflows runs","href":"/developers/skills/base44-cli/references/workflows-runs"},{"title":"base44 workspace get","href":"/developers/skills/base44-cli/references/workspace-get"},{"title":"base44 workspace list","href":"/developers/skills/base44-cli/references/workspace-list"},{"title":"base44 workspace move","href":"/developers/skills/base44-cli/references/workspace-move"}]},{"group":"base44-platform-actors","boost":0.3,"hidden":true,"pages":[{"title":"Base44 actors","href":"/developers/skills/base44-platform-actors/index"},{"title":"Base44 actors: Realtime actors (mobile apps)","href":"/developers/skills/base44-platform-actors/references/mobile"},{"title":"Base44 actors: Realtime actors (web apps)","href":"/developers/skills/base44-platform-actors/references/web"}]},{"group":"base44-platform-agents","boost":0.3,"hidden":true,"pages":[{"title":"Base44 agents","href":"/developers/skills/base44-platform-agents/index"},{"title":"Base44 agents: Agents (Vite SPA: tools are backend functions)","href":"/developers/skills/base44-platform-agents/references/web-spa"},{"title":"Base44 agents: Agents (TanStack Start: tools are server routes)","href":"/developers/skills/base44-platform-agents/references/web-tanstack"}]},{"group":"base44-platform-backend-functions","boost":0.3,"hidden":true,"pages":[{"title":"Base44 backend functions","href":"/developers/skills/base44-platform-backend-functions/index"},{"title":"Base44 backend functions: Backend functions (mobile apps)","href":"/developers/skills/base44-platform-backend-functions/references/mobile"},{"title":"Base44 backend functions: Backend functions (Vite SPA)","href":"/developers/skills/base44-platform-backend-functions/references/web-spa"},{"title":"Base44 backend functions: Server functions and server routes (TanStack Start)","href":"/developers/skills/base44-platform-backend-functions/references/web-tanstack"}]},{"group":"base44-platform-connectors","boost":0.3,"hidden":true,"pages":[{"title":"Base44 connectors","href":"/developers/skills/base44-platform-connectors/index"},{"title":"Base44 connectors: App connectors (mobile apps)","href":"/developers/skills/base44-platform-connectors/references/mobile"},{"title":"Base44 connectors: App connectors (Vite SPA)","href":"/developers/skills/base44-platform-connectors/references/web-spa"},{"title":"Base44 connectors: App connectors (TanStack Start)","href":"/developers/skills/base44-platform-connectors/references/web-tanstack"}]},{"group":"base44-platform-entities","boost":0.3,"hidden":true,"pages":[{"title":"Base44 entities","href":"/developers/skills/base44-platform-entities/index"},{"title":"Base44 entities: Entities and the entity SDK (mobile apps)","href":"/developers/skills/base44-platform-entities/references/mobile"},{"title":"Base44 entities: Row-level security (RLS)","href":"/developers/skills/base44-platform-entities/references/rls"},{"title":"Base44 entities: Entities and the entity SDK (web apps)","href":"/developers/skills/base44-platform-entities/references/web"}]},{"group":"base44-platform-frontend","boost":0.3,"hidden":true,"pages":[{"title":"Base44 frontend","href":"/developers/skills/base44-platform-frontend/index"},{"title":"Base44 frontend: Native mobile app (Expo, React Native, NativeWind)","href":"/developers/skills/base44-platform-frontend/references/mobile"},{"title":"Base44 frontend: Web app, Vite SPA","href":"/developers/skills/base44-platform-frontend/references/web-spa"},{"title":"Base44 frontend: Web app, TanStack Start","href":"/developers/skills/base44-platform-frontend/references/web-tanstack"}]},{"group":"base44-platform-integrations-sdk","boost":0.3,"hidden":true,"pages":[{"title":"Base44 integrations sdk","href":"/developers/skills/base44-platform-integrations-sdk/index"},{"title":"Base44 integrations sdk: Integrations SDK (mobile apps)","href":"/developers/skills/base44-platform-integrations-sdk/references/mobile"},{"title":"Base44 integrations sdk: Integrations and analytics SDK (Vite SPA)","href":"/developers/skills/base44-platform-integrations-sdk/references/web-spa"},{"title":"Base44 integrations sdk: Integrations and analytics SDK (TanStack Start)","href":"/developers/skills/base44-platform-integrations-sdk/references/web-tanstack"}]},{"group":"base44-platform-platform","boost":0.3,"hidden":true,"pages":[{"title":"Base44 platform","href":"/developers/skills/base44-platform-platform/index"},{"title":"Base44 platform: Native mobile app (Expo)","href":"/developers/skills/base44-platform-platform/references/mobile"},{"title":"Base44 platform: Web app, Vite SPA","href":"/developers/skills/base44-platform-platform/references/web-spa"},{"title":"Base44 platform: Web app, TanStack Start","href":"/developers/skills/base44-platform-platform/references/web-tanstack"}]},{"group":"base44-platform-workflows","boost":0.3,"hidden":true,"pages":[{"title":"Base44 workflows","href":"/developers/skills/base44-platform-workflows/index"},{"title":"Base44 workflows: Legacy automations (apps that predate workflows)","href":"/developers/skills/base44-platform-workflows/references/automations-legacy"},{"title":"Backend functions","href":"/developers/skills/base44-platform-workflows/references/backend-functions"},{"title":"Base44 workflows: Legacy automations (mobile apps that predate workflows)","href":"/developers/skills/base44-platform-workflows/references/mobile-automations"},{"title":"Web tanstack","href":"/developers/skills/base44-platform-workflows/references/web-tanstack"}]},{"group":"base44-remote-dev","boost":0.3,"hidden":true,"pages":[{"title":"Remotely develop a Base44 app over MCP","href":"/developers/skills/base44-remote-dev/index"}]},{"group":"base44-sandbox","boost":0.3,"hidden":true,"pages":[{"title":"Base44 in the Cloud Sandbox","href":"/developers/skills/base44-sandbox/index"}]},{"group":"base44-sdk","boost":0.3,"hidden":true,"pages":[{"title":"Base44 Coder","href":"/developers/skills/base44-sdk/index"},{"title":"Base44 SDK Quick Reference","href":"/developers/skills/base44-sdk/references/QUICK_REFERENCE"},{"title":"Actors Module","href":"/developers/skills/base44-sdk/references/actors"},{"title":"AI Gateway Module","href":"/developers/skills/base44-sdk/references/ai-gateway"},{"title":"Analytics Module","href":"/developers/skills/base44-sdk/references/analytics"},{"title":"App Logs Module","href":"/developers/skills/base44-sdk/references/app-logs"},{"title":"Auth Module","href":"/developers/skills/base44-sdk/references/auth"},{"title":"Agents Module","href":"/developers/skills/base44-sdk/references/base44-agents"},{"title":"Client Setup","href":"/developers/skills/base44-sdk/references/client"},{"title":"Connectors Module","href":"/developers/skills/base44-sdk/references/connectors"},{"title":"Entities Module","href":"/developers/skills/base44-sdk/references/entities"},{"title":"Functions Module","href":"/developers/skills/base44-sdk/references/functions"},{"title":"Integrations Module","href":"/developers/skills/base44-sdk/references/integrations"},{"title":"SSO Module","href":"/developers/skills/base44-sdk/references/sso"},{"title":"Users Module","href":"/developers/skills/base44-sdk/references/users"}]},{"group":"base44-troubleshooter","boost":0.3,"hidden":true,"pages":[{"title":"Troubleshoot Production Issues","href":"/developers/skills/base44-troubleshooter/index"},{"title":"base44 logs","href":"/developers/skills/base44-troubleshooter/references/project-logs"}]}],"global":{"anchors":[{"anchor":"Developer Platform","icon":"arrow-left","href":"/developers/home"}]}},{"dropdown":"Compliance API","icon":"shield-check","hidden":true,"groups":[{"group":"Compliance API","pages":[{"title":"Compliance API for security partners","sidebarTitle":"Overview","href":"/developers/references/compliance-api/get-started/overview"},{"title":"Register as a partner","sidebarTitle":"Register as a partner","href":"/developers/references/compliance-api/get-started/register-as-a-partner"},{"title":"Authentication","sidebarTitle":"Authentication","href":"/developers/references/compliance-api/get-started/authentication"},{"title":"Rate limits","href":"/developers/references/compliance-api/get-started/rate-limits"},{"title":"Error codes","sidebarTitle":"Error codes","href":"/developers/references/compliance-api/get-started/error-codes"}]}],"global":{"anchors":[{"anchor":"Developer Platform","icon":"arrow-left","href":"/developers/home"}]}}]},{"tab":"Account \u0026 Billing","pages":[{"title":"Account \u0026 Billing","href":"/Account-and-billing/Billing-and-plans"}]},{"tab":"Enterprise","pages":[{"title":"Enterprise","href":"/Enterprise/Base44-for-enterprises"}]}]},{"language":"pt-BR","navbar":{"links":[{"href":"https://app.base44.com/support/conversations","label":"Support"},{"href":"/pt-BR/changelog/product","label":"Registro de alterações"}],"primary":{"type":"button","label":"Base44","href":"https://base44.com/?utm_source=Mintlify\u0026utm_medium=Main\u0026utm_content=menu"}},"pages":[{"title":"pt-BR","href":"/pt-BR"}]},{"language":"es","navbar":{"links":[{"href":"https://app.base44.com/support/conversations","label":"Support"},{"href":"/es/changelog/product","label":"Registro de cambios"}],"primary":{"type":"button","label":"Base44","href":"https://base44.com/?utm_source=Mintlify\u0026utm_medium=Main\u0026utm_content=menu"}},"pages":[{"title":"es","href":"/es"}]},{"language":"he","navbar":{"links":[{"href":"https://app.base44.com/support/conversations","label":"Support"},{"href":"/he/changelog/product","label":"יומן שינויים"}],"primary":{"type":"button","label":"Base44","href":"https://base44.com/?utm_source=Mintlify\u0026utm_medium=Main\u0026utm_content=menu"}},"hidden":true,"pages":[{"title":"he","href":"/he/index","hidden":true}]},{"language":"ja","navbar":{"links":[{"href":"https://app.base44.com/support/conversations","label":"Support"},{"href":"/ja/changelog/product","label":"変更履歴"}],"primary":{"type":"button","label":"Base44","href":"https://base44.com/?utm_source=Mintlify\u0026utm_medium=Main\u0026utm_content=menu"}},"pages":[{"title":"ja","href":"/ja"}]},{"language":"de","navbar":{"links":[{"href":"https://app.base44.com/support/conversations","label":"Support"},{"href":"/de/changelog/product","label":"Änderungsprotokoll"}],"primary":{"type":"button","label":"Base44","href":"https://base44.com/?utm_source=Mintlify\u0026utm_medium=Main\u0026utm_content=menu"}},"pages":[{"title":"de","href":"/de"}]},{"language":"fr","navbar":{"links":[{"href":"https://app.base44.com/support/conversations","label":"Support"},{"href":"/fr/changelog/product","label":"Notes de version"}],"primary":{"type":"button","label":"Base44","href":"https://base44.com/?utm_source=Mintlify\u0026utm_medium=Main\u0026utm_content=menu"}},"pages":[{"title":"fr","href":"/fr"}]},{"language":"it","navbar":{"links":[{"href":"https://app.base44.com/support/conversations","label":"Support"},{"href":"/it/changelog/product","label":"Registro modifiche"}],"primary":{"type":"button","label":"Base44","href":"https://base44.com/?utm_source=Mintlify\u0026utm_medium=Main\u0026utm_content=menu"}},"pages":[{"title":"it","href":"/it"}]}]},"basePath":"","title":"Managing workflows - Base44 Support Documentation","buildId":"dpl_42LwxxU1kGN114H4XzwGYXa9ZDah","deploymentId":"dpl_42LwxxU1kGN114H4XzwGYXa9ZDah","dynamics":["2bfc744e19","07c022d89b","a74be98ba7"],"chunks":["NarrationPlayer-CtjRNHkQ.js","types-CiTgMxws.js","shallow-DC0lGVIW.js","Frame-5Xwp92K7.js","DynamicMarkdown-BoyYAA8K.js","zoom-image-lightbox-DkE6VzSN.js","lightbox-handle-r17bVUz3.js"]}