Scheduling app
Sales app
Content planning app
Preparing connector details
Before adding the connector in Base44, prepare the details required by the service you want to connect. This usually means creating an OAuth app or project in that service’s developer platform, adding your Base44 redirect URI, and copying the details you need into Base44. The exact setup depends on the service. For example, Google uses Google Cloud, Slack uses Slack API Applications, and LinkedIn uses the LinkedIn developer portal.Setup overview
- Prepare your Base44 redirect URI: Use the callback URL for your live app, custom domain, or preview. See the formats below.
- Create an OAuth app: Do this in the third party service’s developer platform.
- Add the redirect URI: Paste the Base44 redirect URI into the OAuth app settings.
- Prepare the connector details: Copy the Client ID and Client Secret, then choose the scopes your app needs.
- Add the connector in Base44: Paste the details into the connector setup form.
Redirect URI formats
- Live app URL:
https://your-live-app-domain.base44.app/api/external-auth/callback - Custom domain:
https://your-custom-domain.com/api/external-auth/callback - Preview URL:
https://preview--your-live-app-domain.base44.app/api/external-auth/callback
- Some services call the redirect URI a callback URL or authorized redirect URI.
- Enter the redirect URI exactly as shown.
- Add the preview redirect URI if you want to test the connector in preview.
- Some services only show the Client Secret once. Copy it before closing the page.
Adding a connector in Base44
Once you have your OAuth app details, add the connector from your workspace settings or from the AI chat in a specific app.Adding the connector from your workspace
Add the connector from your workspace settings and enter the required details. To add a connector from your workspace:- Click your profile icon.
- Click Account settings.
- Click Connectors.
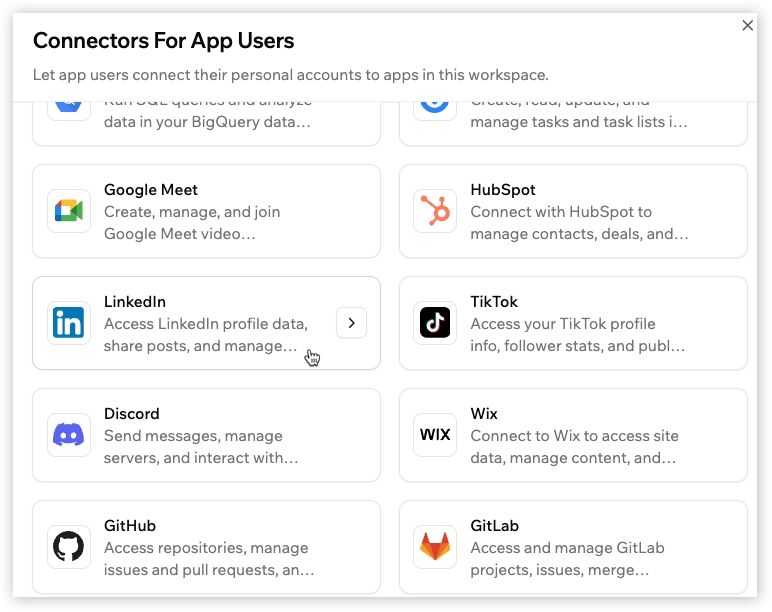
- Under Connectors For App Users, click Add Connector.
- Click the connector you want to add.
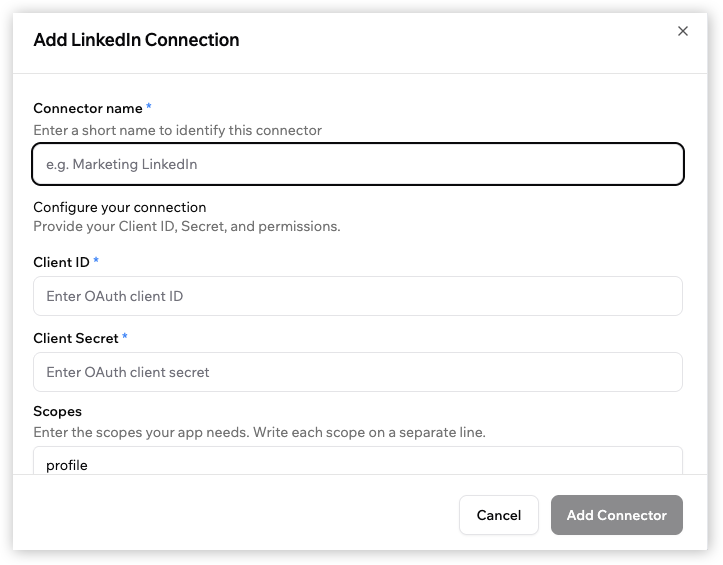
- Enter the following:
- Connector name: Enter a short name to identify this connector, for example
Google Calendar scheduling. - Client ID: Enter the Client ID from the OAuth app you created in the connected service.
- Client Secret: Enter the Client Secret from the same OAuth app.
- Scopes: Choose the scopes your app needs, or add your own in the Additional scopes field.
- Connector name: Enter a short name to identify this connector, for example
- Click Add Connector.
Adding the connector using the AI chat
You can also start from the AI chat in the app where you want to use the connector. To add a connector from the AI chat:- Open the app where you want to use the connector.
- Ask the AI chat to add a feature where each person connects their own account.
- Continue based on your connector status:
- Already set up: The AI chat uses the connector directly. No additional steps needed.
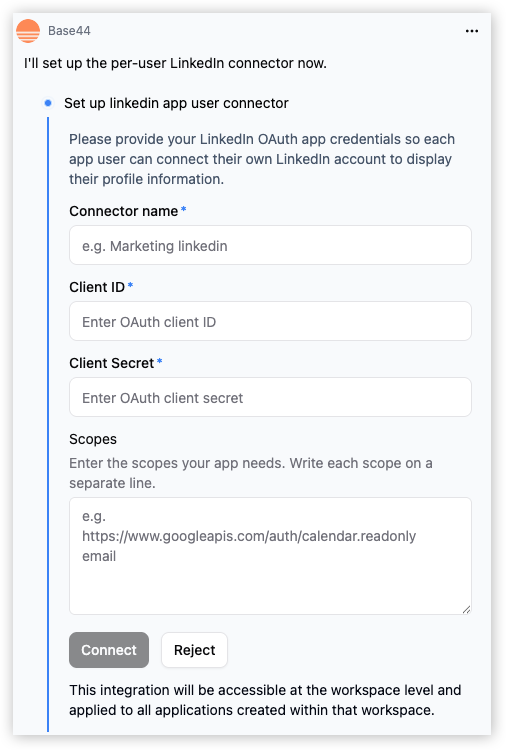
- Not set up yet: A callout appears above the form. Click View redirect URIs to see the redirect URIs for this app and add them to your OAuth provider. Then enter the Connector name, Client ID, Client Secret, and Scopes.
- Click Connect.
Using a connector in your app
Once the connector is set up, prompt the AI chat in the app you want to use it in to build a feature with that connector.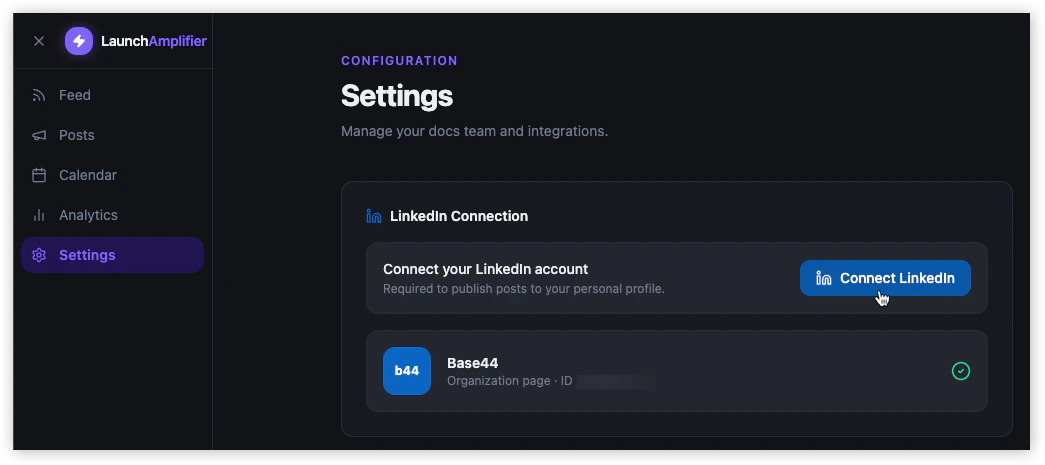
Managing connectors for app users
You can update or remove connectors at any time from the Connectors tab. Changes you make apply across all apps in your workspace.Editing an app user connector
Edit an app user connector to update its name, Client ID, Client Secret, or scopes.- Click your profile icon.
- Click Account settings.
- Click Connectors.
- Under Connectors For App Users, hover over the connector and click View.
- Hover over the connection name and click Edit.
- Update the fields.
- Click Save Changes.
Rotating credentials for an app user connector
Rotate credentials if the connected service asks you to update the OAuth app credentials, or if you need to replace the Client Secret used by the app user connector.- Existing connections continue to work until their access token expires. If you revoke the previous Client Secret in the connected service, people may be prompted to connect their account again from inside your app when their connection needs to refresh.
- The exact credential rotation steps depend on the connected service. Some services call this rotating, regenerating, or revoking a Client Secret.
- Go to the developer account for the relevant service, such as Google, Slack, Notion, or another connected service.
- Find the OAuth app you created for your Base44 connector.
- Open the OAuth or app settings.
- Revoke, rotate, or generate a new Client Secret for the OAuth app.
- In Base44, click your profile icon.
- Click Account settings.
- Click Connectors.
- Under Connectors For App Users, hover over the connector and click View.
- Hover over the connection name and click Edit.
- Update the Client Secret field.
- Click Save Changes.
Deleting an app user connector
Delete an app user connector if you no longer want it to be available across apps in your workspace. To delete an app user connector:- Click your profile icon.
- Click Account settings.
- Click Connectors.
- Under Connectors For App Users, hover over the connector and click View.
- Hover over the connection name and click Edit.
- Click Delete Connector.
- Click Delete Connector again to confirm.

Troubleshooting
Click a topic below to troubleshoot app user connector setup.Redirect URI mismatch
Redirect URI mismatch
- Open the OAuth app in the connected service.
- Go to the redirect URI, callback URL, or authorized redirect URI settings.
- Check that the URL matches your Base44 callback URL exactly.
- Check whether your app uses a custom domain.
- Check whether you are testing in preview.
- Add the correct live, preview, or custom domain callback URL.
- Save the OAuth app settings.
- Try connecting again from your app.
Preview connection not working
Preview connection not working
- Open the OAuth app in the connected service.
- Go to the redirect URI, callback URL, or authorized redirect URI settings.
- Add the preview redirect URI for your app.
- Save the OAuth app settings.
- Open your app preview.
- Sign in as someone using the app.
- Try connecting again.
Invalid Client ID or Client Secret
Invalid Client ID or Client Secret
- Open the OAuth app in the connected service.
- Copy the Client ID again.
- Copy the Client Secret again.
- Go back to Base44.
- Edit the connector.
- Paste the updated values.
- Click Save Changes.
Missing or incorrect scopes
Missing or incorrect scopes
- Check the connected service’s OAuth documentation.
- Confirm which scopes your app needs.
- Copy the scopes exactly as shown in the service’s documentation.
- Add each scope on a separate line in Base44.
- Save the connector.
- Ask people who already connected to connect their account again from inside your app and approve the updated permissions.
OAuth app is still in testing mode
OAuth app is still in testing mode
- Open the OAuth app in the connected service.
- Check whether the app is in testing, development, or unpublished mode.
- Add test users if the service requires it.
- Publish or verify the OAuth app if needed.
- Try connecting again from your app.
FAQs
What is the difference between user connectors and shared connectors?
What is the difference between user connectors and shared connectors?
Why do I need to create an OAuth app in the connected service?
Why do I need to create an OAuth app in the connected service?
Where do I find the Client ID and Client Secret?
Where do I find the Client ID and Client Secret?
What are scopes?
What are scopes?
Which redirect URI should I use?
Which redirect URI should I use?
Do I need to add the preview redirect URI?
Do I need to add the preview redirect URI?
What happens if the connector is already set up in my workspace?
What happens if the connector is already set up in my workspace?
Why is the AI chat asking me to choose a connector type?
Why is the AI chat asking me to choose a connector type?
- Shared: Choose this if you want one account to power the feature for everyone in the app.
- Per-user: Choose this if each person should connect their own account.
Can I add more than one connector of the same type?
Can I add more than one connector of the same type?
What happens if I change the scopes for a connector?
What happens if I change the scopes for a connector?
What happens if I rotate the Client Secret for a connector?
What happens if I rotate the Client Secret for a connector?
What happens if someone's connected account is disconnected?
What happens if someone's connected account is disconnected?
Can people disconnect their account?
Can people disconnect their account?
Are app user tokens stored securely?
Are app user tokens stored securely?