

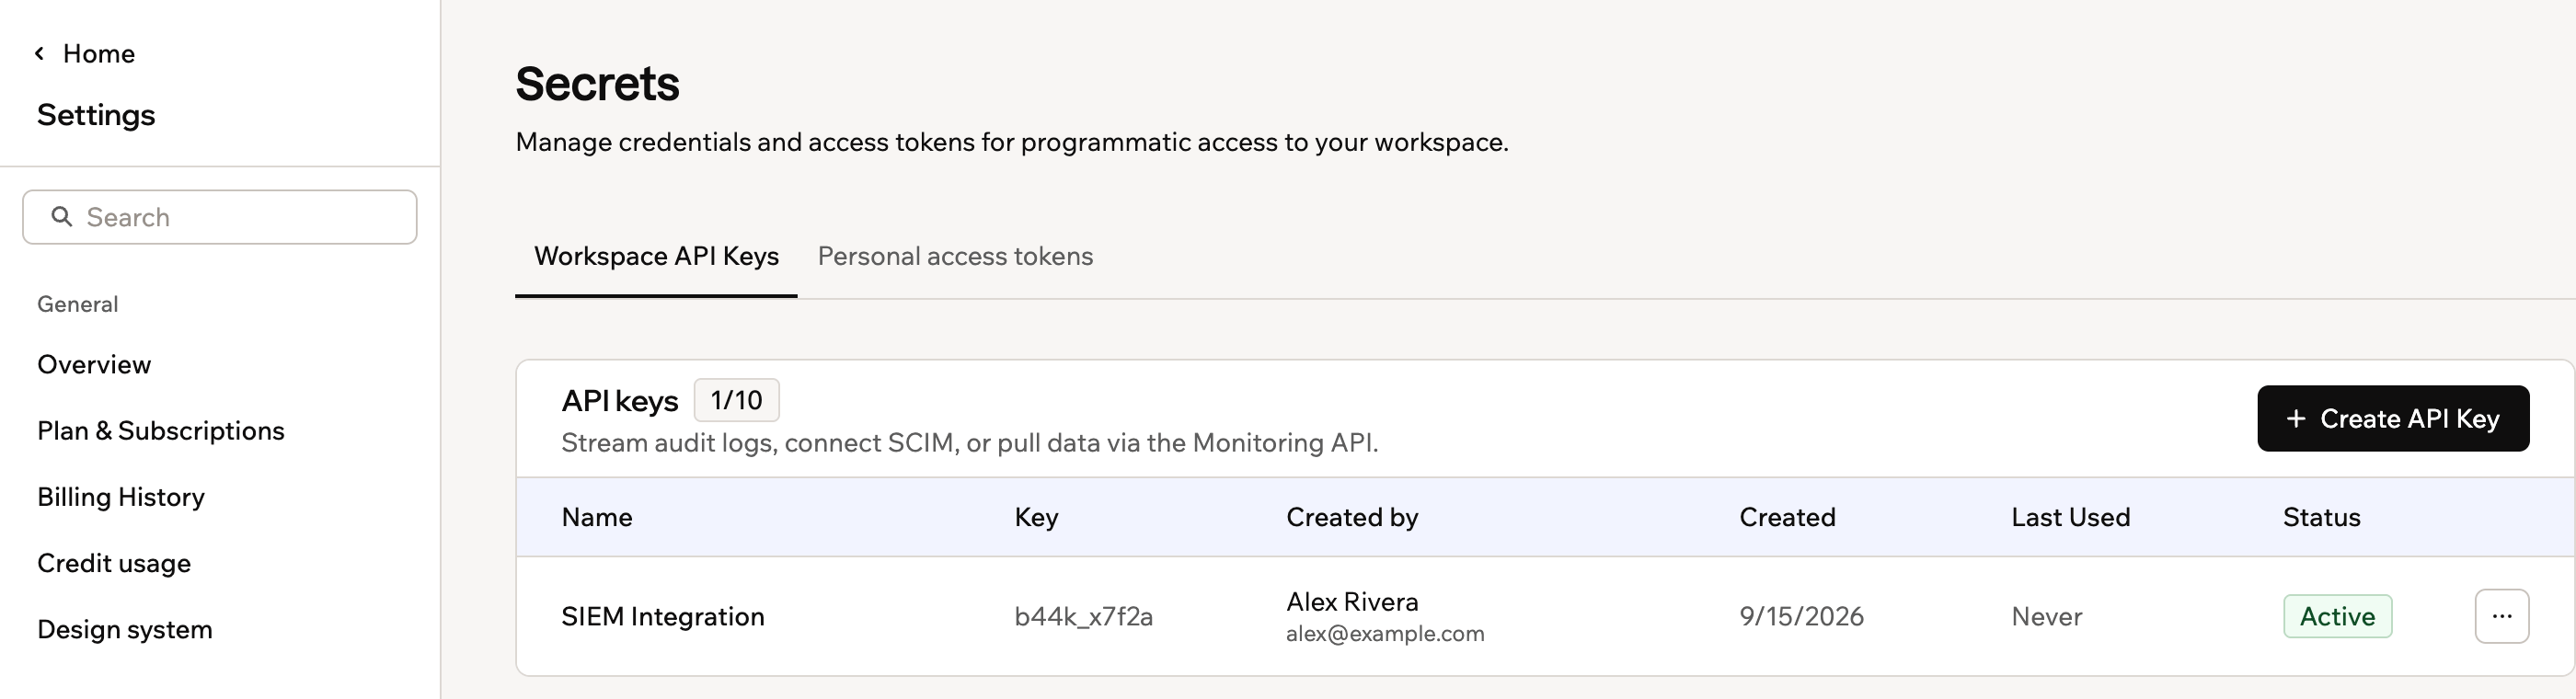
Workspace API keys on the Secrets page
Creating an API key
You can create up to 10 API keys per workspace. To create an API key:- Click your workspace name at the bottom left and click Settings.
- Click Secrets in the sidebar.
- Click + Create API Key.
- Enter a name for the key (required) and an optional description.
- Under Permissions, select the scopes this key should have. See Choosing permissions for what each one grants.
- If you select Deploy apps, set its App access to Selected apps and choose the apps, or to All current and future apps.
- Click Create Key.
- Copy the key and store it somewhere safe.
- Click Done.
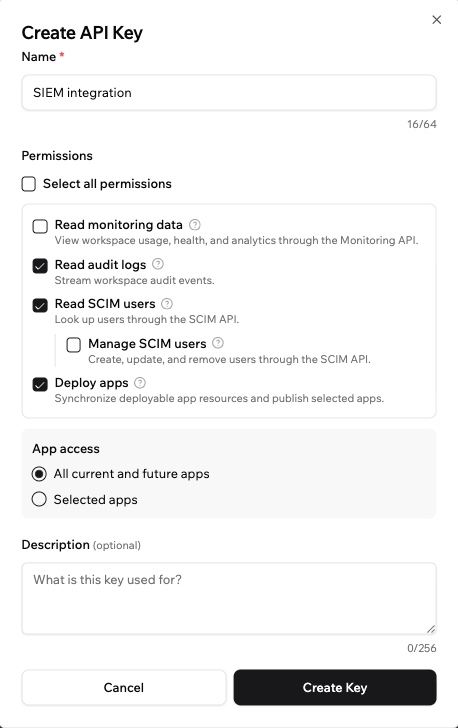
Creating an API key for your workspace
Choosing permissions
Each API key has one or more permissions, called scopes, that control which parts of your workspace it can access. Give a key only the permissions the integration needs.
For the Deploy apps, Provision app users, and Mint embed sign-in tokens permissions, choose which apps the key can reach:
- Selected apps: The key can only deploy the specific apps you choose.
- All current and future apps: The key can deploy any app in the workspace, including apps you add later.
You can make changes to a key at any time. To update its name, description, or permissions, edit the key from the Secrets page.
Managing your API keys
From the Secrets page, you can view all your keys along with who created them, when they were created, and when they were last used. Click the More actions icon next to a key to edit, disable, or delete it.Creating, editing, enabling, disabling, and deleting a key are all recorded in your workspace audit logs, and actions taken with a key are attributed to it.
- Click your workspace name at the bottom left and click Settings.
- Click Secrets in the sidebar.
- Click the More actions icon next to the key you want to manage and select an option:
- Edit: Update the key’s name, description, or permissions.
- Disable key: Temporarily prevent the key from being used without deleting it.
- Enable key: Re-enable a previously disabled key.
- Delete key: Permanently remove the key. This cannot be undone, and anything using that key stops working straight away.
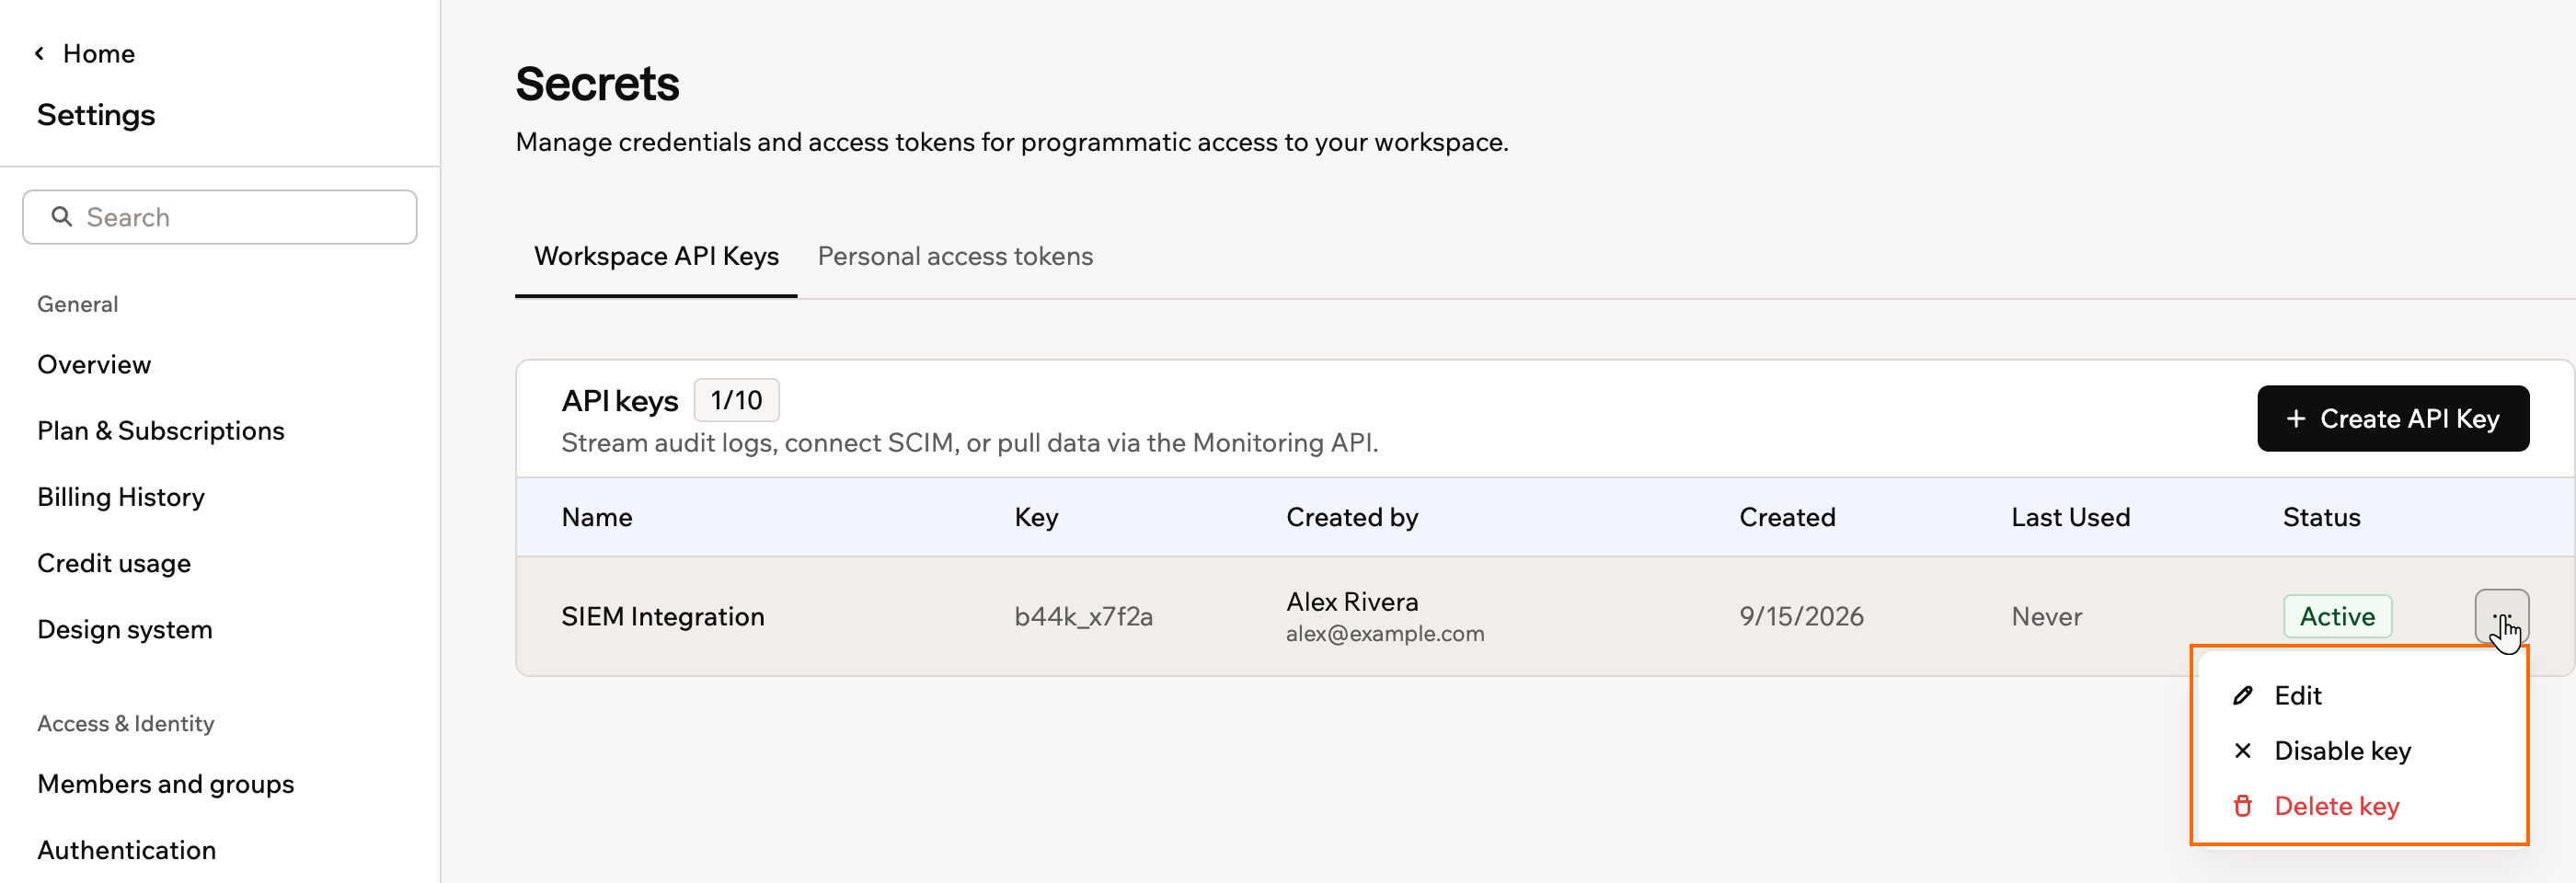
Managing an existing workspace API key
Blocking personal account API keys
Alongside the workspace keys you create here, every Base44 user has their own personal account API key. While someone is a member of your workspace, their personal key can reach your workspace’s apps and data. You can block personal keys so that only workspace API keys, which admins create and manage, can be used. You can do this whether or not your workspace uses SSO. It is especially useful if you require SSO for all workspace members, because it closes the gap between how people sign in and how they can reach your data programmatically.Before you turn this on:
- Blocking personal account API keys requires the Enterprise plan.
- The setting shows how many requests used a personal account API key against your workspace in the last 30 days, and how many members are actively using their keys, so you can see who this affects. You can review the full list in your audit logs.
- Workspace API keys are not affected, so anything built on an admin-managed key keeps working.
- App users signing in to your published apps are not affected.
- Click your workspace name at the bottom left of your account.
- Click Settings.
- Click Governance.
- Turn on Block account API keys.

Blocking personal account API keys for your workspace
Governing personal access tokens
Members can create personal access tokens to let their own scripts and tools reach your workspace’s apps. A token acts as the member who made it and never exceeds their own permissions, and it stops working when they leave the workspace. As an admin you decide whether tokens may be used in your workspace at all, and how much a token is allowed to do. The controls sit in the Enable personal access tokens card on the Governance page, and every member token created for the workspace is listed in Secrets.What to know before you set a policy:
- Governing members’ tokens requires the Enterprise plan. Creating and using tokens works on every plan, so without this control members can still make them.
- Turning the card off suspends every member token immediately. Nothing a member built on one works until you turn it back on.
- Tightening a limit does not break tokens retroactively. A token that no longer fits is marked Doesn’t meet policy and keeps working until someone disables it, so you choose when to cut it off.
- A member cannot re-enable a token that misses the policy, and cannot pick an option the policy does not allow when creating a new one.
Setting the access token policy
The card carries a switch for tokens as a whole, and 2 limits that cap what any token may be. Each limit names the most a token is allowed to be, so choosing Read-only means nobody can create a token that changes data.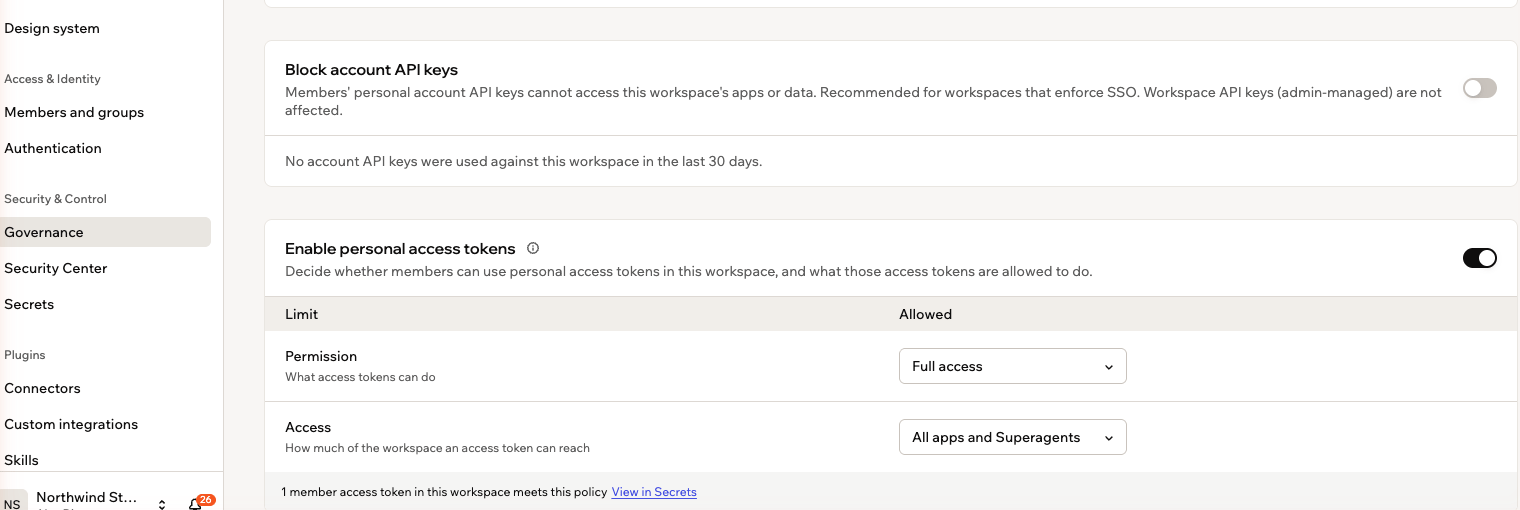
The access token policy on Governance, with the limits that cap what a token may be
- Click your workspace name at the bottom left of your account.
- Click Settings.
- Click Governance.
- Turn the Enable personal access tokens toggle on or off.
- Next to Permission, choose the most a token may do: Full access or Read-only.
- Next to Access, choose how much of the workspace a token may reach: All apps and Superagents or One app or Superagent.
Reviewing members’ access tokens
The card’s footnote counts the member tokens that meet your policy and links straight to the full list. In Secrets, the Personal access tokens in this workspace table is admin only, and shows each token’s owner, access, permission, status, and when it was last used. You can disable or delete any of them, but you cannot change one, since it belongs to the member who made it.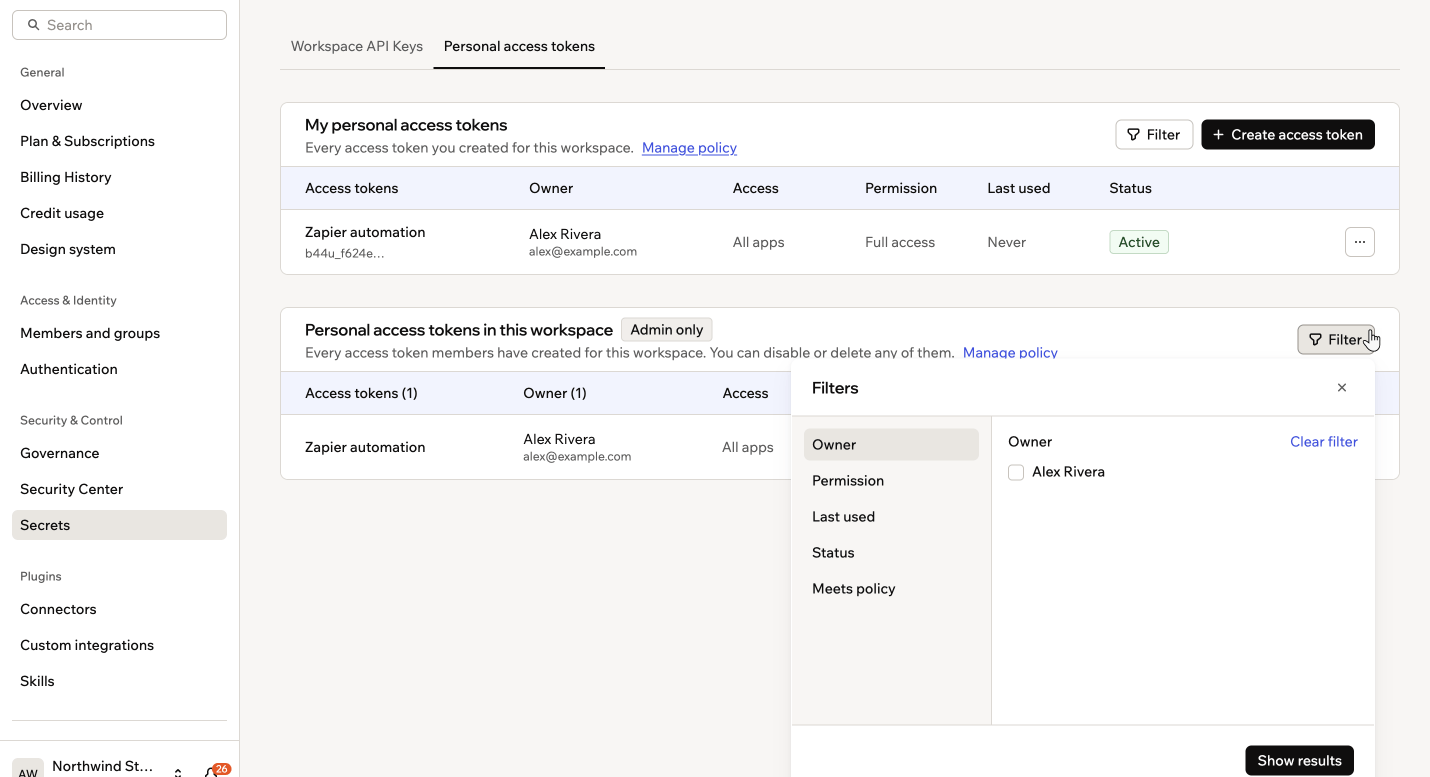
Filtering member access tokens, including by whether they meet your policy
- Click your workspace name at the bottom left of your account.
- Click Settings.
- Click Secrets, then click the Personal access tokens tab.
- Under Personal access tokens in this workspace, click Filter to narrow the list by permission, last used, status, or whether a token meets your policy.
- Next to a token, click the More actions icon and click Disable or Delete.