> ## Documentation Index
> Fetch the complete documentation index at: https://docs.base44.com/llms.txt
> Use this file to discover all available pages before exploring further.
# Creating a Superagent
> Create a Superagent, start chatting, and customize how it looks and works.
Create a [Superagent](https://base44.com/superagents) to handle work, set up automations, and manage everything from a single place. Describe what you want, and your Superagent takes action for you across your tools.
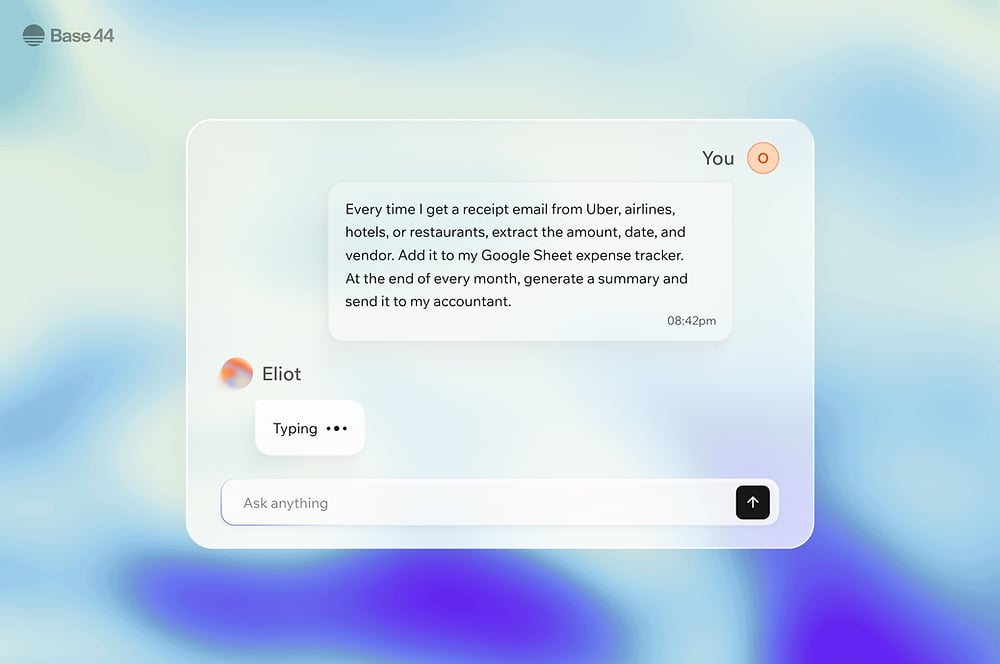 ***
## Step 1 | Start chatting with your Superagent
Create your Superagent by starting a conversation. Describe what you want it to do, then keep chatting to refine results, ask follow-up questions, or trigger actions. You can reply to messages from your Superagent, and copy its response. You can upload files, paste images, and attach videos and GIFs in chat.
***
## Step 1 | Start chatting with your Superagent
Create your Superagent by starting a conversation. Describe what you want it to do, then keep chatting to refine results, ask follow-up questions, or trigger actions. You can reply to messages from your Superagent, and copy its response. You can upload files, paste images, and attach videos and GIFs in chat.
 **To create your Superagent:**
1. Log in to [Base44](https://app.base44.com/).
2. Click **Superagents**.
3. Click **Create a new Superagent**.
4. Describe what you want your Superagent to do.
**For example:**
```text theme={null}
Create a product for my store based on this idea
```
```text theme={null}
Review my latest leads and suggest who to follow up with
```
```text theme={null}
Generate a report from my Google Sheets data
```
To switch to another Superagent or create a new one, click the dropdown next to your Superagent's name at the top of the editor.
### Use voice mode
Use voice mode to talk to your Superagent in real time instead of typing. You can turn your camera on or off, switch between your front and rear camera, and share your screen. Voice sessions pick up context from your last 10 text messages, so your Superagent knows what you have already discussed. Long voice calls reconnect automatically so you can keep talking without restarting the session.
**To start a voice call:**
1. Make sure the chat message box is empty.
2. Click the **Use voice** button in the chat input.
3. Chat with your Superagent.
Screen sharing is available on desktop browsers only. Camera sharing works on desktop and mobile.
Be mindful about what you say or show during a call. Base44 does not store recordings of your voice, screen, or camera. Voice transcripts are saved as messages in your chat history and persist across page refreshes, alongside your text messages.
***
## Step 2 | Connect plugins and add skills
Connect tools your Superagent can use, and add skills that extend what it can do. Connectors let your Superagent work with apps like Gmail, Google Drive, Notion, GitHub, and Slack. Skills add reusable prompts and workflows your Superagent can use on demand.
### Connect tools
You can connect tools directly, or describe what you want to do in chat and let your Superagent suggest the right connector.
**To add a connector:**
1. Click **Plugins** in the sidebar.
2. Browse or search for the connector you want to use.
3. Click **Connect** on the relevant connector.
4. Click **Connect** again to confirm.
5. Choose the account you want to connect.
6. Review the sign-in details and click **Continue**.
7. Review the requested permissions and click **Allow**.
After you connect a tool, your Superagent can use it in chat and suggest relevant actions based on that connection.
### Manage connected tools
Manage how a connected tool behaves and what access your Superagent has to it.
**To manage a connected tool:**
1. Click **Plugins** in the sidebar.
2. Find the connector under **Apps connected**.
3. Click the **More actions** icon.
4. Choose what you want to do:
* **Switch to read-only:** Limit access to viewing data.
* **Switch to manage:** Allow creating or updating data.
* **Switch account:** Change the connected account.
* **Disconnect:** Temporarily disable access.
* **Remove:** Remove the connector.
### Add skills
Skills are reusable sets of instructions that help your Superagent complete specific types of work more consistently. Use them to guide workflows, work better with connected tools, and avoid repeating the same instructions in chat.
You can activate recommended skills for your Superagent, browse the skills catalog, create your own skill in chat, or upload a skill file.
**To create your Superagent:**
1. Log in to [Base44](https://app.base44.com/).
2. Click **Superagents**.
3. Click **Create a new Superagent**.
4. Describe what you want your Superagent to do.
**For example:**
```text theme={null}
Create a product for my store based on this idea
```
```text theme={null}
Review my latest leads and suggest who to follow up with
```
```text theme={null}
Generate a report from my Google Sheets data
```
To switch to another Superagent or create a new one, click the dropdown next to your Superagent's name at the top of the editor.
### Use voice mode
Use voice mode to talk to your Superagent in real time instead of typing. You can turn your camera on or off, switch between your front and rear camera, and share your screen. Voice sessions pick up context from your last 10 text messages, so your Superagent knows what you have already discussed. Long voice calls reconnect automatically so you can keep talking without restarting the session.
**To start a voice call:**
1. Make sure the chat message box is empty.
2. Click the **Use voice** button in the chat input.
3. Chat with your Superagent.
Screen sharing is available on desktop browsers only. Camera sharing works on desktop and mobile.
Be mindful about what you say or show during a call. Base44 does not store recordings of your voice, screen, or camera. Voice transcripts are saved as messages in your chat history and persist across page refreshes, alongside your text messages.
***
## Step 2 | Connect plugins and add skills
Connect tools your Superagent can use, and add skills that extend what it can do. Connectors let your Superagent work with apps like Gmail, Google Drive, Notion, GitHub, and Slack. Skills add reusable prompts and workflows your Superagent can use on demand.
### Connect tools
You can connect tools directly, or describe what you want to do in chat and let your Superagent suggest the right connector.
**To add a connector:**
1. Click **Plugins** in the sidebar.
2. Browse or search for the connector you want to use.
3. Click **Connect** on the relevant connector.
4. Click **Connect** again to confirm.
5. Choose the account you want to connect.
6. Review the sign-in details and click **Continue**.
7. Review the requested permissions and click **Allow**.
After you connect a tool, your Superagent can use it in chat and suggest relevant actions based on that connection.
### Manage connected tools
Manage how a connected tool behaves and what access your Superagent has to it.
**To manage a connected tool:**
1. Click **Plugins** in the sidebar.
2. Find the connector under **Apps connected**.
3. Click the **More actions** icon.
4. Choose what you want to do:
* **Switch to read-only:** Limit access to viewing data.
* **Switch to manage:** Allow creating or updating data.
* **Switch account:** Change the connected account.
* **Disconnect:** Temporarily disable access.
* **Remove:** Remove the connector.
### Add skills
Skills are reusable sets of instructions that help your Superagent complete specific types of work more consistently. Use them to guide workflows, work better with connected tools, and avoid repeating the same instructions in chat.
You can activate recommended skills for your Superagent, browse the skills catalog, create your own skill in chat, or upload a skill file.
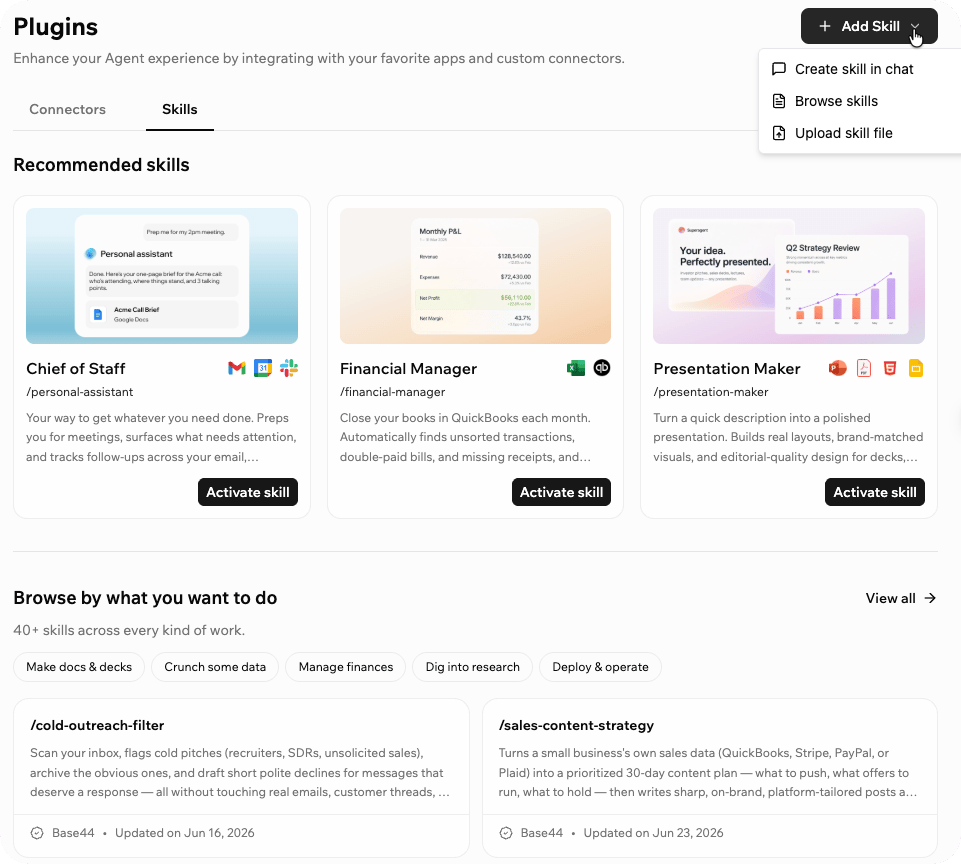 **To add a skill:**
1. Click **Plugins** in the sidebar.
2. Click the **Skills** tab.
3. Choose how you want to add a skill:
* **Recommended skills:** Click **Activate skill** on a recommended skill.
* **Skills catalog:** Click **View all**, select a skill, and click **Activate skill**.
* **Create your own skill:** Click **+ Add Skill** and select **Create skill in chat**.
* **Upload a skill file:** Click **+ Add Skill** and select **Upload skill file**.
**To manage an activated skill:**
1. Click **Plugins** in the sidebar.
2. Click the **Skills** tab.
3. Click a skill under **Activated skills**.
4. Choose what you want to do:
* **Edit the skill:** Update the skill instructions and click **Save Skill**.
* **Download the skill:** Click **Download** to save the skill file.
* **Remove the skill:** Click **Delete**.
* Removing a skill only affects this Superagent. Other Superagents in your workspace are not affected.
* You can add skills from the catalog again at any time.
* Skills you created or uploaded yourself are permanently deleted and cannot be recovered.
***
## Step 3 | Add files and review memory
Add files your Superagent can use as reference, and review the memory it keeps from your conversations.
### Upload files
Upload documents, spreadsheets, PDFs, and other files your Superagent can read and reference during conversations. You can upload files directly in chat or from **Files**.
**To upload a file from Files:**
1. Click **Files** in the sidebar.
2. Click **Add New**.
3. Choose what you want to do:
* **Upload file:** Upload a single file.
* **Upload folder:** Upload a folder of files.
* **New folder:** Create a folder to organize your files.
To download an entire folder as a zip file, click the **More actions** icon next to the folder and select **Download**.
You can also attach files directly in chat by clicking the attachment icon in the chat input.
### Review memory
Memory stores what your Superagent knows about you and your conversations so it can respond with more context over time.
**To review memory:**
1. Click **Memory** in the sidebar.
2. Review the memory sections:
* **Short-term memory:** Context from the current conversation, updated automatically every few messages.
* **Saved facts:** Key facts that persist across all conversations. You can add, edit, or remove these at any time.
* **Daily sessions:** A summary of each day's conversations, shown as a calendar you can browse.
### View and manage data
Each table in your Superagent holds a type of record you can open, edit, export, and manage without leaving your workspace.
**To view your data:**
1. Click **Data** in the sidebar.
2. Click a table to open it, or click the **More actions** icon on a table to choose an action:
* **View Data:** Open the table to browse its records.
* **Export:** Download the table's records as a CSV file.
* **Schema:** View the table's fields and structure.
* **Recently Deleted:** Review and restore records moved to the trash.
* **Delete All:** Move all records in the table to the trash. You can restore them from Recently Deleted.
To add a record, open a table and click **Add Item**, then fill in the fields and click **Submit**. To edit a record, click it and update its fields.
***
## Step 4 | Customize your Superagent
Customize how your Superagent looks, behaves, remembers context, uses permissions, and connects to external systems.
**To add a skill:**
1. Click **Plugins** in the sidebar.
2. Click the **Skills** tab.
3. Choose how you want to add a skill:
* **Recommended skills:** Click **Activate skill** on a recommended skill.
* **Skills catalog:** Click **View all**, select a skill, and click **Activate skill**.
* **Create your own skill:** Click **+ Add Skill** and select **Create skill in chat**.
* **Upload a skill file:** Click **+ Add Skill** and select **Upload skill file**.
**To manage an activated skill:**
1. Click **Plugins** in the sidebar.
2. Click the **Skills** tab.
3. Click a skill under **Activated skills**.
4. Choose what you want to do:
* **Edit the skill:** Update the skill instructions and click **Save Skill**.
* **Download the skill:** Click **Download** to save the skill file.
* **Remove the skill:** Click **Delete**.
* Removing a skill only affects this Superagent. Other Superagents in your workspace are not affected.
* You can add skills from the catalog again at any time.
* Skills you created or uploaded yourself are permanently deleted and cannot be recovered.
***
## Step 3 | Add files and review memory
Add files your Superagent can use as reference, and review the memory it keeps from your conversations.
### Upload files
Upload documents, spreadsheets, PDFs, and other files your Superagent can read and reference during conversations. You can upload files directly in chat or from **Files**.
**To upload a file from Files:**
1. Click **Files** in the sidebar.
2. Click **Add New**.
3. Choose what you want to do:
* **Upload file:** Upload a single file.
* **Upload folder:** Upload a folder of files.
* **New folder:** Create a folder to organize your files.
To download an entire folder as a zip file, click the **More actions** icon next to the folder and select **Download**.
You can also attach files directly in chat by clicking the attachment icon in the chat input.
### Review memory
Memory stores what your Superagent knows about you and your conversations so it can respond with more context over time.
**To review memory:**
1. Click **Memory** in the sidebar.
2. Review the memory sections:
* **Short-term memory:** Context from the current conversation, updated automatically every few messages.
* **Saved facts:** Key facts that persist across all conversations. You can add, edit, or remove these at any time.
* **Daily sessions:** A summary of each day's conversations, shown as a calendar you can browse.
### View and manage data
Each table in your Superagent holds a type of record you can open, edit, export, and manage without leaving your workspace.
**To view your data:**
1. Click **Data** in the sidebar.
2. Click a table to open it, or click the **More actions** icon on a table to choose an action:
* **View Data:** Open the table to browse its records.
* **Export:** Download the table's records as a CSV file.
* **Schema:** View the table's fields and structure.
* **Recently Deleted:** Review and restore records moved to the trash.
* **Delete All:** Move all records in the table to the trash. You can restore them from Recently Deleted.
To add a record, open a table and click **Add Item**, then fill in the fields and click **Submit**. To edit a record, click it and update its fields.
***
## Step 4 | Customize your Superagent
Customize how your Superagent looks, behaves, remembers context, uses permissions, and connects to external systems.
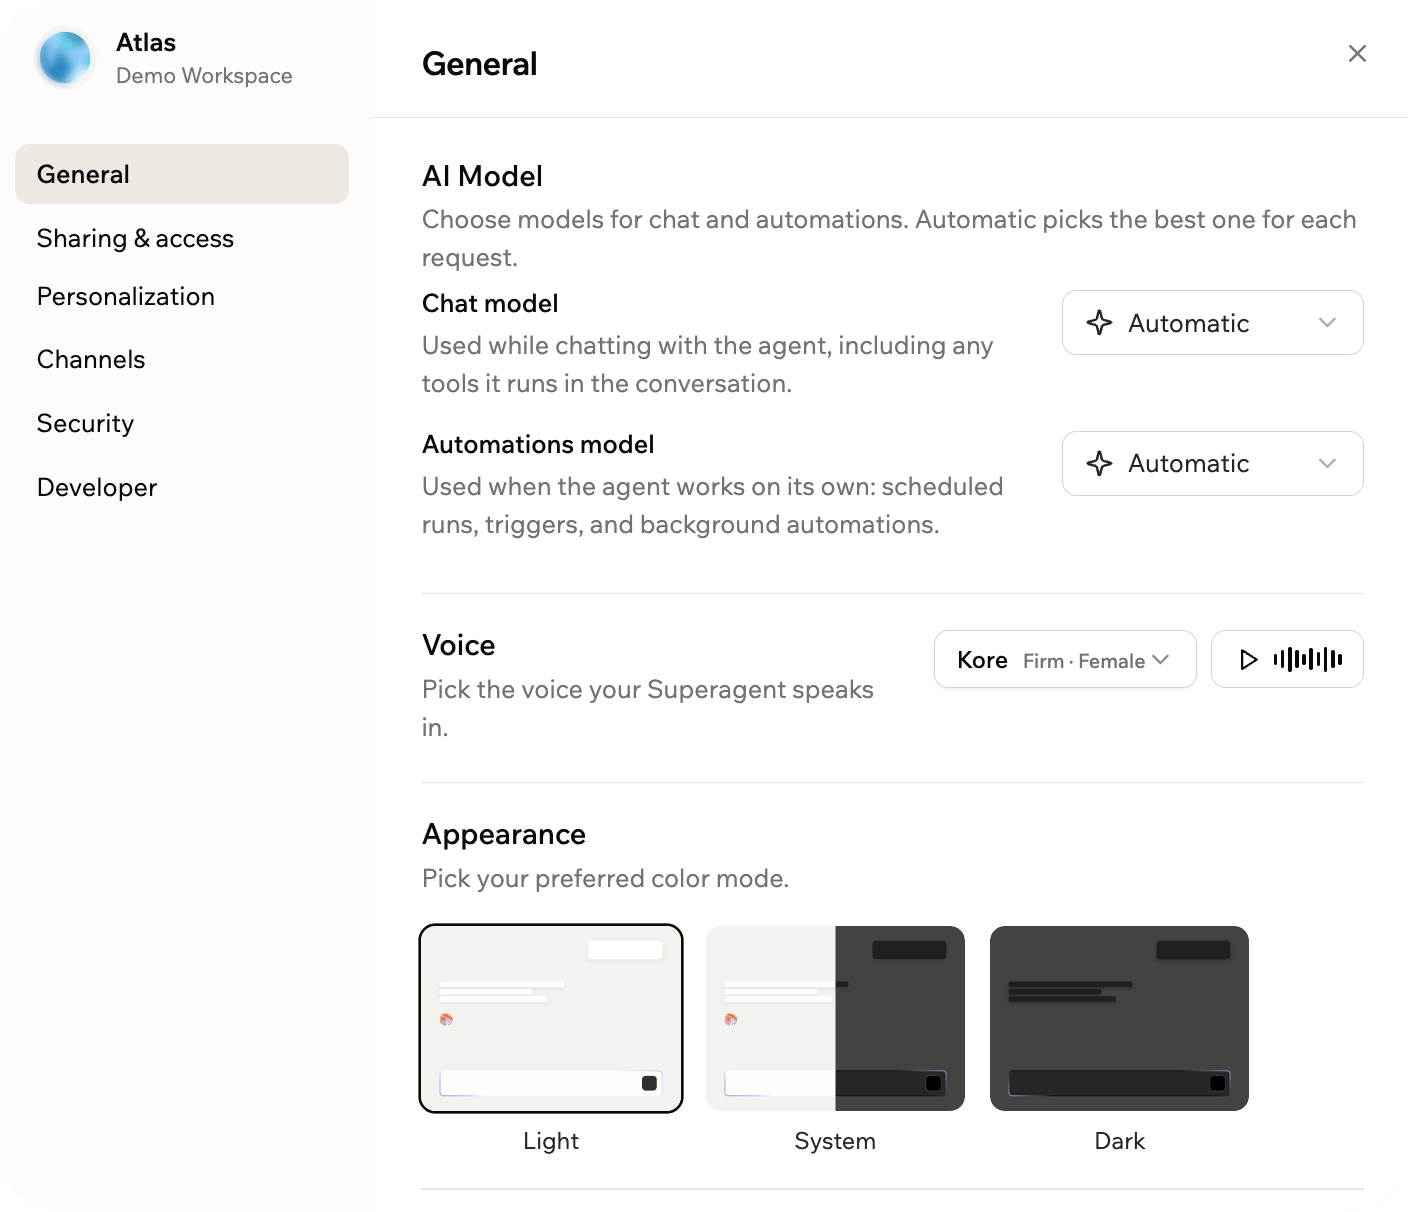 **To customize your Superagent:**
1. Click **Customize** in the sidebar.
2. Set up your Superagent using these tabs:
* **General:** Choose your chat model, automations model, voice, and appearance.
* **Sharing & access:** Invite collaborators and create a public template link.
* **Personalization:** Update your Superagent's identity and review memory.
* **Channels:** Connect supported messaging channels like WhatsApp, Telegram, iMessage, Slack, and LINE.
* **Security:** Configure permissions and secrets.
* **Developer:** View API details and manage webhooks.
For endpoint details, request examples, webhooks, and setup files, click **Developer** and then click **View full API documentation**.
### Connect messaging channels
Connect your Superagent to a channel to chat with it on WhatsApp, Telegram, iMessage, Slack, and LINE.
To set up channels for your Superagent, see [Customizing your Superagent](/superagents/customizing-your-superagent#connecting-channels).
### Webhooks
Use webhooks to receive real-time notifications when your Superagent receives a message or finishes a reply. Use them when you want your backend to react to Superagent activity without repeatedly checking the API.
**To add a webhook:**
1. Click **Customize**.
2. Click **Developer**.
3. Click **View full API documentation**.
4. Scroll to **Your webhooks** and click **Add webhook**.
5. Enter your endpoint in the **Target URL** field.
6. (Optional) Enter a description in the **Description** field.
7. Select which **Events** to send:
* `message.created`: Sent when a message is received.
* `message.completed`: Sent when your Superagent's reply is ready.
8. Select **Sign requests with an HMAC secret (optional)** if you want to verify that webhook requests came from Base44.
9. Click **Create**. If you selected **Sign requests with an HMAC secret**, copy and store the signing secret when it is displayed.
10. Click **Send test payload** to test your webhook.
The signing secret is displayed once after you create the webhook. Copy and store it before closing the dialog.
***
## Step 5 | Set up automations
Create automations your Superagent can run on a schedule or when a trigger happens. You can set them up by describing what you want in chat or from the **Automations** page.
### Create automations
**To create an automation:**
1. Click **Automations** in the sidebar.
2. Click **+ New Automation**.
3. Browse the suggested automations by category, or describe what you want in chat.
4. Click **Send to chat** on the automation you want to set up.
5. Review the automation in chat and complete the setup.
You can also describe an automation directly in chat and let your Superagent set it up for you. All automations you create are saved on the **Automations** page under **Scheduled Automations** and **Triggered Automations**.
### Scheduled automations
Scheduled automations run at specific times, such as every morning, every Monday, or at the end of each day. You can filter them by **Active**, **Paused**, or **Completed**.
**For example:**
```text theme={null}
Every morning at 8 AM, summarize my unread Gmail emails and send me a digest.
```
### Triggered automations
Triggered automations run when a trigger happens, such as activity in a connected tool or changes to your data.
**For example:**
```text theme={null}
When I receive a new email in Gmail, check if it needs a reply and draft a response for me.
```
### Manage running automations
Your Superagent can control automation runs while they are in progress. If an automation is looping or not working as expected, your Superagent can pause or stop the run to prevent unnecessary credit usage.
If a scheduled automation stops working, it pauses automatically and you receive a notification. Review the automation and reactivate it once the issue is resolved.
***
## FAQs
Your Superagent can create content, analyze data, automate processes, respond to messages, manage products, and more. It adapts based on the tools you connect and the instructions you give it.
No. You can create and manage a Superagent using natural language. Your Superagent helps guide setup, suggests actions, and handles complexity behind the scenes.
Your Superagent only has access to the tools and data you connect. After you connect a tool, it understands what actions are possible and starts suggesting relevant automations based on that access.
Yes. Go to **Customize** and click **Security** to control whether your Superagent can update or delete data without asking first. You can also manage connector access from **Plugins**.
Yes. Your Superagent can run scheduled automations and triggered automations. You can set them up in chat or from the **Automations** page, and what your Superagent can do depends on the automations you create and the permissions you allow.
Yes. You can upload files directly in chat or from **Files**. Your Superagent can then use those files as reference while you work with it.
* **Short-term memory** captures context from the current conversation and updates automatically every few messages.
* **Saved facts** are key facts that persist across all conversations. You can add, edit, or remove them at any time.
* **Daily sessions** are summaries of each day's conversations, shown as a browsable calendar.
Yes. Your Superagent runs in a private environment and only accesses the data you allow. Your data is not used to train external models.
Yes. You can connect messaging channels like WhatsApp, Telegram, iMessage, Slack, and LINE to interact with your Superagent from anywhere. You can also interact with your Superagent using the Base44 app on [Android](https://play.google.com/store/apps/details?id=com.base44.android) or [iOS](https://apps.apple.com/us/app/base44-build-with-ai/id6757432427).
Yes. You can add collaborators to work with the same Superagent, or share your Superagent as a template so others can create their own copy.
When you share a Superagent as a template, you can choose whether to include skills, agent memory, files, and automations. Connectors are not included, and anyone who creates a copy must reconnect their own accounts and services.
Use the **All Agents** page to organize, share, clone, move, and delete your Superagents. For more information, see [Managing your Superagents](/superagents/managing-your-superagents).
Only workspace Owners and Admins can edit or remove skills. If you do not see these options, contact your workspace admin.
**To customize your Superagent:**
1. Click **Customize** in the sidebar.
2. Set up your Superagent using these tabs:
* **General:** Choose your chat model, automations model, voice, and appearance.
* **Sharing & access:** Invite collaborators and create a public template link.
* **Personalization:** Update your Superagent's identity and review memory.
* **Channels:** Connect supported messaging channels like WhatsApp, Telegram, iMessage, Slack, and LINE.
* **Security:** Configure permissions and secrets.
* **Developer:** View API details and manage webhooks.
For endpoint details, request examples, webhooks, and setup files, click **Developer** and then click **View full API documentation**.
### Connect messaging channels
Connect your Superagent to a channel to chat with it on WhatsApp, Telegram, iMessage, Slack, and LINE.
To set up channels for your Superagent, see [Customizing your Superagent](/superagents/customizing-your-superagent#connecting-channels).
### Webhooks
Use webhooks to receive real-time notifications when your Superagent receives a message or finishes a reply. Use them when you want your backend to react to Superagent activity without repeatedly checking the API.
**To add a webhook:**
1. Click **Customize**.
2. Click **Developer**.
3. Click **View full API documentation**.
4. Scroll to **Your webhooks** and click **Add webhook**.
5. Enter your endpoint in the **Target URL** field.
6. (Optional) Enter a description in the **Description** field.
7. Select which **Events** to send:
* `message.created`: Sent when a message is received.
* `message.completed`: Sent when your Superagent's reply is ready.
8. Select **Sign requests with an HMAC secret (optional)** if you want to verify that webhook requests came from Base44.
9. Click **Create**. If you selected **Sign requests with an HMAC secret**, copy and store the signing secret when it is displayed.
10. Click **Send test payload** to test your webhook.
The signing secret is displayed once after you create the webhook. Copy and store it before closing the dialog.
***
## Step 5 | Set up automations
Create automations your Superagent can run on a schedule or when a trigger happens. You can set them up by describing what you want in chat or from the **Automations** page.
### Create automations
**To create an automation:**
1. Click **Automations** in the sidebar.
2. Click **+ New Automation**.
3. Browse the suggested automations by category, or describe what you want in chat.
4. Click **Send to chat** on the automation you want to set up.
5. Review the automation in chat and complete the setup.
You can also describe an automation directly in chat and let your Superagent set it up for you. All automations you create are saved on the **Automations** page under **Scheduled Automations** and **Triggered Automations**.
### Scheduled automations
Scheduled automations run at specific times, such as every morning, every Monday, or at the end of each day. You can filter them by **Active**, **Paused**, or **Completed**.
**For example:**
```text theme={null}
Every morning at 8 AM, summarize my unread Gmail emails and send me a digest.
```
### Triggered automations
Triggered automations run when a trigger happens, such as activity in a connected tool or changes to your data.
**For example:**
```text theme={null}
When I receive a new email in Gmail, check if it needs a reply and draft a response for me.
```
### Manage running automations
Your Superagent can control automation runs while they are in progress. If an automation is looping or not working as expected, your Superagent can pause or stop the run to prevent unnecessary credit usage.
If a scheduled automation stops working, it pauses automatically and you receive a notification. Review the automation and reactivate it once the issue is resolved.
***
## FAQs
Your Superagent can create content, analyze data, automate processes, respond to messages, manage products, and more. It adapts based on the tools you connect and the instructions you give it.
No. You can create and manage a Superagent using natural language. Your Superagent helps guide setup, suggests actions, and handles complexity behind the scenes.
Your Superagent only has access to the tools and data you connect. After you connect a tool, it understands what actions are possible and starts suggesting relevant automations based on that access.
Yes. Go to **Customize** and click **Security** to control whether your Superagent can update or delete data without asking first. You can also manage connector access from **Plugins**.
Yes. Your Superagent can run scheduled automations and triggered automations. You can set them up in chat or from the **Automations** page, and what your Superagent can do depends on the automations you create and the permissions you allow.
Yes. You can upload files directly in chat or from **Files**. Your Superagent can then use those files as reference while you work with it.
* **Short-term memory** captures context from the current conversation and updates automatically every few messages.
* **Saved facts** are key facts that persist across all conversations. You can add, edit, or remove them at any time.
* **Daily sessions** are summaries of each day's conversations, shown as a browsable calendar.
Yes. Your Superagent runs in a private environment and only accesses the data you allow. Your data is not used to train external models.
Yes. You can connect messaging channels like WhatsApp, Telegram, iMessage, Slack, and LINE to interact with your Superagent from anywhere. You can also interact with your Superagent using the Base44 app on [Android](https://play.google.com/store/apps/details?id=com.base44.android) or [iOS](https://apps.apple.com/us/app/base44-build-with-ai/id6757432427).
Yes. You can add collaborators to work with the same Superagent, or share your Superagent as a template so others can create their own copy.
When you share a Superagent as a template, you can choose whether to include skills, agent memory, files, and automations. Connectors are not included, and anyone who creates a copy must reconnect their own accounts and services.
Use the **All Agents** page to organize, share, clone, move, and delete your Superagents. For more information, see [Managing your Superagents](/superagents/managing-your-superagents).
Only workspace Owners and Admins can edit or remove skills. If you do not see these options, contact your workspace admin.