> ## Documentation Index
> Fetch the complete documentation index at: https://docs.base44.com/llms.txt
> Use this file to discover all available pages before exploring further.
# Gmail コネクタを使用する
> Base44 アプリを Gmail に接続して、API キーを管理せずにメール送信、ダイジェスト作成、通知の自動化を行います。
## Gmail コネクタについて
[Gmail コネクタ](https://base44.com/integrations/connectors/gmail) を使用すると、アプリが単一の Gmail 接続を介してメールを送信できます。これを使って、Gmail アカウントから直接、アラート、承認、ダイジェスト、レポート、自動更新を配信します。
Gmail 接続はアプリ全体で共有されます。Gmail に接続すると、そのアプリに対して 1 つの Google アカウントを認可します。アプリを編集できる全員が共有 Gmail 接続と同じ Gmail 駆動のフローを使用します。
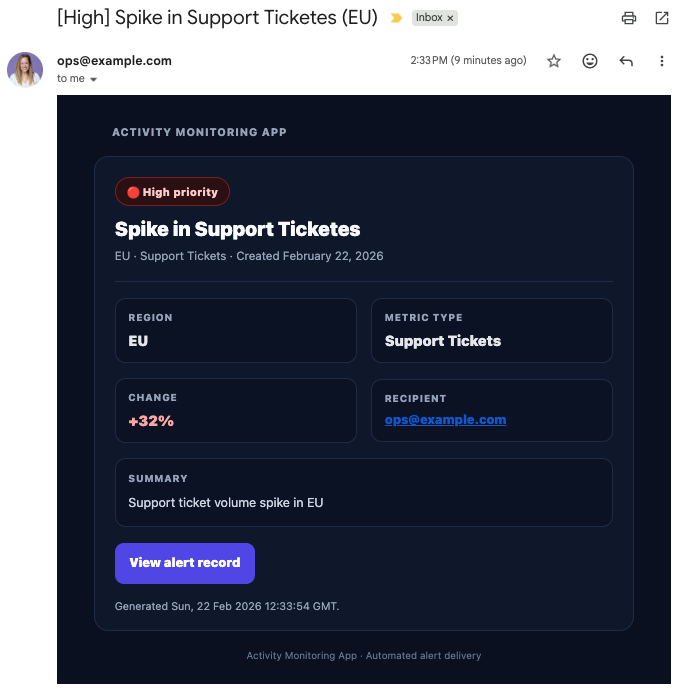 **重要:** コネクタはアプリレベルの共有接続です。アプリを使用する各ユーザーがそれぞれ自分の受信トレイを接続する必要がある場合は、Gmail コネクタを使用しないでください。ユーザーごとの Gmail アクセスには、バックエンド関数を使ったカスタム OAuth フローを作成してください。
***
## Gmail のユースケースとプロンプト
Gmail コネクタを使用して、コミュニケーションを自動化し、ステークホルダーに情報を提供し続け、アプリからシグナルの強いメール更新を生成します。
インシデント、承認、エスカレーション、失敗など、アプリで重要なイベントが発生したときにリアルタイムでメールを送信します。
**プロンプト例:**
```text theme={null}
Email me when a new high-priority ticket is created, including the ticket ID, title, and link.
```
```text theme={null}
Send an email to ops@company.com when an incident is opened, including severity and owner.
```
```text theme={null}
Notify a user by email when their document is approved, with a link to the document page.
```
```text theme={null}
Email me when ticket volume spikes above baseline, including count and top tags.
```
```text theme={null}
Send a deployment notification email with environment, version, and release notes.
```
アプリのアクティビティ、メトリクス、変更を要約する定期的なメールダイジェストを生成します。
**プロンプト例:**
```text theme={null}
Email me a daily summary at 5pm with new signups grouped by plan.
```
```text theme={null}
Send a weekly task report every Monday with completed and overdue items by assignee.
```
```text theme={null}
Email leadership a weekly KPI report with revenue, conversions, and churn.
```
```text theme={null}
Summarize the last 24 hours of activity in this app and email it to me.
```
```text theme={null}
Send a monthly performance report with key metrics and short explanations.
```
BigQuery、Google Sheets、Notion、HubSpot、その他の CRM など、接続されたシステムからのイベントに基づいて Gmail メッセージをトリガーします。
**プロンプト例:**
```text theme={null}
Send an email when a new row is added to my Google Sheet of customer feedback.
```
```text theme={null}
Email me when my BigQuery data agent detects a sudden drop in conversions.
```
```text theme={null}
Notify the team by email when a new Notion page is created for a client.
```
```text theme={null}
Send an email when a HubSpot deal moves to Closed Won with deal value and owner.
```
```text theme={null}
Email a weekly KPI summary pulling data from BigQuery.
```
AI チャットで自動メールを記述するときは、各メールを受信すべき相手、何がトリガーするか、メッセージ本文に含めるべき詳細を指定してください。
***
## アプリに Gmail を接続する
AI チャットを使用して Gmail に接続するか、アプリのダッシュボードから既製のプロンプトを使って接続します。
**始める前に:** アプリでコネクタを使用するには、[Builder プラン](https://base44.com/pricing) 以上が必要です。
### AI チャットを使用
1. アプリエディタに移動します。
2. AI チャットで Gmail を使って何をしたいかを記述します。例:
* `Connect this app to Gmail and email me when a new ticket is created.`
* `Send a daily summary email with completed tasks.`
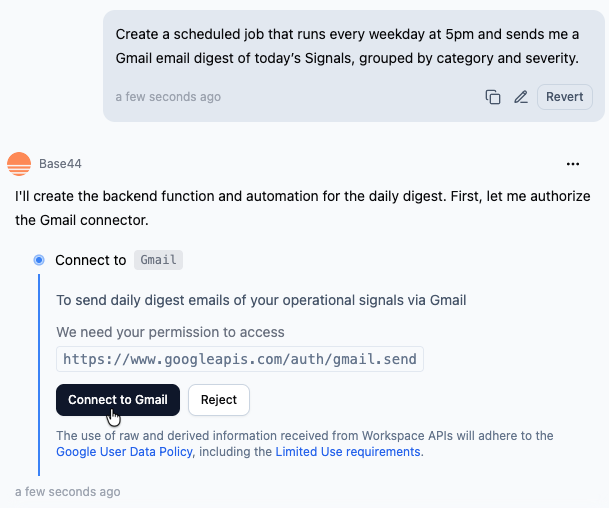
3. サイドパネルで **Action required** と **Required permissions** を確認します。
4. **Connect to Gmail** をクリックします。
5. 開いた Google ウィンドウで:
1. 接続したい Google アカウントを選択します。
2. 権限を確認して **Allow** をクリックします。
6. エディタに戻り、AI が Gmail を使用するフローの作成を完了するのを待ちます。
**重要:** コネクタはアプリレベルの共有接続です。アプリを使用する各ユーザーがそれぞれ自分の受信トレイを接続する必要がある場合は、Gmail コネクタを使用しないでください。ユーザーごとの Gmail アクセスには、バックエンド関数を使ったカスタム OAuth フローを作成してください。
***
## Gmail のユースケースとプロンプト
Gmail コネクタを使用して、コミュニケーションを自動化し、ステークホルダーに情報を提供し続け、アプリからシグナルの強いメール更新を生成します。
インシデント、承認、エスカレーション、失敗など、アプリで重要なイベントが発生したときにリアルタイムでメールを送信します。
**プロンプト例:**
```text theme={null}
Email me when a new high-priority ticket is created, including the ticket ID, title, and link.
```
```text theme={null}
Send an email to ops@company.com when an incident is opened, including severity and owner.
```
```text theme={null}
Notify a user by email when their document is approved, with a link to the document page.
```
```text theme={null}
Email me when ticket volume spikes above baseline, including count and top tags.
```
```text theme={null}
Send a deployment notification email with environment, version, and release notes.
```
アプリのアクティビティ、メトリクス、変更を要約する定期的なメールダイジェストを生成します。
**プロンプト例:**
```text theme={null}
Email me a daily summary at 5pm with new signups grouped by plan.
```
```text theme={null}
Send a weekly task report every Monday with completed and overdue items by assignee.
```
```text theme={null}
Email leadership a weekly KPI report with revenue, conversions, and churn.
```
```text theme={null}
Summarize the last 24 hours of activity in this app and email it to me.
```
```text theme={null}
Send a monthly performance report with key metrics and short explanations.
```
BigQuery、Google Sheets、Notion、HubSpot、その他の CRM など、接続されたシステムからのイベントに基づいて Gmail メッセージをトリガーします。
**プロンプト例:**
```text theme={null}
Send an email when a new row is added to my Google Sheet of customer feedback.
```
```text theme={null}
Email me when my BigQuery data agent detects a sudden drop in conversions.
```
```text theme={null}
Notify the team by email when a new Notion page is created for a client.
```
```text theme={null}
Send an email when a HubSpot deal moves to Closed Won with deal value and owner.
```
```text theme={null}
Email a weekly KPI summary pulling data from BigQuery.
```
AI チャットで自動メールを記述するときは、各メールを受信すべき相手、何がトリガーするか、メッセージ本文に含めるべき詳細を指定してください。
***
## アプリに Gmail を接続する
AI チャットを使用して Gmail に接続するか、アプリのダッシュボードから既製のプロンプトを使って接続します。
**始める前に:** アプリでコネクタを使用するには、[Builder プラン](https://base44.com/pricing) 以上が必要です。
### AI チャットを使用
1. アプリエディタに移動します。
2. AI チャットで Gmail を使って何をしたいかを記述します。例:
* `Connect this app to Gmail and email me when a new ticket is created.`
* `Send a daily summary email with completed tasks.`
3. サイドパネルで **Action required** と **Required permissions** を確認します。
4. **Connect to Gmail** をクリックします。
5. 開いた Google ウィンドウで:
1. 接続したい Google アカウントを選択します。
2. 権限を確認して **Allow** をクリックします。
6. エディタに戻り、AI が Gmail を使用するフローの作成を完了するのを待ちます。
 ### アプリダッシュボードから
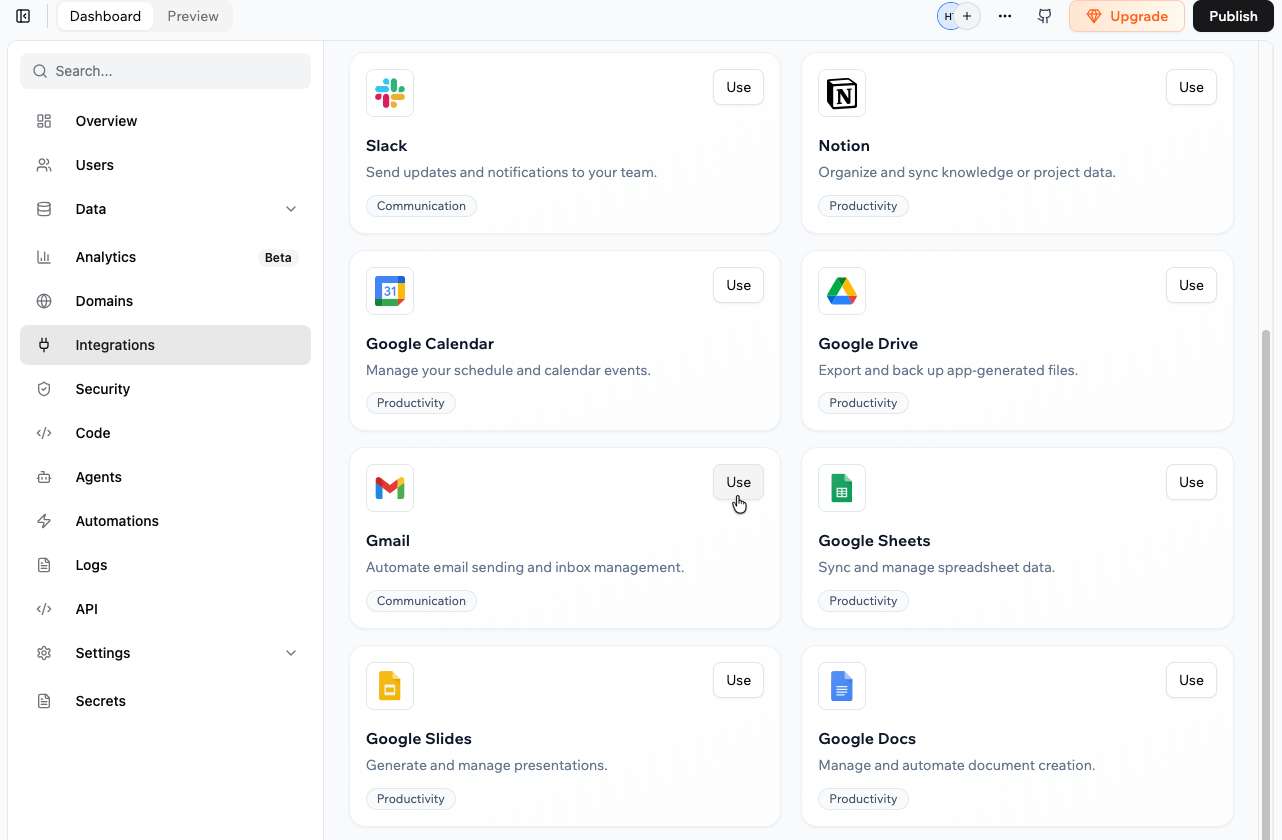
1. アプリエディタで **Dashboard** をクリックします。
2. **Integrations** をクリックします。
3. **Browse** タブをクリックします。
4. **Gmail** を見つけて **Use** をクリックします。
5. AI チャットに追加したい既製のプロンプトを選択します。
6. AI チャットで **Action required** と **Required permissions** を確認します。
7. **Connect to Gmail** をクリックします。
8. 開いた Google ウィンドウで:
1. 接続したい Google アカウントを選択します。
2. 権限を確認して **Allow** をクリックします。
9. エディタに戻り、AI が Gmail を使用するフローの作成を完了するのを待ちます。
### アプリダッシュボードから
1. アプリエディタで **Dashboard** をクリックします。
2. **Integrations** をクリックします。
3. **Browse** タブをクリックします。
4. **Gmail** を見つけて **Use** をクリックします。
5. AI チャットに追加したい既製のプロンプトを選択します。
6. AI チャットで **Action required** と **Required permissions** を確認します。
7. **Connect to Gmail** をクリックします。
8. 開いた Google ウィンドウで:
1. 接続したい Google アカウントを選択します。
2. 権限を確認して **Allow** をクリックします。
9. エディタに戻り、AI が Gmail を使用するフローの作成を完了するのを待ちます。
 Gmail 駆動の関数を作成したら、イベントをトリガーして期待通りのフォーマットとコンテンツでメールが届くことを確認することで、各フローをテストしてください。
Gmail 認可ウィンドウで **Skip** をクリックした場合、コネクタは追加されません。AI チャットまたは **Integrations → Browse** から接続フローを再実行できます。
***
## Gmail 接続を管理する
各アプリの Gmail コネクタは、アプリダッシュボードから確認・管理できます。
**Gmail コネクタを表示または更新するには:**
1. アプリダッシュボードに移動します。
2. **Integrations** をクリックします。
3. **My integrations** タブをクリックします。
4. **Gmail** を見つけて、実行したいことを選びます:
* **View access**: Gmail がこのアプリで現在持っている権限を確認します。
* **More Actions** アイコン をクリックし、オプションを選択:
* **Switch account**
* **Disconnect account**
* **Remove**
Gmail 駆動の関数を作成したら、イベントをトリガーして期待通りのフォーマットとコンテンツでメールが届くことを確認することで、各フローをテストしてください。
Gmail 認可ウィンドウで **Skip** をクリックした場合、コネクタは追加されません。AI チャットまたは **Integrations → Browse** から接続フローを再実行できます。
***
## Gmail 接続を管理する
各アプリの Gmail コネクタは、アプリダッシュボードから確認・管理できます。
**Gmail コネクタを表示または更新するには:**
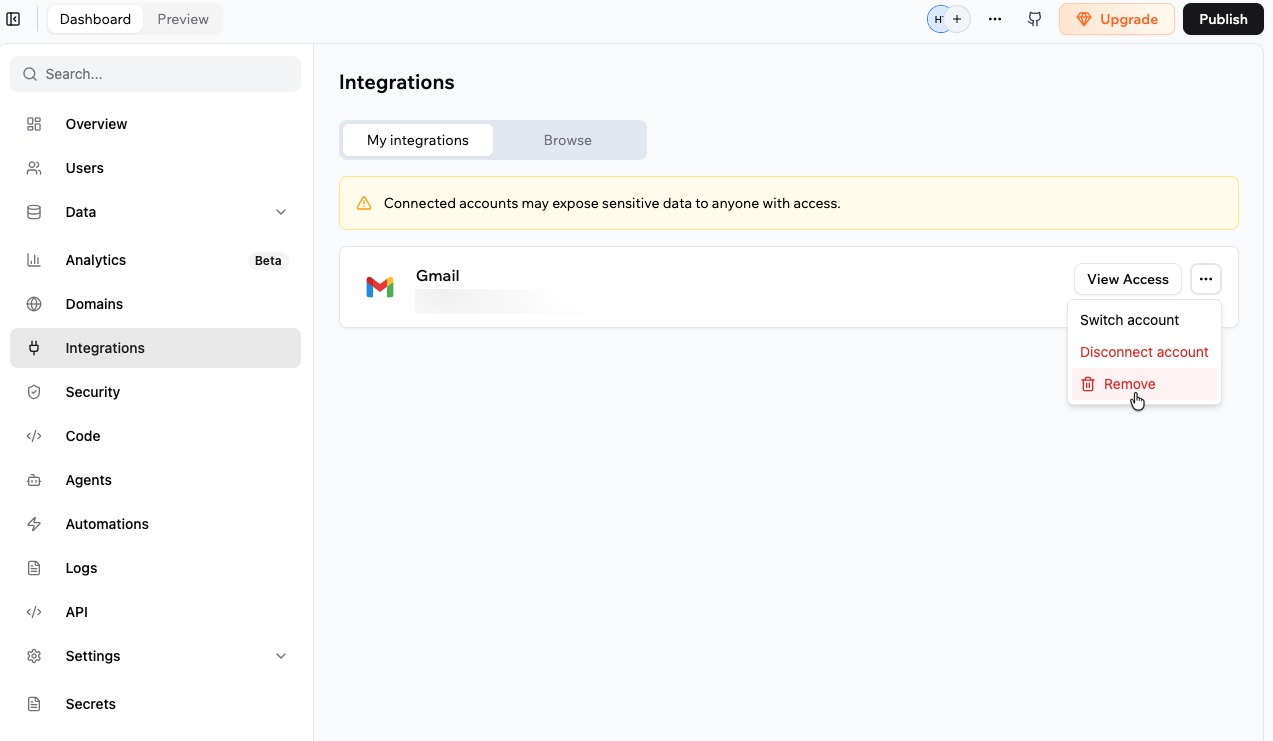
1. アプリダッシュボードに移動します。
2. **Integrations** をクリックします。
3. **My integrations** タブをクリックします。
4. **Gmail** を見つけて、実行したいことを選びます:
* **View access**: Gmail がこのアプリで現在持っている権限を確認します。
* **More Actions** アイコン をクリックし、オプションを選択:
* **Switch account**
* **Disconnect account**
* **Remove**
 ***
## Gmail のスコープと権限
Gmail に接続すると、コネクタは Gmail アカウントに対してアプリができることを制御する権限 (スコープ) を要求します。
以下は、コネクタが要求する可能性がある現在の Gmail スコープのリストです。
* `https://www.googleapis.com/auth/gmail.readonly`: メールメッセージとメタデータの読み取り。
* `https://www.googleapis.com/auth/gmail.send`: メールメッセージの送信。
* `https://www.googleapis.com/auth/gmail.modify`: メッセージの変更 (たとえば既読にする、フォルダへの移動)。
* `https://www.googleapis.com/auth/gmail.compose`: 下書きメッセージの作成。
**注意:**
* スコープのリストは時間とともに変化する可能性があります。常に接続フロー中に表示される権限を確認してください。
* ここに掲載されていない Gmail スコープが必要な場合は、[ご意見をお寄せください](https://feedback.base44.com/?b=67cf45295430bd6b6434b68c)。
***
## FAQ
Gmail コネクタについて詳しく知るには、下の質問をクリックしてください。
いいえ。各アプリは 1 つの共有 Gmail アカウントを使用します。複数の Gmail アカウントを使用するには、別のアプリを作成するか、バックエンド関数でカスタム OAuth フローを構築してください。
いいえ。コネクタはアプリレベルです。Gmail に接続すると、アプリ内のすべてのフローが使用する単一の Gmail アカウントを接続します。
アプリを使用する各ユーザーがそれぞれの Gmail 受信トレイを接続できるようにするには、ユーザーごとのトークン保存と更新を含む、バックエンド関数と Gmail API を使ったカスタム OAuth フローを構築する必要があります。
1. アプリダッシュボードに移動し、**Integrations** をクリックします。
2. **My integrations** タブをクリックします。
3. **Gmail** を見つけて **More Actions** アイコン をクリックし、**Switch account** を選択します。
はい。AI チャットで、件名、メッセージ本文、フォーマット、受信者、動的フィールドを指定してください。
**Dashboard → Code → Functions** で生成されたバックエンド関数を編集して、メールペイロードをさらにカスタマイズすることもできます。
このページは AI を使用して翻訳されました。最も正確で最新の情報については、[英語版](/) を参照してください。
***
## Gmail のスコープと権限
Gmail に接続すると、コネクタは Gmail アカウントに対してアプリができることを制御する権限 (スコープ) を要求します。
以下は、コネクタが要求する可能性がある現在の Gmail スコープのリストです。
* `https://www.googleapis.com/auth/gmail.readonly`: メールメッセージとメタデータの読み取り。
* `https://www.googleapis.com/auth/gmail.send`: メールメッセージの送信。
* `https://www.googleapis.com/auth/gmail.modify`: メッセージの変更 (たとえば既読にする、フォルダへの移動)。
* `https://www.googleapis.com/auth/gmail.compose`: 下書きメッセージの作成。
**注意:**
* スコープのリストは時間とともに変化する可能性があります。常に接続フロー中に表示される権限を確認してください。
* ここに掲載されていない Gmail スコープが必要な場合は、[ご意見をお寄せください](https://feedback.base44.com/?b=67cf45295430bd6b6434b68c)。
***
## FAQ
Gmail コネクタについて詳しく知るには、下の質問をクリックしてください。
いいえ。各アプリは 1 つの共有 Gmail アカウントを使用します。複数の Gmail アカウントを使用するには、別のアプリを作成するか、バックエンド関数でカスタム OAuth フローを構築してください。
いいえ。コネクタはアプリレベルです。Gmail に接続すると、アプリ内のすべてのフローが使用する単一の Gmail アカウントを接続します。
アプリを使用する各ユーザーがそれぞれの Gmail 受信トレイを接続できるようにするには、ユーザーごとのトークン保存と更新を含む、バックエンド関数と Gmail API を使ったカスタム OAuth フローを構築する必要があります。
1. アプリダッシュボードに移動し、**Integrations** をクリックします。
2. **My integrations** タブをクリックします。
3. **Gmail** を見つけて **More Actions** アイコン をクリックし、**Switch account** を選択します。
はい。AI チャットで、件名、メッセージ本文、フォーマット、受信者、動的フィールドを指定してください。
**Dashboard → Code → Functions** で生成されたバックエンド関数を編集して、メールペイロードをさらにカスタマイズすることもできます。
このページは AI を使用して翻訳されました。最も正確で最新の情報については、[英語版](/) を参照してください。