> ## Documentation Index
> Fetch the complete documentation index at: https://docs.base44.com/llms.txt
> Use this file to discover all available pages before exploring further.
# GitHub コネクタを使用する
> Base44 アプリを GitHub に接続して、リポジトリの管理、Issue の一覧表示、プルリクエストのレビュー、コードベースに接続されたワークフローの自動化を行います。
## GitHub コネクタについて
GitHub コネクタを使用すると、Base44 アプリは OAuth を通じて GitHub のデータに安全にアクセスできます。これを使って、プルリクエストや Issue のダッシュボードを構築したり、Issue の作成を自動化したり、リリースノートを生成したり、リポジトリのアクティビティをアプリに同期したりできます。
GitHub 接続はアプリレベルで共有されます。GitHub に接続すると、そのアプリに対して 1 つの GitHub アカウントを認可します。アプリを編集できる全員が同じ GitHub 接続を使用し、アプリ内で同じ GitHub 駆動のデータを参照します。
 **重要:** コネクタはアプリレベルの共有接続です。アプリを使用する各ユーザーがそれぞれ自分の GitHub アカウントを接続する必要がある場合は、GitHub コネクタを使用しないでください。ユーザーごとの GitHub ログインには、バックエンド関数を使用したカスタム OAuth フローを構築してください。
**始める前に:** アプリでコネクタを使用するには、[Builder プラン](https://base44.com/pricing) 以上が必要です。
***
## GitHub のユースケースとプロンプト
GitHub コネクタを使用して、エンジニアリング作業を追跡し、ステークホルダーへの最新情報の共有を続け、コードのワークフローを他のツールに接続します。
プルリクエストを一覧表示し、ステータスを表示し、レビューが必要なものを浮き彫りにするダッシュボードを構築します。最近のコミット、コントリビューター、リポジトリのアクティビティのビューも作成できます。
**プロンプト例:**
```text theme={null}
Connect to GitHub and show all open pull requests across my repositories that are waiting for review.
```
```text theme={null}
Build a dashboard for one repository showing open pull requests, status checks, reviewers, and last update time.
```
```text theme={null}
Create a page that shows the latest commits for this repository with author, message, and timestamp.
```
```text theme={null}
Add a widget that highlights pull requests marked as "changes requested" and still open.
```
```text theme={null}
Show a list of pull requests merged in the last 7 days, grouped by repository.
```
GitHub の Issue をアプリ内の構造化されたキューに変えます。優先度、担当者、ラベル、古くなった Issue を追跡し、ブロックされているものや期限切れのものを明確に把握できます。
**プロンプト例:**
```text theme={null}
Show open issues from my repository in a table with labels, assignee, priority, and created date.
```
```text theme={null}
Create a page that lists issues labeled "bug" and "p0" and sort them by oldest first.
```
```text theme={null}
Build a weekly report that summarizes new issues created this week and the top labels.
```
```text theme={null}
Add a view that shows issues that have not been updated in 14 days.
```
```text theme={null}
Create a dashboard that counts open issues by label and assignee.
```
バグが報告されたときに Issue を作成したり、インシデントが作成されたときにトラッキング Issue をオープンしたりするなど、アプリ内のイベントから GitHub アクションをトリガーします。
**プロンプト例:**
```text theme={null}
When a new bug report is created in this app, create a GitHub issue in repo org/repo with the title and steps to reproduce.
```
```text theme={null}
Create a GitHub issue automatically when a critical incident is created, including severity, owner, and incident link.
```
```text theme={null}
When a feature request is marked Approved, open a GitHub issue with acceptance criteria and priority label.
```
```text theme={null}
When a customer ticket is escalated, create a GitHub issue and link back to the ticket.
```
```text theme={null}
Add a button that lets an admin create a GitHub issue from a record in this app.
```
マージされたプルリクエストやコミットを変更履歴に同期したり、GitHub のアクティビティからリリースノートを自動生成したりします。
**プロンプト例:**
```text theme={null}
Sync merged pull requests from org/repo into a changelog page with title, author, and link.
```
```text theme={null}
Generate release notes for the last 2 weeks based on merged pull requests, grouped by label.
```
```text theme={null}
Create a weekly digest summarizing what shipped, including links to pull requests and issues closed.
```
```text theme={null}
Show a list of releases and their notes for this repository.
```
```text theme={null}
Create a "What's new" page that updates every Friday with this week's merged pull requests.
```
GitHub を Slack、Gmail、BigQuery、Notion、CRM に接続して、エンジニアリングの更新情報をチームが働く場所に配信します。
**プロンプト例:**
```text theme={null}
Post a message in Slack when a pull request is merged, including title, author, and link.
```
```text theme={null}
Send a weekly Gmail digest with merged pull requests and closed issues, grouped by repository.
```
```text theme={null}
When a GitHub issue labeled "customer" is created, add it to a Notion database and notify #support in Slack.
```
```text theme={null}
Mirror issues labeled "docs" into a documentation backlog table inside my app.
```
```text theme={null}
Create a dashboard that joins GitHub deployment activity with BigQuery performance metrics.
```
AI チャットでマルチツールフローを記述するときは、どの GitHub イベントがアクションをトリガーすべきか、どの詳細 (リポジトリ、Issue/PR 番号、タイトル、ラベル、リンク) を含めるかを明示してください。
***
## アプリに GitHub を接続する
AI チャットを使用して GitHub に接続するか、アプリのダッシュボードから既製のプロンプトを使って接続します。
### AI チャットを使用
1. アプリエディタに移動します。
2. AI チャットで GitHub を使って何をしたいかを記述します。例:
* `Connect to GitHub and show all open pull requests for org/repo that are waiting for review.`
* `Create a GitHub issue when a new bug is reported in this app.`
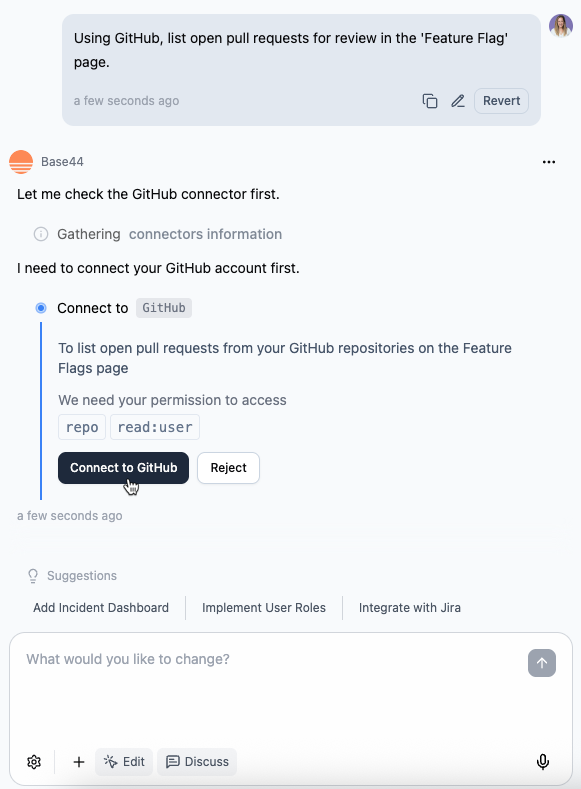
3. サイドパネルで **Action required** と **Required permissions** を確認します。
4. **Connect to GitHub** をクリックします。
5. 開いた GitHub ウィンドウで:
1. 接続したい GitHub アカウントにサインインします。
2. 要求された権限を確認して **Authorize** をクリックします。
6. エディタに戻り、AI が GitHub 駆動のページ、テーブル、フローの作成を完了するのを待ちます。
**重要:** コネクタはアプリレベルの共有接続です。アプリを使用する各ユーザーがそれぞれ自分の GitHub アカウントを接続する必要がある場合は、GitHub コネクタを使用しないでください。ユーザーごとの GitHub ログインには、バックエンド関数を使用したカスタム OAuth フローを構築してください。
**始める前に:** アプリでコネクタを使用するには、[Builder プラン](https://base44.com/pricing) 以上が必要です。
***
## GitHub のユースケースとプロンプト
GitHub コネクタを使用して、エンジニアリング作業を追跡し、ステークホルダーへの最新情報の共有を続け、コードのワークフローを他のツールに接続します。
プルリクエストを一覧表示し、ステータスを表示し、レビューが必要なものを浮き彫りにするダッシュボードを構築します。最近のコミット、コントリビューター、リポジトリのアクティビティのビューも作成できます。
**プロンプト例:**
```text theme={null}
Connect to GitHub and show all open pull requests across my repositories that are waiting for review.
```
```text theme={null}
Build a dashboard for one repository showing open pull requests, status checks, reviewers, and last update time.
```
```text theme={null}
Create a page that shows the latest commits for this repository with author, message, and timestamp.
```
```text theme={null}
Add a widget that highlights pull requests marked as "changes requested" and still open.
```
```text theme={null}
Show a list of pull requests merged in the last 7 days, grouped by repository.
```
GitHub の Issue をアプリ内の構造化されたキューに変えます。優先度、担当者、ラベル、古くなった Issue を追跡し、ブロックされているものや期限切れのものを明確に把握できます。
**プロンプト例:**
```text theme={null}
Show open issues from my repository in a table with labels, assignee, priority, and created date.
```
```text theme={null}
Create a page that lists issues labeled "bug" and "p0" and sort them by oldest first.
```
```text theme={null}
Build a weekly report that summarizes new issues created this week and the top labels.
```
```text theme={null}
Add a view that shows issues that have not been updated in 14 days.
```
```text theme={null}
Create a dashboard that counts open issues by label and assignee.
```
バグが報告されたときに Issue を作成したり、インシデントが作成されたときにトラッキング Issue をオープンしたりするなど、アプリ内のイベントから GitHub アクションをトリガーします。
**プロンプト例:**
```text theme={null}
When a new bug report is created in this app, create a GitHub issue in repo org/repo with the title and steps to reproduce.
```
```text theme={null}
Create a GitHub issue automatically when a critical incident is created, including severity, owner, and incident link.
```
```text theme={null}
When a feature request is marked Approved, open a GitHub issue with acceptance criteria and priority label.
```
```text theme={null}
When a customer ticket is escalated, create a GitHub issue and link back to the ticket.
```
```text theme={null}
Add a button that lets an admin create a GitHub issue from a record in this app.
```
マージされたプルリクエストやコミットを変更履歴に同期したり、GitHub のアクティビティからリリースノートを自動生成したりします。
**プロンプト例:**
```text theme={null}
Sync merged pull requests from org/repo into a changelog page with title, author, and link.
```
```text theme={null}
Generate release notes for the last 2 weeks based on merged pull requests, grouped by label.
```
```text theme={null}
Create a weekly digest summarizing what shipped, including links to pull requests and issues closed.
```
```text theme={null}
Show a list of releases and their notes for this repository.
```
```text theme={null}
Create a "What's new" page that updates every Friday with this week's merged pull requests.
```
GitHub を Slack、Gmail、BigQuery、Notion、CRM に接続して、エンジニアリングの更新情報をチームが働く場所に配信します。
**プロンプト例:**
```text theme={null}
Post a message in Slack when a pull request is merged, including title, author, and link.
```
```text theme={null}
Send a weekly Gmail digest with merged pull requests and closed issues, grouped by repository.
```
```text theme={null}
When a GitHub issue labeled "customer" is created, add it to a Notion database and notify #support in Slack.
```
```text theme={null}
Mirror issues labeled "docs" into a documentation backlog table inside my app.
```
```text theme={null}
Create a dashboard that joins GitHub deployment activity with BigQuery performance metrics.
```
AI チャットでマルチツールフローを記述するときは、どの GitHub イベントがアクションをトリガーすべきか、どの詳細 (リポジトリ、Issue/PR 番号、タイトル、ラベル、リンク) を含めるかを明示してください。
***
## アプリに GitHub を接続する
AI チャットを使用して GitHub に接続するか、アプリのダッシュボードから既製のプロンプトを使って接続します。
### AI チャットを使用
1. アプリエディタに移動します。
2. AI チャットで GitHub を使って何をしたいかを記述します。例:
* `Connect to GitHub and show all open pull requests for org/repo that are waiting for review.`
* `Create a GitHub issue when a new bug is reported in this app.`
3. サイドパネルで **Action required** と **Required permissions** を確認します。
4. **Connect to GitHub** をクリックします。
5. 開いた GitHub ウィンドウで:
1. 接続したい GitHub アカウントにサインインします。
2. 要求された権限を確認して **Authorize** をクリックします。
6. エディタに戻り、AI が GitHub 駆動のページ、テーブル、フローの作成を完了するのを待ちます。
 ### アプリダッシュボードから
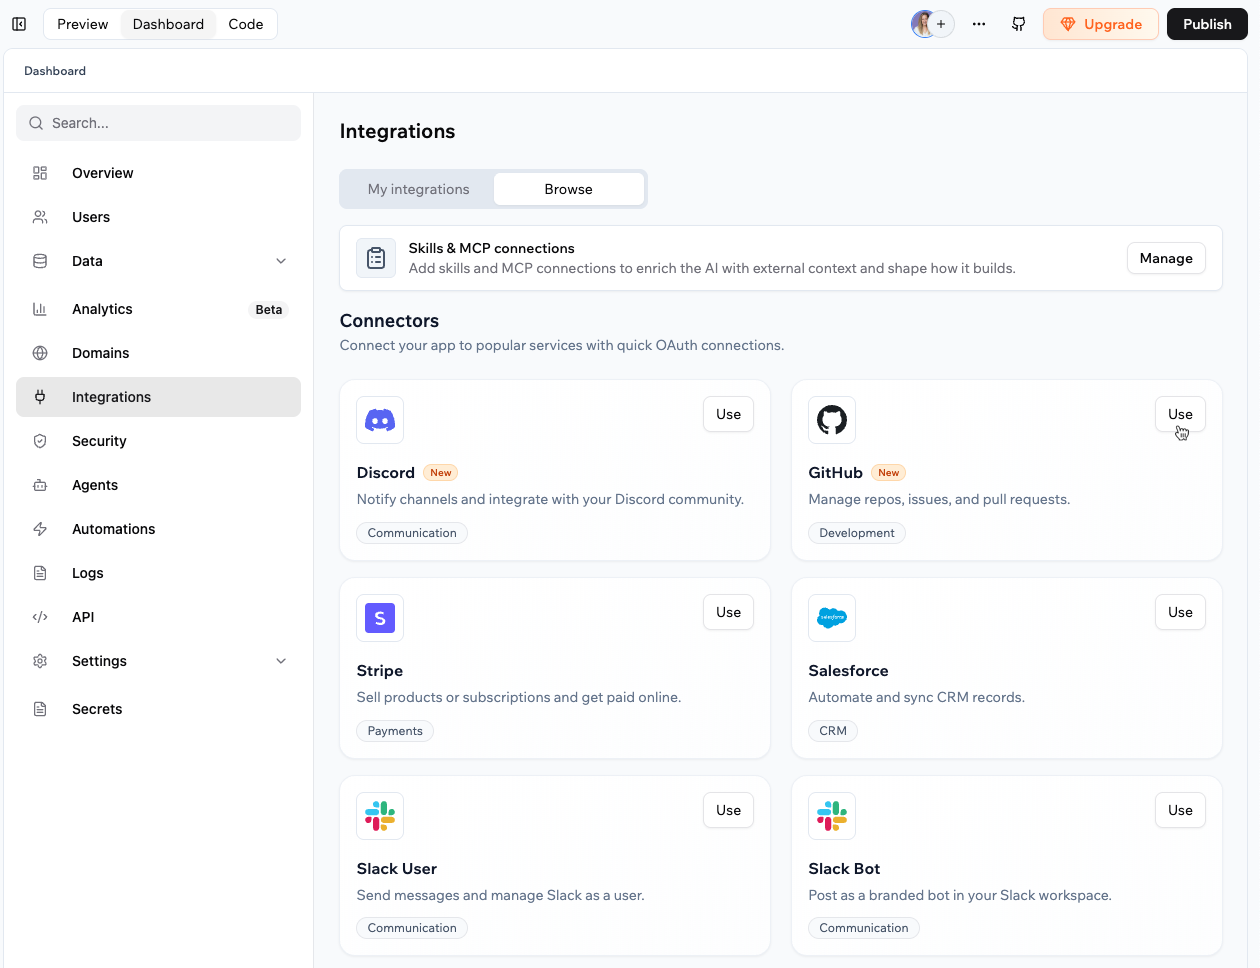
1. アプリエディタで **Dashboard** をクリックします。
2. **Integrations** をクリックします。
3. **Browse** タブをクリックします。
4. **GitHub** を見つけて **Use** をクリックします。
5. AI チャットに追加したい既製のプロンプトを選択します。
6. AI チャットで **Action required** と **Required permissions** を確認します。
7. **Connect to GitHub** をクリックして認可フローを完了します。
8. エディタに戻り、AI が GitHub 駆動のフローの作成を完了するのを待ちます。
### アプリダッシュボードから
1. アプリエディタで **Dashboard** をクリックします。
2. **Integrations** をクリックします。
3. **Browse** タブをクリックします。
4. **GitHub** を見つけて **Use** をクリックします。
5. AI チャットに追加したい既製のプロンプトを選択します。
6. AI チャットで **Action required** と **Required permissions** を確認します。
7. **Connect to GitHub** をクリックして認可フローを完了します。
8. エディタに戻り、AI が GitHub 駆動のフローの作成を完了するのを待ちます。
 まずシンプルな読み取り専用フロー (open プルリクエストの一覧表示など) から始めて、接続が機能することを確認してください。それから Issue の作成などの書き込みアクションを追加します。
**Reject** をクリックしたり認可ウィンドウを閉じたりした場合、コネクタは追加されません。AI チャットまたは **Integrations** → **Browse** から接続フローを再実行できます。
***
## GitHub 接続を管理する
各アプリの GitHub コネクタは、アプリのダッシュボードから確認・管理できます。
**GitHub コネクタを管理するには:**
1. アプリのダッシュボードに移動します。
2. **Integrations** をクリックします。
3. **My integrations** タブをクリックします。
4. **GitHub** コネクタを見つけます。
5. 実行したいことを選びます:
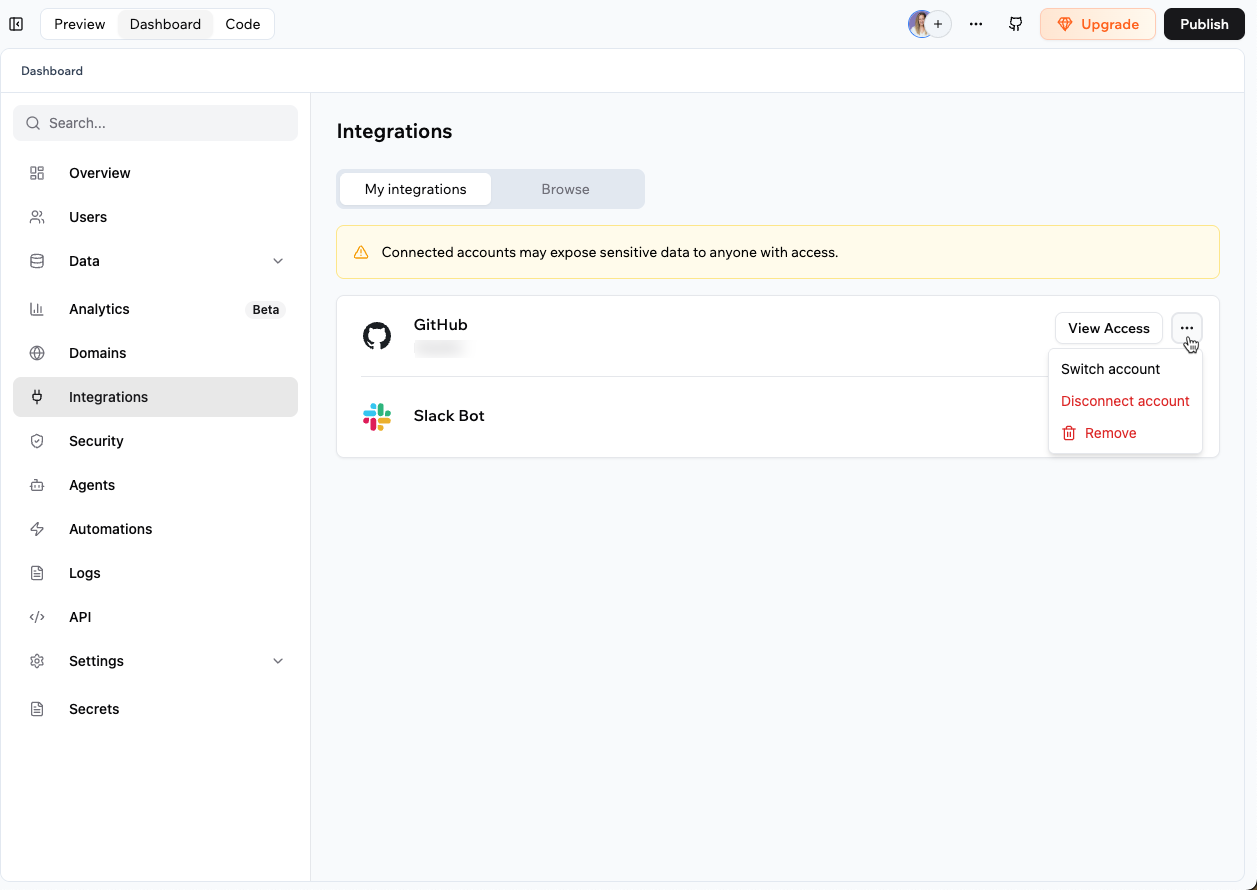
* **View access:** GitHub がこのアプリで現在持っている権限を確認します。
* **More actions:** 接続された GitHub アカウントを再接続、切り替え、切断、削除します。利用可能なアクションはコネクタのステータスによって異なります。
まずシンプルな読み取り専用フロー (open プルリクエストの一覧表示など) から始めて、接続が機能することを確認してください。それから Issue の作成などの書き込みアクションを追加します。
**Reject** をクリックしたり認可ウィンドウを閉じたりした場合、コネクタは追加されません。AI チャットまたは **Integrations** → **Browse** から接続フローを再実行できます。
***
## GitHub 接続を管理する
各アプリの GitHub コネクタは、アプリのダッシュボードから確認・管理できます。
**GitHub コネクタを管理するには:**
1. アプリのダッシュボードに移動します。
2. **Integrations** をクリックします。
3. **My integrations** タブをクリックします。
4. **GitHub** コネクタを見つけます。
5. 実行したいことを選びます:
* **View access:** GitHub がこのアプリで現在持っている権限を確認します。
* **More actions:** 接続された GitHub アカウントを再接続、切り替え、切断、削除します。利用可能なアクションはコネクタのステータスによって異なります。
 ### GitHub の再接続
接続されたアカウントが切断された場合、GitHub でアクセスが取り消された場合、または GitHub が再度アクセス認可を求める場合は、GitHub を再接続してください。
**GitHub を再接続するには:**
1. アプリのダッシュボードに移動します。
2. **Integrations** をクリックします。
3. **My integrations** タブをクリックします。
4. **GitHub** コネクタを見つけます。
5. **GitHub** コネクタの **More actions** アイコン をクリックし、**Reconnect** を選択します。
6. 要求された権限を確認してアクセスを承認します。
***
## GitHub のスコープと権限
GitHub に接続すると、コネクタは GitHub の OAuth 認可フローを通じて権限を要求します。表示される正確な権限は、アプリが構築または実行しようとしている内容によって異なります。
アクセスを承認する前に、必ず GitHub の認可ウィンドウに表示される権限を確認してください。
**表示される可能性のある権限の例:**
* `repo`: 接続されたアカウントがアクセスできるリポジトリへのフルアクセス。
* `read:user`: 接続されたアカウントの基本プロフィール情報の読み取り。
* `user:email`: 接続されたアカウントのメールアドレスの読み取り。
GitHub の権限は、構築するフローによって変わることがあります。認可ウィンドウには、現在要求されているアクセスが常に表示されます。
***
## FAQ
いいえ。各アプリは 1 つの共有 GitHub アカウントを使用します。複数の GitHub アカウントを使用するには、別のアプリを作成するか、バックエンド関数でカスタム OAuth フローを構築してください。
いいえ。コネクタはアプリレベルです。GitHub に接続すると、アプリ内のすべてのフローが使用する単一の GitHub アカウントを接続します。
アプリを使用する各ユーザーがそれぞれの GitHub アカウントを接続できるようにするには、ユーザーごとのトークン保存と更新を含む、バックエンド関数と GitHub API を使ったカスタム OAuth フローを構築する必要があります。
1. アプリのダッシュボードに移動します。
2. **Integrations** をクリックします。
3. **My integrations** タブをクリックします。
4. **GitHub** コネクタの **More actions** アイコン をクリックし、**Switch account** を選択します。
5. 新しいアカウントに対して GitHub 認可フローを完了します。
プライベートリポジトリへのアクセスは、認可中に承認した内容と、接続された GitHub アカウントがアクセスできるリポジトリによります。GitHub を再接続し、認可ウィンドウに表示される権限を確認して、必要なリポジトリに対してコネクタが認可されていることを確認してください。
再接続については、[GitHub の再接続](#reconnecting-github) を参照してください。
はい。構築するフローが書き込み権限を必要とし、認可中にそれを承認した場合は可能です。アクセスを承認する前に、必ず接続フローに表示される権限を確認してください。
このページは AI を使用して翻訳されました。最も正確で最新の情報については、[英語版](/) を参照してください。
### GitHub の再接続
接続されたアカウントが切断された場合、GitHub でアクセスが取り消された場合、または GitHub が再度アクセス認可を求める場合は、GitHub を再接続してください。
**GitHub を再接続するには:**
1. アプリのダッシュボードに移動します。
2. **Integrations** をクリックします。
3. **My integrations** タブをクリックします。
4. **GitHub** コネクタを見つけます。
5. **GitHub** コネクタの **More actions** アイコン をクリックし、**Reconnect** を選択します。
6. 要求された権限を確認してアクセスを承認します。
***
## GitHub のスコープと権限
GitHub に接続すると、コネクタは GitHub の OAuth 認可フローを通じて権限を要求します。表示される正確な権限は、アプリが構築または実行しようとしている内容によって異なります。
アクセスを承認する前に、必ず GitHub の認可ウィンドウに表示される権限を確認してください。
**表示される可能性のある権限の例:**
* `repo`: 接続されたアカウントがアクセスできるリポジトリへのフルアクセス。
* `read:user`: 接続されたアカウントの基本プロフィール情報の読み取り。
* `user:email`: 接続されたアカウントのメールアドレスの読み取り。
GitHub の権限は、構築するフローによって変わることがあります。認可ウィンドウには、現在要求されているアクセスが常に表示されます。
***
## FAQ
いいえ。各アプリは 1 つの共有 GitHub アカウントを使用します。複数の GitHub アカウントを使用するには、別のアプリを作成するか、バックエンド関数でカスタム OAuth フローを構築してください。
いいえ。コネクタはアプリレベルです。GitHub に接続すると、アプリ内のすべてのフローが使用する単一の GitHub アカウントを接続します。
アプリを使用する各ユーザーがそれぞれの GitHub アカウントを接続できるようにするには、ユーザーごとのトークン保存と更新を含む、バックエンド関数と GitHub API を使ったカスタム OAuth フローを構築する必要があります。
1. アプリのダッシュボードに移動します。
2. **Integrations** をクリックします。
3. **My integrations** タブをクリックします。
4. **GitHub** コネクタの **More actions** アイコン をクリックし、**Switch account** を選択します。
5. 新しいアカウントに対して GitHub 認可フローを完了します。
プライベートリポジトリへのアクセスは、認可中に承認した内容と、接続された GitHub アカウントがアクセスできるリポジトリによります。GitHub を再接続し、認可ウィンドウに表示される権限を確認して、必要なリポジトリに対してコネクタが認可されていることを確認してください。
再接続については、[GitHub の再接続](#reconnecting-github) を参照してください。
はい。構築するフローが書き込み権限を必要とし、認可中にそれを承認した場合は可能です。アクセスを承認する前に、必ず接続フローに表示される権限を確認してください。
このページは AI を使用して翻訳されました。最も正確で最新の情報については、[英語版](/) を参照してください。