> ## Documentation Index
> Fetch the complete documentation index at: https://docs.base44.com/llms.txt
> Use this file to discover all available pages before exploring further.
# Google Places 連携
> アプリを Google Places に接続して、実世界の場所を簡単に検索、提案、表示できるようにします。
注意: Google Places 連携は Builder ティア以上で利用できます。Free ティアをご利用の場合、バックエンド関数や支払い機能を使用するにはアプリのアップグレードが必要です。
***
# ステップごとのセットアップ:
## パート 1: Google 側
すでに Google Places API キーをお持ちの場合は、[****パート 2: Base44 側****](https://docs.base44.com/Integrations/Google-places-integration#part-2%3A-the-base44-side) に進んでください。
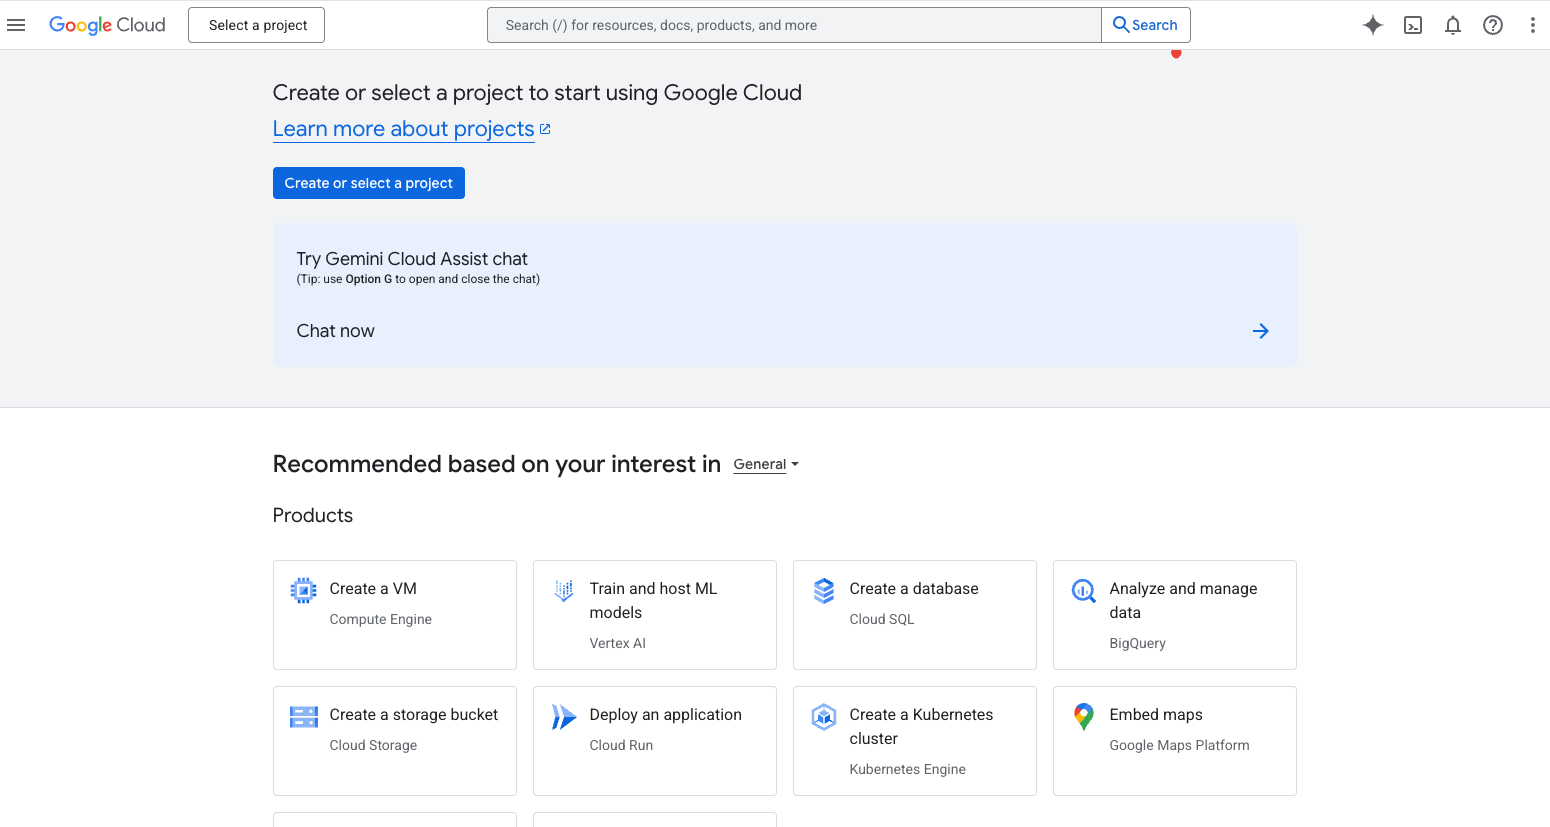 * Google Cloud Console にアクセスし、既存のプロジェクトを選択するか、新しいプロジェクトを作成します。
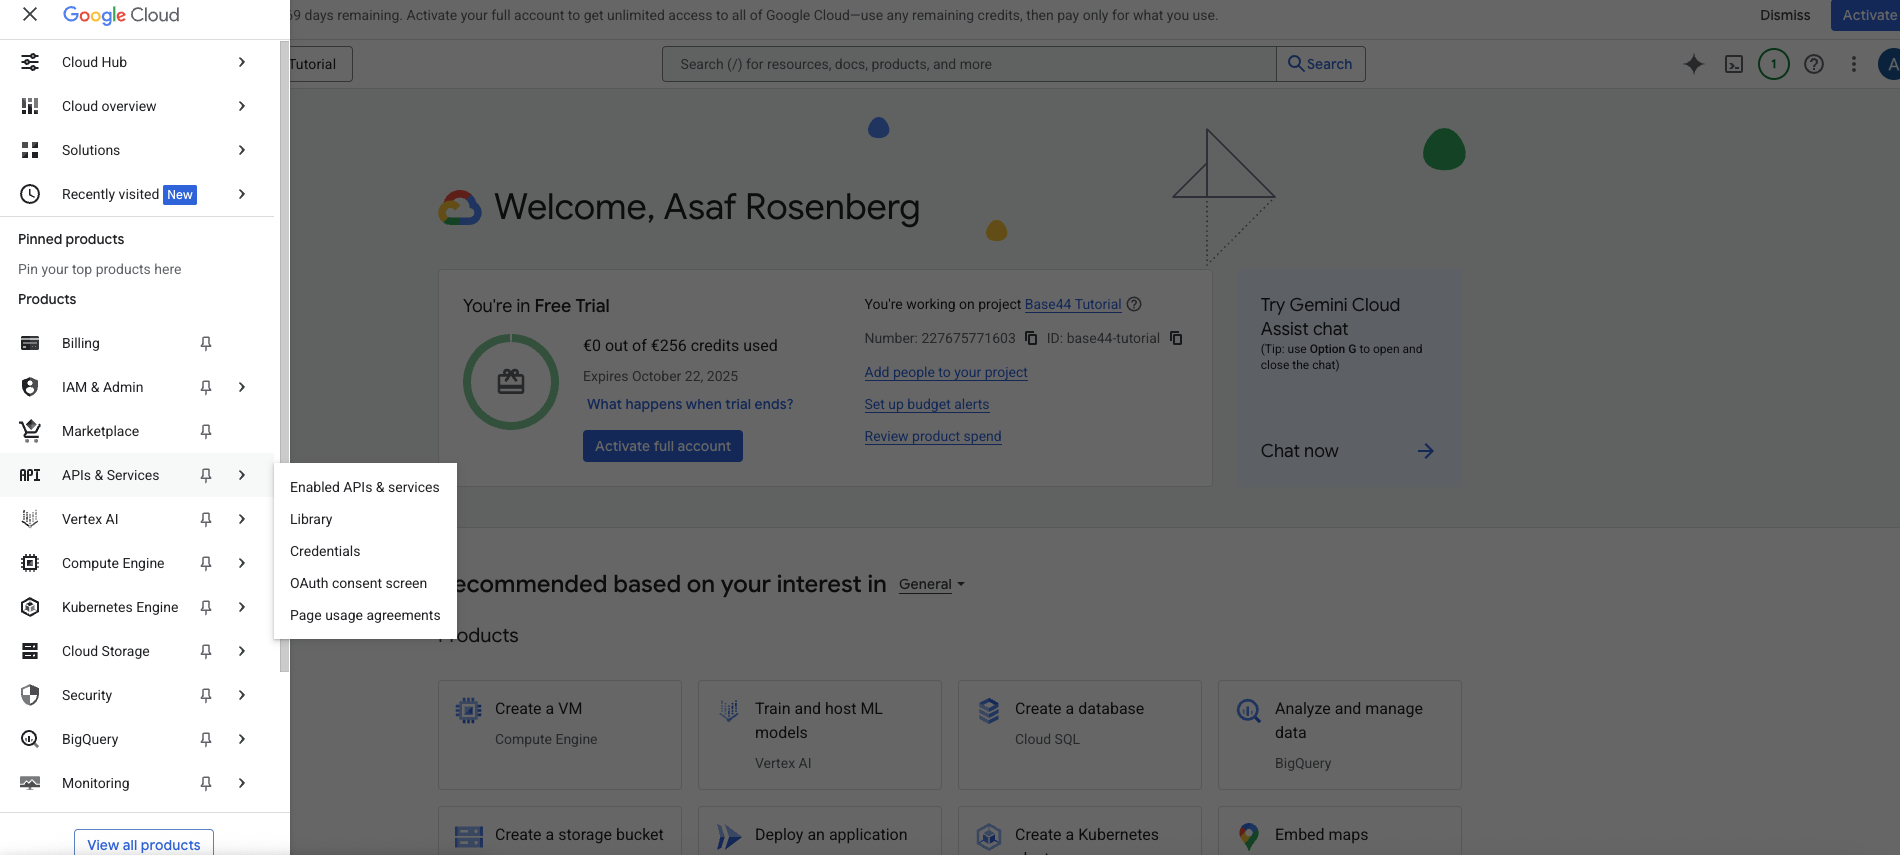 * 左のサイドバーで **APIs and Services** → **Library** をクリックします。
* 検索バーで **Places API (New)** を見つけて開きます。
* プロジェクトで有効化するために **Enable** をクリックします。
* API の認証情報ページで **Create Key** をクリックしてコピーします。
* キーを安全な場所に保存します。Base44 に貼り付ける必要があります。
後で `REQUEST_DENIED` のようなエラーが表示される場合、通常は請求が有効になっていないか、API キーの制限が厳しすぎることを意味します。請求をオンにし、テスト中に制限を緩めると、これは多くの場合解決します。ブラウザでマップを表示する予定がある場合は、**Maps JavaScript API** も有効にし、サイトに制限したブラウザキーを使用してください。
***
## パート 2: Base44 側
Google Places API キーを取得したら、2 つの方法で Base44 に接続できます:
* ゼロから新しいアプリを始める場合は、こちらの方法を選択してください。
* すでにアプリを構築中で、既存のアプリに Google Places を統合したい場合は、こちらの方法を選択してください。
### オプション A: Ready-made 連携 (新しいアプリを作成)
* Base44 で Integrations をクリックします
* 左のサイドバーで **APIs and Services** → **Library** をクリックします。
* 検索バーで **Places API (New)** を見つけて開きます。
* プロジェクトで有効化するために **Enable** をクリックします。
* API の認証情報ページで **Create Key** をクリックしてコピーします。
* キーを安全な場所に保存します。Base44 に貼り付ける必要があります。
後で `REQUEST_DENIED` のようなエラーが表示される場合、通常は請求が有効になっていないか、API キーの制限が厳しすぎることを意味します。請求をオンにし、テスト中に制限を緩めると、これは多くの場合解決します。ブラウザでマップを表示する予定がある場合は、**Maps JavaScript API** も有効にし、サイトに制限したブラウザキーを使用してください。
***
## パート 2: Base44 側
Google Places API キーを取得したら、2 つの方法で Base44 に接続できます:
* ゼロから新しいアプリを始める場合は、こちらの方法を選択してください。
* すでにアプリを構築中で、既存のアプリに Google Places を統合したい場合は、こちらの方法を選択してください。
### オプション A: Ready-made 連携 (新しいアプリを作成)
* Base44 で Integrations をクリックします
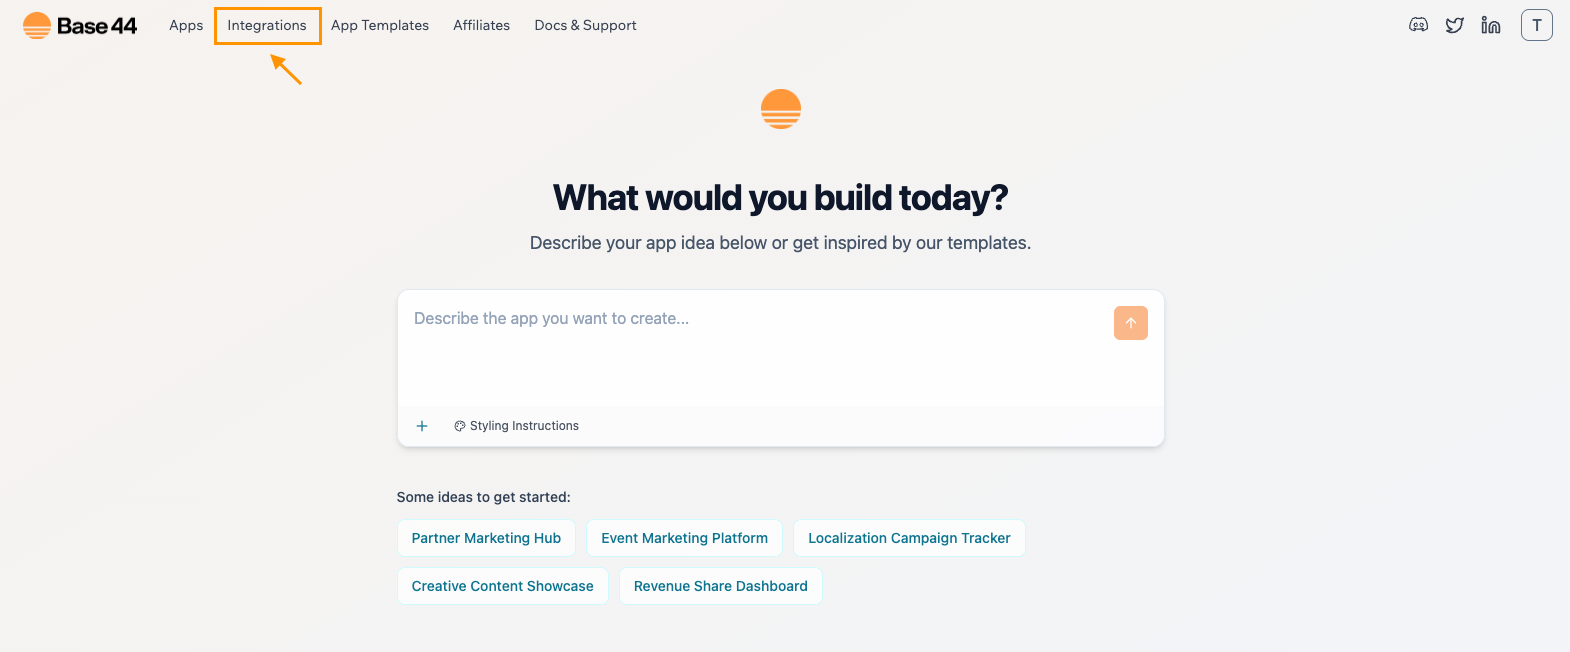 * **Google Places** を見つけます
* **Use this Integration** を選択します
* **Google Places** を見つけます
* **Use this Integration** を選択します
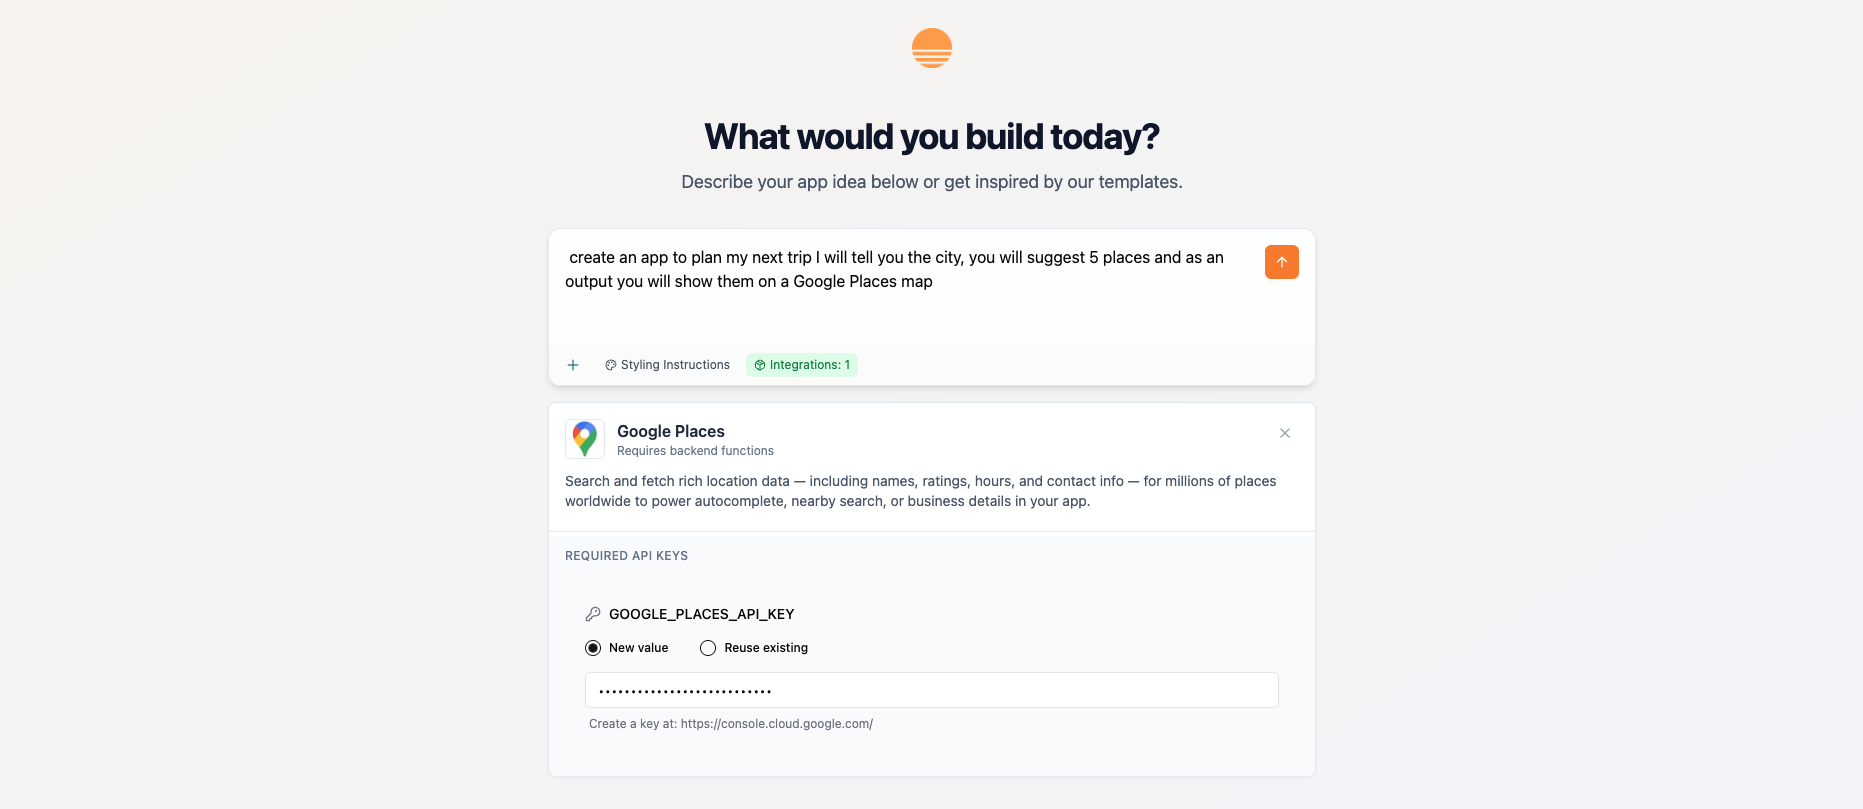 * プロンプトが表示されたら、`GOOGLE_PLACES_API_KEY` ラベルのフィールドに Places API キーを貼り付けます。
* AI チャットで、アプリの目的を記述します。
* 例:\
` Create an app to plan my next trip. I will tell you the city, you will suggest five places, and you will show them on a Google Places map.`
* Base44 の AI が基本構造を構築します。
* 都市を入力し、最大 5 つの場所を検索して、旅行を保存します。
* 選択したすべての場所のマーカー付きマップが表示され、それらに合わせて自動的にズームすることを確認します。
***
### オプション B: Instant 連携 (既存のアプリへの接続)
アプリが部分的に構築済みで、ゼロからやり直さずに Places を統合したい場合は、このアプローチを使用します。
* サンプルアプリを構築するために AI チャットに入力したプロンプト:\
` "Create an app to plan my next trip. I will tell you the city and you will choose five places for me to visit."`
* プロンプトが表示されたら、`GOOGLE_PLACES_API_KEY` ラベルのフィールドに Places API キーを貼り付けます。
* AI チャットで、アプリの目的を記述します。
* 例:\
` Create an app to plan my next trip. I will tell you the city, you will suggest five places, and you will show them on a Google Places map.`
* Base44 の AI が基本構造を構築します。
* 都市を入力し、最大 5 つの場所を検索して、旅行を保存します。
* 選択したすべての場所のマーカー付きマップが表示され、それらに合わせて自動的にズームすることを確認します。
***
### オプション B: Instant 連携 (既存のアプリへの接続)
アプリが部分的に構築済みで、ゼロからやり直さずに Places を統合したい場合は、このアプローチを使用します。
* サンプルアプリを構築するために AI チャットに入力したプロンプト:\
` "Create an app to plan my next trip. I will tell you the city and you will choose five places for me to visit."`
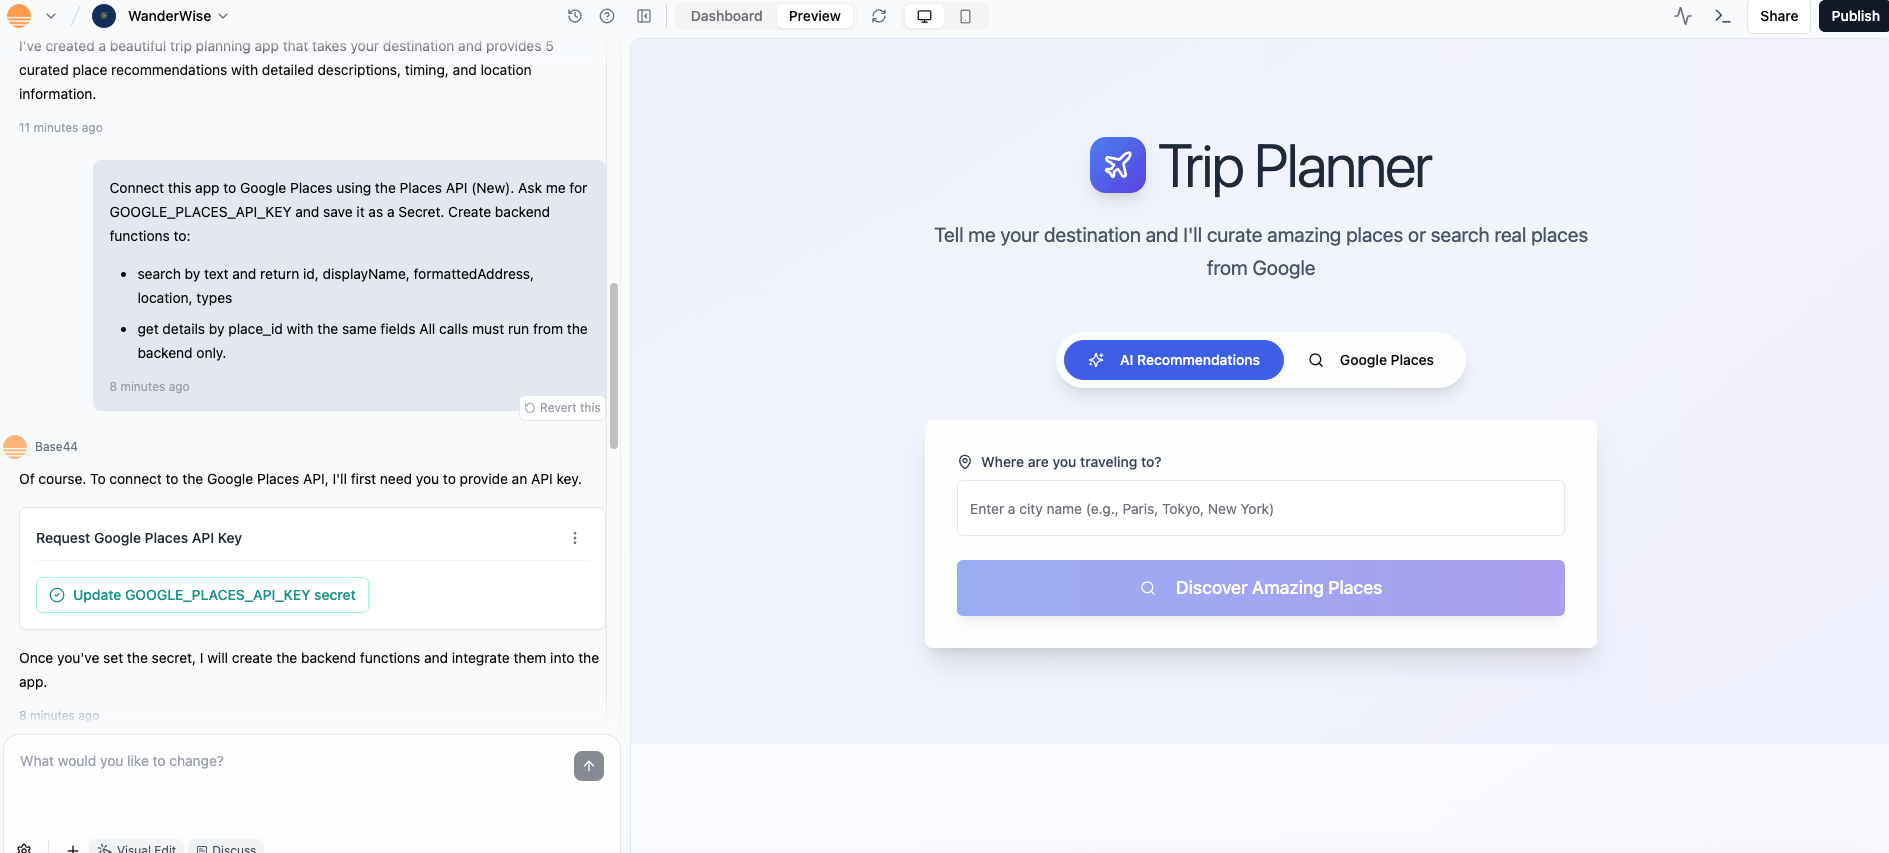 * アプリを Google Places に接続するようチャットに依頼します。このサンプルプロンプトを編集できます:
`Connect this app to Google Places using the Places API (New). Ask me for GOOGLE_PLACES_API_KEY and save it as a Secret. Create backend functions to:`
`- search by text and return id, displayName, formattedAddress, location, types`
`- get details by place_id with the same fields`
`All calls must run from the backend only.`
* アプリを Google Places に接続するようチャットに依頼します。このサンプルプロンプトを編集できます:
`Connect this app to Google Places using the Places API (New). Ask me for GOOGLE_PLACES_API_KEY and save it as a Secret. Create backend functions to:`
`- search by text and return id, displayName, formattedAddress, location, types`
`- get details by place_id with the same fields`
`All calls must run from the backend only.`
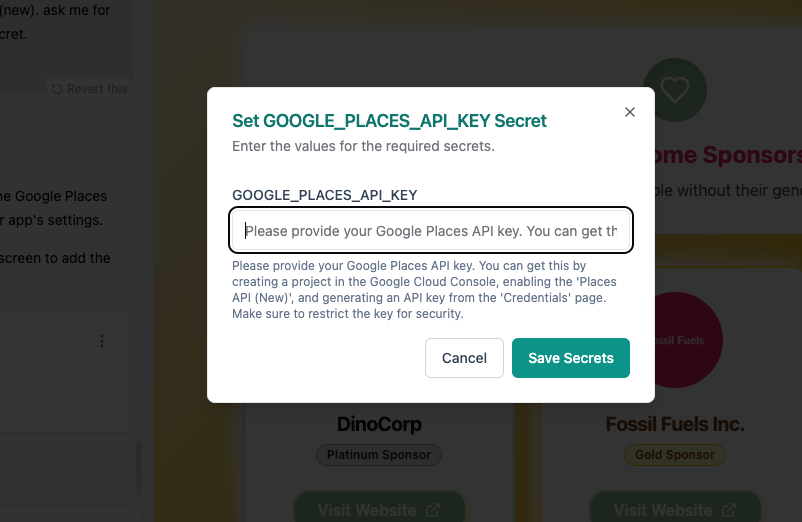 * AI チャットでプロンプトが表示されたら、`Update GOOGLE_PLACES_API_KEY` をクリックします
* 続いて API キーをポップアップウィンドウに貼り付けます
* Trip Planner UI とマップを追加します。
* 次のようなプロンプトでインターフェースを構築できます:
`Add a Trip Planner page with:`
`- a City field`
`- 5 auto-suggest place inputs powered by the backend`
`When a place is selected, save place_id, name, formatted_address, latitude, longitude, types.`
`Add a Google Map that places a marker for each saved place and automatically fits bounds to show them all. Include a Reset button.`
* 都市を入力し、アプリに 5 つの場所を提案させて保存します。
* マーカーが表示され、マップがすべてのポイントに合わせて表示されることを確認します。
* アプリを更新して、保存した場所が正しくレンダリングされることを確認します。
***
## **トラブルシューティング**
* **403 または REQUEST\_DENIED エラー** – 通常、Places API が有効になっていない、API キーが間違っている、またはキーの制限が厳しすぎることが原因です。**Places API (New)** が有効で、請求アカウントが設定されていることを再確認し、テスト中は制限を緩めてください。
* **サジェストが空** – 別の都市や検索語を試してください。検索がブラウザではなくバックエンドで実行されていることを確認してください。
* **マップがすべてのポイントに合わない** – すべてのマーカーがマップに追加された後にアプリが fitBounds を呼び出していることを確認してください。
* **保存されたフィールドが誤り** – マップとフィルタが確実に動作するように、上記の正確なフィールド (place\_id、name、formatted\_address、latitude、longitude、types) を保存してください。
## よくあるユースケース
Google のドキュメントや他の Places API プロバイダーの例に基づいて、Base44 アプリで Google Places API を活用するアイデアをいくつか紹介します:
* **旅行プランナー** – 都市を選んだときにレストラン、観光名所、ホテルを提案。
* **ローカルビジネスファインダー** – ユーザーが近くのカフェ、店舗、サービスを検索可能に。
* **ルートヘルパー** – 旅程に沿ったガソリンスタンド、休憩所、飲食店を表示。
* **不動産ツール** – 物件の近くにある学校、公園、店舗をハイライト。
* **緊急サービスロケーター** – 病院、警察署、薬局をすばやく検索。
* **シティガイド** – キュレートされたランドマーク、イベント、ライフスタイルスポットを含むアプリを構築。
これらの例は、Places API を使用して位置情報対応機能、検索ツール、パーソナライズされたおすすめを Base44 アプリに追加するための多くの方法のほんの一部です。
このページは AI を使用して翻訳されました。最も正確で最新の情報については、[英語版](/) を参照してください。
* AI チャットでプロンプトが表示されたら、`Update GOOGLE_PLACES_API_KEY` をクリックします
* 続いて API キーをポップアップウィンドウに貼り付けます
* Trip Planner UI とマップを追加します。
* 次のようなプロンプトでインターフェースを構築できます:
`Add a Trip Planner page with:`
`- a City field`
`- 5 auto-suggest place inputs powered by the backend`
`When a place is selected, save place_id, name, formatted_address, latitude, longitude, types.`
`Add a Google Map that places a marker for each saved place and automatically fits bounds to show them all. Include a Reset button.`
* 都市を入力し、アプリに 5 つの場所を提案させて保存します。
* マーカーが表示され、マップがすべてのポイントに合わせて表示されることを確認します。
* アプリを更新して、保存した場所が正しくレンダリングされることを確認します。
***
## **トラブルシューティング**
* **403 または REQUEST\_DENIED エラー** – 通常、Places API が有効になっていない、API キーが間違っている、またはキーの制限が厳しすぎることが原因です。**Places API (New)** が有効で、請求アカウントが設定されていることを再確認し、テスト中は制限を緩めてください。
* **サジェストが空** – 別の都市や検索語を試してください。検索がブラウザではなくバックエンドで実行されていることを確認してください。
* **マップがすべてのポイントに合わない** – すべてのマーカーがマップに追加された後にアプリが fitBounds を呼び出していることを確認してください。
* **保存されたフィールドが誤り** – マップとフィルタが確実に動作するように、上記の正確なフィールド (place\_id、name、formatted\_address、latitude、longitude、types) を保存してください。
## よくあるユースケース
Google のドキュメントや他の Places API プロバイダーの例に基づいて、Base44 アプリで Google Places API を活用するアイデアをいくつか紹介します:
* **旅行プランナー** – 都市を選んだときにレストラン、観光名所、ホテルを提案。
* **ローカルビジネスファインダー** – ユーザーが近くのカフェ、店舗、サービスを検索可能に。
* **ルートヘルパー** – 旅程に沿ったガソリンスタンド、休憩所、飲食店を表示。
* **不動産ツール** – 物件の近くにある学校、公園、店舗をハイライト。
* **緊急サービスロケーター** – 病院、警察署、薬局をすばやく検索。
* **シティガイド** – キュレートされたランドマーク、イベント、ライフスタイルスポットを含むアプリを構築。
これらの例は、Places API を使用して位置情報対応機能、検索ツール、パーソナライズされたおすすめを Base44 アプリに追加するための多くの方法のほんの一部です。
このページは AI を使用して翻訳されました。最も正確で最新の情報については、[英語版](/) を参照してください。