> ## Documentation Index
> Fetch the complete documentation index at: https://docs.base44.com/llms.txt
> Use this file to discover all available pages before exploring further.

# Connecting a domain to your app

> Connect your Base44 app to your own domain to show your brand at the front and make your app easy to find, remember, and share.

A custom domain puts your brand front and center and makes your app easy to find, remember, and share. Base44 is an [app builder](https://base44.com/ai-app-builder) that gives you 2 ways to set up a custom domain. You can buy one from Base44 for automatic connection, or connect a domain you already own.

<Tip>
  **Before you begin:**

  * Custom domains are available on Builder, Pro, and Elite plans.
  * Allow up to 72 hours for DNS changes if you use an external domain provider.
</Tip>

***

## Changing your Base44 app URL

Every Base44 app comes with a free built-in domain (`myapp.base44.app`) that you can personalize anytime. No DNS setup or payment required.
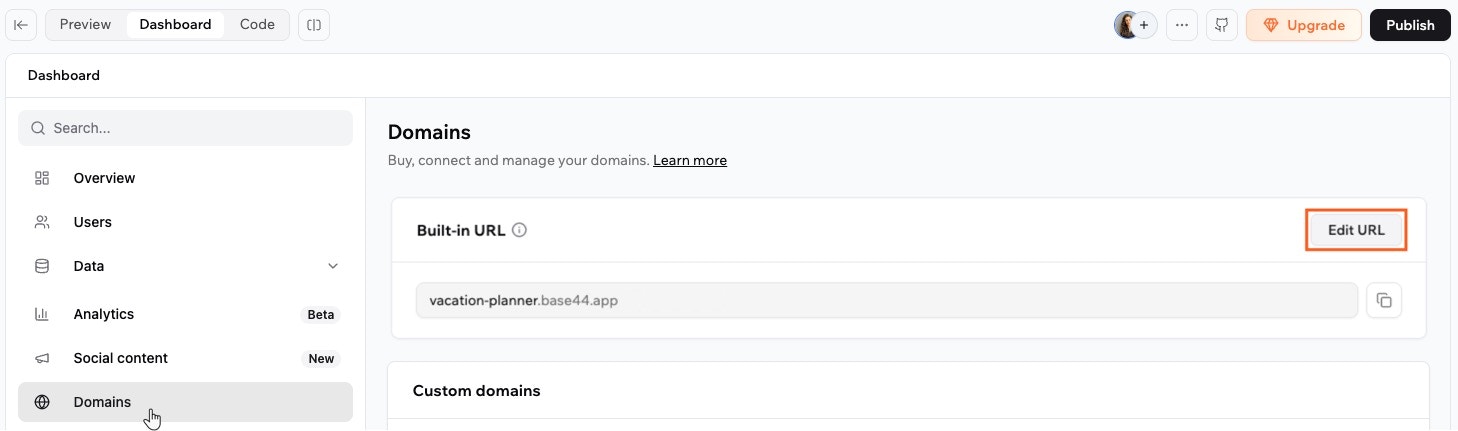
**To change your URL:**

1. Click **Dashboard** in your app editor.
2. Click **Domains**.
3. Click **Edit URL** under your app's **Built-in URL**.
4. Enter a new name for your link. For example: `best-business` → `best-business.base44.app`.
5. Click **Change** to save.

<Frame caption="Editing the URL of your app in Base44">
  <img src="https://mintcdn.com/base44/kDuWAJEDkqCYePBn/images/edit-app-url.jpg?fit=max&auto=format&n=kDuWAJEDkqCYePBn&q=85&s=6f641a67655857ebc8d6d08b09e579b8" alt="Editing the URL of your app in Base44" width="1458" height="431" data-path="images/edit-app-url.jpg" />
</Frame>

<Warning>
  Your new URL is live instantly, and your old link immediately stops working. Make sure to share your updated link with anyone who needs access.
</Warning>

***

## Setting up your custom domain

A custom domain puts your brand front and center and makes your app easy to find, remember, and share. There are 2 ways to set up a custom domain. You can buy one from Base44 for automatic connection, or connect a domain you already own.

When you connect a custom domain, your DNS records stay at your domain provider or DNS host, such as IONOS, GoDaddy, Namecheap, or Cloudflare. Base44 is not a domain registrar. It hosts your app and provides the targets your DNS records should point to.

Once your DNS records are correct and the domain is active with your registrar, Base44 issues and renews your SSL certificate automatically.

### Buying a domain from Base44

Purchase a domain directly from Base44 for the simplest, hands-off setup. DNS and SSL are handled for you, and your app is connected quickly.

<Tip>
  Domains purchased through Base44 include automatic SSL and do not require any manual DNS setup.
</Tip>

You can start a domain purchase from two places in your app editor: from the **Domains** tab: and from the **Publish** panel.

Both options open the domain search, powered by IONOS, where you can search for available domains and complete your purchase.

**To buy and connect a new domain:**

1. Click **Dashboard** in your app editor.
2. Click **Domains** and click **Buy this domain**.
3. Search for your desired domain name and complete the purchase.
4. Your domain connects automatically, usually within 5–30 minutes.
5. Check your inbox, including spam, for a verification email from the registrar. Follow the link in that email to confirm your contact details so your domain stays active.

***

### Connecting an external domain

Use a domain managed by another provider by updating your DNS records as shown in your Base44 dashboard.

<Note>
  Notes:

  * Make sure DNS records match exactly what is shown below and in your Base44 dashboard.
  * Remove any AAAA (IPv6) records for hostnames used with Base44, as they can block connections.
  * Remove or update any CAA records that could block certificate authorities used by Base44.
  * The SSL certificate is issued automatically once your domain is verified and DNS is resolving correctly.
  * If you are reusing an old domain from an app deleted before **June 5, 2025**, please [contact support](https://app.base44.com/support/conversations) so we can clear it from our system.
</Note>

**Step 1 | Add your domain**

1. Click **Dashboard** in your app editor.
2. Click **Domains**.
3. Click **Connect existing domain**.
4. Enter your domain name (for example, `mycoolapp.com`).

**Step 2 | Configure DNS at your registrar or DNS host**

Choose the setup type below that matches what your domain provider supports.

<Accordion title="Use ANAME or ALIAS for your root domain (recommended)">
  Set your root domain to point directly to Base44 while keeping it flexible if Base44 updates its infrastructure later.

  * Root domain (@)
    ```text theme={null}
    Type: ANAME or ALIAS
    Name: @
    Value: base44.onrender.com
    ```
  * www subdomain
    ```text theme={null}
    Type: CNAME
    Name: www
    Value: base44.onrender.com
    ```

  <Info>
    ANAME or ALIAS lets your root domain point to Base44 without locking it to a fixed IP address. Your DNS host handles the underlying IPs for you.
  </Info>
</Accordion>

<Accordion title="Use an A record for your root domain (no ANAME/ALIAS option)">
  If your provider does not support ANAME or ALIAS, use an A record for the root domain and a CNAME for `www`.

  * Root domain (@)
    ```text theme={null}
    Type: A
    Name: @
    Value: 216.24.57.1
    ```
  * www subdomain
    ```text theme={null}
    Type: CNAME
    Name: www
    Value: base44.onrender.com
    ```

  <Info>
    Make sure this is the only A record for your root domain. Remove any other A records added by your provider, such as parking or default records.
  </Info>
</Accordion>

<Accordion title="Set up a subdomain (for example, app.example.com)">
  First, add the exact subdomain you want in **Dashboard → Domains**.

  Then add a CNAME record at your DNS provider:

  Type: CNAME\
  Name: \[your subdomain label]\
  Value: base44.onrender.com

  For example, if you want `app.example.com`, set **Name** to `app`.

  To make `www.app.example.com` work as well, you can add a second CNAME:

  Type: CNAME\
  Name: [www.app](http://www.app/)\
  Value: base44.onrender.com

  <Info>
    Subdomains connected to Base44 only need a CNAME pointing to `base44.onrender.com`. Remove any A, AAAA, or other records at the same hostname to avoid conflicts.
  </Info>
</Accordion>

<Accordion title="Use nameserver delegation only (for example, some .ar domains)">
  Some country registries such as NIC.ar for `.ar` domains only let you set nameservers. They do not provide a full DNS zone editor where you can add A or CNAME records directly.

  In this case, you can use a DNS provider such as Cloudflare between your registry and Base44:

  1. Create an account with a DNS provider like Cloudflare.
  2. Add your domain to the DNS provider.
  3. Copy the nameservers they give you.
  4. In your registry portal, set those nameservers in the delegation settings for your domain.
  5. Wait for the nameserver change to propagate.
  6. In your DNS provider, add the Base44 records:
     * For the root domain: `A @` to `216.24.57.1` (or ANAME/ALIAS to `base44.onrender.com` if supported).
     * For `www`: `CNAME www` to `base44.onrender.com`.
  7. Remove any AAAA and conflicting CAA records, and keep the Base44 related records as DNS only if your DNS provider offers proxying.
</Accordion>

**Step 3 | Verify your domain**

1. Click **Dashboard** in your app editor.
2. Click **Domains**.
3. Click **Verify** next to your domain.
4. Allow up to 48–72 hours for DNS propagation if you use an external registrar or DNS host.

<Tip>
  If verification does not complete after DNS propagation, run a WHOIS lookup on your domain to check that it is active and not on a status such as `clientHold` or `serverHold`. If it is on hold, contact your registrar to resolve the issue before you continue.
</Tip>

***

### Connecting a subdomain

You can connect a subdomain you already own to your Base44 app by adding CNAME records in your DNS provider. This helps you use addresses like `subdomain.yourdomain.com` for your app while keeping your main domain untouched.

<Warning>
  **Important:**

  * Base44 only supports connecting specific subdomains. Wildcard subdomains are not supported. Only enter the specific subdomains you want to connect, such as `subdomain` or `www.subdomain`.
  * SSL certificates are issued only for the exact subdomains you manually connect.
</Warning>

**To connect your subdomain to Base44:**

1. Go to your domain provider's DNS settings.
2. Add a new CNAME record with:
   * Type: CNAME
   * Name: `[your subdomain]` (for example, `subdomain` if you want `subdomain.yourdomain.com`)
   * Value: `base44.onrender.com`
3. (Recommended) To make sure both `subdomain.yourdomain.com` and `www.subdomain.yourdomain.com` work, add an additional CNAME record:
   * Type: CNAME
   * Name: `www.subdomain`
   * Value: `base44.onrender.com`

<Tip>
  Adding both CNAME records (for `subdomain` and `www.subdomain`) helps your app be accessible with or without `www` at the start of the subdomain. Make sure there are no A or AAAA records at the same hostnames.
</Tip>

***

## Sending emails from a custom domain

If you are using the Base44 built-in email service, you can send emails from your app using your own domain, such as `support@your-domain.com`, instead of the generic `no-reply@base44-apps.com`. This applies to all email types, including send email integrations, one time passwords (OTP), password resets, and app invitations.

The **Email domain** section on your Domains page shows your current sending address and sender name. By default, your app sends from `no-reply@base44-apps.com`. Sending from the default domain costs 1 integration credit per email. To send from your own domain instead, click **Use your custom domain**. This costs 2 integration credits per email.

Using a custom email domain gives your communications a professional look that matches your brand and can improve trust and deliverability.

Base44 Custom Email Domain is for sending only. It does not create an inbox or control incoming email. To receive email at addresses on your domain, you must configure MX records with your email provider, such as Google Workspace or Microsoft 365.

<Warning>
  **Important:**

  * **Credits:** Sending an email from a custom domain uses 2 integration credits per email. Standard emails use 1 credit.
  * **Recipients:** You can only send emails to registered members of your app. To send to external mailing lists, use an external email integration.
</Warning>

<Tip>
  **Before you begin:**

  * You must be on the **Builder** plan or higher.
  * Make sure your custom domain is connected to your app before you start.
  * You can connect one custom email domain per app.
</Tip>

The setup process depends on where your domain is managed. Choose the relevant option below.

### Using a Base44 domain

If you bought your domain directly from Base44, Base44 automatically handles the DNS records for your sending domain.

**To set up your email domain:**

1. Click **Dashboard** in your app editor.
2. Click **Domains**.
3. Scroll down to the **Email domain** section.
4. Click **Use Your Custom Domain**.
   <Note>
     **Note:** If you have multiple domains connected, select the Base44 domain you want to use.
   </Note>
5. Enter your **Sender name** (how you want your name to appear in inboxes).
6. Enter your preferred **Custom address prefix** (for example, `info`, `no-reply`, or `support`).
7. Click **Connect Domain**.

<Info>
  **Status:** You see a **Pending verification** status while the system updates your DNS records. This usually takes a few minutes but can take up to 48 hours to fully propagate. Once complete, the status changes to **Active**.
</Info>

### Using an external domain

If you connected a domain purchased from an external provider, such as GoDaddy or Namecheap, you must manually add DNS records to verify the domain for email sending.

**To set up your email domain:**

1. Click **Dashboard** in your app editor.
2. Click **Domains**.
3. Scroll down to the **Email domain** section.
4. Click **Use Your Custom Domain**. \
   **Note:** If you have multiple domains connected, select the external domain you want to use.
5. Enter your **Sender name** (how you want your name to appear in inboxes).
6. Enter your preferred **Custom address prefix** (for example, `info`, `no-reply`, or `support`).
7. Click **Connect Domain**.
8. In the verification window, copy the CNAME records that Base44 shows you.
9. Go to your domain provider's DNS settings and add the new CNAME records exactly as shown.
10. (Optional but recommended) Add a DMARC TXT record to set your email policy. See the example below.
11. Return to the Base44 dashboard and click **Verify**.

<Note>
  It may take up to 48 hours for the records to propagate and for the status to change to **Active**.
</Note>

### Understanding your DNS records

When you set up a custom email domain, Base44 gives you three CNAME records for authentication. You only need to add these three CNAME records for Base44 email sending. Additional TXT records for SPF or DKIM are not required.

For a domain-level sending address, the records follow this pattern:

* Envelope sender
  * **Name:** `em`
  * **Value:** a host such as `u58367809.wl060.sendgrid.net` (example value, your value is different)
* DKIM key 1
  * **Name:** `s1._domainkey`
  * **Value:** a host such as `s1.domainkey.u58367809.wl060.sendgrid.net`
* DKIM key 2
  * **Name:** `s2._domainkey`
  * **Value:** a host such as `s2.domainkey.u58367809.wl060.sendgrid.net`

If your DNS provider shows full hostnames, they look like:

* `em.yourdomain.com`
* `s1._domainkey.yourdomain.com`
* `s2._domainkey.yourdomain.com`

If you are setting up email on a subdomain, the hostnames use that subdomain. For example, if your email domain is `mail.yourdomain.com`, the record names are:

* `em.mail`
* `s1._domainkey.mail`
* `s2._domainkey.mail`

Some DNS providers only ask for the host label and add the domain automatically. In that case, you enter:

* `em`
* `s1._domainkey`
* `s2._domainkey`

and the provider appends your domain.

Each of these hosts points to a value that includes a unique token, such as `u12345678.wl123.sendgrid.net`. The full hostnames and values must match exactly what you see in your Base44 dashboard.

Key points:

* There are always three CNAME records for the Base44 email setup.
* The record names and values are specific to your domain, so copy and paste them without changes.
* You do not need extra TXT records for SPF or DKIM. Those checks are handled through the CNAME records.
* If your DNS provider only asks for the host label, enter just the label (for example, `em` or `s1._domainkey`) and the provider adds your domain automatically.

Many domains already have records named `s1._domainkey` or `s2._domainkey` from another email provider. If those records exist, remove or update them so only the Base44 specific CNAME records remain.

### Optional: Adding a DMARC record

DMARC is an optional but recommended TXT record that tells other email providers how to handle messages that fail SPF or DKIM checks. Base44 does not add DMARC automatically.

You can start with a relaxed DMARC policy such as:

* **Host:** `_dmarc`
* **Type:** `TXT`
* **Value:** `v=DMARC1; p=none; adkim=r; aspf=r; pct=100`

This collects DMARC data without rejecting or quarantining messages.

***

## FAQs

Click a question below to learn more about domains.

<AccordionGroup>
  <Accordion title="Do I need to buy SSL separately?">
    No. Base44 issues and renews a free SSL certificate automatically after your domain is verified and DNS is configured correctly, for both external and Base44 purchased domains.
  </Accordion>

  <Accordion title="How do I remove a domain?">
    To completely remove a domain from an app and free it up for use elsewhere:

    1. Click **Dashboard** in your app editor.
    2. Click **Domains**.
    3. Click the custom domain you want to remove.
    4. Click **Unlink Domain** to disconnect it from the app.
    5. Click the red **Delete** icon (trash) to remove the domain from the app's domain list.
  </Accordion>

  <Accordion title="What is DNS propagation and how do I check it?">
    When you update your DNS settings, the changes need to spread to servers around the world. This process is called DNS propagation. It can take up to 72 hours, although it is often much faster.

    You can check the progress by visiting [whatsmydns.net](http://whatsmydns.net), entering your domain, and selecting the record type (A, CNAME, etc.) to see which locations have updated.
  </Accordion>

  <Accordion title="Can I reuse a domain from a deleted app?">
    Yes. If the domain was used in an app deleted before **June 5, 2025**, contact [Base44 support](https://app.base44.com/support/conversations) to clear it from our records before you add it again.
  </Accordion>

  <Accordion title="Who is the legal owner of a domain purchased through Base44?">
    The person who purchased the domain is the legal owner. Base44 acts as a reseller through a registrar partner but does not own your domain.
  </Accordion>

  <Accordion title="How do renewals happen?">
    Domains purchased through Base44 renew according to the settings in the registrar account. Renewals are set to automatic by default, and you can manage renewal settings from your domain management page with the registrar, such as IONOS.
  </Accordion>

  <Accordion title="Can I transfer a Base44 purchased domain to an external registrar?">
    Yes. You can transfer a domain purchased through Base44 to another registrar. The transfer follows [IONOS's terms and conditions](https://www.ionos.com/help/) and standard domain transfer rules.
  </Accordion>

  <Accordion title="What happens to a Base44 purchased domain if I downgrade from a Builder tier to a lower tier?">
    The domain remains registered and available for use until the end of its billing cycle, one year from the purchase date. To connect that domain to a Base44 app, you need a Builder plan or higher.
  </Accordion>

  <Accordion title="Can I connect multiple domains to one Base44 app?">
    Yes. You can connect multiple domains and subdomains to a single Base44 app, up to 350 domains.
  </Accordion>

  <Accordion title="Is there a way to set up domain redirects in Base44?">
    Base44 does not currently provide domain redirect settings in the dashboard. If you need to redirect one domain to another, set this up through your domain provider or DNS service by using HTTP redirects or page rules.
  </Accordion>

  <Accordion title="How do I correctly connect a custom domain without delays?">
    To connect your custom domain to your Base44 app quickly and smoothly:

    * If you can, buy your domain directly through Base44. DNS and SSL are handled for you and your app usually connects within 5–30 minutes.
    * If you are using an external provider, add the DNS records shown in your Base44 dashboard exactly as instructed.
    * Use an ANAME or ALIAS record for your root domain if your DNS host supports it, and a CNAME record for the `www` subdomain.
    * If your provider does not support ANAME or ALIAS, use the A record for your root domain and a CNAME for `www`.

    Key tips:

    * Double check all DNS records for typos.\
      **Tip:** Copy and paste values directly from your Base44 dashboard.
    * Remove any AAAA (IPv6) records for hostnames connected to Base44.
    * Remove or adjust CAA records that could block certificate authorities used by Base44.
    * Make sure there is only one A record for your root domain if you use the A record method.
    * Check that your domain registration is active in WHOIS and not on a status such as `clientHold` or `serverHold`.
    * If you use Cloudflare, set Base44 related records to **DNS only** (grey cloud) while you set up and troubleshoot the connection.
    * After you set your records, click **Verify** in the **Domains** tab of your dashboard.
    * Allow up to 48–72 hours for global DNS propagation when using an external registrar. This timing is standard and cannot be shortened by Base44 or other providers.
  </Accordion>

  <Accordion title="Can I disable the redirect from www.domain.com to domain.com?">
    No. There is no setting in Base44 to stop or reverse the `www → root` redirect.

    You may want `www` to be your primary domain for SEO or personal preference. From Google's perspective, both `www` and the root domain are treated the same as long as your canonical setup is consistent.

    As a workaround, make sure you have a `CNAME` record for `www` pointing to `base44.onrender.com` in your DNS settings. This ensures `www.domain.com` loads your app. If you need finer control over redirect behavior, set this up with your DNS or hosting provider outside of Base44.

    If you want more control over this feature in the future, you can [submit a feature request](https://feedback.base44.com/) to the Base44 product team.
  </Accordion>

  <Accordion title="What is the email from the domain registrar IONOS?">
    If you purchase a domain from Base44, check for an email from [**support@ionos.com**](mailto:support@ionos.com) asking you to confirm ownership and your contact details. Confirm your email address within 15 days of receiving the email to keep your domain active.

    If you do not confirm in time, the registrar can pause your domain and it may stop resolving until you complete verification.

    <img src="https://mintcdn.com/base44/-Vklow6W-uVvNnvR/images/ionosemail.png?fit=max&auto=format&n=-Vklow6W-uVvNnvR&q=85&s=599dd355d45a533564845b3323b833ce" alt="A confirmation email from Ionos" width="606" height="694" data-path="images/ionosemail.png" />
  </Accordion>

  <Accordion title="How do I fix issues with my domain connection?">
    If you are experiencing problems with your domain, [see our troubleshooting steps](https://docs.base44.com/Community-and-support/Troubleshooting#domains). Check your DNS records, make sure there are no AAAA or conflicting CAA records, confirm that your domain is not on hold at your registrar, and verify that your records are set to DNS only if you use Cloudflare.
  </Accordion>

  <Accordion title="Which plans support custom email?">
    Custom email is available on the Builder, Pro, and Elite plans. If you are on a different plan, upgrade to one of these plans to connect your own email address.
  </Accordion>
</AccordionGroup>
