> ## Documentation Index
> Fetch the complete documentation index at: https://docs.base44.com/llms.txt
> Use this file to discover all available pages before exploring further.
# Using the Gmail connector
> Connect your Base44 app to Gmail to send emails, create digests, and automate notifications without managing API keys.
## About the Gmail connector
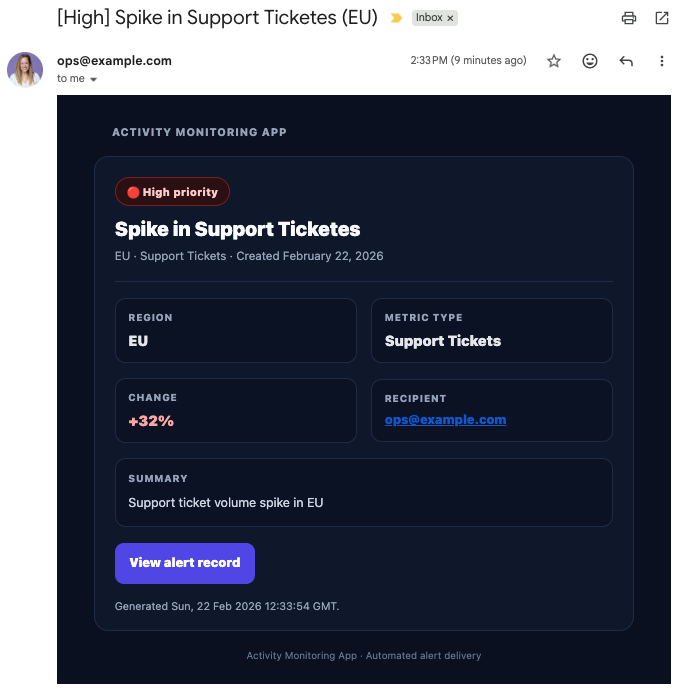
The [Gmail connector](https://base44.com/integrations/connectors/gmail) lets your app send email through a single Gmail connection. Use it to deliver alerts, approvals, digests, reports, and automated updates directly from your Gmail account.
The Gmail connection is shared across your app. When you connect Gmail, you authorize one Google account for that app. Everyone who can edit the app uses the shared Gmail connection and the same Gmail-powered flows.
 **Important:** Connectors are app-level, shared connections. Do not use the Gmail connector if each person using your app needs to connect their own inbox. For per-person Gmail access, create a custom OAuth flow with backend functions.
***
## Gmail use cases and prompts
Use the Gmail connector to automate communication, keep stakeholders informed, and generate high-signal email updates from your app.
Send real-time emails when important events happen in your app, such as incidents, approvals, escalations, and failures.
**Example prompts:**
```text theme={null}
Email me when a new high-priority ticket is created, including the ticket ID, title, and link.
```
```text theme={null}
Send an email to ops@company.com when an incident is opened, including severity and owner.
```
```text theme={null}
Notify a user by email when their document is approved, with a link to the document page.
```
```text theme={null}
Email me when ticket volume spikes above baseline, including count and top tags.
```
```text theme={null}
Send a deployment notification email with environment, version, and release notes.
```
Generate scheduled email digests that summarize activity, metrics, or changes from your app.
**Example prompts:**
```text theme={null}
Email me a daily summary at 5pm with new signups grouped by plan.
```
```text theme={null}
Send a weekly task report every Monday with completed and overdue items by assignee.
```
```text theme={null}
Email leadership a weekly KPI report with revenue, conversions, and churn.
```
```text theme={null}
Summarize the last 24 hours of activity in this app and email it to me.
```
```text theme={null}
Send a monthly performance report with key metrics and short explanations.
```
Trigger Gmail messages based on events from your connected systems such as BigQuery, Google Sheets, Notion, HubSpot, or other CRMs.
**Example prompts:**
```text theme={null}
Send an email when a new row is added to my Google Sheet of customer feedback.
```
```text theme={null}
Email me when my BigQuery data agent detects a sudden drop in conversions.
```
```text theme={null}
Notify the team by email when a new Notion page is created for a client.
```
```text theme={null}
Send an email when a HubSpot deal moves to Closed Won with deal value and owner.
```
```text theme={null}
Email a weekly KPI summary pulling data from BigQuery.
```
When describing automated emails in the AI chat, specify who should receive each email, what triggers it, and which details to include in the message body.
***
## Connecting Gmail to your app
Use the AI chat to connect to Gmail, or connect using a pre-made prompt from your app dashboard.
\*\*Before you begin: \*\*You need a [Builder plan](https://base44.com/pricing) or higher to use connectors in your app.
### Using the AI chat
1. Go to your app editor.
2. Describe what you want to do with Gmail in the AI chat, for example:
* `Connect this app to Gmail and email me when a new ticket is created.`
* `Send a daily summary email with completed tasks.`
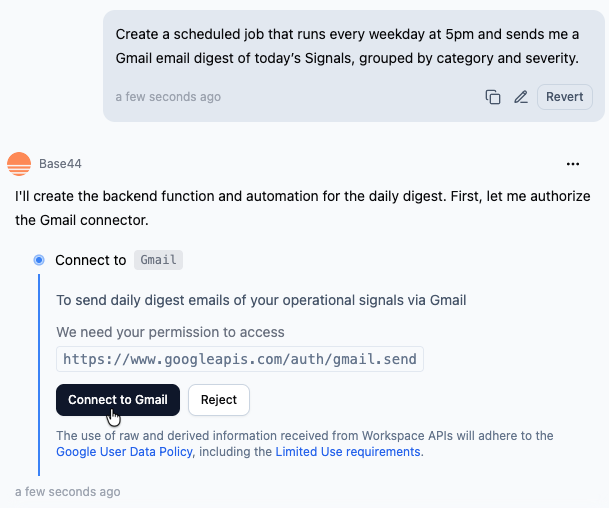
3. Review the **Action required** and **Required permissions** in the side panel.
4. Click **Connect to Gmail**.
5. In the Google window that opens:
1. Select the Google account you want to connect.
2. Review the permissions and click **Allow**.
6. Return to the editor and let the AI finish creating the flows that use Gmail.
**Important:** Connectors are app-level, shared connections. Do not use the Gmail connector if each person using your app needs to connect their own inbox. For per-person Gmail access, create a custom OAuth flow with backend functions.
***
## Gmail use cases and prompts
Use the Gmail connector to automate communication, keep stakeholders informed, and generate high-signal email updates from your app.
Send real-time emails when important events happen in your app, such as incidents, approvals, escalations, and failures.
**Example prompts:**
```text theme={null}
Email me when a new high-priority ticket is created, including the ticket ID, title, and link.
```
```text theme={null}
Send an email to ops@company.com when an incident is opened, including severity and owner.
```
```text theme={null}
Notify a user by email when their document is approved, with a link to the document page.
```
```text theme={null}
Email me when ticket volume spikes above baseline, including count and top tags.
```
```text theme={null}
Send a deployment notification email with environment, version, and release notes.
```
Generate scheduled email digests that summarize activity, metrics, or changes from your app.
**Example prompts:**
```text theme={null}
Email me a daily summary at 5pm with new signups grouped by plan.
```
```text theme={null}
Send a weekly task report every Monday with completed and overdue items by assignee.
```
```text theme={null}
Email leadership a weekly KPI report with revenue, conversions, and churn.
```
```text theme={null}
Summarize the last 24 hours of activity in this app and email it to me.
```
```text theme={null}
Send a monthly performance report with key metrics and short explanations.
```
Trigger Gmail messages based on events from your connected systems such as BigQuery, Google Sheets, Notion, HubSpot, or other CRMs.
**Example prompts:**
```text theme={null}
Send an email when a new row is added to my Google Sheet of customer feedback.
```
```text theme={null}
Email me when my BigQuery data agent detects a sudden drop in conversions.
```
```text theme={null}
Notify the team by email when a new Notion page is created for a client.
```
```text theme={null}
Send an email when a HubSpot deal moves to Closed Won with deal value and owner.
```
```text theme={null}
Email a weekly KPI summary pulling data from BigQuery.
```
When describing automated emails in the AI chat, specify who should receive each email, what triggers it, and which details to include in the message body.
***
## Connecting Gmail to your app
Use the AI chat to connect to Gmail, or connect using a pre-made prompt from your app dashboard.
\*\*Before you begin: \*\*You need a [Builder plan](https://base44.com/pricing) or higher to use connectors in your app.
### Using the AI chat
1. Go to your app editor.
2. Describe what you want to do with Gmail in the AI chat, for example:
* `Connect this app to Gmail and email me when a new ticket is created.`
* `Send a daily summary email with completed tasks.`
3. Review the **Action required** and **Required permissions** in the side panel.
4. Click **Connect to Gmail**.
5. In the Google window that opens:
1. Select the Google account you want to connect.
2. Review the permissions and click **Allow**.
6. Return to the editor and let the AI finish creating the flows that use Gmail.
 ### From the app dashboard
1. Click **Dashboard** in your app editor.
2. Click **Integrations**.
3. Click the **Browse** tab.
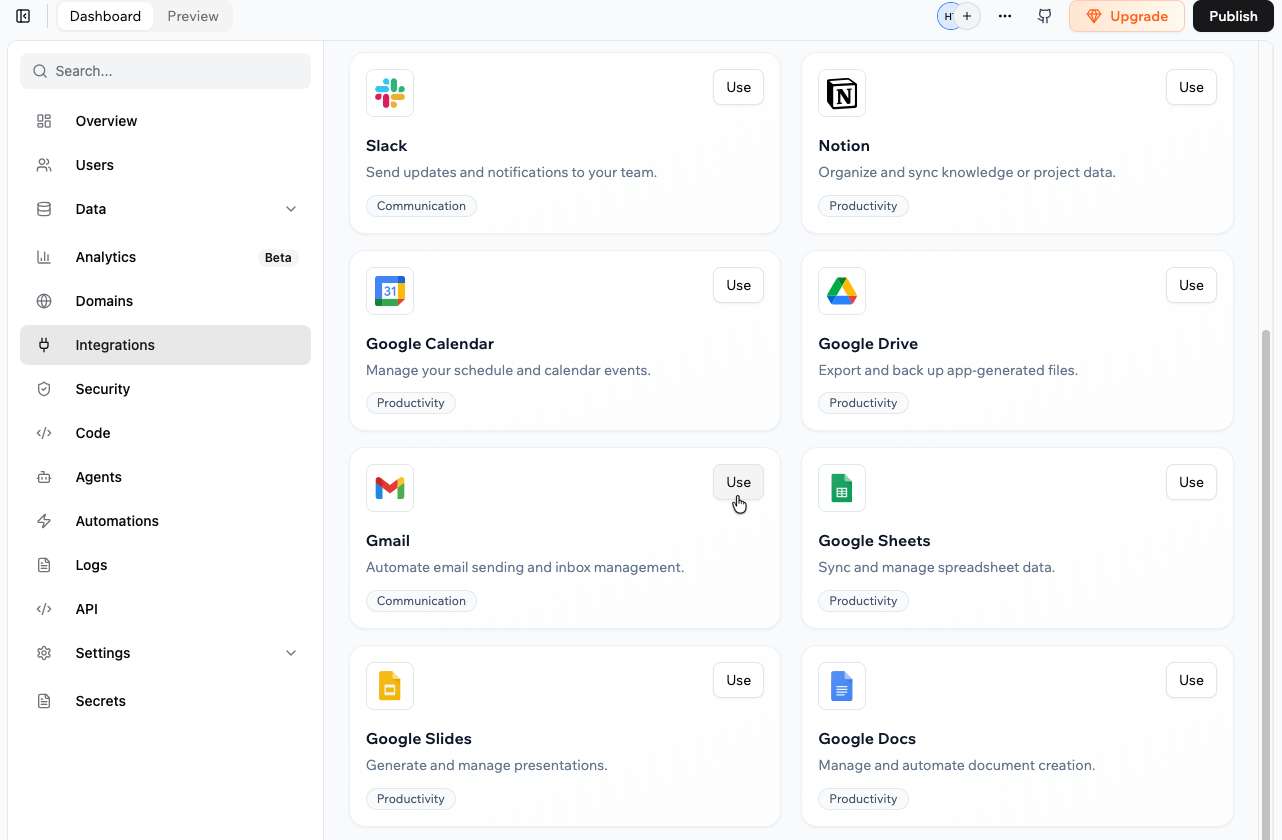
4. Find **Gmail** and click **Use**.
5. Select the pre-made prompt you want to add to the AI chat.
6. In the AI chat, review the **Action required** and **Required permissions**.
7. Click **Connect to Gmail**.
8. In the Google window that opens:
1. Select the Google account you want to connect.
2. Review the permissions and click **Allow**.
9. Return to the editor and let the AI finish creating the flows that use Gmail.
### From the app dashboard
1. Click **Dashboard** in your app editor.
2. Click **Integrations**.
3. Click the **Browse** tab.
4. Find **Gmail** and click **Use**.
5. Select the pre-made prompt you want to add to the AI chat.
6. In the AI chat, review the **Action required** and **Required permissions**.
7. Click **Connect to Gmail**.
8. In the Google window that opens:
1. Select the Google account you want to connect.
2. Review the permissions and click **Allow**.
9. Return to the editor and let the AI finish creating the flows that use Gmail.
 After creating Gmail-powered functions, test each flow by triggering the event and confirming the email arrives with the expected formatting and content.
If you click **Skip** in the Gmail authorization window, the connector is not added. You can run the connection flow again from the AI chat or from **Integrations → Browse**.
***
## Managing your Gmail connection
You can review and manage the Gmail connector for each app from the app dashboard.
**To view or update your Gmail connector:**
1. Go to your app dashboard.
2. Click **Integrations**.
3. Click the **My integrations** tab.
4. Find **Gmail**, then choose what you want to do:
* **View access**: See which permissions Gmail currently has in this app.
* Click the **More Actions** icon and select an option:
* **Switch account**
* **Disconnect account**
* **Remove**
After creating Gmail-powered functions, test each flow by triggering the event and confirming the email arrives with the expected formatting and content.
If you click **Skip** in the Gmail authorization window, the connector is not added. You can run the connection flow again from the AI chat or from **Integrations → Browse**.
***
## Managing your Gmail connection
You can review and manage the Gmail connector for each app from the app dashboard.
**To view or update your Gmail connector:**
1. Go to your app dashboard.
2. Click **Integrations**.
3. Click the **My integrations** tab.
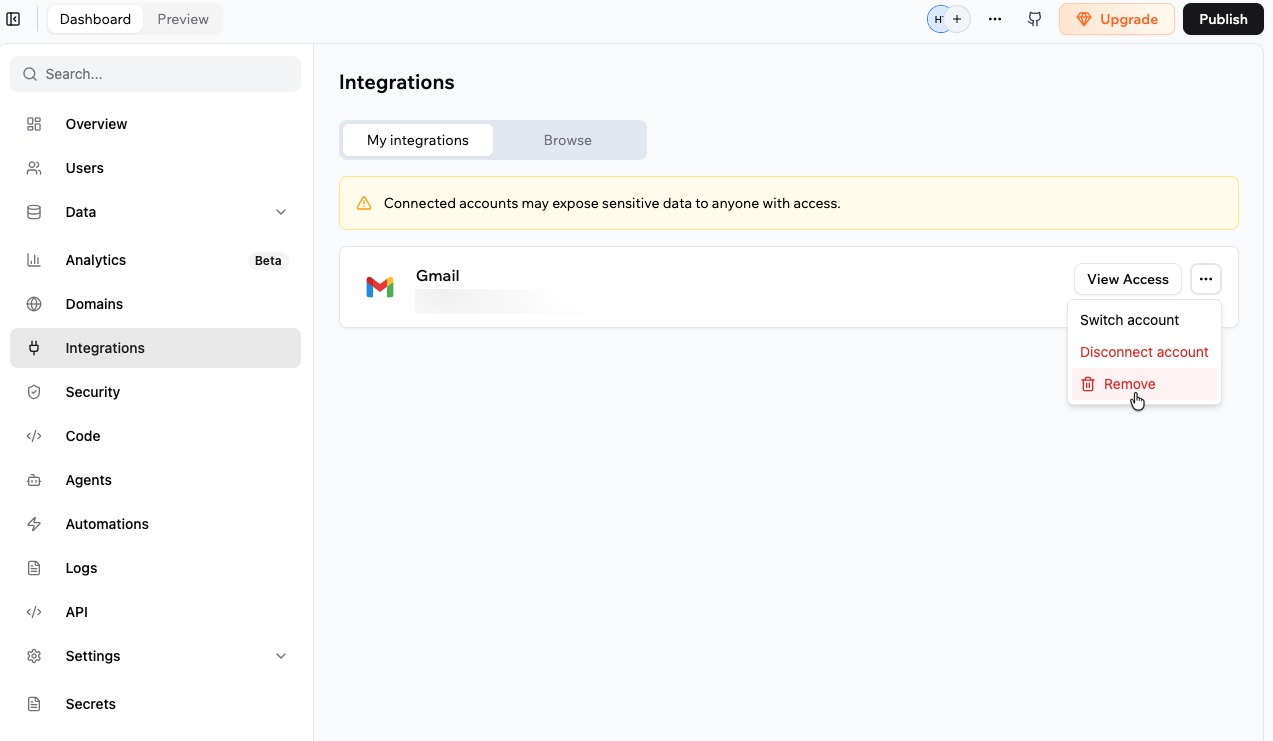
4. Find **Gmail**, then choose what you want to do:
* **View access**: See which permissions Gmail currently has in this app.
* Click the **More Actions** icon and select an option:
* **Switch account**
* **Disconnect account**
* **Remove**
 ***
## Gmail scopes and permissions
When you connect Gmail, the connector requests permissions (scopes) that control what your app can do with your Gmail account.
Below is the current list of Gmail scopes the connector may request.
* `https://www.googleapis.com/auth/gmail.readonly`: Read email messages and metadata.
* `https://www.googleapis.com/auth/gmail.send`: Send email messages.
* `https://www.googleapis.com/auth/gmail.modify`: Modify messages (for example, mark as read or move to folders).
* `https://www.googleapis.com/auth/gmail.compose`: Create draft messages.
**Notes:**
* Scope lists may change over time. Always review the permissions shown during the connection flow.
* If you need a Gmail scope that is not listed here, [share your feedback with us](https://feedback.base44.com/?b=67cf45295430bd6b6434b68c).
***
## FAQs
Click a question below to learn more about the Gmail connector.
No. Each app uses one shared Gmail account. To use multiple Gmail accounts, create separate apps or build a custom OAuth flow with backend functions.
No. Connectors are app-level. When you connect Gmail, you connect a single Gmail account that all flows in the app use.
To let each person using your app connect their own Gmail inbox, you need to build a custom OAuth flow with backend functions and the Gmail API, including per-user token storage and refresh.
1. Go to your app dashboard and click **Integrations**.
2. Click the **My integrations** tab.
3. Find **Gmail** and click the **More Actions** icon , then **Switch account**.
Yes. In the AI chat, specify the subject line, message body, formatting, recipients, and any dynamic fields.
You can also edit the generated backend functions in **Dashboard → Code → Functions** to further customize the email payload.
***
## Gmail scopes and permissions
When you connect Gmail, the connector requests permissions (scopes) that control what your app can do with your Gmail account.
Below is the current list of Gmail scopes the connector may request.
* `https://www.googleapis.com/auth/gmail.readonly`: Read email messages and metadata.
* `https://www.googleapis.com/auth/gmail.send`: Send email messages.
* `https://www.googleapis.com/auth/gmail.modify`: Modify messages (for example, mark as read or move to folders).
* `https://www.googleapis.com/auth/gmail.compose`: Create draft messages.
**Notes:**
* Scope lists may change over time. Always review the permissions shown during the connection flow.
* If you need a Gmail scope that is not listed here, [share your feedback with us](https://feedback.base44.com/?b=67cf45295430bd6b6434b68c).
***
## FAQs
Click a question below to learn more about the Gmail connector.
No. Each app uses one shared Gmail account. To use multiple Gmail accounts, create separate apps or build a custom OAuth flow with backend functions.
No. Connectors are app-level. When you connect Gmail, you connect a single Gmail account that all flows in the app use.
To let each person using your app connect their own Gmail inbox, you need to build a custom OAuth flow with backend functions and the Gmail API, including per-user token storage and refresh.
1. Go to your app dashboard and click **Integrations**.
2. Click the **My integrations** tab.
3. Find **Gmail** and click the **More Actions** icon , then **Switch account**.
Yes. In the AI chat, specify the subject line, message body, formatting, recipients, and any dynamic fields.
You can also edit the generated backend functions in **Dashboard → Code → Functions** to further customize the email payload.