> ## Documentation Index
> Fetch the complete documentation index at: https://docs.base44.com/llms.txt
> Use this file to discover all available pages before exploring further.
# Getting started as an enterprise admin
> Set up your enterprise workspace, invite your team, and configure security and app policies.
As a workspace owner or admin, you are responsible for setting up your enterprise workspace for your team. Learn the key tasks to get everything configured and ready.
Make sure your Base44 account manager has confirmed that your enterprise workspace is created and that you have owner or admin access to it.
**Have the following ready before you begin:**
* Your organization's domain name
* Your identity provider details (if you plan to set up SSO)
* Email addresses for your team members
***
## 1. Invite your team
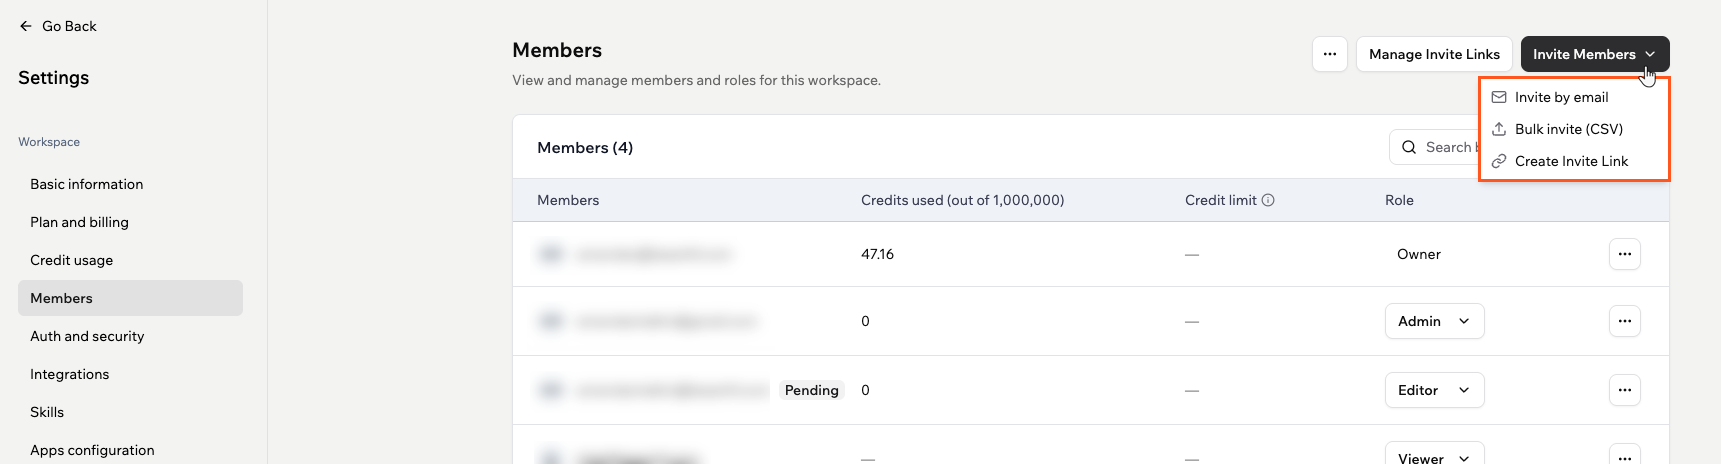
Start by adding your team members to the workspace. You can invite people individually or upload a CSV to invite in bulk. Each person is assigned a role that controls what they can do.
| Role | What they can do |
| ---------- | ------------------------------------------------------------------- |
| **Admin** | Manages members and workspace settings. Does not handle billing. |
| **Editor** | Builds and edits apps, and uses credits from the workspace pool. |
| **Viewer** | Has read-only access to specific apps and does not consume credits. |
**To invite members:**
1. Click your workspace name at the top left.
2. Click **Settings**.
3. Click **Members**.
4. Click **Invite member** to add someone individually, or **Bulk Invite** to upload a CSV.
 If you plan to use SCIM provisioning to sync members automatically from your identity provider, you can skip manual invites for those users. See step 5.
For full details on roles and credit limits, see [Managing enterprise workspace members](/Enterprise/managing-enterprise-members).
***
## 2. Connect your workspace domain
Connect your organization's domain to your workspace for a branded address and domain-based access control. Your domain is also required before you can set up SSO. If your organization uses more than one email domain, you can connect several domains to the same workspace.
This is also a good time to decide your data residency region. You can choose where your workspace app data is stored: US, EU, or UK. See [Privacy and security](/Community-and-support/Privacy-and-security) for details.
Learn how to [connect your workspace domain](/Enterprise/Enterprise-workspace-domain).
***
## 3. Set up Single Sign-On
Enable SSO so your team signs in with their existing company credentials. Once enabled, anyone with your approved email domain is added to the workspace automatically as a Viewer when they first sign in.
Learn how to [set up SSO for your workspace](/Enterprise/SSO-for-enterprise-workspace).
***
## 4. Configure workspace policies
Control how apps, Superagents, connectors, and external access behave for everyone in the workspace.
* **[Require SSO for all workspace members](/Enterprise/SSO-for-enterprise-workspace#require-sso-for-all-workspace-members):** Require every workspace member to sign in through your SSO provider to access the workspace
* **[Enforce SSO for all apps](/Enterprise/Enterprise-SSO-and-app-visibility#managing-sso-for-app-access):** Require app users to authenticate through your SSO provider
* **[Publishing permissions](/Enterprise/Enterprise-SSO-and-app-visibility#publishing-permissions):** Control who can publish apps and which visibility levels each role can use
* **[Connector management](/Enterprise/workspace-connectors):** Control which external services are available in your workspace, and whether apps can use shared credentials, app user credentials, or both
* **[Disable Superagents](/Enterprise/Enterprise-SSO-and-app-visibility#managing-superagents):** Hide Superagents from all workspace members if your organization has not approved AI agents for use
* **[External collaborators](/Account-and-billing/Managing-your-workspaces#controlling-guest-invitations):** Control whether any member or only admins can invite people from outside the workspace to collaborate on apps
***
## 5. Set up automated provisioning (optional)
If your organization uses Okta or Microsoft Entra ID, set up SCIM to automatically sync workspace membership. When someone joins or leaves your organization in your identity provider, their Base44 access updates instantly with no manual work needed.
Learn how to [set up automated provisioning with SCIM](/Enterprise/SCIM-provisioning).
***
## 6. Set credit limits (optional)
Set a default monthly credit cap that applies to all workspace members, with the option to override limits for specific individuals. This is useful for preventing any one member from consuming a disproportionate share of the workspace credit pool.
Learn how to [set credit limits for your members](/Enterprise/managing-enterprise-members#credit-limits).
***
## 7. Move existing apps (optional)
If you or your team have apps in a personal workspace that you want to bring into the enterprise workspace, you can move them from the app dashboard. Because each app can only be moved by its owner, this is a 2-step process between you and each app owner.
**Before anyone can move an app:**
* The app owner must be an active member of the enterprise workspace
* App transfers must be enabled in the source workspace (**Settings** → **Apps configuration** → **App Transfers**)
* The app cannot be a purchased app
**Step 1: You invite the app owner (performed by the enterprise workspace admin)**
1. Click your workspace name at the top left.
2. Click **Settings** → **Members** → **Invite member**.
3. Enter the app owner's email address.
4. Assign a role. **Editor** or higher is recommended so the app owner can build and contribute in the workspace.
5. Click **Send Invite**.
**Step 2: The app owner accepts the invite and moves the app**
1. Open the invitation email from Base44 and click **Accept Invitation**.
2. Open the app in its current workspace.
3. Go to the app dashboard and click **Overview**.
4. Click **Move App** next to **Move to Workspace**.
5. Select the enterprise workspace from the list.
6. Click **Move App** to confirm.
If you plan to use SCIM provisioning to sync members automatically from your identity provider, you can skip manual invites for those users. See step 5.
For full details on roles and credit limits, see [Managing enterprise workspace members](/Enterprise/managing-enterprise-members).
***
## 2. Connect your workspace domain
Connect your organization's domain to your workspace for a branded address and domain-based access control. Your domain is also required before you can set up SSO. If your organization uses more than one email domain, you can connect several domains to the same workspace.
This is also a good time to decide your data residency region. You can choose where your workspace app data is stored: US, EU, or UK. See [Privacy and security](/Community-and-support/Privacy-and-security) for details.
Learn how to [connect your workspace domain](/Enterprise/Enterprise-workspace-domain).
***
## 3. Set up Single Sign-On
Enable SSO so your team signs in with their existing company credentials. Once enabled, anyone with your approved email domain is added to the workspace automatically as a Viewer when they first sign in.
Learn how to [set up SSO for your workspace](/Enterprise/SSO-for-enterprise-workspace).
***
## 4. Configure workspace policies
Control how apps, Superagents, connectors, and external access behave for everyone in the workspace.
* **[Require SSO for all workspace members](/Enterprise/SSO-for-enterprise-workspace#require-sso-for-all-workspace-members):** Require every workspace member to sign in through your SSO provider to access the workspace
* **[Enforce SSO for all apps](/Enterprise/Enterprise-SSO-and-app-visibility#managing-sso-for-app-access):** Require app users to authenticate through your SSO provider
* **[Publishing permissions](/Enterprise/Enterprise-SSO-and-app-visibility#publishing-permissions):** Control who can publish apps and which visibility levels each role can use
* **[Connector management](/Enterprise/workspace-connectors):** Control which external services are available in your workspace, and whether apps can use shared credentials, app user credentials, or both
* **[Disable Superagents](/Enterprise/Enterprise-SSO-and-app-visibility#managing-superagents):** Hide Superagents from all workspace members if your organization has not approved AI agents for use
* **[External collaborators](/Account-and-billing/Managing-your-workspaces#controlling-guest-invitations):** Control whether any member or only admins can invite people from outside the workspace to collaborate on apps
***
## 5. Set up automated provisioning (optional)
If your organization uses Okta or Microsoft Entra ID, set up SCIM to automatically sync workspace membership. When someone joins or leaves your organization in your identity provider, their Base44 access updates instantly with no manual work needed.
Learn how to [set up automated provisioning with SCIM](/Enterprise/SCIM-provisioning).
***
## 6. Set credit limits (optional)
Set a default monthly credit cap that applies to all workspace members, with the option to override limits for specific individuals. This is useful for preventing any one member from consuming a disproportionate share of the workspace credit pool.
Learn how to [set credit limits for your members](/Enterprise/managing-enterprise-members#credit-limits).
***
## 7. Move existing apps (optional)
If you or your team have apps in a personal workspace that you want to bring into the enterprise workspace, you can move them from the app dashboard. Because each app can only be moved by its owner, this is a 2-step process between you and each app owner.
**Before anyone can move an app:**
* The app owner must be an active member of the enterprise workspace
* App transfers must be enabled in the source workspace (**Settings** → **Apps configuration** → **App Transfers**)
* The app cannot be a purchased app
**Step 1: You invite the app owner (performed by the enterprise workspace admin)**
1. Click your workspace name at the top left.
2. Click **Settings** → **Members** → **Invite member**.
3. Enter the app owner's email address.
4. Assign a role. **Editor** or higher is recommended so the app owner can build and contribute in the workspace.
5. Click **Send Invite**.
**Step 2: The app owner accepts the invite and moves the app**
1. Open the invitation email from Base44 and click **Accept Invitation**.
2. Open the app in its current workspace.
3. Go to the app dashboard and click **Overview**.
4. Click **Move App** next to **Move to Workspace**.
5. Select the enterprise workspace from the list.
6. Click **Move App** to confirm.
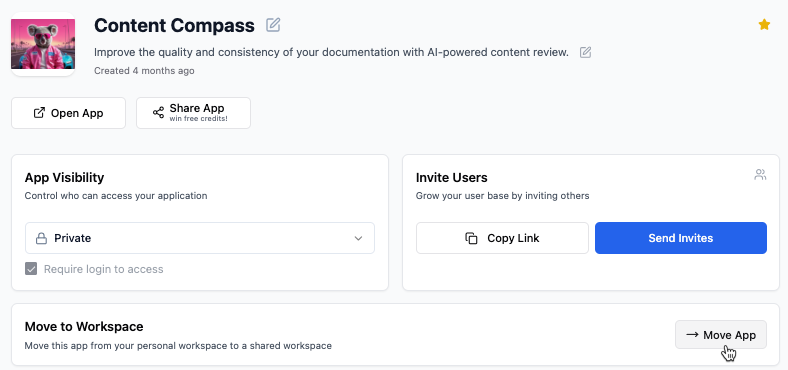 After moving, the app uses the enterprise workspace's credit pool. The published app URL does not change and all app data, media, and configurations remain intact.
For full details on moving and transferring apps, see [Managing workspace apps](/documentation/using-your-workspaces/managing-your-workspace-apps).
***
## 8. Explore more enterprise features
Once the basics are in place, explore additional security and access controls.
* [IP allowlist](/documentation/enterprise/ip-allowlist): Restrict workspace access to approved IP addresses and networks
* [Workspace secrets](/Enterprise/workspace-secrets): Create API keys for programmatic access to audit logs and workspace data via the Monitoring API
* [Connector management](/Enterprise/workspace-connectors): Manage connector availability across your workspace, review affected apps before disabling access, and control how apps connect to external services
***
## Setup checklist
**[Invite your team](#1-invite-your-team):** Add members by email and assign each the right role\
**[Connect your workspace domain](#2-connect-your-workspace-domain):** Give your workspace a branded address and domain-based access control\
**[Set up Single Sign-On](#3-set-up-single-sign-on):** Let your team sign in with your company's identity provider, and verify your email domains\
**[Configure workspace policies](#4-configure-workspace-policies):** Control publishing permissions, app visibility, Superagents, and external collaborators\
**[Configure connector management](/Enterprise/workspace-connectors):** Choose which external services apps can use and how they connect\
**[Set up the IP allowlist](/documentation/enterprise/ip-allowlist):** Restrict workspace and app access to your trusted networks\
**[Store API keys and credentials as Secrets](/Enterprise/workspace-secrets):** Keep credentials out of your app dashboards\
**[Set up automated provisioning](#5-set-up-automated-provisioning-optional):** Sync workspace membership from Okta or Entra with SCIM *(optional)*\
**[Set credit limits](#6-set-credit-limits-optional):** Cap monthly credit use per member *(optional)*\
**[Move existing apps](#7-move-existing-apps-optional):** Bring apps from personal workspaces into the enterprise workspace *(optional)*
For a full overview of security features available in Base44, see [Security overview](/Setting-up-your-app/security-overview).
***
## Getting help
As an enterprise customer, you have access to dedicated support.
* **Dedicated account manager:** Your account manager is your main point of contact for guidance and ongoing support
* **Priority support:** Use the Help menu inside Base44 to open a support ticket with guaranteed response times
After moving, the app uses the enterprise workspace's credit pool. The published app URL does not change and all app data, media, and configurations remain intact.
For full details on moving and transferring apps, see [Managing workspace apps](/documentation/using-your-workspaces/managing-your-workspace-apps).
***
## 8. Explore more enterprise features
Once the basics are in place, explore additional security and access controls.
* [IP allowlist](/documentation/enterprise/ip-allowlist): Restrict workspace access to approved IP addresses and networks
* [Workspace secrets](/Enterprise/workspace-secrets): Create API keys for programmatic access to audit logs and workspace data via the Monitoring API
* [Connector management](/Enterprise/workspace-connectors): Manage connector availability across your workspace, review affected apps before disabling access, and control how apps connect to external services
***
## Setup checklist
**[Invite your team](#1-invite-your-team):** Add members by email and assign each the right role\
**[Connect your workspace domain](#2-connect-your-workspace-domain):** Give your workspace a branded address and domain-based access control\
**[Set up Single Sign-On](#3-set-up-single-sign-on):** Let your team sign in with your company's identity provider, and verify your email domains\
**[Configure workspace policies](#4-configure-workspace-policies):** Control publishing permissions, app visibility, Superagents, and external collaborators\
**[Configure connector management](/Enterprise/workspace-connectors):** Choose which external services apps can use and how they connect\
**[Set up the IP allowlist](/documentation/enterprise/ip-allowlist):** Restrict workspace and app access to your trusted networks\
**[Store API keys and credentials as Secrets](/Enterprise/workspace-secrets):** Keep credentials out of your app dashboards\
**[Set up automated provisioning](#5-set-up-automated-provisioning-optional):** Sync workspace membership from Okta or Entra with SCIM *(optional)*\
**[Set credit limits](#6-set-credit-limits-optional):** Cap monthly credit use per member *(optional)*\
**[Move existing apps](#7-move-existing-apps-optional):** Bring apps from personal workspaces into the enterprise workspace *(optional)*
For a full overview of security features available in Base44, see [Security overview](/Setting-up-your-app/security-overview).
***
## Getting help
As an enterprise customer, you have access to dedicated support.
* **Dedicated account manager:** Your account manager is your main point of contact for guidance and ongoing support
* **Priority support:** Use the Help menu inside Base44 to open a support ticket with guaranteed response times